amr64离线安装MySQL,部署双主
一·检查当前MySQL并卸载
安装前查看系统是否自带MySQL和MariaDB
rpm -qa | grep mysql
rpm -qa | grep mariadb
rpm -e --nodeps mariadb-libs
rpm -e mariadb-server --nodeps
yum -y remove mysql*
yum -y remove mariadb*
查询所有的mysql相关文件,然后统统删除(同样删除/etc/my.cnf)
find / -name mysql


rm -rf xxxx
二·下载安装
官网下载最新版本MySQL安装包
官网下载地址:(https://downloads.mysql.com/archives/community/)

上传至服务器/usr/local内

命令行进入该路径,解压文件
cd /usr/local

tar -xvf mysql-8.0.30-1.el7.aarch64.rpm-bundle.tar
解压后得到文件如下:

解压后按照顺序安装
rpm -ivh mysql-community-common-8.0.30-1.el7.aarch64.rpm --nodeps --force
rpm -ivh mysql-community-client-plugins-8.0.30-1.el7.aarch64.rpm --nodeps --force
rpm -ivh mysql-community-libs-8.0.30-1.el7.aarch64.rpm --nodeps --force
rpm -ivh mysql-community-client-8.0.30-1.el7.aarch64.rpm --nodeps --force
rpm -ivh mysql-community-icu-data-files-8.0.30-1.el7.aarch64.rpm --nodeps --force
rpm -ivh mysql-community-server-8.0.30-1.el7.aarch64.rpm --nodeps --force
修改配置文件
vi /etc/my.cnf在文件末尾追加配置,大小写不敏感及禁止DNS解析
lower_case_table_names=1
skip-name-resolve
初始化数据库
初始化之前先安装OpenSSL10,不然会初始化失败
下载地址:https://vault.centos.org/centos/8/AppStream/aarch64/os/Packages/compat-openssl10-1.0.2o-3.el8.aarch64.rpm
rpm -ivh compat-openssl10-1.0.2o-3.el8.aarch64.rpm --nodeps --force
mysqld --initialize
启动数据库
systemctl start mysqld初始化及启动过程中可能会不成功,这里遇到的问题是权限不足,通过查看日志分析具体问题
tail -f /var/log/mysqld.log授权
chown -R mysql:mysql /var/lib/mysql/第二台服务器重复以上步骤
三·部署双主
前文已经成功启动MySQL,先查看默认密码
cat /var/log/mysqld.log | grep password时间最近的则为默认密码,根据默认密码登录MySQL
mysql -uroot -p修改密码,本版本为MySQL8.0.30,修改密码之前要先执行,否则一直报错
alert user 'root'@'localhost' identified by 'xxxx';
update user set host='%' where user='root';
grant all privileges  on *.* to 'root'@'%' with grant option;
flush privileges;
使用刚才创建的root重新登陆MySQL,并创建节点使用账号
注意如果不写with mysql_native_password,等下双主复制的时候会报错Authentication plugin ‘caching_sha2_password‘ reported error: Authentication,是主库repl的plugin是caching_sha2_password 导致连接不上
create user 'repl'@'%' identified with mysql_native_password by 'xxx';
grant replication slave on *.* to 'repl'@'%';
flush privileges;
两台服务器都已经完成以上步骤后
在A机上执行
mysql -uroot -p
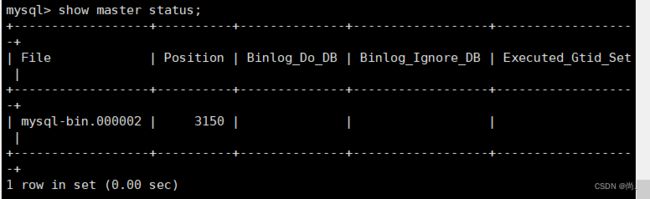
show master status;显示为:

到B机上登录MySQL后执行:
其中master_log_file和master_log_pos为上图中,A机查询到的信息
stop slave;

change master to
master_host='A机的IP',
master_user='repl',
master_password='xxx',
master_log_file='mysql-bin.000001',
master_log_pos=2827;

statr slave;

show slave status\G;
显示如下则成功:salve_io_running及slave_sql_running都为YES即成功
*************************** 1. row ***************************
               Slave_IO_State: Waiting for source to send event
                  Master_Host: A机的IP
                  Master_User: repl
                  Master_Port: 3306
                Connect_Retry: 60
              Master_Log_File: mysql-bin.000002
          Read_Master_Log_Pos: 3150
               Relay_Log_File: mysql-relay-bin.000003
                Relay_Log_Pos: 1529
        Relay_Master_Log_File: mysql-bin.000002
             Slave_IO_Running: Yes
            Slave_SQL_Running: Yes
              Replicate_Do_DB:
          Replicate_Ignore_DB:
           Replicate_Do_Table:
       Replicate_Ignore_Table:
      Replicate_Wild_Do_Table:
  Replicate_Wild_Ignore_Table:
                   Last_Errno: 0
                   Last_Error:
                 Skip_Counter: 0
          Exec_Master_Log_Pos: 3150
              Relay_Log_Space: 1908
              Until_Condition: None
               Until_Log_File:
                Until_Log_Pos: 0
           Master_SSL_Allowed: No
           Master_SSL_CA_File:
           Master_SSL_CA_Path:
              Master_SSL_Cert:
            Master_SSL_Cipher:
               Master_SSL_Key:
        Seconds_Behind_Master: 0
Master_SSL_Verify_Server_Cert: No
                Last_IO_Errno: 0
                Last_IO_Error:
               Last_SQL_Errno: 0
               Last_SQL_Error:
  Replicate_Ignore_Server_Ids:
             Master_Server_Id: 94
                  Master_UUID: 745767f6-6b9a-11ed-9d35-fa163e8ef872
             Master_Info_File: mysql.slave_master_info
                    SQL_Delay: 0
          SQL_Remaining_Delay: NULL
      Slave_SQL_Running_State: Replica has read all relay log; waiting for more updates
           Master_Retry_Count: 86400
                  Master_Bind:
      Last_IO_Error_Timestamp:
     Last_SQL_Error_Timestamp:
               Master_SSL_Crl:
           Master_SSL_Crlpath:
           Retrieved_Gtid_Set:
            Executed_Gtid_Set:
                Auto_Position: 0
         Replicate_Rewrite_DB:
                 Channel_Name:
           Master_TLS_Version:
       Master_public_key_path:
        Get_master_public_key: 0
            Network_Namespace:
1 row in set, 1 warning (0.00 sec)
同理,在B机执行 ,
mysql -uroot -p
show master status;
得到结果
随后到A机执行
stop slave;

change master to
master_host='B机的IP',
master_user='repl',
master_password='xxx',
master_log_file='mysql-bin.000002',
master_log_pos=3150;

statr slave;

show slave status\G;
查看是否成功与上面查看方式一致;
四·测试
在A机上修改或新增任一数据,到B机种查看是否同步;
在B机上修改或新增任一数据,到A机种查看是否同步;
大功告成!