.Net Core 3.1简单搭建微服务
学如逆水行舟,不进则退!最近发现微服务真的是大势所趋,停留在公司所用框架里已经严重满足不了未来的项目需要了,所以抽空了解了一下微服务,并进行了代码落地。
虽然项目简单,但过程中确实也学到了不少东西。
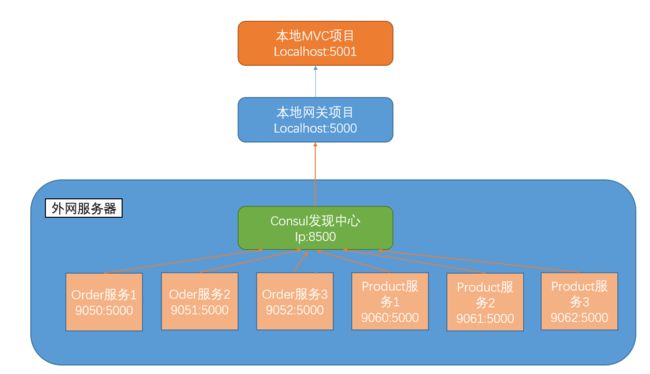
写在前面:先看下项目总体目录以及拓扑图,其中包括2个服务(几乎一样),一个网关,一个mvc项目。我的服务器是用虚拟机搭建的,环境是CentOS 7。本片文章看似繁杂冗长,其实只是记录的步骤比较详细,实操完成你会发现并不难理解,只是微服务的简单入门而已。还请大神多多指教!
一、准备Consul注册中心
在Docker中安装一个Consul
1. 拉取镜像
docker pull consul
2. 启动Server
启动前, 先建立 /consul/data文件夹, 保存 consul 的数据
mkdir -p /data/consul
3. 使用 docker run 启动 server
docker run -d -p 8500:8500 -v /consul/data:/consul/data -e --name=consul1 consul agent -server -bootstrap -ui -client='0.0.0.0'
agent: 表示启动 agent 进程server: 表示 consul 为 server 模式client: 表示 consul 为 client 模式bootstrap: 表示这个节点是 Server-Leaderui: 启动 Web UI, 默认端口 8500node: 指定节点名称, 集群中节点名称唯一client: 绑定客户端接口地址, 0.0.0.0 表示所有地址都可以访问

二、准备服务
1. 创建订单服务项目
2. 创建OrderController和HealthCheckController,用于显示订单信息和进行健康检查。
(1)OrderController代码如下:
using Microsoft.AspNetCore.Mvc; using Microsoft.Extensions.Configuration; using Microsoft.Extensions.Logging; using System; using System.Collections.Generic; using System.Linq; using System.Threading.Tasks; namespace Order.API.Controllers { [ApiController,Route("[controller]")] public class OrderController:ControllerBase { private readonly ILogger_logger; private readonly IConfiguration _configuration; public OrderController(ILogger logger, IConfiguration configuration) { _logger = logger; _configuration = configuration; } [HttpGet] public IActionResult Get() { string result = $"【订单服务】{DateTime.Now.ToString("yyyy-MM-dd HH:mm:ss")}——" + $"{Request.HttpContext.Connection.LocalIpAddress}:{_configuration["ConsulSetting:ServicePort"]}"; return Ok(result); } } }
(2)HealthCheckController控制器代码如下:
using Microsoft.AspNetCore.Mvc; using System; using System.Collections.Generic; using System.Linq; using System.Threading.Tasks; namespace Order.API.Controllers { [Route("[controller]")] [ApiController] public class HealthCheckController : ControllerBase { ////// 健康检查接口 /// /// [HttpGet] public IActionResult Get() { return Ok(); } } }
(3)创建ConsulHelper帮助类,用来向Consul(服务注册中心)进行服务注册。注意,先在Nuget中添加Consul类库。
using Consul; using Microsoft.AspNetCore.Builder; using Microsoft.Extensions.Configuration; using Microsoft.Extensions.Hosting; using System; using System.Collections.Generic; using System.Linq; using System.Threading.Tasks; namespace Order.API.Helper { public static class ConsulHelper { ////// 服务注册到consul /// /// /// public static IApplicationBuilder RegisterConsul(this IApplicationBuilder app, IConfiguration configuration, IHostApplicationLifetime lifetime) { var consulClient = new ConsulClient(c => { //consul地址 c.Address = new Uri(configuration["ConsulSetting:ConsulAddress"]); }); var registration = new AgentServiceRegistration() { ID = Guid.NewGuid().ToString(),//服务实例唯一标识 Name = configuration["ConsulSetting:ServiceName"],//服务名称 Address = configuration["ConsulSetting:ServiceIP"], //服务所在宿主机IP Port = int.Parse(configuration["ConsulSetting:ServicePort"] ?? "5000"),//服务端口 因为要运行多个实例,所以要在在docker容器启动时时动态传入 --ConsulSetting:ServicePort="port" Check = new AgentServiceCheck() { DeregisterCriticalServiceAfter = TimeSpan.FromSeconds(5),//服务启动多久后注册 Interval = TimeSpan.FromSeconds(10),//健康检查时间间隔 HTTP = $"http://{configuration["ConsulSetting:ServiceIP"]}:{configuration["ConsulSetting:ServicePort"]}{configuration["ConsulSetting:ServiceHealthCheck"]}",//健康检查地址 Timeout = TimeSpan.FromSeconds(5)//超时时间 } }; //服务注册 consulClient.Agent.ServiceRegister(registration).Wait(); //应用程序终止时,取消注册 lifetime.ApplicationStopping.Register(() => { consulClient.Agent.ServiceDeregister(registration.ID).Wait(); }); return app; } } }
(4)appsetting.json配置文件代码
{
  "Logging": {
    "LogLevel": {
      "Default": "Information",
      "Microsoft": "Warning",
      "Microsoft.Hosting.Lifetime": "Information"
    }
  },
  "AllowedHosts": "*",
  "ConsulSetting": {
    "ServiceName": "order", //服务名称
    "ServiceIP": "192.168.183.129", //服务所在宿主机的IP地址
    "ServiceHealthCheck": "/healthcheck",//健康检查地址
    "ConsulAddress": "http://192.168.183.129:8500/" //Consul注册中心所在宿主机的IP地址和端口
  }
}
(5)Program类代码如下
using Microsoft.AspNetCore.Hosting;
using Microsoft.Extensions.Configuration;
using Microsoft.Extensions.Hosting;
using Microsoft.Extensions.Logging;
using System;
using System.Collections.Generic;
using System.Linq;
using System.Threading.Tasks;

namespace Order.API
{
    public class Program
    {
        public static void Main(string[] args)
        {
            CreateHostBuilder(args).Build().Run();
        }

        public static IHostBuilder CreateHostBuilder(string[] args) =>
            Host.CreateDefaultBuilder(args)
                .ConfigureWebHostDefaults(webBuilder =>
                {
                    webBuilder.UseUrls("http://0.0.0.0:5000");//用来在服务器中监听外部请求的,0.0.0.0代表任何地址都可访问该服务,5000端口
                    webBuilder.UseStartup();
                });
    }
}
启动项目测试,结果如下
2. 创建产品服务,内容跟Order服务一样,这里就不赘述了。注意为了区分两个服务,把ProductController中的输出信息做一下改变,如:把【订单服务】修改为【产品服务】
(1)ProductController控制器代码
using Microsoft.AspNetCore.Mvc; using Microsoft.Extensions.Configuration; using Microsoft.Extensions.Logging; using System; using System.Collections.Generic; using System.Linq; using System.Threading.Tasks; namespace Product.API.Controllers { [ApiController,Route("[controller]")] public class ProductController:ControllerBase { private readonly ILogger_logger; private readonly IConfiguration _configuration; public ProductController(ILogger logger, IConfiguration configuration) { _logger = logger; _configuration = configuration; } [HttpGet] public IActionResult Get() { string result = $"【产品服务】{DateTime.Now.ToString("yyyy-MM-dd HH:mm:ss")}——" + $"{Request.HttpContext.Connection.LocalIpAddress}:{_configuration["ConsulSetting:ServicePort"]}"; return Ok(result); } } }
(2)appsetting.json代码
{
  "Logging": {
    "LogLevel": {
      "Default": "Information",
      "Microsoft": "Warning",
      "Microsoft.Hosting.Lifetime": "Information"
    }
  },
  "AllowedHosts": "*",
  "ConsulSetting": {
    "ServiceName": "product",//注意这里的服务名称跟Order不一样
    "ServiceIP": "192.168.183.129",
    "ServiceHealthCheck": "/healthcheck",
    "ConsulAddress": "http://192.168.183.129:8500/"
  }
}
(3)运行测试,输出内容跟Order服务大体一致。
二、部署到Docker容器(以Order服务为例)
1. 创建DockerFile文件,文件代码如下
#See https://aka.ms/containerfastmode to understand how Visual Studio uses this Dockerfile to build your images for faster debugging.

FROM mcr.microsoft.com/dotnet/aspnet:3.1 AS base
WORKDIR /app
EXPOSE 5000
COPY . .
ENTRYPOINT ["dotnet", "Order.API.dll"]
2. 发布项目
3. 发布完成之后将发布以后的文件目录放到服务器上,并将DockerFile文件放入根目录,如图
4. 构建Order服务的镜像
在Order服务的根目录下,执行docker命令,
docker build -t orderapi .
构建完成后,启动一个docker容器同时启动我们已经拷贝过来的Order服务,启动命令如下(以下启动了三个容器,分别为9050、9051、9052端口,都映射到了容器的5000端口)
docker run -d -p 9050:5000 --name order1 orderapi --ConsulSetting:ServicePort="9050"
docker run -d -p 9051:5000 --name order2 orderapi --ConsulSetting:ServicePort="9051"
docker run -d -p 9052:5000 --name order3 orderapi --ConsulSetting:ServicePort="9052"
以上,9050:5000,表示将服务器的9050端口映射到容器的5000端口,--ConsulSetting:ServicePort="9050" 表示向服务动态传入端口,服务通过此端口来向Consul注册端口信息
5. 观察Consul控制台,如果5秒后,控制台出现了新的服务,并从红色变味了绿色,那么恭喜您,您的第一个服务就向注册中心注册成功了!
点击Order服务,您会发现有3个服务实例,这就是您刚刚用容器启动的三个服务实例了。
同理,再次部署Product服务,注意,Product的服务端口要改为别的端口,比如9060,不能跟Order重复了!
docker命令如下:
docker build -t productapi .
docker run -d -p 9060:5000 --name product1 productapi --ConsulSetting:ServicePort="9060"
docker run -d -p 9061:5000 --name product2 productapi --ConsulSetting:ServicePort="9061"
docker run -d -p 9062:5000 --name product3 productapi --ConsulSetting:ServicePort="9062"
6. 至此,我们所需要的2个服务,6个实例已经都部署好了,那么我们在请求接口时,就会有6个请求地址:
http://ip:9050/order
http://ip:9051/order
http://ip:9052/order
http://ip:9060/product
http://ip:9061/product
http://ip:9062/product
那么我们mvc项目在请求接口的时候不可能挨个请求啊,这也不太现实,这时候,我么则需要一个网关Ocelot。有了Ocelot,我们只需要请求网关地址就可以了,网关就会根据我们请求的地址,自动匹配下游的服务。
比如,网关地址为http://ip:5000,那么当我们请求http://ip:5000/oder的时候,网关就会匹配路由,自动请求http://ip:9050/order、http://ip:9051/order、http://ip:9052/order的任意一个地址。
当然,这几个地址是通过Ocelot与Consul的集成实现的,Ocelot会自动获取Consul中已经存在的服务的地址,供路由进行自动匹配。
下面,我们来搭建网关。
三、搭建网关
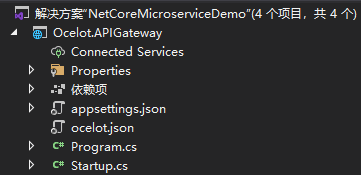
1. 新建空的Web项目,如图:
2. 添加Ocelot和Consul的类库,如图
3. 添加代码
(1)startup类的代码
using Microsoft.AspNetCore.Builder;
using Microsoft.AspNetCore.Hosting;
using Microsoft.Extensions.Configuration;
using Microsoft.Extensions.DependencyInjection;
using Microsoft.Extensions.Hosting;
using Ocelot.DependencyInjection;
using Ocelot.Middleware;
using Ocelot.Provider.Consul;
using Ocelot.Provider.Polly;
using System;
using System.Collections.Generic;
using System.Linq;
using System.Threading.Tasks;

namespace Ocelot.APIGateway
{
    public class Startup
    {
        public Startup(IConfiguration configuration)
        {
            Configuration = configuration;
        }

        public IConfiguration Configuration { get; }

        // This method gets called by the runtime. Use this method to add services to the container.
        public void ConfigureServices(IServiceCollection services)
        {
            services.AddOcelot()
                    .AddConsul()//集成Consul服务发现
                    .AddPolly();//添加超时/熔断服务

        }

        // This method gets called by the runtime. Use this method to configure the HTTP request pipeline.
        public void Configure(IApplicationBuilder app, IWebHostEnvironment env)
        {
            app.UseOcelot().Wait();
        }
    }
}
(2)添加ocelot.json配置文件,代码如下
{
  "ReRoutes": [
    {
      "DownstreamPathTemplate": "/order",
      "DownstreamScheme": "http",
      "UpstreamPathTemplate": "/order",
      "UpstreamHttpMethod": [ "GET", "POST" ],
      "ServiceName": "order", //Consul服务名称
      "RateLimitOptions": { //限流
        "ClientWhitelist": [ "SuperClient" ], //白名单,不受限
        "EnableRateLimiting": true,
        "Period": "5s", //1s,5m,1h,1d等
        "PeriodTimespan": 2,
        "Limit": 1
      },
      "QoSOptions": { //超时/熔断配置
        "ExceptionsAllowedBeforeBreaking": 3, //代表发生错误的次数
        "DurationOfBreak": 10000, //代表熔断时间
        "TimeoutValue": 5000 //代表超时时间
      }
    },
    {
      "DownstreamPathTemplate": "/product",
      "DownstreamScheme": "http",
      "UpstreamPathTemplate": "/product",
      "UpstreamHttpMethod": [ "GET", "POST" ],
      "ServiceName": "product", //Consul服务名称
      "RateLimitOptions": { //限流
        "ClientWhitelist": [ "SuperClient" ], //白名单,不受限
        "EnableRateLimiting": true,
        "Period": "5s", //1s,5m,1h,1d等
        "PeriodTimespan": 2,
        "Limit": 1 //最重要的就是Period,PeriodTimespan,Limit这几个配置。
      },
      "QoSOptions": { //超时/熔断配置
        "ExceptionsAllowedBeforeBreaking": 3, //代表发生错误的次数
        "DurationOfBreak": 10000, //代表熔断时间
        "TimeoutValue": 5000 //代表超时时间
      }
    }
  ],
  "GlobalConfiguration": {
    "BaseUrl": "http://192.168.183.129:5000", //用来访问服务的地址
    "ServiceDiscoveryProvider": {//Consul服务发现,用来获取Consul的服务地址的
      "Scheme": "http",
      "Host": "192.168.183.129",//Consul的IP地址
      "Port": 8500,//端口
      "Type": "Consul"
    },
    "RateLimitOptions": { //限流
      "DisableRateLimitHeaders": false, //代表是否禁用X-Rate-Limit和Retry-After标头(请求达到上限时response header中的限制数和多少秒后能重试)
      "QuotaExceededMessage": "too many requests...", //代表请求达到上限时返回给客户端的消息
      "HttpStatusCode": 999, //代表请求达到上限时返回给客户端的HTTP状态代码
      "ClientIdHeader": "Test" //可以允许自定义用于标识客户端的标头。默认情况下为“ ClientId”
    }
  }
}
(3)Startup.cs类代码
using Microsoft.AspNetCore.Builder;
using Microsoft.AspNetCore.Hosting;
using Microsoft.Extensions.Configuration;
using Microsoft.Extensions.DependencyInjection;
using Microsoft.Extensions.Hosting;
using Ocelot.DependencyInjection;
using Ocelot.Middleware;
using Ocelot.Provider.Consul;
using Ocelot.Provider.Polly;
using System;
using System.Collections.Generic;
using System.Linq;
using System.Threading.Tasks;

namespace Ocelot.APIGateway
{
    public class Startup
    {
        public Startup(IConfiguration configuration)
        {
            Configuration = configuration;
        }

        public IConfiguration Configuration { get; }

        // This method gets called by the runtime. Use this method to add services to the container.
        public void ConfigureServices(IServiceCollection services)
        {
            services.AddOcelot()
                    .AddConsul()//集成Consul服务发现
                    .AddPolly();//添加超时/熔断服务

        }

        // This method gets called by the runtime. Use this method to configure the HTTP request pipeline.
        public void Configure(IApplicationBuilder app, IWebHostEnvironment env)
        {
            app.UseOcelot().Wait();
        }
    }
}
(4)Program.cs类代码如下
using Microsoft.AspNetCore.Hosting;
using Microsoft.Extensions.Configuration;
using Microsoft.Extensions.Hosting;
using Microsoft.Extensions.Logging;
using System;
using System.Collections.Generic;
using System.Linq;
using System.Threading.Tasks;

namespace Ocelot.APIGateway
{
    public class Program
    {
        public static void Main(string[] args)
        {
            CreateHostBuilder(args).Build().Run();
        }

        public static IHostBuilder CreateHostBuilder(string[] args) =>
            Host.CreateDefaultBuilder(args)
                .ConfigureAppConfiguration((hostingContext, config) => {
                    config.AddJsonFile("ocelot.json");
                })
                .ConfigureWebHostDefaults(webBuilder =>
                {
                    webBuilder.UseStartup();
                });
    }
}
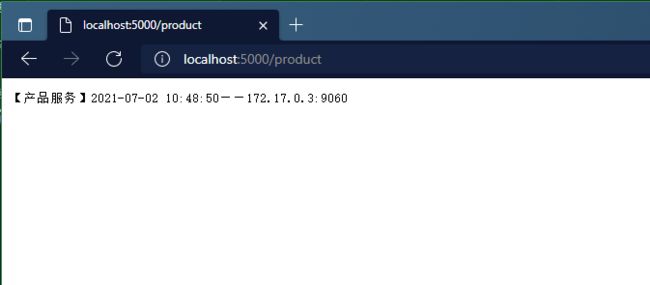
(5)启动网关项目,进行测试,结果如下
至此,网关搭建完成,之后,我们的MVC项目只需要访问网关的地址进行接口调用就可以了。
四、新建MVC项目,进行调用模拟
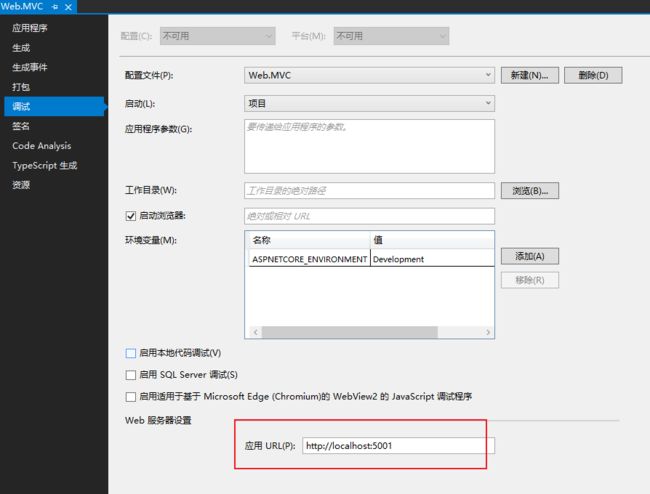
1. 新建空MVC项目并添加代码,如图
2. 添加代码
(1)HomeController代码
using Microsoft.AspNetCore.Mvc; using Microsoft.Extensions.Logging; using System; using System.Collections.Generic; using System.Linq; using System.Threading.Tasks; using Web.MVC.Helper; namespace Web.MVC.Controllers { public class HomeController:Controller { private readonly ILogger_logger; private readonly IServiceHelper _serviceHelper; public HomeController(ILogger logger, IServiceHelper serviceHelper) { _logger = logger; _serviceHelper = serviceHelper; } public async Task Index() { ViewBag.OrderData = await _serviceHelper.GetOrder(); ViewBag.ProductData = await _serviceHelper.GetProduct(); return View(); } } }
(2)IServiceHelper、ServiceHelper代码
using System; using System.Collections.Generic; using System.Linq; using System.Threading.Tasks; namespace Web.MVC.Helper { public interface IServiceHelper { ////// 获取产品数据 /// /// Task<string> GetProduct(); /// /// 获取订单数据 /// /// Task<string> GetOrder(); } }
using Consul;
using Microsoft.Extensions.Configuration;
using RestSharp;
using System;
using System.Collections.Concurrent;
using System.Collections.Generic;
using System.Linq;
using System.Threading.Tasks;

namespace Web.MVC.Helper
{
    public class ServiceHelper : IServiceHelper
    {
        public async Task<string> GetOrder()
        {
            var Client = new RestClient("http://ip:5000");//此处指的是网关项目的地址
            var request = new RestRequest("/order", Method.GET);
            var response = await Client.ExecuteAsync(request);
            return response.Content;
        }

        public async Task<string> GetProduct()
        {
            var Client = new RestClient("http://ip:5000");//此处指的是网关的地址
            var request = new RestRequest("/product", Method.GET);
            var response = await Client.ExecuteAsync(request);
            return response.Content;
        }
    }
}
(3)Home/Index.cshtml的代码
@{ ViewData["Title"] = "Home Page"; }class="text-center">class="display-4">Welcome
@ViewBag.OrderData
@ViewBag.ProductData
(4)Startup.cs中在ConfigureServices中,添加代码


