Nginx(3)web架构
LNMP架构概述
什么是LNMP
LNMP是一套技术的组合,L=Linux、N=Nginx、M~=MySQL、P~=PHP
LNMP架构是如何工作的
首先Nginx服务是不能处理动态请求,那么当用户发起动态请求时, Nginx又是如何进行处理的。
当用户发起http请求,请求会被Nginx处理,如果是静态资源请求Nginx则直接返回,如果是动态请求Nginx则通过fastcgi协议转交给后端的PHP程序处理,具体如下图所示

Nginx与Fast-CGO详细工作流程
1.用户通过http协议发起请求,请求会先抵达LNMP架构中的Nginx
2.Nginx会根据用户的请求进行判断,这个判断是有Location进行完成
3.判断用户请求的是静态页面,Nginx直接进行处理
4.判断用户请求的是动态页面,Nginx会将该请求交给fastcgi协议下发
5.fastgi会将请求交给php-fpm管理进程, php-fpm管理进程接收到后会调用具体的工作进程warrap
6.warrap进程会调用php程序进行解析,如果只是解析代码php直接返回
7.如果有查询数据库操作,则由php连接数据库(用户 密码 IP)发起查询的操作
8.最终数据由*mysql->php->php-fpm->fastcgi->nginx->http->user
LNMP架构环境部署
Nginx配置官网仓库
[root@web01 conf.d]# cat /etc/yum.repos.d/nginx.repo
[nginx-stable]
name=nginx stable repo
baseurl=http://nginx.org/packages/centos/$releasever/$basearch/
gpgcheck=1
enabled=1
gpgkey=https://nginx.org/keys/nginx_signing.key
安装Nginx
[root@web01 ~]# yum -y install nginx
启动Nginx并加入开机自启
[root@web01 ~]# systemctl start nginx
[root@web01 ~]# systemctl enable nginx
使用第三方扩展源安装php7.1
[root@web01 ~]# vim /etc/yum.repos.d/php.repo
[php-webtatic]
name = PHP Repository
baseurl = http://us-east.repo.webtatic.com/yum/el7/x86_64/
gpgcheck = 0

[root@web01 ~]# yum -y install php71w php71w-cli php71w-common php71w-devel php71w-embedded php71w-gd php71w-mcrypt php71w-mbstring php71w-pdo php71w-xml php71w-fpm php71w-mysqlnd php71w-opcache php71w-pecl-memcached php71w-pecl-redis php71w-pecl-mongodb --nogpgcheck
使用官网安装包安装php
# rpm -Uvh https://dl.fedoraproject.org/pub/epel/epel-release-latest-7.noarch.rpm
# rpm -Uvh https://mirror.webtatic.com/yum/el7/webtatic-release.rpm
启动php-fpm加入开机自启
[root@web01 ~]# systemctl start php-fpm
[root@web01 ~]# systemctl enable php-fpm
安装Mariadb数据库(Mysql)
[root@web01 ~]# yum -y install mariadb-server
启动Mariadb加入开机自动
[root@web01 ~]# systemctl start mariadb
[root@web01 ~]# systemctl enable mariadb
[root@web01 ~]# netstat -tnulp
Active Internet connections (only servers)
Proto Recv-Q Send-Q Local Address           Foreign Address         State       PID/Program name
tcp        0      0 127.0.0.1:9000          0.0.0.0:*               LISTEN      31437/php-fpm: mast
tcp        0      0 0.0.0.0:3306            0.0.0.0:*               LISTEN      31771/mysqld
设置数据库密码为1 默认密码为空
[root@web01 ~]# mysqladmin password '1'
登陆数据测试:
[root@web01 ~]# mysql -uroot -p1
Welcome to the MariaDB monitor.  Commands end with ; or \g.
Your MariaDB connection id is 3
Server version: 5.5.68-MariaDB MariaDB Server

Copyright (c) 2000, 2018, Oracle, MariaDB Corporation Ab and others.

Type 'help;' or '\h' for help. Type '\c' to clear the current input statement.

MariaDB [(none)]> quit      # 退出数据库
LNMP架构环境配置
在将Nginx与PHP集成过程中,需要先了解Fastcgi代理配置语法
1.设置fastcgi服务器的地址,该地址可以指定为域名或IP地址,以及端口
Syntax: fastcgi_pass address;
Default: —
Context: location, if in location
语法示例
fastcgi_pass localhost:9000;
fastcgi_pass unix:/tmp/fastcgi.socket;
2.设置fastcgi默认的首页文件,需要结合fastcgi_param一起设置
Syntax: fastcgi_index name;
Default: —
Context: http, server, location
3.通过fastcgi_param设置变量,并将设置的变量传递到后端的fastcgi服务器
Syntax: fastcgi_param parameter value [if_not_empty];
Default: —
Context: http, server, location
语法示例
fastcgi_index index.php;
fastcgi_param SCRIPT_FILENAME /code$fastcgi_script_name;
4.通过图形方式展示fastcgi_index与fastcgi_param作用

5.最终Nginx连接Fastcgi服务器配置如下
[root@web01 ~]# cat /etc/nginx/conf.d/php.conf
server {
        listen 80;
        server_name php.ahui.com;

        location / {
                root /code;
                index index.php index.html;
        }

        location ~ \.php$ {
                root /code;
                fastcgi_pass 127.0.0.1:9000;
                fastcgi_param SCRIPT_FILENAME $document_root$fastcgi_script_name
        }
}
6.在/code目录下创建info.php文件,测试能否通过浏览器访问,访问成功如下图
[root@web01 ~]# cat /code/info.php
<?php
        phpinfo();
?>
按照刚才的配置,页面打开一片空白。
[root@web01 ~]# cat /etc/nginx/conf.d/php.conf
server {
        listen 80;
        server_name php.ahui.com;

        location / {
                root /code;
                index index.php index.html;
        }

        location ~ \.php$ {
                root /code;
                fastcgi_pass 127.0.0.1:9000;
                fastcgi_param SCRIPT_FILENAME $document_root$fastcgi_script_name;
                include fastcgi_params;		#/etc/nginx/fastcgi_params
        }
}
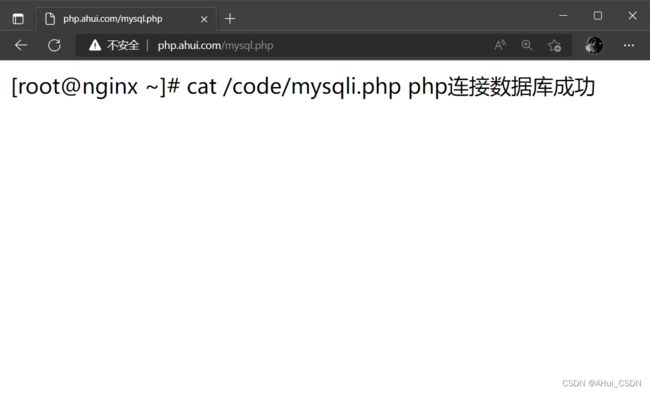
7.在/code目录下创建mysqli.php文件,填入对应的数据库IP、用户名、密码
[root@web01 ~]# cat /code/mysqli.php
<?php
    $servername = "localhost";
    $username = "root";
    $password = "1";

    // 创建连接
    $conn = mysqli_connect($servername, $username, $password);

    // 检测连接
    if (!$conn) {
        die("Connection failed: " . mysqli_connect_error());
    }
    echo "php连接数据库成功";
?>
PHP和Nginx修改虚拟用户信息配置文件
Nginx:
[root@web01 ~]# head /etc/nginx/nginx.conf

user  nginx;
PHP:
[root@web01 ~]# vim /etc/php-fpm.d/www.conf
[root@web01 ~]# grep www /etc/php-fpm.d/www.conf
; Start a new pool named 'www'.
[www]
user = apache
group = apache
部署WordPress(博客)
1)配置Nginx虚拟主机站点,域名为wordpress.ahui.com
nginx具体配置信息
[root@web01 conf.d]# cat wordpress.conf
server {
	listen 80;
	server_name wordpress.ahui.com;

	location / {
	root /code/wordpress/;
	index  index.php index.html;
	}

	location ~ \.php$ {
	root /code/wordpress/;
	fastcgi_pass 127.0.0.1:9000;
	fastcgi_param SCRIPT_FILENAME $document_root$fastcgi_script_name;
	include fastcgi_params;
	}

}
2)重启nginx服务
[root@web01 ~]# systemctl restart nginx
什么情况下需要重启:在新增加nginx配置文件
什么情况下重新加载: 只修改配置文件直接加载 reload
修改代码不需要重启 不需要加载
3)根据配置文件创建必要信息:
[root@web01 conf.d]# mkdir /code/wordpress/
4)获取wordpress产品,解压并部署wordress
博客官网地址:https://cn.wordpress.org/download/
[root@web01 wordpress]# wget https://cn.wordpress.org/latest-zh_CN.tar.gz
解压代码:
[root@web01 code]# tar xf latest-zh_CN.tar.gz
[root@web01 code]# ll
total 21376
-rw-r--r-- 1 root root 21881579 Jun 16 14:00 latest-zh_CN.tar.gz
drwxr-xr-x 5 1006 1006     4096 Jun 16 14:00 wordpress
[root@web01 code]# rm -rf latest-zh_CN.tar.gz
5)授权/code/wordpress 属主属组为php的启动用户apache
php在运行代码时会修改代码文件,给予php服务的虚拟用户apache代码文件的权限
[root@web01 ~]# chown -R apache.apache /code/wordpress
[root@web01 ~]# ll /code/wordpress/
total 216
-rw-r--r--  1 apache apache   405 Feb  6  2020 index.php
-rw-r--r--  1 apache apache 19915 Jan  1 08:15 license.txt
-rw-r--r--  1 apache apache  7401 Mar 23 05:11 readme.html
-rw-r--r--  1 apache apache  7165 Jan 21  2021 wp-activate.php
drwxr-xr-x  9 apache apache  4096 Jun 16 14:00 wp-admin
-rw-r--r--  1 apache apache   351 Feb  6  2020 wp-blog-header.php
-rw-r--r--  1 apache apache  2338 Nov 10  2021 wp-comments-post.php
-rw-rw-rw-  1 apache apache  3270 Jun 18 12:11 wp-config.php
-rw-r--r--  1 apache apache  3001 Dec 14  2021 wp-config-sample.php
drwxr-xr-x  6 apache apache    84 Jun 18 12:40 wp-content
-rw-r--r--  1 apache apache  3943 Apr 28 17:49 wp-cron.php
drwxr-xr-x 26 apache apache 12288 Jun 16 14:00 wp-includes
-rw-r--r--  1 apache apache  2494 Mar 20 04:31 wp-links-opml.php
-rw-r--r--  1 apache apache  3973 Apr 12 09:47 wp-load.php
-rw-r--r--  1 apache apache 48498 Apr 29 22:36 wp-login.php
-rw-r--r--  1 apache apache  8577 Mar 23 00:25 wp-mail.php
-rw-r--r--  1 apache apache 23706 Apr 12 17:26 wp-settings.php
-rw-r--r--  1 apache apache 32051 Apr 11 19:42 wp-signup.php
-rw-r--r--  1 apache apache  4748 Apr 11 19:42 wp-trackback.php
-rw-r--r--  1 apache apache  3236 Jun  9  2020 xmlrpc.php
6)由于wordpress产品需要依赖数据库,所以需要手动建立数据库
方法一:
[root@web01 ~]# mysql -uroot -p1 -e "create database wordpress;"
方法二:
[root@web01 ~]# mysql -uroot -p1
mysql> create database wordpress;
mysql> exit
检查wordperss库
[root@web01 ~]# mysql -uroot -p1 -e "show databases;"
+--------------------+
| Database           |
+--------------------+
| information_schema |
| mysql              |
| performance_schema |
| test               |
| wordpress          |
+--------------------+
7)windows做hosts解析
wordpress.ahui.com 10.0.0.7
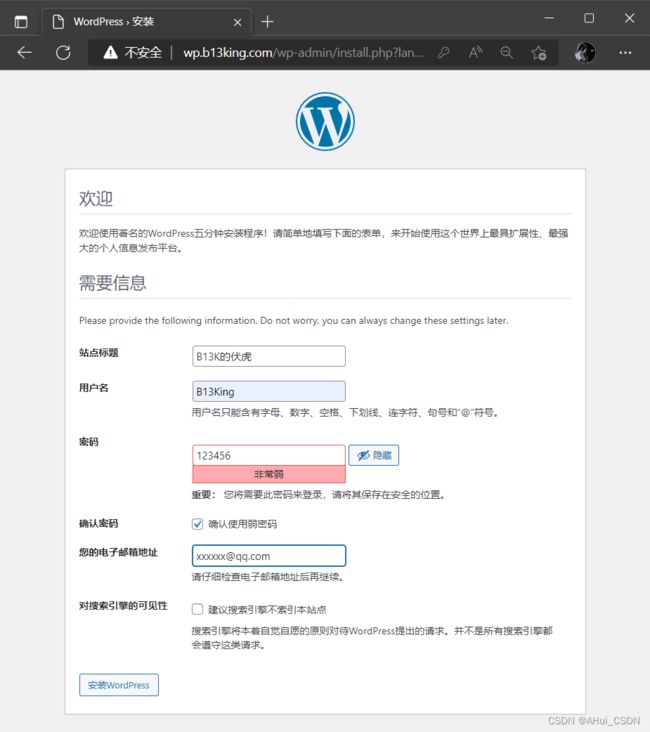
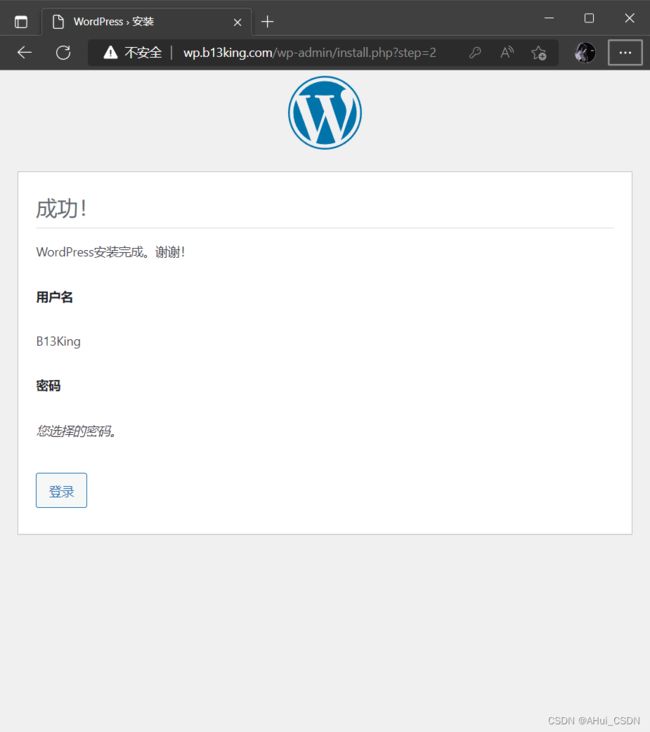
8)通过浏览器访问wordpress.ahui.com 进行安装部署业务



PHP和Nginx修改文件上传大小限制
php:
[root@web01 ~]vim /etc/php.ini
post_max_size = 8M
upload_max_filesize = 2M
nginx:
[root@web01 ~]vim /etc/php.ini
client_max_body_size 20M
部署知乎产品Wecenter(知乎)
LNMP框架 Linux Nginx MySQL PHP
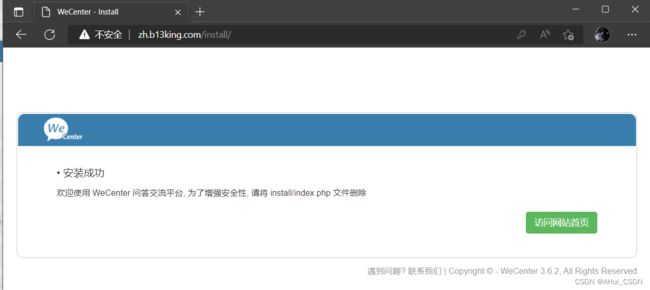
1.配置Nginx虚拟主机站点,域名为zh.ahui.com
nginx具体配置信息
[root@web01 ~]# cat /etc/nginx/conf.d/zh.conf
server {
    listen 80;
    server_name zh.b13king.com;
    root /code/zh;
    index index.php index.html;

        location ~ \.php$ {
        root /code/zh;
                fastcgi_pass   127.0.0.1:9000;
                fastcgi_index  index.php;
                fastcgi_param  SCRIPT_FILENAME  $document_root$fastcgi_script_name;
                include        fastcgi_params;
        }
}
检测语法并重启服务
[root@web01 conf.d]# nginx -t
nginx: the configuration file /etc/nginx/nginx.conf syntax is ok
nginx: configuration file /etc/nginx/nginx.conf test is successful
[root@web01 conf.d]# systemctl restart nginx
2.下载Wecenter产品,部署Wecenter并授权
官方下载地址:http://www.wecenter.com/downloads/
[root@web02 ~]# wget http://ahdx.down.chinaz.com/201605/WeCenter_v3.6.2.zip
[root@web02 ~]# unzip WeCenter_3-2-1.zip
[root@web02 ~]# mv WeCenter_3-2-1/ /code/zh
[root@web02 ~]# chown -R www.www /code/zh/
3.由于wecenter产品需要依赖数据库, 所以需要手动建立数据库
登陆数据库
[root@web01 zh]# mysql -uroot -p1 -e "create database zh;"
[root@web01 zh]# mysql -uroot -p1 -e "show databases;"
	+--------------------+
	| Database           |
	+--------------------+
	| information_schema |
	| mysql              |
	| performance_schema |
	| test               |
	| wordpress          |
	| zh                 |
	+--------------------+
4.hosts解析
10.0.0.7 zh.b13king.com
部署phpshe(电商平台)
官网:http://www.phpshe.com/
1.创建商城nginx配置文件
[root@web01 conf.d]# cp zh.conf phpshe.conf
[root@web01 conf.d]# vim php.conf
server {
	listen 80;
	server_name phpshe.b13king.com;

	location / {
	root /code/phpshe/;
	index  index.php index.html;
	}

	location ~ \.php$ {
	root /code/phpshe/;
	fastcgi_pass 127.0.0.1:9000;
	fastcgi_param SCRIPT_FILENAME $document_root$fastcgi_script_name;
	include fastcgi_params;
	}

}
检测并重启nginx
[root@web01 conf.d]# nginx -t
nginx: the configuration file /etc/nginx/nginx.conf syntax is ok
nginx: configuration file /etc/nginx/nginx.conf test is successful
[root@web01 conf.d]# systemctl restart nginx
2.创建代码目录 /code/phpshe 上传代码
[root@web01 ~]# mkdir /code/phpshe
[root@web01 ~]# cd /code/phpshe
[root@web01 phpshe]#
解压移动
[root@web01 phpshe]# unzip phpshe1.8.zip
将1目录下的代码文件移动到当前phpshe目录
[root@web01 phpshe]# mv phpshe1.8/* .
授权属主属组为apache
[root@web01 phpshe]# chown -R apache.apache ../phpshe/
3.hosts解析
10.0.0.7 phpshe.b13king.com
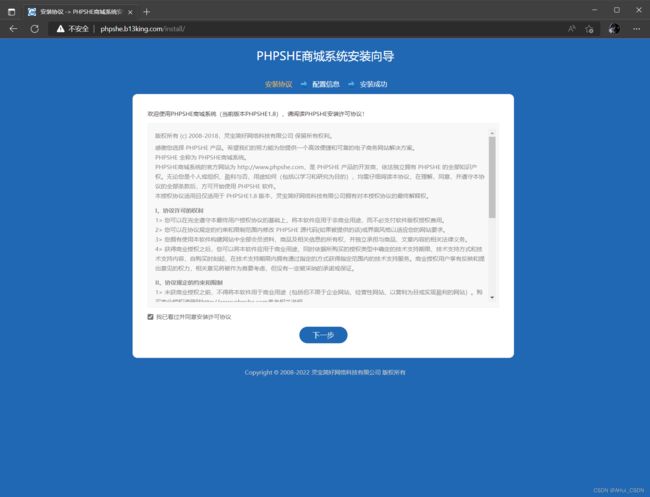
4.浏览器访问安装
http://phpshe.b13king.com/install

部署edusoho(教培网站)
配置文件
server {
    listen 80;

    # [改] 网站的域名 或服务器ip
    server_name edu.ahui.com;


    #301跳转可以在nginx中配置

    # 程序的安装路径
    root /code/edusoho/web/;

    # 日志路径
    access_log /var/log/nginx/edusoho.com.access.log;
    error_log /var/log/nginx/edusoho.com.error.log;

    location / {
        index app.php;
        try_files $uri @rewriteapp;
    }

	location @rewriteapp {
			rewrite ^(.*)$ /app.php/$1 last;
		}

		location ~ ^/udisk {
			internal;
			root /code/edusoho/app/data/;
		}
		location ~ ^/(app|app_dev)\.php(/|$) {
			fastcgi_pass   127.0.0.1:9000;
			fastcgi_split_path_info ^(.+\.php)(/.*)$;
			include fastcgi_params;
			fastcgi_param  SCRIPT_FILENAME    $document_root$fastcgi_script_name;
			fastcgi_param  HTTPS              off;
			fastcgi_param HTTP_X-Sendfile-Type X-Accel-Redirect;
			fastcgi_param HTTP_X-Accel-Mapping /udisk=/code/edusoho/app/data/udisk;
			fastcgi_buffer_size 128k;
			fastcgi_buffers 8 128k;
		}


    # 配置设置图片格式文件
    location ~* \.(jpg|jpeg|gif|png|ico|swf)$ {
        # 过期时间为3年
        expires 3y;

        # 关闭日志记录
        access_log off;

        # 关闭gzip压缩,减少CPU消耗,因为图片的压缩率不高。
        gzip off;
    }

    # 配置css/js文件
    location ~* \.(css|js)$ {
        access_log off;
        expires 3y;
    }

    # 禁止用户上传目录下所有.php文件的访问,提高安全性
    location ~ ^/files/.*\.(php|php7.0)$ {
        deny all;
    }

 # 以下配置允许运行.php的程序,方便于其他第三方系统的集成。
    location ~ \.php$ {
        # [改] 请根据实际php-fpm运行的方式修改
        fastcgi_pass   127.0.0.1:9000;
        fastcgi_split_path_info ^(.+\.php)(/.*)$;
        include fastcgi_params;
        fastcgi_param  SCRIPT_FILENAME    $document_root$fastcgi_script_name;
        fastcgi_param  HTTPS              off;
        fastcgi_param  HTTP_PROXY         "";
    }
}
当然除了这些产品,还有很多我们可以尝试着搭建的: phpmyadmin zblog discuz kodbox
拆分数据库至独立服务器
为什么要进行数据库的拆分
由于单台服务器运行LNMP架构会导致网站访问缓慢,当内存被占满时,很容易导致系统出现oom从而kill掉MySQL数据库,所以要将web和数据库进行独立部署。
数据库拆分后解决了什么问题
1.缓解web网站的压力
2.增强数据库读写性能
3.提高用户访问速度
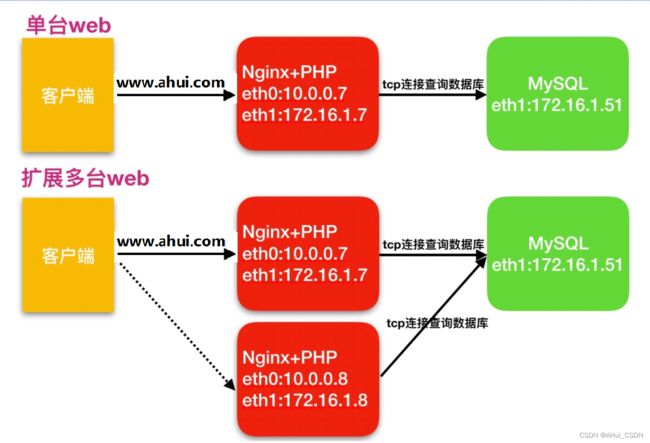
数据库拆分架构演变过程,如下图所示

拆分数据库到独立服务器172.16.1.51:
第一步: 准备服务器安装mariadb
[root@db01 ~]# yum -y install mariadb-server
第二步: 启动数据库加入开机自启动
[root@db01 ~]# systemctl start mariadb
[root@db01 ~]# systemctl enable mariadb
第三步: 将web01数据库的数据导出到all.sql
[root@web01 ~]# mysqldump -uroot -p1 -A > all.sql
[root@web01 ~]# ll all.sql
-rw-r--r-- 1 root root 2252811 Jun 20 11:52 all.sql
第四步: 将all.sql拷贝172.16.1.51导入到新的数据库中
[root@web01 ~]# scp all.sql 172.16.1.51:/root/
# 导入到新的数据库
[root@db01 ~]# mysql -uroot < all.sql
# 重启数据库
[root@db01 ~]# systemctl restart mariadb
检查数据库是否导入正常: phpshe zh wordpress
[root@db01 ~]# mysql -uroot -p1
Welcome to the MariaDB monitor.  Commands end with ; or \g.
Your MariaDB connection id is 3
Server version: 5.5.68-MariaDB MariaDB Server

Copyright (c) 2000, 2018, Oracle, MariaDB Corporation Ab and others.

Type 'help;' or '\h' for help. Type '\c' to clear the current input statement.

MariaDB [(none)]> show databases;
+--------------------+
| Database           |
+--------------------+
| information_schema |
| mysql              |
| performance_schema |
| phpshe             |
| test               |
| wordpress          |
| zh                 |
+--------------------+
7 rows in set (0.00 sec)
第五步: 在新的库授权一个账号能支持远程连接51
创建ahui用户管理所有的库和里面所有的表 密码是1
MariaDB [(none)]> grant all on *.* to ahui@'%' identified by '1';
测试远程连接数据库:
测试连接本地:
[root@db01 ~]# mysql -uroot -p1.com -h 127.0.0.1
测试远程连接: web01连接db01测试
[root@web01 ~]# mysql -uahui -p1.com -h 172.16.1.51
第六步: 修改业务代码PHP的数据连接信息 连接到172.16.1.51去查询数据
停止WEB01的数据库
[root@web01 ~]# systemctl stop mariadb
[root@web01 ~]# systemctl disable mariadb
wordpress代码:
[root@web01 ~]# cd /code/wordpress/
[root@web01 wordpress]# vim wp-config.php
/** Database username */
define( 'DB_USER', 'ahui' );					 # 需要改用户名

/** Database password */
define( 'DB_PASSWORD', '1' );

/** Database hostname */
define( 'DB_HOST', '172.16.1.51' );			  # 修改连接的IP地址为远端服务器51
修改知乎代码:
[root@web01 ~]# cd /code/zh/
[root@web01 zh]# vim system/config/database.php
[root@web01 zh]# cat system/config/database.php
<?php

$config['charset'] = 'utf8mb4';
$config['prefix'] = 'aws_';
$config['driver'] = 'MySQLi';
$config['master'] = array (
  'charset' => 'utf8mb4',
  'host' => '172.16.1.51',
  'username' => 'ahui',
  'password' => '1',
  'dbname' => 'zh',
  'port' => '3306',
修改PHP代码同理
在安装的时候直接将数据部署到172.16.1.51
在安装部署过程中需要用到一个远程用户
扩展多台相同的Web服务器
为什么要扩展多台web节点
单台web服务器能抗住的访问量是有限的,配置多台web服务器能提升更高的访问速度。
扩展多台web解决了什么问题
1.单台web节点如果故障,会导致业务down机
2.多台web节点能保证业务的持续稳定,扩展性高
3.多台web节点能有效的提升用户访问网站的速度
扩展web环境
| 主机名称 | 应用环境 | 外网地址 | 内网地址 |
|---|---|---|---|
| web01 | nginx+php | 10.0.0.7 | 172.16.1.7 |
| web02 | nginx+php | 10.0.0.8 | 172.16.1.8 |
| db01 | mysql | 10.0.0.51 | 172.16.1.51 |
快速扩展一台web节点详细步骤
通过web01现有环境快速的扩展一台web02的服务器,数据库统一使用db01
1)创建www用户
[root@web02 ~]# groupadd -g666 www
[root@web02 ~]# useradd -u666 -g666 www
2)安装LNP
[root@web02 ~]# scp -rp [email protected]:/etc/yum.repos.d/* /etc/yum.repos.d/
[root@web02 ~]# scp -rp [email protected]:/etc/pki/rpm-gpg/* /etc/pki/rpm-gpg/

[root@web02 ~]# yum install nginx -y
[root@web02 ~]# yum -y install php71w php71w-cli php71w-common php71w-devel php71w-embedded php71w-gd php71w-mcrypt php71w-mbstring php71w-pdo php71w-xml php71w-fpm php71w-mysqlnd php71w-opcache php71w-pecl-memcached php71w-pecl-redis php71w-pecl-mongodb
3)将web01的nginx配置文件导入到web02
[root@web02 ~]# scp -rp [email protected]:/etc/nginx /etc/
4)将web01的php配置文件导入到web02
[root@web02 ~]# scp -rp [email protected]:/etc/php-fpm.d /etc/
5)将web01的产品代码打包传输到web02服务器上,在web01上线进行打包操作
[root@web01 ~]# tar czf code.tar.gz /code
[root@web01 ~]# scp code.tar.gz [email protected]:/tmp

#在web02服务器上进行解压
[root@web02 ~]# tar xf /tmp/code.tar.gz -C /
6)最后启动nginx与php-fpm,并加入开机自启
[root@web02 ~]# systemctl start nginx php-fpm
[root@web02 ~]# systemctl enable nginx php-fpm
拆分静态资源至独立服务器
为什么拆分静态资源至独立存储服务器
当后端的web节点出现多台时,会导致用户上传的图片、视频附件等内容仅上传至一台web服务器,那么其他的web服务器则无法访问到该图片。
新增一台nfs存储解决了什么问题
1.保证了多台web节点静态资源一致。
2.有效节省多台web节点的存储空间。
3.统一管理静态资源,便于后期推送至CDN进行静态资源加速
多台web节点技术架构组成,如下图所示
环境准备
| 主机名称 | 应用环境 | 外网地址 | 内网地址 |
|---|---|---|---|
| web01 | nginx+php | 10.0.0.7 | 172.16.1.7 |
| web02 | nginx+php | 10.0.0.8 | 172.16.1.8 |
| nfs | nfs | 10.0.0.31 | 172.16.1.31 |
| db01 | mysql | 10.0.0.51 | 172.16.1.51 |
nfs服务端,操作步骤如下
1)安装并配置nfs
[root@nfs ~]# yum install nfs-utils -y
[root@nfs ~]# cat /etc/exports
/data/blog 172.16.1.0/24(rw,sync,all_squash,anonuid=666,anongid=666)
/data/zh 172.16.1.0/24(rw,sync,all_squash,anonuid=666,anongid=666)
2)创建共享目录,并进行授权
[root@nfs01 ~]# mkdir /data/{blog,zh} -p
[root@nfs01 ~]# chown -R www.www /data/
3)启动nfs服务,并加入开机自启
[root@nfs01 ~]# systemctl restart nfs-server
web01端操作步骤如下
1)web01节点安装nfs,然后使用showmount查看服务端共享的资源
[root@web01 ~]# yum install nfs-utils -y
[root@web01 ~]# showmount -e 172.16.1.31
Export list for 172.16.1.31:
/data/zh   172.16.1.0/24
/data/blog 172.16.1.0/24
2)如何查找Wordpress静态资源存放的位置
浏览器->右键->检查->Network->选择左上角的Select按钮->点击对应的图片,然后能获取到对应的url地址,如下
# http://blog.ahui.com/wp-content/uploads/2018/11/timg.gif
3)备份web01服务器上Wordpress的静态资源,因为该服务器上的资源资源最全
[root@web01 ~]# cd /code/wordpress/wp-content
[root@web01 wp-content]# cp uploads/ uploads_bak/
4)web01客户端执行挂载操作
[root@web01 wp-content]# mount -t nfs 172.16.1.31:/data/blog /code/wordpress/wp-content/uploads/

#恢复对应的数据
[root@web01 wp-content]# cp -rp uploads_bak/* uploads/
5)将挂载信息加入开机自启
[root@web01 wp-content]# tail -1 /etc/fstab
172.16.1.31:/data/blog  /code/wordpress/wp-content/uploads nfs defaults 0 0
[root@web01 wp-content]# mount -a
web02端操作步骤如下
1)web02客户端直接挂载nfs即可
[root@web02 ~]# mount -t nfs 172.16.1.31:/data/blog /code/wordpress/wp-content/uploads/
2)将挂载信息加入开机自启
[root@web02 ~]# tail -1 /etc/fstab
172.16.1.31:/data/blog  /code/wordpress/wp-content/uploads nfs defaults 0 0
[root@web02 ~]# mount -a


