Nginx性能优化
性能优化概述
基于Nginx性能优化,那么在性能优化这一章,我们将分为如下几方面做介绍
1、首先我们需要了解性能优化要考虑哪些方面。
2、然后我们需要了解性能优化必要用到的压力测试工具ab
3、最后我们需要了解系统上有哪些注意和优化的点,以及nginx配置文件
我们再做性能优化工作前,我们重点需要考虑哪些方面,和了解哪些方面
1、首先需要了解我们当前系统的结构和瓶颈,了解当前使用的是什么,运行的是什么业务,都有哪些服务,了解每个服务最大能支撑多少并发。比如nginx作为静态资源服务并发是多少,最高瓶颈在哪里,能支持多少qps(每秒查询率)的访问请求,那我们怎么得出这组系统结构瓶颈呢,比如top查看系统的CPU负载、内存使用率、总得运行进程等,也可以通过日志去分析请求的情况,当然也可以通过我们前面介绍到的stub_statius模块查看当前的连接情况,也可以对线上的业务进行压力测试(低峰期),去了解当前这套系统能承担多少的请求和并发,已做好响应的评估。这个是我们做性能优化最先考虑的地方。
2、其次我们需要了解业务模式,虽然我们是做性能优化,但每一个性能的优化都是为业务所提供的服务的,我们需要了解每个业务接口的类型,比如:电商网站中的抢购模式,这种情况下面,平时没什么流量,但到了抢购时间流量会突增。
我们还需要了解系统层次化的结构,比如:我们使用nginx做的是代理、还是动静分离、还是后端直接服务用户,那么这个就需要我们对每一层做好相应的梳理。以便更好的服务业务。
3、最后我们需要考虑性能与安全,往往注重了性能,但是忽略了安全。往往过于注重安全,对性能又会产生影响。比如:我们在设计防火墙功能时,检测过于严密,这样就会给性能带来影响。那么如果对于性能完全追求,却不顾服务的安全,这个也会造成很大的隐患,所以需要评估好两者的关系,把握好两者的孰重孰轻。以及整体的相关性,权衡好对应的点。
从OSI模型考虑优化方向
硬件 代理(CPU) 静态(磁盘IO) 动态(cpu、内存)
网络 带宽、丢包、延迟
系统 文件描述符(文件句柄数)
应用 服务与服务保持长连接 http1.1
服务 静态资源服务优化
压力测试工具
在系统业务量没有增长之前,我们就要做好相应的准备工作,以防患业务量突增带来的接口压力,所以对于接口压力测试就显得非常重要了,我们首先要评估好系统压力,然后使用工具检测当前系统情况,是否能满足对应压力的需求。
安装ab压力测试工具
[root@web01 conf.d]# yum install httpd-tools -y
压测工具使用方式
[root@web01 ~]# ab -n 200 -c 2 http://127.0.0.1/
-n 要执行的请求数
-c 请求的并发数
-k 是否开启长连接
[root@web01 conf.d]# ab
ab: wrong number of arguments
Usage: ab [options] [http[s]://]hostname[:port]/path
配置Nginx静态网站与tomcat动态网站环境
配置nginx
[root@lb01 conf.d]# cat try.conf
server {
    listen 80;
    server_name try.ahui.com;

    location / {
    root /code;
        try_files $uri $uri/ @java;
    index index.jsp index.html;
    }

    location @java {
    proxy_pass http://172.16.1.8:8080;
    }
}
配置nginx使用的静态页面
[root@lb01 conf.d]# echo "nginx ab" > /code/ab.html
配置tomcat使用的静态页面
[root@web02 ~]# wget http://mirrors.hust.edu.cn/apache/tomcat/tomcat-9/v9.0.16/bin/apache-tomcat-9.0.16.tar.gz
[root@web02 ~]# tar xf apache-tomcat-9.0.16.tar.gz
[root@web02 ~]# cd /usr/share/tomcat/webapps/ROOT
[root@web02 ROOT]# echo "ahui_tomcat" > tomcat.html
压测工具测试nginx处理静态资源
[root@lb01 conf.d]# ab -n 10000 -c 200 http://try.ahui.com/ab.html

Server Software:        nginx/1.14.2
Server Hostname:        try.ahui.com
Server Port:            80

Document Path:          /ab.html
Document Length:        9 bytes

Concurrency Level:      200
Time taken for tests:   1.078 seconds
Complete requests:      10000
Failed requests:        0
Write errors:           0
Total transferred:      2380000 bytes
HTML transferred:       90000 bytes
Requests per second:    9272.58 [#/sec] (mean)
Time per request:       21.569 [ms] (mean)
Time per request:       0.108 [ms] (mean, across all concurrent requests)
Transfer rate:          2155.15 [Kbytes/sec] received
压测工具测试tomcat处理静态资源
[root@lb01 conf.d]# ab -n 10000 -c 200 http://try.ahui.com/tomcat.html

Server Software:        nginx/1.14.2
Server Hostname:        try.ahui.com
Server Port:            80

Document Path:          /tomcat.html
Document Length:        13 bytes

Concurrency Level:      200
Time taken for tests:   4.956 seconds
Complete requests:      10000
Failed requests:        0
Write errors:           0
Total transferred:      2510000 bytes
HTML transferred:       130000 bytes
Requests per second:    2017.78 [#/sec] (mean)
Time per request:       99.119 [ms] (mean)
Time per request:       0.496 [ms] (mean, across all concurrent requests)
Transfer rate:          494.59 [Kbytes/sec] received
了解影响性能指标
1、网络
(1)网络的流量
(2)网络是否丢包
(3)这些会影响http的请求与调用
2、系统
(1)硬件有没有磁盘损坏,磁盘速率
(2)系统的负载、内存、系统稳定性
3、服务
(1)连接优化。请求优化
(2)根据业务形态做对应的服务设置
4、程序
(1)接口性能
(2)处理速度
(3)程序执行效率
5、数据库
每个服务与服务之间都或多或少有一些关联,我们需要将整个架构进行分层,找到对应系统或服务的短板,然后进行优化
系统性能优化
文件句柄,Linux一切皆文件,文件句柄可以理解为就是一个索引,文件句柄会随着我们进程的调用频繁增加,系统默认文件句柄是有限制的,不能让一个进程无限的调用,所以我们需要限制每个 进程和每个服务使用多大的文件句柄,文件句柄也是必须要调整的优化参数。
文件句柄的设置方式:
1、系统全局性修改。
2、用户局部性修改。
3、进程局部性修改。
1、系统全局性修改。
* 代表所有用户
[root@lb01 ~]# vim /etc/security/limits.conf
...
* soft nofile 25535
* hard nofile 25535
...
2.用户局部性修改
针对root用户,soft仅提醒,hard限制,nofile打开最大文件数
[root@lb01 ~]# vim /etc/security/limits.conf
...
root soft nofile 65535
root hard nofile 65535
...
3.进程局部性修改
#针对nginx进程,nginx自带配置
[root@lb01 ~]# vim /etc/security/limits.conf
...
worker_rlimit_nofile 30000
...
4.调整内核参数:让time_wait状态重用(端口重用)[flag]
[root@web01 ROOT]# vim /etc/sysctl.conf
net.ipv4.tcp_tw_reuse = 1     # 开启端口复用
net.ipv4.tcp_timestamps = 0   # 禁用时间戳
[root@web01 ROOT]# sysctl -p    #可以查看我们添加的内核参数
[root@web01 ROOT]# sysctl -a    #可以查看所有内核参数
在高并发短连接的TCP服务器上,当服务器处理完请求后立刻主动正常关闭连接。这个场景下会出现大量socket处于TIME_WAIT状态。如果客户端的并发量持续很高,此时部分客户端就会显示连接不上。 我来解释下这个场景。主动正常关闭TCP连接,都会出现TIMEWAIT。
为什么我们要关注这个高并发短连接呢?有两个方面需要注意:
(1).高并发可以让服务器在短时间范围内同时占用大量端口,而端口有个0~65535的范围,并不是很多,刨除系统和其他服务要用的,剩下的就更少了。
(2).在这个场景中,短连接表示业务处理+传输数据的时间 远远小于 TIMEWAIT超时的时间的连接。
这里有个相对长短的概念,比如取一个web页面,1秒钟的http短连接处理完业务,在关闭连接之后,这个业务用过的端口会停留在TIMEWAIT状态几分钟,而这几分钟,其他HTTP请求来临的时候是无法占用此端口的(占着茅坑不拉翔)。单用这个业务计算服务器的利用率会发现,服务器干正经事的时间和端口(资源)被挂着无法被使用的时间的比例是 1:几百,服务器资源严重浪费。(说个题外话,从这个意义出发来考虑服务器性能调优的话,长连接业务的服务就不需要考虑TIMEWAIT状态。同时,假如你对服务器业务场景非常熟悉,你会发现,在实际业务场景中,一般长连接对应的业务的并发量并不会很高。
禁止时间戳,防止丢弃因网络等原因延迟传输来的数据包。
代理服务优化
通常nginx作为代理服务,负责转发用户的请求,那么在转发的过程中建议开启HTTP长连接,用于减少握手次数,降低服务器损耗。
长连接语法示例(应用层面优化)
Syntax: keepalive connection;
Default: -
Context: upstream
该指令出现在1.1.4版中
配置nginx代理服务使用长连接方式
upstream http_backend {
    server 127.0.0.1:8080;
    keepalive 16;   #长连接
}

server {
    ...
    location /http/ {
        proxy_pass http://http_backend;
        proxy_http_version 1.1;         #对于http协议应该指定为1.1
        proxy_set_header Connection ""; #清除“connection”头字段
        proxy_next_upstream error timeout http_500 http_502 http_503 http_504;  #平滑过渡
        proxy_set_header Host $http_host;
        proxy_set_header X-Real-IP $remote_addr;
        proxy_set_header X-Forwared-For $proxy_add_x_forwarded_for;
        proxy_connect_timeout 30s;      # 代理连接web超时时间
        proxy_read_timeout 60s;         # 代理等待web响应超时时间
        proxy_send_timeout 60s;         # web回传数据至代理超时时间
        proxy_buffering on;             # 开启代理缓冲区,web回传数据至缓冲区,代理边收边传返回给客户端
        proxy_buffer_size 32k;          # 代理接收web响应的头信息的缓冲区大小
        proxy_buffers 4 128k;           # 缓冲代理接收单个长连接内包含的web响应的数量和大小
    ...
    }
}
对于fastcgi服务器,需要设置fastcgi_keep_conn以便保持长连接[flag]
upstream fastcgi_backend {
    server 127.0.0.1:9000;
    keepalive 8;
}

server {
    ...
    location /fastcgi/ {
        fastcgi_pass fastcgi_backend;
        fastcgi_param  SCRIPT_FILENAME  $document_root$fastcgi_script_name;
        fastcgi_keep_conn on;
        fastcgi_connect_timeout 60s;
        include fastcgi_params;
        ...
    }
}
注意:
1.scgi和uwsgi协议没有保持连接的概念。
2.但无论是proxy、fastcgi、uwsgi协议都有cache缓存的功能,开启后可加速网站访问的效率。(取决硬件)
keepalive_requests设置通过一个keepalive连接提供的最大请求数,在发出最大请求数后,将关闭连接
Syntax: keepalive_requests number;
Default: keepalive_requests 100;
Context: upstream
该指令出现在1.15.3版中
keepalive_timeout设置超时,再次期间与代理服务器的空闲keepalive连接将保持打开状态
Syntax: keepalive_timeout timeout;
Default: keepalive_timeout 60s;
Context: upstream
该指令出现在1.15.3版中
静态资源优化
Nginx作为静态资源Web服务器,用于静态资源处理,传输非常的高效

静态资源指的是非WEB服务器端运行处理而生成的文件
静态资源类型 种类
浏览器渲染 HTML、CSS、JS
图片文件 JPEG、GIF、PNG
视频文件 FLV、Mp4、AVI
其他文件 TXT、DOC、PDF、…
| 静态资源类型 | 种类 |
|---|---|
| 浏览器渲染 | HTML、CSS、JS |
| 图片文件 | JPEG、GIF、PNG |
| 视频文件 | FLV、Mp4、AVI |
| 其他文件 | TXT、DOC、PDF、… |
静态资源缓存
浏览器缓存设置用于提高网站性能,尤其是新闻网站,图片一旦发布,改动的可能是非常小的,所以我们希望能否用户访问一次后,图片缓存在用户的浏览器长时间缓存。 浏览器是有自己的缓存机制,他是基于HTTP协议缓存机制来实现的,在HTTP协议中有很多头信息,那么实现浏览器的缓存就需要依赖特殊的头信息来与服务器进行特殊的验证,如Expires(http/1.0);Cache-control(http/1.1)。


浏览器缓存过期校验机制

说明:
1、浏览器请求服务器会先进行Expires、Cache-Control的检查,检查缓存是否过期,如果没有过期则直接从缓存文件中读取。
2、如果缓存过期首先检查是否存在etag,如果存在那么客户端会向web服务器请求If-None-Match,与etag值进行比对,有服务器决策返回200还是304。
3、如果etag不存在,则进行last-Modified检查,客户端会向web服务器请求if-Modified-Since,与last-Modified进行比对,有服务器决策返回200还是304。
Last-Modified:服务器上文件的最后修改时间
Etag:文件标识
Expires:本地缓存目录中,文件过期的时间(由服务器指定具体的时间)
Cache-control:本地缓存目录中,文件过期的时间(由服务器指定过期的间隔时间,由于浏览器根据间隔生成具体的时间)
如何配置静态资源缓存expires
Syntax: expires [modified] time;
        epoch | max | off;
Default: expires off;
Context: http, server, location, if in location
作用:添加Cache-Control Expires头
配置静态资源缓存场景
server {
    listen 80;
    server_name static.ahui.com;

    location ~ .*\.(jpg|gif|png)$ {
        expires      7d;
    }
    location ~ .*\.(js|css)$ {
        expires      30d;
    }
}
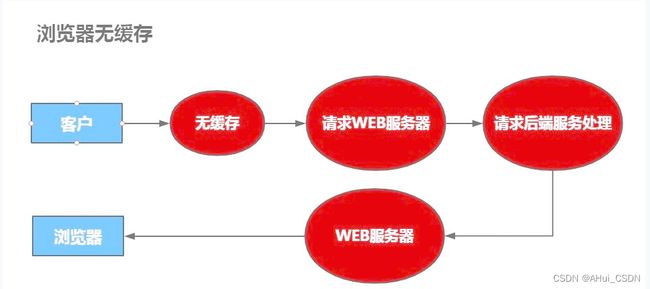
如果开发代码没有正式上线,希望静态文件不被缓存
location ~ .*\.(js|css|html)$ {
    add_header Cache-Control no-store;
    add_header Pragma no-cache;
}
取消js、css、html等静态文件缓存
静态资源读取
文件读取高效sendfile
Syntax: sendfile on | off;
Default: sendfile off;
Context: http, server, location, if in location
传统读取文件方式 VS sendfile读取文件方式
将多个包一次发送,用于提升网络传输效率,大文件推荐打开,需要开启sendfile才行
Syntax: tcp_nopush on | off;
Default: tcp_nopush off;
Context: http, server, location
提高网络传输实时性,需要开启keepalive,来一个包发一个包不等待行
Syntax: tcp_nodelay on | off;
Default: tcpnodelay off;
Context: http, server, location
静态资源压缩
Nginx将响应报文发送至客户端之前启用压缩功能,然后进行传输,这能够有效地节约带宽,并提高响应至客户端的速度。

gzip传输压缩,传输前压缩,传输后解压
Syntax: gzip on | off;
Default: gzip off;
Context: http, server, location, if in location
gzip压缩哪些文件
Syntax: gzip_types mime-type ...;
Default: gzip_types text/html;
Context: http, server, location
gzip压缩比率,加快传输,但压缩本身比较耗费服务器性能
Syntax: gzip_comp_level level;
Default:gzip_comp_level level 1;
Context: http, server, location
gzip压缩协议版本,压缩使用在http哪个协议,主流选择1.1版本
Syntax: gzip_http_version 1.0 | 1.1;
Default:gzip_http_version 1.1;
Context: http, server, location
静态文件压缩案例
[root@lb01 conf.d]# cat try.conf
server {
    listen 80;
    server_name try.ahui.com;
    location ~ .*\.(jpg|png|gif) {
        root /code/images;
        #gzip on;
        #gzip_types image/jpeg image/gif image/png;
        #gzip_comp_level 2;
        #gzip_http_version 1.1;
    }
    location ~ .*\.(txt|xml|html|json|js|css)$ {
        gzip on;
        gzip_http_version 1.1;
        gzip_comp_level 1;
        gzip_types text/plain application/json application/x-javascript application/css application/xml text/javascript;
    }
}


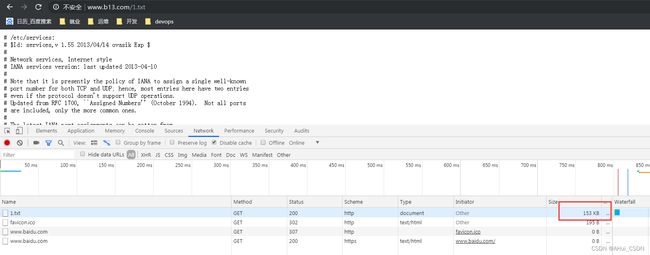
从上图可以看出,gzip对于压缩图片的比率不太明显,没有压缩545K,压缩后539K


对于文件的压缩,655K可以压缩到153K压缩的比率很高。
防止资源盗链
防盗链,指的是防止资源被其他网站恶意盗用。
基础防盗链设置思路:主要是针对客户端请求过程中所携带的一些Header信息来验证请求的合法性,比如客户端在请求的过程中都会携带referer信息。优点是规则简单,配置和使用都很方便,缺点是防盗链所依赖的Referer验证信息是可以伪造的,所以通过referer信息防盗链并非100%可靠,但是他能够限制大部分的盗链情况。
Syntax: valid_referers none | blocked | server_name | string ...;
Default: -;
Context: server, location

#none: referer来源头部为空的情况
#blocked: referer来源头部不为空,这些都不以http://或者https://开头
#server_name: 来源头部信息包含当前域名,可以正则匹配
在盗链服务器上准备html文件,偷取我的图片
<html>
<head>
    <meta charset="utf-8">
    <title>ahui.com</title>
</head>
<body style="background-color:pink;">
    <center><img src="https://web.ahui.com/daolian.jpg"/></center>
</body>
</html>
服务器上配置防盗链
location ~ .*\.(jpg|png|gif) {
         root /var/www/wordpress/wp-content/extra/;
         valid_referers none blocked *.ahui.com;
         if ( $invalid_referer ) {
            return 403;
        }
}
以上配置含义表示,所有来自*.ahui.com都可以访问到当前站点的图片,如果来源域名不在这个列表中,那么$invalid_referer等于1,在if语句中返回一个403个客户,这样用户便会看到一个403的页面
如果不使用return而是用rewrite,那么盗链图片会返回一个pei.jpg给用户
防盗链demo
location ~ .*\.(jpg|png|gif) {
            root /var/www/wordpress/wp-content/extra/;
            valid_referers none blocked *.ahui.com;
            if ( $invalid_referer ) {
                rewrite ^(.*)$ /Picture/daolian1.gif break;
            }
}
如果希望某些网站可以盗链
location ~ .*\.(jpg|png|gif) {
    root /data;
    valid_referers none blocked *.ahui.com server_name ~\.google\. ~\.baidu\.;
    if ( $invalid_referer ) {
        return 403;
    }
}
当然这种防护并不能百分百保证资源不被盗链,因为我们可以通过命令来修改来源的refer信息
伪造协议头访问
[root@web01 code]# curl -e "https://www.baidu.com" -I http://test.ahui.com/Picture/daolian.jpg
HTTP/1.1 403 Forbidden
Server: nginx
Date: Thu, 10 Oct 2019 09:01:05 GMT
Content-Type: text/html; charset=utf-8,gbk
Content-Length: 162
Connection: keep-alive
伪造协议头访问
[root@web01 code]# curl -e "https://www.ahui.com" -I http://test.ahui.com/Picture/daolian.jpg
HTTP/1.1 200 OK
Server: nginx
Date: Thu, 10 Oct 2019 09:01:35 GMT
Content-Type: image/jpeg
Content-Length: 556417
Last-Modified: Thu, 10 Oct 2019 07:14:19 GMT
Connection: keep-alive
ETag: "5d9eda4b-87d81"
Accept-Ranges: bytes
模拟盗链实例
配置被盗链机器
10.0.0.8 static.ahui.com
1.配置Nginx
[root@web02 conf.d]# cat static.conf
server {
    listen 80;
    server_name static.ahui.com;
    root /code;

    location / {
        index index.html;
    }
}
2.上传2张图片
一张是可以被盗链的图片
一张是广告位的图片
#3.重启服务器
[root@web02 code]# systemctl restart nginx
另一台机器盗链
10.0.0.7 dl.ahui.com 盗链服务器
1.配置Nginx
[root@web01 conf.d]# cat try.conf
server {
    server_name dl.ahui.com;
    listen 80;
    root /code;
    location / {
        index index.html;
    }
}
2.配置盗链的页面
[root@web01 code]# cat /code/tt.html
<html>
<head>
    <meta charset="utf-8">
    <title>ahui.comtitle>
head>
<body style="background-color:pink;">
    <img src="http://static.ahui.com/daolian.jpg"/>   #根据情况修改你的服务器地址
body>
html>
添加防盗链
location ~* \.(gif|jpg|png|bmp)$ {
    valid_referers none blocked *.ahui.com;
    if ($invalid_referer) {
        return 403;                         #可以选择直接返回403
        rewrite ^(.*)$ /daolian.png break;      #也可以选择返回一张水印的图片,给公司做广告
}
允许跨域访问
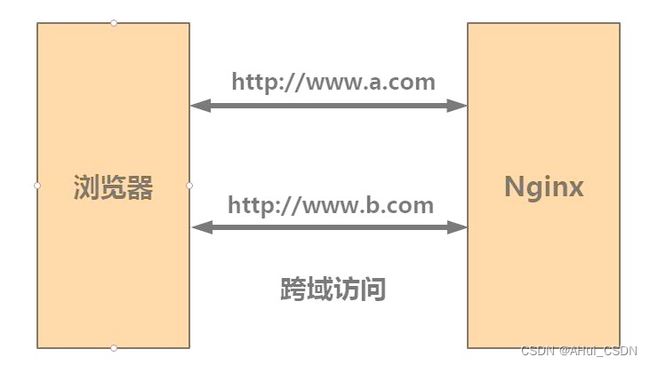
什么是跨域访问,当我们通过浏览器访问a网站时,同时会利用到ajax或其他方式,同时也请求b网站,这样的话就出现了请求一个页面,使用了两个域名,这种方式对浏览器来说默认是禁止的。
那Nginx语序跨站访问与浏览器有什么关系呢,因为浏览器会读取Access-Control-Allow-Origin的头信息,如果服务端允许,则浏览器不会进行拦截。
Syntax: add_header name value [always];
Default: -;
Context: http, server, location, if in location
在网站上准备跨域访问的文件
编辑nginx配置文件
[root@web02 code]# vim /etc/nginx/conf.d/s.conf
server {
        listen 80;
        server_name s.ahui.com;
        location / {
                root /code;
                index index.html;
        }
}
编辑html文件
[root@Nginx ~]# cat /code/tt.html
<html lang="en">
<head>
        <meta charset="UTF-8" />
        <title>测试ajax和跨域访问title>
        <script src="http://libs.baidu.com/jquery/2.1.4/jquery.min.js">script>
head>
<script type="text/javascript">
$(document).ready(function(){
        $.ajax({
        type: "GET",
        url: "http://web.ahui.com",
        success: function(data) {
                alert("sucess 成功了!!!");
        },
        error: function() {
                alert("fail!!,跨不过去啊,不让进去啊,只能...!");
        }
        });
});
script>
        <body>
                <h1>跨域访问测试h1>
        body>
html>
在被关联的网站配置
server {
        listen 80;
        server_name web.ahui.com;
        root /code;
        index index.html;
        charset utf-8;

        location ~ .*\.(html|htm)$ {
            add_header Access-Control-Allow-Origin *;
            add_header Access-Control-Allow-Methods GET,POST,PUT,DELETE,OPTIONS;
        }
}
CPU亲和配置
CPU亲和(affinity)减少进程之间不断频繁切换,减少性能损耗,其实现原理是建CPU核心和Nginx工作进程绑定方式,把每个worker进程固定到对应的cpu上执行,减少切换CPU的cache miss,获得更好的性能。

查看当前CPU物理状态
[root@tomcat01 ~]$ lscpu | grep "CPU(s)"
CPU(s):                8
On-line CPU(s) list:   0-7
NUMA node0 CPU(s):     0-7
以上服务器有一颗物理CPU,上面有8个核心
将nginx worker进程绑定至不通的核心上,官方建议与CPU的核心保持一致
第一种绑定组合方式(不推荐)
[root@nginx ~]# cat /etc/nginx/nginx.conf
...
worker_processes 12;
worker_cpu_affinity 000000000001 000000000010 000000000100 000000001000 000000010000 000000100000 000001000000 000010000000 000100000000 001000000000 010000000000 10000000000;
...
第二种方式(使用较少)
[root@nginx ~]# cat /etc/nginx/nginx.conf
...
worker_processes 2;
worker_cpu_affinity 101010101010 010101010101;
...
第三种最佳绑定方式,修改nginx启动的work进程为自动。
[root@nginx ~]# cat /etc/nginx/nginx.conf
...
worker_processes  auto;
worker_cpu_affinity auto;
...
查看nginx worker进程绑定至对应cpu
[root@web01 ~]# ps -eo pid,args,psr|grep [n]ginx
  1242 nginx: master process /usr/   2
  1243 nginx: worker process         0
  1244 nginx: worker process         1
  1245 nginx: worker process         2
  1246 nginx: worker process         3
通用优化配置
nginx优化总结,nginx通用优化配置文件
[root@nginx ~]# cat nginx.conf
user www;                   # nginx进程启动用户
worker_processes auto;      #与cpu核心一致即可
worker_cpu_affinity auto;   # cpu亲和

error_log /var/log/nginx/error.log warn;    # 错误日志
pid /run/nginx.pid;
worker_rlimit_nofile 35535;     #每个work能打开的文件描述符,调整至1w以上,负荷较高建议2-3w

events {
    use epoll;                  # 使用epoll高效网络模型
    worker_connections 10240;   # 限制每个进程能处理多少个连接,10240x[cpu核心]
}

http {
    include             mime.types;
    default_type        application/octet-stream;
    charset utf-8;      # 统一使用utf-8字符集

    # 定义日志格式
    log_format  main  '$remote_addr - $remote_user [$time_local] "$request" '
                      '$status $body_bytes_sent "$http_referer" '
                      '"$http_user_agent" "$http_x_forwarded_for"';

    #定义json日志格式
    log_format json_access '{"@timestamp":"$time_iso8601",'
                      '"host":"$server_addr",'
                      '"clientip":"$remote_addr",'
                      '"size":$body_bytes_sent,'
                      '"responsetime":$request_time,'
                      '"upstreamtime":"$upstream_response_time",'
                      '"upstreamhost":"$upstream_addr",'
                      '"http_host":"$host",'
                      '"url":"$uri",'
                      '"domain":"$host",'
                      '"xff":"$http_x_forwarded_for",'
                      '"referer":"$http_referer",'
                      '"status":"$status"}';

    access_log  /var/log/nginx/access.log  main;    # 访问日志

    server_tokens off;  # 禁止浏览器显示nginx版本号
    client_max_body_size 200m;  # 文件上传大小限制调整

    # 文件高效传输,静态资源服务器建议打开
    sendfile            on;
    tcp_nopush          on;
    # 文件实时传输,动态资源服务建议打开,需要打开keepalive
    tcp_nodelay         on;
    keepalive_timeout   65;

    # Gzip 压缩
    gzip on;
    gzip_disable "MSIE [1-6]\.";    #针对IE浏览器不进行压缩
    gzip_http_version 1.1;
    gzip_comp_level 2;      #压缩级别
    gzip_buffers 16 8k;     #压缩的缓冲区
    gzip_min_length 1024;   #文件大于1024字节才进行压缩,默认值20
    gzip_types text/plain text/css application/json application/x-javascript text/xml application/xml application/xml+rss text/javascript image/jpeg;

    # 虚拟主机
    include /etc/nginx/conf.d/*.conf;
}
Nginx安全与优化总结
1、CPU亲和、worker进程数、调整每个worker进程打开的文件数
2、使用额pool网络模型、调整每个worker进程的最大连接数
3、文件的高效读取sendfile、no铺设
4、文件的传输实时性、nodealy
5、开启tcp长连接,以及长连接超时时间keepalived
6、开启文件传输压缩gzip
7、开启静态文件expires缓存
8、异常nginx版本号
9、禁止通过ip地址访问,禁止恶意域名解析,只允许域名访问
10、配置防盗链、以及跨域访问
11、防DDOS、cc攻击,限制单IP并发连接,以及http请求
12、优雅限制nginx错误页面
13、nginx加密传输https优化
14、nginx proxy_cache、fastcgi_cache、uwsgi_cache 缓存,第三方工具(squid、varnish)


