12.1搭建LNMP、搭建wordpress、知乎、edusoho、拆分数据库、扩展web服务器、搭建文件共享、实时备份、12.2代理的定义、模块、实践
一、回顾
1.搭建LNMP环境
2.搭建wordpress
二、搭建LNMP
1.配置官方源
2.yum安装nginx
3.配置nginx
4.创建用户
5.启动
6.上传php包
7.安装
8.配置PHP
9.启动
10.安装mariadb
11.启动
12.设置数据库密码
13.使用密码连接数据库测试
三、搭建wordpress、知乎、edusoho
1.上传代码包
2.解压代码包
3.授权代码
4.配置nginx
1)配置wordpress的nginx
2)配置知乎的nginx配置
3)配置edusoho的nginx配置
4)重启nginx
5.配置本地hosts访问测试
6.数据库建库
7.创建数据库用户并授权
8.根据页面提示操作
四、拆分数据库
1.为什么要拆分
2.数据库拆分后解决了什么问题
3.环境准备
4.在新的服务器上搭建数据库(盖新房子)
5.配置数据库密码(装修)
6.测试连接远程数据库(测试房子能不能住人)
7.授权用户远程连接(想办法住)
8.再次测试连接(房子可以住了)
9.旧数据库导出数据(打包行李搬出房子)
10.将数据推送到新服务器(汽车运送行李)
11.将数据导入新数据库(将行李放入新房子)
1)库外导入
2)库内读取
3)任意门方式导数据
12.查看数据
13.修改项目中数据库地址(告知亲戚新家地址)
14.停掉旧数据库(拆迁旧家)
15.访问页面测试
五、扩展web服务器
1.环境准备
2.web02搭建nginx
1)配置官方源
2)安装nginx
3)创建用户
4)上传php包
5)解压安装php
6)同步web01的配置文件到web02
7)启动nginx和php服务
8)推送web01站点目录到web02
9)授权站点目录
10)修改本地hosts访问测试
六、搭建文件共享
1.环境准备
2.搭建NFS服务器
1)安装nfs
2)创建挂载目录
3)配置NFS
4)创建用户
5)授权
6)启动NFS
7)检查配置
3.配置客户端
1)安装nfs和rpcbind
2)启动rpcbind
3)查看挂载点
4)确定挂载目录
5)先推送挂载目录下的文件
6)挂载
七、实时备份
一、回顾
1.搭建LNMP环境
#搭建nginx
1.配置yum源
2.安装nginx
3.配置nginx
4.创建用户
5.启动服务

#搭建php
1.上传服务包
2.解压包
3.安装本地rpm包
4.配置php
5.启动

#搭建mariadb
1.安装
2.启动
3.连接测试
4.设置数据库的用户名密码
2.搭建wordpress
1.配置nginx
2.创建站点目录
3.上传代码包
4.解压
5.授权代码
6.重启nginx
7.配置hosts访问测试
8.数据库建库
9.根据页面提示配置数据库信息
10.使用博客
二、搭建LNMP
1.配置官方源
[root@web03 ~]# cat /etc/yum.repos.d/nginx.repo
[nginx-stable]
name=nginx stable repo
baseurl=http://nginx.org/packages/centos/7/$basearch/
gpgcheck=1
enabled=1
gpgkey=https://nginx.org/keys/nginx_signing.key
module_hotfixes=true
2.yum安装nginx
[root@web03 ~]# yum install -y nginx
3.配置nginx
[root@web03 ~]# vim /etc/nginx/nginx.conf
user  www;
...
http {
    client_max_body_size 200m;
}
4.创建用户
[root@web03 ~]# groupadd www -g 666
[root@web03 ~]# useradd www -u 666 -g 666 -s /sbin/nologin -M
5.启动
[root@web03 ~]# systemctl start nginx
[root@web03 ~]# systemctl enable nginx
6.上传php包
[root@web03 ~]# rz
[root@web03 ~]# ll
-rw-r--r--  1 root root 19889622 Nov 22 15:52 php.tar.gz
7.安装
[root@web03 ~]# tar xf php.tar.gz
[root@web03 ~]# yum localinstall -y *.rpm
8.配置PHP
[root@web03 ~]# vim /etc/php-fpm.d/www.conf
user = www
group = www

[root@web03 ~]# vim /etc/php.ini
upload_max_filesize = 200M
post_max_size = 200M
9.启动
[root@web03 ~]# systemctl start php-fpm
[root@web03 ~]# systemctl enable php-fpm
10.安装mariadb
[root@web03 ~]# yum install -y mariadb-server
11.启动
[root@web03 ~]# systemctl start mariadb
[root@web03 ~]# systemctl enable mariadb
12.设置数据库密码
[root@web03 ~]# mysqladmin -uroot password
New password: 123
Confirm new password: 123
13.使用密码连接数据库测试
[root@web03 ~]# mysql -uroot -p
Enter password: 123
三、搭建wordpress、知乎、edusoho
1.上传代码包
[root@web03 ~]# mkdir /code
[root@web03 ~]# cd /code/
[root@web03 code]# rz
[root@web03 code]# ll
total 86372
-rw-r--r-- 1 root root 68889387 Dec  1 09:07 edusoho-8.3.36.tar.gz
-rw-r--r-- 1 root root  8451194 Dec  1 09:07 WeCenter_3-2-1.zip
-rw-r--r-- 1 root root 11098483 Sep 12 17:52 wordpress-5.0.3-zh_CN.tar.gz
2.解压代码包
[root@web03 code]# tar xf edusoho-8.3.36.tar.gz
[root@web03 code]# tar xf wordpress-5.0.3-zh_CN.tar.gz
[root@web03 code]# unzip WeCenter_3-2-1.zip

[root@web03 code]# mv WeCenter_3-2-1 zhihu

[root@web03 code]# ll
drwxr-xr-x 10  501 games      115 Jul 18  2019 edusoho
drwxr-xr-x  5 1006  1006     4096 Jan 11  2019 wordpress
drwx------ 14 root root       296 Jun  4  2018 zhihu
3.授权代码
[root@web03 code]# chown -R www.www /code/
4.配置nginx
1)配置wordpress的nginx
[root@web03 ~]# vim /etc/nginx/conf.d/linux.wp.com.conf
server {
    listen 80;
    server_name linux.wp.com;

    location / {
        root /code/wordpress;
        index index.php;
    }

    location ~* \.php$ {
        fastcgi_pass 127.0.0.1:9000;
        fastcgi_param SCRIPT_FILENAME /code/wordpress/$fastcgi_script_name;
        include fastcgi_params;
    }
}
2)配置知乎的nginx配置
[root@web03 ~]# vim /etc/nginx/conf.d/linux.zh.com.conf
server {
    listen 80;
    server_name linux.zh.com;
    root /code/zhihu;

    location / {
        index index.php;
    }

    location ~* \.php$ {
        fastcgi_pass 127.0.0.1:9000;
        fastcgi_param SCRIPT_FILENAME $document_root$fastcgi_script_name;
        include fastcgi_params;
    }
}
3)配置edusoho的nginx配置
server {
    listen 80;
    server_name linux.edu.com;
    root /code/edusoho/web;

    location / {
    	index app.php;
    	try_files $uri @rewriteapp;
    }
    location @rewriteapp {
    	rewrite ^(.*)$ /app.php/$1 last;
    }
    location ~ ^/udisk {
    	internal;
    	root /var/www/edusoho/app/data/;
    }
    location ~ ^/(app|app_dev)\.php(/|$) {
        fastcgi_pass   127.0.0.1:9000;
        fastcgi_split_path_info ^(.+\.php)(/.*)$;
        include fastcgi_params;
        fastcgi_param SCRIPT_FILENAME $document_root$fastcgi_script_name;
        fastcgi_param HTTPS off;
        fastcgi_param HTTP_X-Sendfile-Type X-Accel-Redirect;
        fastcgi_param HTTP_X-Accel-Mapping /udisk=/code/edusoho/app/data/udisk;
        fastcgi_buffer_size 128k;
        fastcgi_buffers 8 128k;
    }
    # 配置设置图片格式文件
    location ~* \.(jpg|jpeg|gif|png|ico|swf)$ {
    	# 过期时间为3年
    	expires 3y;
    	# 关闭日志记录
    	access_log off;
    	# 关闭gzip压缩,减少CPU消耗,因为图片的压缩率不高。
    	gzip off;
    }
    # 配置css/js文件
    location ~* \.(css|js)$ {
    	access_log off;
    	expires 3y;
    }
    # 禁止用户上传目录下所有.php文件的访问,提高安全性
    location ~ ^/files/.*\.(php|php5)$ {
    	deny all;
    }
    # 以下配置允许运行.php的程序,方便于其他第三方系统的集成。
    location ~ \.php$ {
    	# [改] 请根据实际php-fpm运行的方式修改
    	fastcgi_pass 127.0.0.1:9000;
    	fastcgi_split_path_info ^(.+\.php)(/.*)$;
    	include fastcgi_params;
    	fastcgi_param  SCRIPT_FILENAME $document_root$fastcgi_script_name;
    	fastcgi_param HTTPS off;
    }
}
4)重启nginx
[root@web03 ~]# nginx -t
nginx: the configuration file /etc/nginx/nginx.conf syntax is ok
nginx: configuration file /etc/nginx/nginx.conf test is successful
[root@web03 ~]# systemctl restart nginx
5.配置本地hosts访问测试
10.0.0.9 linux.wp.com linux.zh.com

10.0.0.9 linux.wp.com
10.0.0.9 linux.zh.com
6.数据库建库
[root@web03 ~]# mysql -uroot -p
Enter password: 123
MariaDB [(none)]> show databases;
+--------------------+
| Database |
+--------------------+
| information_schema |
| mysql |
| performance_schema |
| test |
+--------------------+
4 rows in set (0.01 sec)
MariaDB [(none)]> create database wordpress;
Query OK, 1 row affected (0.00 sec)
MariaDB [(none)]> create database zhihu;
Query OK, 1 row affected (0.00 sec)
MariaDB [(none)]> show databases;
+--------------------+
| Database |
+--------------------+
| information_schema |
| mysql |
| performance_schema |
| test |
| wordpress |
| zhihu |
+--------------------+
6 rows in set (0.00 sec)
7.创建数据库用户并授权
MariaDB [(none)]> grant all on wordpress.* to wp@'172.16.1.%' identified by '123';
Query OK, 0 rows affected (0.07 sec)

MariaDB [(none)]> grant all on zhihu.* to zh@'172.16.1.%' identified by '123';
Query OK, 0 rows affected (0.00 sec)

#查看用户
MariaDB [(none)]> select user,host from mysql.user;
+------+------------+
| user | host       |
+------+------------+
| root | 127.0.0.1  |
| wp   | 172.16.1.% |
| zh   | 172.16.1.% |
| root | ::1        |
|      | db01       |
| root | db01       |
|      | localhost  |
| root | localhost  |
| wp   | localhost  |
| zh   | localhost  |
+------+------------+
10 rows in set (0.00 sec)
8.根据页面提示操作
四、拆分数据库
1.为什么要拆分
由于单台服务器运行LNMP架构会导致网站访问缓慢,当内存被占满时,很容易导致系统出现out of memory从而kill掉MySQL数据库,所以要将web和数据库进行独立部署。
2.数据库拆分后解决了什么问题
1.缓解web网站的压力
2.增强数据库读写性能
3.提高用户访问速度
3.环境准备

4.在新的服务器上搭建数据库(盖新房子)
[root@db01 ~]# yum install -y mariadb-server
5.配置数据库密码(装修)
[root@db01 ~]# systemctl start mariadb
[root@db01 ~]# mysqladmin -uroot password
New password: 123
Confirm new password: 123
6.测试连接远程数据库(测试房子能不能住人)
[root@web01 ~]# mysql -uroot -p -h 172.16.1.51
Enter password:
ERROR 1130 (HY000): Host '172.16.1.7' is not allowed to connect to this MariaDB server

mysql 			#数据库命令
-u				#指定用户
root 			#root用户
-p 				#使用数据库root用户的密码
123				#数据库root用户的密码
-h				#指定数据库的主机
172.16.1.51		#主机IP
7.授权用户远程连接(想办法住)
MariaDB [(none)]> create database wordpress;
Query OK, 1 row affected (0.00 sec)

MariaDB [(none)]> grant all on wordpress.* to wp@'172.16.1.%' identified by '1qaz@WSX';
Query OK, 0 rows affected (0.00 sec)

grant 				#数据库授权命令
all 				#所有权限
on					#在...上面
wordpress.* 		 #wordpress下面的所有表   库.表
to					#给...
wp@'172.16.1.%' 	 #数据库用户
identified			#设置密码
by 					#密码是...
'1qaz@WSX';			 #密码内容
8.再次测试连接(房子可以住了)
[root@web01 ~]# mysql -uwp -p -h 172.16.1.51
Enter password:
Welcome to the MariaDB monitor.  Commands end with ; or \g.
Your MariaDB connection id is 7
Server version: 5.5.68-MariaDB MariaDB Server

Copyright (c) 2000, 2018, Oracle, MariaDB Corporation Ab and others.

Type 'help;' or '\h' for help. Type '\c' to clear the current input statement.

MariaDB [(none)]> show databases;
+--------------------+
| Database           |
+--------------------+
| information_schema |
| test               |
| wordpress          |
+--------------------+
3 rows in set (0.00 sec)
9.旧数据库导出数据(打包行李搬出房子)
[root@web01 ~]# mysqldump -uroot -p -B wordpress > /tmp/wp.sql
Enter password: 123
10.将数据推送到新服务器(汽车运送行李)
[root@web01 ~]# scp /tmp/wp.sql 172.16.1.51:/tmp/
11.将数据导入新数据库(将行李放入新房子)
1)库外导入
[root@db01 ~]# mysql -uroot -p < /tmp/wp.sql
Enter password:
2)库内读取
MariaDB [wordpress]> source /tmp/wp.sql;
3)任意门方式导数据
[root@web01 ~]# mysql -uwp -p -h 172.16.1.51 < /tmp/wp.sql
Enter password: 1qaz@WSX
12.查看数据
MariaDB [(none)]> use wordpress;
Reading table information for completion of table and column names
You can turn off this feature to get a quicker startup with -A

Database changed
MariaDB [wordpress]> show tables;
+-----------------------+
| Tables_in_wordpress   |
+-----------------------+
| wp_commentmeta        |
| wp_comments           |
| wp_links              |
| wp_options            |
| wp_postmeta           |
| wp_posts              |
| wp_term_relationships |
| wp_term_taxonomy      |
| wp_termmeta           |
| wp_terms              |
| wp_usermeta           |
| wp_users              |
+-----------------------+
12 rows in set (0.00 sec)
13.修改项目中数据库地址(告知亲戚新家地址)
[root@web01 ~]# vim /code/wordpress/wp-config.php
/** WordPress数据库的名称 */
define('DB_NAME', 'wordpress');

/** MySQL数据库用户名 */
define('DB_USER', 'wp');

/** MySQL数据库密码 */
define('DB_PASSWORD', '1qaz@WSX');

/** MySQL主机 */
define('DB_HOST', '172.16.1.51');

[root@web03 ~]# vim /code/zhihu/system/config/database.phperm_relationships |
| wp_term_taxonomy      |
| wp_termmeta           |
| wp_terms              |
| wp_usermeta           |
| wp_users              |
+-----------------------+
12 rows in set (0.00 sec)
14.停掉旧数据库(拆迁旧家)
[root@web01 ~]# systemctl stop mariadb
15.访问页面测试
http://linux.wp.com/
五、扩展web服务器
1.环境准备

2.web02搭建nginx
1)配置官方源
[root@web01 ~]# scp /etc/yum.repos.d/nginx.repo 172.16.1.8:/etc/yum.repos.d/
2)安装nginx
[root@web02 ~]# yum install -y nginx
3)创建用户
[root@web02 ~]# groupadd www -g 666
[root@web02 ~]# useradd www -u 666 -g 666 -s /sbin/nologin -M
4)上传php包
[root@web02 ~]# rz
5)解压安装php
[root@web02 ~]# tar xf php.tar.gz
[root@web02 ~]# yum localinstall -y *.rpm
6)同步web01的配置文件到web02
#同步nginx配置文件
[root@web01 ~]# scp /etc/nginx/nginx.conf 172.16.1.8:/etc/nginx/
[root@web01 ~]# scp /etc/nginx/conf.d/linux.wp.com.conf 172.16.1.8:/etc/nginx/conf.d/

#同步php的配置
[root@web01 ~]# scp /etc/php-fpm.d/www.conf 172.16.1.8:/etc/php-fpm.d/
[root@web01 ~]# scp /etc/php.ini 172.16.1.8:/etc/
7)启动nginx和php服务
[root@web02 ~]# systemctl start nginx
[root@web02 ~]# systemctl enable nginx
[root@web02 ~]# systemctl start php-fpm
[root@web02 ~]# systemctl enable php-fpm
8)推送web01站点目录到web02
[root@web01 ~]# scp -r /code 172.16.1.8:/
9)授权站点目录
[root@web02 ~]# chown -R www.www /code/
10)修改本地hosts访问测试
#10.0.0.7 linux.wp.com
10.0.0.8 linux.wp.com
六、搭建文件共享
1.环境准备

2.搭建NFS服务器
1)安装nfs
[root@nfs ~]# yum install -y nfs-utils
2)创建挂载目录
[root@nfs ~]# mkdir /data/wp -p
3)配置NFS
[root@nfs ~]# vim /etc/exports
/data/wp 172.16.1.0/24(rw,sync,all_squash,anonuid=666,anongid=666)
4)创建用户
5)授权
[root@nfs ~]# chown -R www.www /data/
6)启动NFS
[root@nfs ~]# systemctl start nfs
7)检查配置
[root@nfs ~]# cat /var/lib/nfs/etab
/data/wp	172.16.1.0/24(rw,sync,wdelay,hide,nocrossmnt,secure,root_squash,all_squash,no_subtree_check,secure_locks,acl,no_pnfs,anonuid=666,anongid=666,sec=sys,rw,secure,root_squash,all_squash)
3.配置客户端
1)安装nfs和rpcbind
[root@web01 ~]# yum install -y nfs-utils rpcbind
2)启动rpcbind
3)查看挂载点
[root@web01 ~]# showmount -e 172.16.1.31
Export list for 172.16.1.31:
/data/wp 172.16.1.0/24
4)确定挂载目录
[root@web01 ~]# ll /code/wordpress/wp-content/uploads/
5)先推送挂载目录下的文件
[root@web01 ~]# rsync -avz /code/wordpress/wp-content/uploads/ 172.16.1.31:/data/wp/
[root@web02 ~]# rsync -avz /code/wordpress/wp-content/uploads/ 172.16.1.31:/data/wp/

#验证文件
[root@nfs ~]# ll /data/wp/2020/12/
6)挂载
[root@web01 ~]# mount -t nfs 172.16.1.31:/data/wp /code/wordpress/wp-content/uploads
[root@web02 ~]# mount -t nfs 172.16.1.31:/data/wp /code/wordpress/wp-content/uploads
4.backup服务器搭建rsync服务端
1)安装
[root@backup ~]# yum install -y rsync
2)配置rsync
[root@backup ~]# vim /etc/rsyncd.conf
uid = www
gid = www
port = 873
fake super = yes
use chroot = no
max connections = 200
timeout = 600
ignore errors
read only = false
list = true
auth users = rsync_backup
secrets file = /etc/rsync.passwd
log file = /var/log/rsyncd.log
#####################################
[web_data]
comment = "该备份文件是web端挂载到nfs服务器的文件"
path = /data
3)创建用户
[root@backup ~]# groupadd www -g 666
[root@backup ~]# useradd www -u 666 -g 666
4)创建密码文件并授权
[root@backup ~]# echo "rsync_backup:123456" > /etc/rsync.passwd
#授权
[root@backup ~]# chmod 600 /etc/rsync.passwd
5)创建真实目录并授权
[root@backup ~]# mkdir /data
[root@backup ~]# chown -R www.www /data/
6)启动服务
[root@backup ~]# systemctl start rsyncd
#验证启动
[root@backup ~]# ps -ef | grep rsync
root 25733 1 0 15:24 ? 00:00:00 /usr/bin/rsync --daemon --no-
detach
七、实时备份----sersync 实时同步
1.什么是实时同步?
实时同步是一种只要当前目录发生变化则会触发一个事件,事件触发后会将变化的目录同步至远程服务器。
2.为什么使用?
保证数据的连续性, 减少人力维护成本,解决nfs单点故障
3.实时同步工具选择?
sersync + RSYNC(√)、inotify + rsync
Inotify是一个通知接口,用来监控文件系统的各种变化,如果文件存取,删除,移动。可以非常方便地实现文件异动告警,增量备份,并针对目录或文件的变化及时作出响应。rsync + inotify 可以做到实时同步
sersync是国人基于rsync+inotify-tools开发的工具,不仅保留了优点同时还强化了实时监控,文件过滤,简化配置等功能,帮助用户提高运行效率,节省时间和网络资源。
sersync项目地址:https://github.com/wsgzao/sersync
4.安装sersync
1)安装rsync和inotify
[root@nfs ~]# yum install -y inotify-tools rsync
2)上传或下载sersync包
[root@nfs ~]# rz sersync2.5.4_64bit_binary_stable_final.tar.gz
[root@nfs ~]# wget
3)解压安装
[root@nfs ~]# tar xf sersync2.5.4_64bit_binary_stable_final.tar.gz
4)移动目录并改名
[root@nfs ~]# mv GNU-Linux-x86 /usr/local/sersync
5)配置sersync
[root@nfs ~]# vim /usr/local/sersync/confxml.xml
... ...

#inotify 监控的动作
start="true"/>
start="true"/>
start="true"/>
start="true"/>
start="true"/>
start="true"/>
start="true"/>
start="true"/>
</inotify>

#监控的目录
"/data">
#远端rsync服务器的地址和模块
"172.16.1.41" name="web_data"/>
</localpath>

#rsync的参数
"-az"/>
#开启认证 #虚拟用户 #指定虚拟用户的密码文件
start="true" users="rsync_backup"
passwordfile="/etc/rsync.passwd"/>
#如果远端rsync服务不是873端口,则开启并修改
start="false" port="874"/><!-- port=874 -->
#超时时间
start="false" time="100"/><!-- timeout=100 -->
start="false"/>
</rsync>
#错误日志存储路径
"/tmp/rsync_fail_log.sh" timeToExecute="60"/><!--default
every 60mins execute once-->
#定时任务,开启后,600分钟默认全备一次
start="false" schedule="600"><!--600mins-->
start="false">
"*.php"></exclude>
"info/*"></exclude>
</crontabfilter>
</crontab>
start="false" name="command"/>
</sersync>
... ...
6)创建虚拟用户密码文件
[root@nfs ~]# echo '123456' > /etc/rsync.passwd
[root@nfs ~]# chmod 600 /etc/rsync.passwd
7)启动服务
[root@nfs ~]# /usr/local/sersync/sersync2 -h
set the system param
execute:echo 50000000 > /proc/sys/fs/inotify/max_user_watches
execute:echo 327679 > /proc/sys/fs/inotify/max_queued_events
parse the command param
_______________________________________________________
参数-d:启用守护进程模式
参数-r:在监控前,将监控目录与远程主机用rsync命令推送一遍
参数-n: 指定开启守护线程的数量,默认为10个
参数-o:指定配置文件,默认使用confxml.xml文件
参数-m:单独启用其他模块,使用 -m refreshCDN 开启刷新CDN模块
参数-m:单独启用其他模块,使用 -m socket 开启socket模块
参数-m:单独启用其他模块,使用 -m http 开启http模块
不加-m参数,则默认执行同步程序
[root@nfs ~]# /usr/local/sersync/sersync2 -dro /usr/local/sersync/confxml.xml
八、测试
九、架构扩展
1.数据库迁移
1)迁移场景:1.配置不足服务 2.器寿命到期
2.web扩展
3.php拆分
1)安装php‘
[root@web03 ~]# rz
[root@web03 ~]# ll
-rw-r--r--  1 root root 19889622 Nov 22 15:52 php.tar.gz
[root@web03 ~]# tar xf php.tar.gz
[root@web03 ~]# yum localinstall -y *.rpm
2)配置php
[root@web03 ~]# vim /etc/php-fpm.d/www.conf
user = www
group = www
[root@web03 ~]# vim /etc/php.ini
upload_max_filesize = 200M
post_max_size = 200M
3)创建用户
[root@web03 ~]# groupadd www -g 666
[root@web03 ~]# useradd www -u 666 -g 666
4)启动
[root@web03 ~]# systemctl start php-fpm
5)配置nginx调用远端的php
[root@web01 ~]# vim /etc/nginx/conf.d/linux.wp.com.conf
server {
    listen 80;
    server_name linux.wp.com;

    location / {
        root /code/wordpress;
        index index.php;
    }

    location ~* \.php$ {
    	#协议代理到远端的php服务
        fastcgi_pass 172.16.1.9:9000;
        fastcgi_param SCRIPT_FILENAME /code/wordpress/$fastcgi_script_name;
        include fastcgi_params;
    }
}
6)重启nginx访问测试
[root@web01 ~]# nginx -t
nginx: the configuration file /etc/nginx/nginx.conf syntax is ok
nginx: configuration file /etc/nginx/nginx.conf test is successful
[root@web01 ~]# systemctl restart nginx

访问 http://linux.wp.com/,报错为 502 连接后端失败
7)进一步修改php配置
[root@web03 ~]# vim /etc/php-fpm.d/www.conf
listen = 172.16.1.9:9000
listen.allowed_clients = 172.16.1.7
8)再次重启访问
[root@web03 ~]# systemctl restart php-fpm

访问 http://linux.wp.com/,报错为 File not found.
#原因:php解析文件找不到
[root@
9)推送站点目录
[root@web01 ~]# scp -r /code 172.16.1.9:/

#授权
[root@web03 ~]# chown -R www.www /code/
10)再次访问测试
1.访问http://linux.wp.com/,没有问题
2.登录没有问题
3.上传图片出现问题
11)php服务器也要进行挂载
[root@web03 ~]# mount -t nfs 172.16.1.31:/data/wp /code/wordpress/wp-content/uploads
12)再次写文章上传图片

补充
一、代理
1.什么是代理
代理一词往往并不陌生, 如下图所示

2.没有代理
在没有代理模式的情况下,客户端和Nginx服务端,都是客户端直接请求服务端,服务端直接响应客户端。

3.有代理
那么在互联网请求里面,为了安全客户端往往无法直接向服务端发起请求,就需要用到代理服务,来实现客户端和服务端通信,如下图所示

4.Nginx代理服务常见模式
Nginx作为代理服务,按照应用场景模式进行总结,代理分为
1.正向代理
2.反向代理
1)正向代理
正向代理,(内部上网) 客户端 <—> 代理 -> 服务端

2)反向代理
反向代理,用于公司集群架构中,客户端 -> 代理 <—> 服务端

3)正向代理与反向代理的区别
1.区别在于形式上服务的”对象”不一样
2.正向代理代理的对象是客户端,为客户端服务
3.反向代理代理的对象是服务端,为服务端服务
二、Nginx代理服务支持协议
1.支持的协议

2.反向代理使用协议
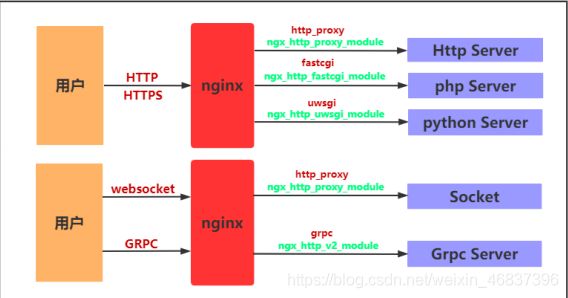
3.模块总结
反向代理模式与Nginx代理模块总结如表格所示

三、Nginx代理常用参数
1.添加发往后端服务器的请求头信息
Syntax:    proxy_set_header field value;
Default:    proxy_set_header Host $http_host;
            proxy_set_header Connection close;
Context:    http, server, location

# 用户请求的时候HOST的值是linux.proxy.com, 那么代理服务会像后端传递请求的还是linux.proxy.com
proxy_set_header Host $http_host;
# 将$remote_addr的值放进变量X-Real-IP中,$remote_addr的值为客户端的ip
proxy_set_header X-Real-IP $remote_addr;
# 客户端通过代理服务访问后端服务, 后端服务通过该变量会记录真实客户端地址
proxy_set_header X-Fo1rwarded-For $proxy_add_x_forwarded_for;
2.代理到后端的TCP连接、响应、返回等超时时间
#nginx代理与后端服务器连接超时时间(代理连接超时)
Syntax: proxy_connect_timeout time;
Default: proxy_connect_timeout 60s;
Context: http, server, location

#nginx代理等待后端服务器的响应时间
Syntax:    proxy_read_timeout time;
Default:    proxy_read_timeout 60s;
Context:    http, server, location

#后端服务器数据回传给nginx代理超时时间
Syntax: proxy_send_timeout time;
Default: proxy_send_timeout 60s;
Context: http, server, location
3.proxy_buffer代理缓冲区
#nignx会把后端返回的内容先放到缓冲区当中,然后再返回给客户端,边收边传, 不是全部接收完再传给客户端
Syntax: proxy_buffering on | off;
Default: proxy_buffering on;
Context: http, server, location

#设置nginx代理保存用户头信息的缓冲区大小
Syntax: proxy_buffer_size size;
Default: proxy_buffer_size 4k|8k;
Context: http, server, location

#proxy_buffers 缓冲区
Syntax: proxy_buffers number size;
Default: proxy_buffers 8 4k|8k;
Context: http, server, location
4.配置代理优化文件
[root@lb01 ~]# vim /etc/nginx/proxy_params
proxy_set_header Host $http_host;
proxy_set_header X-Real-IP $remote_addr;
proxy_set_header X-Forwarded-For $proxy_add_x_forwarded_for;
proxy_connect_timeout 10s;
proxy_read_timeout 10s;
proxy_send_timeout 10s;
proxy_buffering on;
proxy_buffer_size 8k;
proxy_buffers 8 8k;
5.代理调用优化文件
[root@lb01 ~]# vim /etc/nginx/conf.d/linux.proxy.com.conf
server {
    listen 80;
    server_name linux.proxy.com;

    location / {
        proxy_pass http://10.0.0.7:80;
        include proxy_params;
    }
}
四 nginx实践
1.环境准备

2.代理语法
Syntax:	proxy_pass URL;
Default:	—
Context:	location, if in location, limit_except
3.配置web01的nginx
[root@web01 ~]# vim /etc/nginx/conf.d/linux.proxy.com.conf
server {
    listen 80;
    server_name linux.proxy.com;

    location / {
        root /code/proxy;
        index index.html;
    }
}
4.web01编写一个网站
[root@web01 ~]# mkdir /code/proxy
[root@web01 ~]# echo "web01 web01 web01 wbe01 ...." > /code/proxy/index.html
[root@web01 ~]# chown -R www.www /code/
5.访问测试
1.配置hosts
10.0.0.7 linux.proxy.com

2.重启
[root@web01 ~]# systemctl restart nginx

3.访问
linux.proxy.com
6.配置代理
1.安装nginx
[nginx-stable]
name=nginx stable repo
baseurl=http://nginx.org/packages/centos/7/$basearch/
gpgcheck=1
enabled=1
gpgkey=https://nginx.org/keys/nginx_signing.key
module_hotfixes=true
yum安装
[root@web03 ~]# yum install -y nginx

2.配置nginx
[root@web03 ~]# vim /etc/nginx/nginx.conf

user www;

3.创建用户
 groupadd www -g 666
  useradd www -u 666 -g 666 -s /sbin/nologin -M

4.配置nginx代理
[root@lb01 ~]# vim /etc/nginx/conf.d/linux.proxy.com.conf
server {
    listen 80;
    server_name linux.proxy.com;

    location / {
        proxy_pass http://172.16.1.7:80;
    }
}
7.重启代理nginx
[root@lb01 ~]# nginx -t
nginx: the configuration file /etc/nginx/nginx.conf syntax is ok
nginx: configuration file /etc/nginx/nginx.conf test is successful
[root@lb01 ~]# systemctl restart nginx
8.访问页面测试
1.配置hosts
10.0.0.4 linux.proxy.com

2.访问测试
结果:访问的页面不是我们要的内容,返回了web端第一个配置文件的内容
#原因:代理请求web服务端时,没有使用域名,使用了IP,匹配时没有匹配到server_name,所以直接返回默认的第一个配置文件
9.配置代理携带域名访问web端
[root@lb01 ~]# vim /etc/nginx/conf.d/linux.proxy.com.conf
server {
    listen 80;
    server_name linux.proxy.com;

    location / {
        proxy_pass http://172.16.1.7:80;
        proxy_set_header Host $http_host;
    }
}
10.重启后再次访问
[root@lb01 ~]# systemctl restart nginx

再次访问http://linux.proxy.com/,得到想要的内容