使用Tensorflow目标检测API训练自己的数据集
使用官方1.x的目标检测API,安装过程见:https://blog.csdn.net/qq_37194492/article/details/109639699
一、制作数据集
制作自己的数据集可以参考该方式: https://www.bilibili.com/video/BV1kV411k7D8
- 即准备好图片集,然后利用LabelImg等公开标注软件进行标注并生成指定格式的标注文件。
本文使用COCO数据集制作为tf_record格式数据集:
- COCO数据集下载可参考:https://yunyaniu.blog.csdn.net/article/details/82939959 或 使用官方API源码中的文件
research/object_detection/dataset_tools/download_and_preprocess_mscoco.sh
1.1 将COCO数据集转换为TfRecord文件
- 如图所示,框选文件夹即为将要制作的文件(包含标注文件)

- 进入目录
research/object_detection/dataset_tools,该目录包含多种转换文件,本文原数据集使用COCO数据集,因此直接使用文件create_coco_tf_record.py,然后配置参数运行该文件:
python create_coco_tf_record.py \
--train_image_dir=D:/Fils/CUR_WORK/DATASETS/COCO_2017/train2017 \
--val_image_dir=D:/Fils/CUR_WORK/DATASETS/COCO_2017/val2017 \
--test_image_dir=D:/Fils/CUR_WORK/DATASETS/COCO_2017/test2017 \
--train_annotations_file=D:/Fils/CUR_WORK/DATASETS/COCO_2017/stuff_train_val_2017_annotations/stuff_train2017.json \
--val_annotations_file=D:/Fils/CUR_WORK/DATASETS/COCO_2017/stuff_train_val_2017_annotations/stuff_val2017.json \
--testdev_annotations_file=D:/Fils/CUR_WORK/DATASETS/COCO_2017/test2017_annotations/image_info_test-dev2017.json \
--output_dir=D:/Fils/CUR_WORK/DATASETS/TF_REACORD_datasets/COCO
各参数根据名称即可知道作用,在此不多赘述。对于xml类型的数据集,可以参考文章进行制作,原理一样。
出现 Windows fatal exception: access viola 错误时大概率是参数路径问题,仔细查看路径即可解决
最后生成文件如下图所示: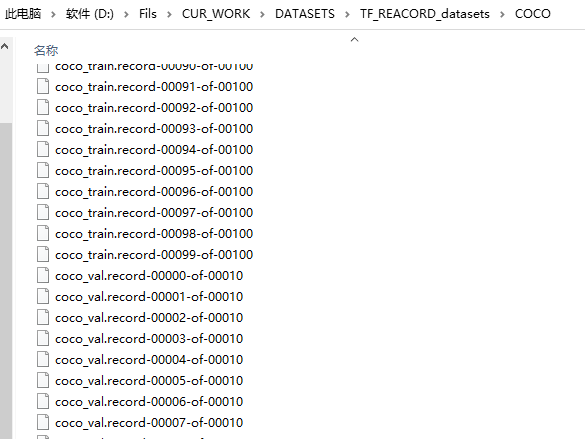
二、训练网络
2.1 下载预训练模型
首先下载预训练模型,使得自己训练的网络效果更好。可在官网https://github.com/tensorflow/models/tree/master/research/object_detection内README.md的tfx_detection_zoo.md链接处下载指定的模型。本人所用预训练模型如图所示:
下载完成之后,解压放入指定文件夹内,如research/my_download_pretrained,如图所示:

2.2 配置参数
在目录research/object_detection/samples/configs内找到预训练模型的配置文件,如faster_rcnn_resnet50_coco.config,修改三组参数:
- 预训练模型位置参数
fine_tune_checkpoint:即将原fine_tune_checkpoint: "PATH_TO_BE_CONFIGURED/model.ckpt"改为fine_tune_checkpoint: "D:/tensorflowAPI/models/research/my_download_pretrained/faster_rcnn_resnet50_coco_2018_01_28/model.ckpt"(路径根据自己的位置设置) - 训练集参数
train_input_reader中的input_path(TfRecord文件位置)和label_map_path(标签映射文件位置,存放于research/object_detection/data目录),如修改为input_path: "D:/Fils/CUR_WORK/DATASETS/TF_REACORD_datasets/COCO/coco_train.record-?????-of-00100"和label_map_path: "D:/tensorflowAPI/models/research/object_detection/data/mscoco_label_map.pbtxt"(路径根据自己的位置设置) - 验证集参数同理:修改为
input_path: "D:/Fils/CUR_WORK/DATASETS/TF_REACORD_datasets/COCO/coco_val.record-?????-of-00010"和label_map_path: "D:/tensorflowAPI/models/research/object_detection/data/mscoco_label_map.pbtxt"(路径根据自己的位置设置)
**注:**若发现训练参数不合适可修改总训练步数参数num_steps和学习率参数manual_step_learning_rate(多个)等进行适应性调整。可通过可视化结果进行判断,其中可视化中的各种损失含义见参考链接。
2.3 训练
训练文件train.py位于research/object_detection/legacy里,配置参数并运行:(后两个参数分别为模型保存位置和预训练模型配置文件位置)
python train.py \
--logtostderr \
--train_dir=D:/tensorflowAPI/output \
--pipeline_config_path=D:/tensorflowAPI/models/research/object_detection/samples/configs/faster_rcnn_resnet50_coco.config
1、出现
Windows fatal exception: access viola错误时大概率是参数路径问题,仔细查看路径即可解决
2、出现Could not create cudnn handle: CUDNN_STATUS_INTERNAL_ERROR,关闭其他占用显卡的程序再次尝试
开始训练中… (单机多卡训练等方式参考网上其他教程)
查看可视化(下图为我采用800步,并适当修改学习率之后训练的结果):tensorboard --logdir=D:/tensorflowAPI/output(后面填写模型输出路径,即运行train.py时的train_dir参数值)
保存后的模型:


2.4 导出模型
使用文件research/object_detection/export_inference_graph.py导出模型,默认生成文件frozen_inference_graph.pb(其他文件如下图),配置如下:
python
export_inference_graph.py
\
--pipeline_config_path=samples/configs/faster_rcnn_resnet50_coco.config  # 模型配置文件
\
--trained_checkpoint_prefix=D:/tensorflowAPI/output/model.ckpt-800  # 选择训练较好的模型
\
--output_directory=D:/tensorflowAPI/output/export_model_output  # 输出路径

三、评估
评估文件位于research/object_detection/legacy/eval.py,配置参数后运行(评估数据来源于之前所设置的config文件配置):
python eval.py \
--logtostderr \
--checkpoint_dir=D:/tensorflowAPI/output \  # 训练文件ckpt目录
--eval_dir=D:/tensorflowAPI/output/eval \  # 评估输出目录
--pipeline_config_path=../samples/configs/faster_rcnn_resnet50_coco.config
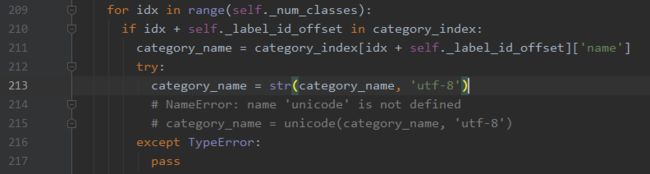
若出现错误:NameError: name ‘unicode’ is not defined,可以点击
Run窗口最后一行(D:\Anaconda\envs\tf-gpu\Lib\site-packages\object_detection-0.1-py3.7.egg\object_detection\utils\object_detection_evaluation.py)报错,然后修改错误的行,如图所示:

四、预测图片
修改模型路径、测试图片路径和类标签映射文件(包含类数量)等进行预测。本文后面保存了预测结果,具体路径也需要自己修改,可视化被注释,需要可以打开。
import matplotlib.pyplot as plt
import numpy as np
import os
import tensorflow as tf
from object_detection.utils import label_map_util
from object_detection.utils import visualization_utils as vis_util
from PIL import Image


def test():
    # 重置图
    tf.reset_default_graph()
    '''
    载入模型以及数据集样本标签,加载待测试的图片文件
    '''
    # 指定要使用的模型的路径  包含图结构,以及参数
    PATH_TO_CKPT = r'D:\tensorflowAPI\output\export_model_output\frozen_inference_graph.pb'

    # 测试图片所在的路径
    PATH_TO_TEST_IMAGES_DIR = r'D:\Fils\CUR_WORK\DATASETS\COCO_2017\my_test_img'
    TEST_IMAGE_PATHS = [os.path.join(PATH_TO_TEST_IMAGES_DIR, i) for i in os.listdir(PATH_TO_TEST_IMAGES_DIR)]

    # 数据集对应的label mscoco_label_map.pbtxt文件保存了index到类别名的映射
    PATH_TO_LABELS = r'D:\tensorflowAPI\models\research\object_detection\data\mscoco_label_map.pbtxt'
    NUM_CLASSES = 90

    # 重新定义一个图
    output_graph_def = tf.GraphDef()

    with tf.gfile.GFile(PATH_TO_CKPT, 'rb') as fid:
        # 将*.pb文件读入serialized_graph
        serialized_graph = fid.read()
        # 将serialized_graph的内容恢复到图中
        output_graph_def.ParseFromString(serialized_graph)
        # print(output_graph_def)
        # 将output_graph_def导入当前默认图中(加载模型)
        tf.import_graph_def(output_graph_def, name='')

    print('模型加载完成')

    # 载入coco数据集标签文件
    label_map = label_map_util.load_labelmap(PATH_TO_LABELS)
    categories = label_map_util.convert_label_map_to_categories(label_map, max_num_classes=NUM_CLASSES,
                                                                use_display_name=True)
    category_index = label_map_util.create_category_index(categories)

    '''
    定义session
    '''

    def load_image_into_numpy_array(image):
        '''
        将图片转换为ndarray数组的形式
        '''
        im_width, im_height = image.size
        return np.array(image.getdata()).reshape((im_height, im_width, 3)).astype(np.uint0)

    # 设置输出图片的大小
    IMAGE_SIZE = (12, 8)

    # 使用默认图,此时已经加载了模型
    detection_graph = tf.get_default_graph()

    img_num = 0
    with tf.Session(graph=detection_graph) as sess:
        for image_path in TEST_IMAGE_PATHS:
            image = Image.open(image_path)
            # 将图片转换为numpy格式
            image_np = load_image_into_numpy_array(image)

            '''
            定义节点,运行并可视化
            '''
            # 将图片扩展一维,最后进入神经网络的图片格式应该是[1,?,?,3]
            image_np_expanded = np.expand_dims(image_np, axis=0)

            '''
            获取模型中的tensor
            '''
            image_tensor = detection_graph.get_tensor_by_name('image_tensor:0')

            # boxes用来显示识别结果
            boxes = detection_graph.get_tensor_by_name('detection_boxes:0')

            # Echo score代表识别出的物体与标签匹配的相似程度,在类型标签后面
            scores = detection_graph.get_tensor_by_name('detection_scores:0')
            classes = detection_graph.get_tensor_by_name('detection_classes:0')
            num_detections = detection_graph.get_tensor_by_name('num_detections:0')

            # 开始检查
            boxes, scores, classes, num_detections = sess.run([boxes, scores, classes, num_detections],
                                                              feed_dict={image_tensor: image_np_expanded})

            # 可视化结果
            vis_util.visualize_boxes_and_labels_on_image_array(
                image_np,
                np.squeeze(boxes),
                np.squeeze(classes).astype(np.int32),
                np.squeeze(scores),
                category_index,
                use_normalized_coordinates=True,
                line_thickness=8)
            plt.figure(figsize=IMAGE_SIZE)
            # print(type(image_np))
            # print(image_np.shape)
            image_np = np.array(image_np, dtype=np.uint8)

            #  显示图像,其他方式也可以
            im = Image.fromarray(image_np)
            im.save("D:/Fils/CUR_WORK/DATASETS/COCO_2017/my_predict_img/out_%s.jpeg" % img_num)
            img_num += 1
            del im

            # 可视化
            # import cv2
            # img = cv2.imread("out.jpeg")
            # cv2.imshow('test', img)
            # cv2.waitKey(0)
            # cv2.destroyWindow('test')


if __name__ == '__main__':
    test()
由于训练不充分,测试效果不佳。建议改为类别少的数据集进行训练测试。
参考:
使用Tensorflow目标检测API 训练 Faster R-CNN!(待完善)
TensorFlow目标检测API中这些损失(loss)代表含义是什么
第三十二节,使用谷歌Object Detection API进行目标检测、训练新的模型(使用VOC 2012数据集)
成功解决NameError: name ‘unicode’ is not defined
tensorflow Restoring from checkpoint failed