初探安卓混合开发(WebView、html)
最近有个任务,需要在安卓上使用到网页的功能,大致了解了一下相关知识,稍微写了写,涉及东西不深,但是最后能用了吧!下面简单讲讲。
官方文档
工欲善其事必先利其器,这里我们要在安卓中使用 HTML,需要用到 WebView 这个控件,而官方文档已经提供了详细的说明(中文),所以我们应该先好好学习一番,以知识为利器,再去实现我们的功能与想法。
下面是官方文档的链接:
https://developer.android.google.cn/guide/webapps?hl=zh_cn
WebView 的简单使用
我这里没有使用进度条,直接在布局里面放了个宽高最大化的 WebView
简单用的话,代码也很简单,获取到控件后设置下 WebViewClient 再加载链接就可以。
@Override
protected void onCreate(Bundle savedInstanceState) {
    super.onCreate(savedInstanceState);
    setContentView(R.layout.activity_h5_player);

    //从assets中加载网页
    mWebView = (WebView) findViewById(R.id.webview);

    //设置浏览器相关属性
    WebSettings webSettings = mWebView.getSettings();
    webSettings.setJavaScriptEnabled(true);//启用js

    //保证在app内打开
    mWebView.setWebViewClient(new WebViewClient() {});
    mWebView.loadUrl(uLink);
}
网络链接
要访问网络连接,首先需要在 manifest 里面先添加网络权限:
<uses-permission android:name="android.permission.INTERNET" />
但是高版本的安卓系统(9.0)要求使用 https,这里要处理下,有下面两种办法:
-
直接在 manifest 的 application 中配置
android:usesCleartextTraffic="true" -
第二个是在 manifest 的 application 中指定网络安全配置文件:
android:networkSecurityConfig="@xml/network_security_config"内容按自动生成的就可以
<network-security-config>
    <base-config cleartextTrafficPermitted="true" />
network-security-config>
使用
mWebView.loadUrl(“http://www.baidu.com”);
本地网页
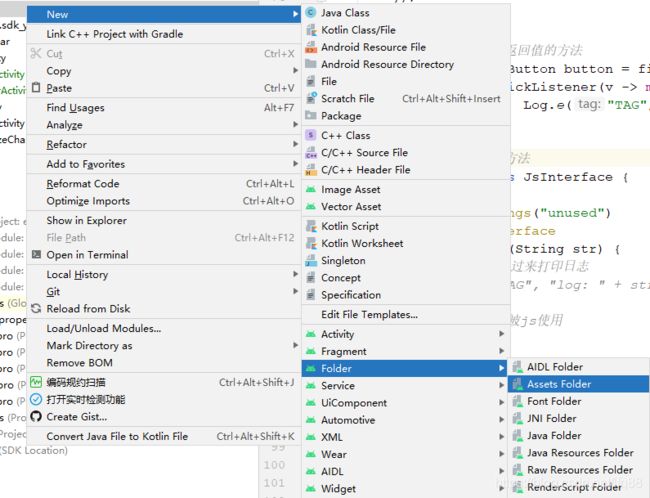
如果打开本地网页的话,一般需要将网页放到 assets 目录中去,选中 app 里面目录,右键如图创建 assets 目录,在里面放网页就可以了。
使用的时候,可以通过下面链接拿到 assets 文件夹得内容
mWebView.loadUrl("file:///android_asset/html_player.html");
JS 和 Java 的互相调用
本地网页设计
我们这里有一个 iframe 用来放一个视频播放器,html 代码如下:
<html>
<head>
    <TITLE>云存储回放TITLE>
    <META http-equiv=Content-Type content="text/html; charset=utf-8">
    <META http-equiv=Content-Language content=utf-8>
    <STYLE type=text/css>
        A:link {
           COLOR: #555555; TEXT-DECORATION: none
        }
    STYLE>

    <script type="text/javascript">

        function getPlayer(){
            //获取播放器元素
            return document.getElementById('ysOpenDevice').contentWindow;
        }

        function setSrc(src){
            //设置播放路径
            document.getElementById('ysOpenDevice').src = src;

            //调用Java的log()方法
            window.android.log("setSrc:" + src);
        }

        function testReturn(a,b){
            //调用Java的log()方法
            window.android.log("testReturn");
            //测试传参及返回数据
            return a + b;
        }

        function play(){
            //播放
            var player = getPlayer();
            player.postMessage("play", "https://open.ys7.com/ezopen/h5/iframe");
            window.android.log("play");
            return 1;
        }

        function stop(){
            //结束
            var player = getPlayer();
            player.postMessage("stop", "https://open.ys7.com/ezopen/h5/iframe");
            window.android.log("stop");
        }

    script>
head>

<body>
    <iframe width="600" height="400" id="ysOpenDevice" allowfullscreen src="">iframe>
body>

html>
功能很简单,css 被我删除了一些,就 body 里面一个 iframe 以及一些 js 代码,具体使用后面讲。
布局文件
这里在网页的布局里面,丢了个悬浮按钮,用来测试 Java 触发 JS 用:
- activity_html_player
<androidx.constraintlayout.widget.ConstraintLayout xmlns:android="http://schemas.android.com/apk/res/android"
    xmlns:app="http://schemas.android.com/apk/res-auto"
    xmlns:tools="http://schemas.android.com/tools"
    android:layout_width="match_parent"
    android:layout_height="match_parent"
    tools:context=".HtmlPlayerActivity">

    <WebView
        android:id="@+id/webview"
        android:layout_width="match_parent"
        android:layout_height="match_parent"
        >

    WebView>

    <com.google.android.material.floatingactionbutton.FloatingActionButton
        android:id="@+id/floatingActionButton"
        android:layout_width="wrap_content"
        android:layout_height="wrap_content"
        app:layout_constraintBottom_toBottomOf="parent"
        app:layout_constraintEnd_toEndOf="parent"
        android:layout_margin="20dp"
        android:src="@android:drawable/ic_media_play"
        android:contentDescription="play button"
        tools:ignore="HardcodedText" />

androidx.constraintlayout.widget.ConstraintLayout>
Activity 代码
这里省的大家一个一个 Alt + Enter 导入依赖了,下面看代码:
import android.annotation.SuppressLint;
import android.content.Context;
import android.content.Intent;
import android.os.Build;
import android.os.Bundle;
import android.text.TextUtils;
import android.util.Log;
import android.webkit.JavascriptInterface;
import android.webkit.WebSettings;
import android.webkit.WebView;
import android.webkit.WebViewClient;

import com.google.android.material.floatingactionbutton.FloatingActionButton;

import androidx.annotation.RequiresApi;
import androidx.appcompat.app.AppCompatActivity;

public class HtmlPlayerActivity extends AppCompatActivity {

    public static final String HTML_LINK_KEY = "ys_html_link";

    WebView mWebView;

    String src;

    @RequiresApi(api = Build.VERSION_CODES.KITKAT)
    @SuppressLint({"JavascriptInterface", "SetJavaScriptEnabled", "AddJavascriptInterface"})
    @Override
    protected void onCreate(Bundle savedInstanceState) {
        super.onCreate(savedInstanceState);
        setContentView(R.layout.activity_html_player);

        //获取传入的播放链接
        src = getIntent().getStringExtra(HTML_LINK_KEY);

        //从assets中加载网页
        mWebView = (WebView) findViewById(R.id.webview);
        mWebView.loadUrl("file:///android_asset/html_player.html");

        //设置浏览器相关属性
        WebSettings webSettings = mWebView.getSettings();
        webSettings.setJavaScriptEnabled(true);//启用js

        //设置Java方法,现在就一个log
        mWebView.addJavascriptInterface(new NativeJsBridge(), "android");

        //拦截网页点击事件(test)
        mWebView.setWebViewClient(new WebViewClient() {
            @Override
            public boolean shouldOverrideUrlLoading(WebView view, String url) {
                //拦截网页跳转,改为activity跳转
                if (url.equals("file:///android_asset/test2.html")) {
                    startActivity(new Intent(HtmlPlayerActivity.this, PlayActivity.class));
                    return true;
                } else {
                    mWebView.loadUrl(url);
                    return false;
                }
            }

            @Override
            public void onPageFinished(WebView view, String url) {
                //网页加载完成再设置src
                mWebView.evaluateJavascript("setSrc(\"" + src + "\")", value -> {});
            }

        });


        //测试:调用JS带返回值的方法
        FloatingActionButton button = findViewById(R.id.floatingActionButton);
        button.setOnClickListener(v -> mWebView.evaluateJavascript("testReturn(1,2)", value ->
                        Log.e("TAG", "onReceiveValue value = " + value)));
    }

    //js中可以执行的Java方法
    public static class NativeJsBridge {

        @SuppressWarnings("unused")
        @JavascriptInterface
        public int log(String str) {
            //js传递参数过来打印日志
            //Log.e("TAG", "log: " + str);

            //返回参数可被js使用
            return 0;
        }

    }

    public static void start(Context context, String link) {
        Intent intent = new Intent(context, HtmlPlayerActivity.class);
        intent.putExtra(HTML_LINK_KEY, link);
        context.startActivity(intent);
    }
}
比较下简单使用的代码,其实就是增加了三段代码,即设置 JS 能够调用的 Java 代码、WebViewClient的设置(包含拦截网页跳转及网页加载完成监听)、悬浮按钮点击调用 JS 代码。实际上就是 JS 和 Java 的互相调用,下面讲解。
JS 调用 Java 方法
WebView 的 addJavascriptInterface 方法接收一个对象和一个名称,名称一般就填"android",而前面的对象一般就是 JsBridge,起到桥接作用。
	//设置Java方法
	mWebView.addJavascriptInterface(new JsInterface(), "android");

    //js中可以执行的Java方法
    public static class NativeJsBridge {

        @SuppressWarnings("unused")
        @JavascriptInterface
        public int log(String str) {
            //js传递参数过来打印日志
            //Log.e("TAG", "log: " + str);

            //返回参数可被js使用
            return 0;
        }

    }
这里需要注意 @JavascriptInterface 注解的使用,没有注解的方法,JS 无法调用。
在 JS 方法中调用 Java 方法,只能调用上面传入的方法:
window.android.log("play");
//javascript:android.log("play");
Java 中调用 JS 方法
这里有两种用法,最简单的是调用无返回值的方法,直接通过 loadUrl 调用:
mWebView.loadUrl("javascript:play()");
第二个是带返回值的,但是要求安卓版本 4.4 以上,使用如下:
mWebView.evaluateJavascript("testReturn(1,2)", value ->
                        Log.e("TAG", "onReceiveValue value = " + value));
在我的应用中发现,在 activity 的 onCreate() 方法中调用会不生效,原因是 HTML 还未加载完成,所以如果需要在网页加载完了调用 JS 方法,需要在 WebViewClient 中处理:
mWebView.setWebViewClient(new WebViewClient() {

    ...

    @Override
    public void onPageFinished(WebView view, String url) {
        //网页加载完成再设置src
        mWebView.evaluateJavascript("setSrc(\"" + src + "\")", value -> {});
    }

});
简单使用
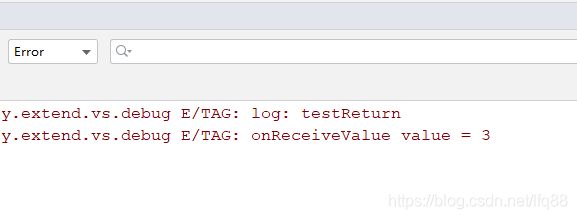
上面我们设置了一个悬浮按钮,点击的时候会调用 JS 的带返回函数 testReturn,而 testReturn 内会调用一下 Java 方法输出日志,而当 JS 方法计算完成返回后, Java 代码中会以日志形式输出结果。
下面我们编译代码,点击一下悬浮按钮,查看日志输出:
可以看到,正如我们想的一样,点击悬浮按钮后,在 Java 中调用了 JS 的方法进行计算,而 JS 计算的方法内调用了 Java 的代码输出日志,而后返回数据在 Java 代码中打印结果,Java 和 JS 的互相调用 get it !
混淆问题
如果打包的时候开启了混淆功能,JS和Java交互的类不能被混淆!混淆相关的知识可以看我这篇博客:安卓混淆文件使用。
我们这里只需要将这个NativeJsBridge 类不进行混淆就行了
-keep class com.silence.HtmlPlayerActivity $NativeJsBridge {public*;}
结语
以上就是安卓中 html 的简单使用,涉及 Java 和 JS 的互相调用,希望对读者有所帮助!
点赞、评论、收藏、关注都是对博主的莫大支持,是博主创作下去的动力!
end

