iOS端JSON转Model链式编程框架SuperKVC用法与原理
背景
在客户端编程中,字典转模型是一个极为常见的问题,苹果提供了KVC来实现NSDictionary到Model的注入,但是KVC只能进行单层浅注入,且无法处理类型转换、key与属性名不对应、深度注入等问题,笔者从Masonry得到启发,开发了一个通过链式配置注入器实现深度注入、类型转换、key-属性名映射等功能的轻量级注入框架SuperKVC。目前已经开源到GitHub,点击这里前往,欢迎Star和Fork,欢迎和我一起完善这个框架!
本文将从应用和原理两个角度介绍SuperKVC
用法
该框架与Masonry类似,要求用户在相关方法参数的block中通过链式编程的方法配置注入器参数,例如配置要创建和注入的class、类型转换器、名称映射等,然后方法会返回注入后的结果。如果JSON的根元素为字典,则返回一个模型实例;如果JSON的根元素为数组,则返回一个模型数组。
浅注入示例
假设我们有如下的JSON,要注入到UserModel中。
{
    "id": 100075,
    "name": "Greedy",
    "birthday": "1993-03-06",
    "isVip": true,
    "partners": [100236, 100244, 100083]
}
@interface UserModel : NSObject

@property (nonatomic, assign) int64_t userId;
@property (nonatomic, copy) NSString *name;
@property (nonatomic, strong) NSDate *birthday;
@property (nonatomic, assign) BOOL isVip;
@property (nonatomic, strong) NSArray *partners;

@end
注意到这里的几个“坑点”,响应的id对应的是模型的userId,响应的birthday类型为NSString,而模型的birthday类型为NSDate,使用SuperKVC进行注入的代码如下。
// responseObject is a JSONObject(NSDictionary).
UserModel *userModel = [responseObject sk_injectWithInjector:^(SuperKVCInjector *injector) {
    // 配置要生成和注入的模型实例类型
    injector.bind([UserModel class]);
    // 配置key到属性名的映射
    injector.mapping(@"id").to(@"userId");
    // 配置类型转换
    injector.format(@"birthday").with.converter(^NSDate* (NSString *birthdayString) {
        NSDateFormatter *fmt = [NSDateFormatter new];
        fmt.dateFormat = @"yyyy-MM-dd";
        return [fmt dateFromString:birthdayString];
    });
}];
可以看到,SuperKVC的使用方式与Masonry十分类似,通过链式编程的方式配置注入器,具有较高的可读性,且使用方便,不需要手动创建模型和从字典中取值和对模型赋值。
数组注入示例
SuperKVC还能够自动处理字典数组到模型数组的转换,对于下面的JSON。
[{
    "id": 100075,
    "name": "Greedy",
    "birthday": "1993-03-06",
    "isVip": true,
    "partners": [100236, 100244, 100083]
},
{
    "id": 100724,
    "name": "Charlie",
    "birthday": "1996-08-12",
    "isVip": false,
    "partners": [100710, 100715]
},{},]
按照上面的配置调用注入器,即可得到UserModel的模型数组。
// responseObject is a JSONObject(NSArray).
NSArray *userModels = [responseObject sk_injectWithInjector:^(SuperKVCInjector *injector) {
    injector.bind([UserModel class]);
    injector.mapping(@"id").to(@"userId");
    injector.format(@"birthday").with.converter(^NSDate* (NSString *birthdayString) {
        NSDateFormatter *fmt = [NSDateFormatter new];
        fmt.dateFormat = @"yyyy-MM-dd";
        return [fmt dateFromString:birthdayString];
    });
}];
深度注入示例
对于模型中包含模型的情况,通过converter来嵌套调用注入器,例如下面的JSON。
[{
    "id": 100075,
    "name": "Greedy",
    "birthday": "1993-03-06",
    "isVip": false,
    "cards": [
        {
            "id": 400820666,
            "name": "King Card of Unity",
            "expire": "2026-03-27"
        },
        {
            "id": 622800333,
            "name": "Silver Card of Glory",
            "expire": "2029-02-21"
        },
        {
            "id": 623400765,
            "name": "King Card of Floyt",
            "expire": "2024-08-15"
        }
    ]
},{},]
@interface UserModel : NSObject

@property (nonatomic, assign) int64_t userId;
@property (nonatomic, copy) NSString *name;
@property (nonatomic, strong) NSDate *birthday;
@property (nonatomic, assign) BOOL isVip;
@property (nonatomic, strong) NSArray *cards;

@end

@interface CardModel : NSObject

@property (nonatomic, assign) int64_t cardId;
@property (nonatomic, copy) NSString *name;
@property (nonatomic, strong) NSDate *expireDate;

@end
这里的关键问题是如何配置UserModel的cards属性使得注入的Card字典数组被自动转换为CardModel数组,我们需要借助于converter,对cards对应的字典数组进行格式转换,代码如下。
NSArray *userArray = [responseObject sk_injectWithInjector:^(SuperKVCInjector *injector) {
    injector.bind([UserModel class]);
    injector.mapping(@"id").to(@"userId");
    injector.format(@"birthday").with.converter(^NSDate* (NSString *birthdayString) {
        return [fmt dateFromString:birthdayString];
    });
    injector.format(@"cards").with.converter(^CardModel* (NSDictionary *cardDictArray) {
        return [cardDictArray sk_dequeInjectorForClass:[CardModel class] emptyHandler:^(SuperKVCInjector *injector) {
            injector.bind([CardModel class]);
            injector.mapping(@"id").to(@"cardId");
            injector.mapping(@"expire").to(@"expireDate");
            injector.format(@"expireDate").with.converter(^NSDate* (NSString *birthdayString) {
                return [fmt dateFromString:birthdayString];
            });
        }];
    });
}];
上面几行都是常规配置,注意cards处理方式,借助converter,嵌套的调用injector来实现内层的注入,这里同样涉及到名称映射和日期格式转换,注意到内层的injector使用了deque开头的方法,这是为了避免重复创建相同的注入器而采用的复用机制。
原理
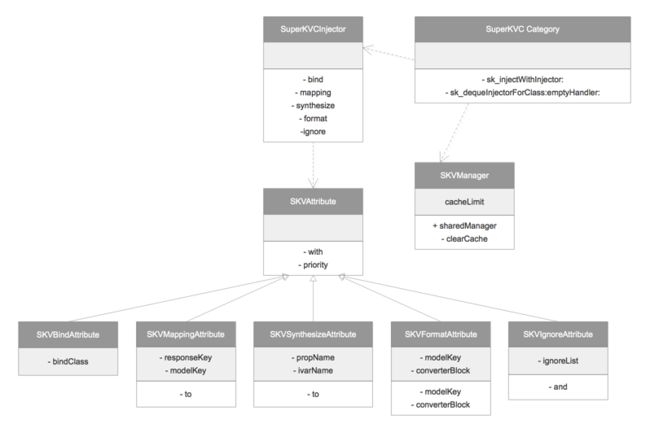
SuperKVC的注入基于反射和KVC实现的,反射是为了获取属性列表和填充实例变量,KVC是为了处理基本类型在运行时对实例变量的填充,链式配置通过block实现,注入器和方法缓存通过LRU(NSCache)实现,整个框架的结构如下。
其中直接暴露给用户的只有NSObject的Category、SuperKVCInjector和SKVManager,Category中包含了执行注入的两个方法。
@interface NSObject (SuperKVC)

- (id)sk_injectWithInjector:(void(^)(SuperKVCInjector *injector))block;
- (id)sk_dequeInjectorForClass:(Class)clazz emptyHandler:(void(^)(SuperKVCInjector *injector))block;

@end
第一个方法用于常规注入,每次调用都会创建一个全新的注入器;第二个方法包含了注入器复用的逻辑,通常用于嵌套调用时提高执行效率。由于第二个方法只是对注入器的缓存逻辑,不涉及核心算法,因此这里不再赘述,我们来看第一个方法的内部实现。
- (id)sk_injectWithInjector:(void (^)(SuperKVCInjector *))block {
    SuperKVCInjector *injector = [SuperKVCInjector new];
    block(injector);
    return [self parseAttributesForInjector:injector];
}
方法内部先是创建了一个注入器,然后调用外部block要求用户配置注入器,最后使用注入器来处理注入逻辑,这里的关键是注入器的配置。根据前面的描述,我们知道要配置的内容主要包括下列内容。
| 名称 | 功能 | 使用 |
|---|---|---|
| bind | 配置要生成和注入的模型类 | injector.bind(Class); |
| mapping | 配置字典key到模型属性名的映射 | injector.mapping(responseKey).to(propertyName); |
| format | 自主格式化一个属性的值 | injector.format(propertyName).with.converter(^id (id oldVar) { /* your format code */ return newVar; }); |
| ignore | 忽略一些模型属性的注入 | injector.ignore(propName1).and(propName2) … |
| synthesize | 如果通过@synthesize配置了新的存取规则,需要手动指定属性对应的实例变量名称 | injector.synthesize(propertyName).to(ivarName); |
这几类属性的实现比较类似,下面讲解bind和mapping的实现。
bind的用法为传入一个class,并且要求使用小括号调用,为了实现这种效果,要把bind的调用转为函数调用而不能是方法调用,并且利用OC中返回值非空的无参方法可以用点语法调用,因此让bind方法无参,但是返回一个有参block,这个block接收bind的参数即可,由于bind之后不需要连接其他操作,因此block的返回值为空,bind方法的实现如下。
- (void(^)(Class clazz))bind {
    return ^(Class clazz) {
        SKVBindAttribute *attr = [[SKVBindAttribute alloc] initWithBindClass:clazz];
        [self.attributes addObject:attr];
    };
}
可以看到,调用bind方法的实质是返回了一个block,这个block接收一个Class参数,并且没有返回值,block内创建了一个SKVBindAttribute,并且存储Class信息,最后将这个属性存储到注入器的属性列表中。注入器的属性列表用来存储所有配置信息,每个信息都是SKVAttribute的一个子类,每个子类对应一行链式操作,用来存储一行的完整上下文。对于bind操作,由于只接收一个Class参数,因此处理较为简单。
下面我们看一下mapping这个接收两个参数的操作,与bind类似,mapping也是一个无参方法,但是由于有后续操作,mapping方法返回的block的返回值不能为空,而是一个mapping时创建的SVKMappingAttribute,这个attribute已经存储了mapping传入的参数,并沿着调用链继续向后传递,具体代码如下。
- (SKVMappingAttribute *(^)(NSString *))mapping {
    return ^SKVMappingAttribute* (NSString *responseKey) {
        SKVMappingAttribute *attr = [SKVMappingAttribute new];
        attr.responseKey = responseKey;
        [self.attributes addObject:attr];
        return attr;
    };
}
经过mapping操作之后,返回的是已经存储了响应key的SKVMappingAttribute实例,通过调用实例的to方法继续处理要映射到的属性key的名称,SKVMappingAttribute的结构如下。
@interface SKVMappingAttribute : SKVAttribute

@property (nonatomic, strong) NSString *responseKey;
@property (nonatomic, strong) NSString *modelKey;

- (void(^)(NSString *modelKey))to;

@end
在前面的调用中,已经设置了responseKey,并且返回了attribute实例,这时候可以继续调用to方法,设置modelKey,从而完成mapping上下文的存储。
- (void (^)(NSString *))to {
    return ^ (NSString *to) {
        self.modelKey = to;
    };
}
其他操作都是类似的,这里不再赘述,如有兴趣可去看源码。经过所有配置之后,接下来要进行的是属性处理,首先将属性排序,排序的优先级通过priority确定,其中bind的优先级最高,经过排序后,将这些配置依次写入注入器,为反射之前做准备,注入器存储这些配置的数据结构如下。
@interface SuperKVCInjector ()

@property (nonatomic, assign) Class bindClass;
@property (nonatomic, strong) NSMutableDictionary *mappingDict;
@property (nonatomic, strong) NSMutableDictionary *synthesizeDict;
@property (nonatomic, strong) NSMutableSet *ignoreSet;
@property (nonatomic, strong) NSMutableDictionary *formatDict;

@end
在遍历的属性中会构建这些集合结构,用于反射时查询和处理,在经过这些操作之后,就可以生成模型开始注入了,这时还要区分要处理的JSONObject是数组还是字典,如果是数组,需要遍历每一个元素分别处理模型注入,最后生成一个全新的模型数组;如果是字典,则直接处理接下来的注入。
- (id)buildAndInjectWithClass:(Class)clazz forInjector:(SuperKVCInjector *)injector {
    id ret = nil;
    if ([self isKindOfClass:[NSArray class]]) {
        ret = @[].mutableCopy;
        NSArray *dicts = (NSArray *)self;
        for (NSDictionary *dict in dicts) {
            id model = [self buildAndInjectModelWithClass:clazz dict:dict forInjector:injector];
            [ret addObject:model];
        }
    } else if ([self isKindOfClass:[NSDictionary class]]) {
        ret = [self buildAndInjectModelWithClass:clazz dict:(NSDictionary *)self forInjector:injector];
    }
    return ret;
}
处理单个模型注入的方法较为复杂,这里截取核心部分,主要是对不同配置的查询和处理,下面的代码是其中使用的一个处理单个属性注入的代码块。
BOOL (^handlePropNamed)(id model, NSString *propName) = ^BOOL (id model, NSString *propName) {
        // 一般情况下,字典的key与属性名相同
        NSString *responseName = propName;
        // 查询映射表,如果不为空,则按照映射表获取属性名对应的响应名
        if (injector.mappingDict[propName] != nil) {
            responseName = injector.mappingDict[propName];
        }
        // 根据属性名获取实例变量名,一般情况下为_属性名
        NSString *ivarName = [NSString stringWithFormat:@"_%@",propName];
        // 如果使用了@synthesize,则需要查表获得实例变量名
        if (injector.hasSynthesize && injector.synthesizeDict[propName]) {
            ivarName = injector.synthesizeDict[propName];
        }
        Ivar ivar = class_getInstanceVariable(clazz, ivarName.UTF8String);
        if (ivar == NULL) {
            return NO;
        }
        id value = dict[responseName];
        // 对于NSNull,不处理注入,否则对模型的操作容易引起崩溃
        if ([value isKindOfClass:[NSNull class]]) {
            return YES;
        }
        // 查询自定义格式转换表,如果有自定义格式转换,则调用格式转换的block来转换格式
        if (injector.formatDict[propName] != nil) {
            SKVFormatAttribute *formatAttr = injector.formatDict[propName];
            value = formatAttr.converterBlock(value);
        }
        // 对于基本类型,需要借助KVC来注入
        if ([value isKindOfClass:[NSValue class]]) {
            [model setValue:value forKey:propName];
        } else {
            // 对于对象类型,通过runtime直接注入
            object_setIvar(model, ivar, value);
        }
        return YES;
    };
以上就是框架的主要逻辑,具体处理细节请参考源码,源码地址在文章开头。
