文件预览(通过URL访问本地资源)
一、addResourceHandlers:预览图片和pdf,其他文件不支持
图片或者视频存放在专门的服务器上面(Windows服务器),假设存储路径为C:\upload\data\picture\ 该路径下面存储的是所有需预览的图片。
1、 模拟创建实体类表
// 检测数据
public Class CheckData {
	// 检测数据名称
	private String name;
	// 文件路径(c:\upload\data\picture\1.png)
	private String filePath;
}


2、 添加配置类
@Configuration
public class FileConfig implements WebMvcConfigurer {
      @Value("${file.config.diskPath}")
      // 文件本地路径 c:\
      private String diskPath;
      @Value("${file.config.pathPattern}")
      // /file/**
      private String pathPattern;
      public FileConfig(){
      }

      @Override
      public void addResourceHandlers(ResourceHandlerRegistry registry) {
          // addResourceHandler-浏览器请求路径;addResourceLocations-文件存放的真实路径(比如C盘)
          registry.addResourceHandler(pathPattern).addResourceLocations("file:"+ diskPath);
      }
}
该配置文件的作用就是将URL地址中file路径替换为C盘路径-建立file与C的映射。


3、 构造返回给前端的数据
@GetMapping("/getCheckData")
public List getCheckData() {
// 假设此为从数据库中查询出来的数据
List checkDataList = new ArrayList<>();
// 因为数据库中filePath存储的是本地路径
	for (CheckData checkData : checkDataList) {
		// ipAddress为当前服务部署的Ip地址
		// replace方法:将localPath中包含C:\的部分替换为空字符串
		// urlPath:/file/ ; 可在配置文件中定义
		String localPath = "c:\upload\data\picture\1.png";
		String filePath = "http://" + ipAddress + urlPath + StringUtils.replace(checkData.getFilePath(), "c:\", "");
		checkData.setPath(filePath);
		// 这样当用户访问http://192.168.50.2/file/upload/data/picture/1.png时,通过配置类,自动将file映射为C盘。
	}
	return checkDataList;
} 二、kkFileView(file.dir是在properties中是固定值,服务启动后此路径不能动态更改)
1、kkfileview是一款开源的在线预览文档的工具,提供上传,http的预览访问方式
2、所有预览方式使用get方式请求
链接地址:http://xxx.xxx.xx.xx:8012/onlinePreview?url=http://xxx.xx.xxx:8000/media/key.txt
http://xxx.xxx.xx.xx:8012/onlinePreview? 代表预览工具服务的请求地址(默认端口为8012)
url=http://xxx.xx.xxx:8000/media/key.txt (参数)代表请求需要预览的文件的资源路径(或者文件的下载路径,但是最后必须附带文件名称和类型作为url的参数)
3、支持的格式
    .txt   (还支持html,xml,java,py,c,cpp,sql,md以文本形式展示)
	.doc和.docx
	.ppt和.pptx
	.xls和.xlsx
	.pdf
	.zip  显示压缩包内容,并列出压缩包内容中文件(还支持rar,jar,tar)
.png (还支持jpg,jpeg,gif等)三、jetty编程发布(区分windows和linux上的IP地址)
不是用jetty做servlet容器那样修改配置文件发布,而是借鉴了jetty的嵌入式开发模式,即使用API中提供的Endpoint。
我的应用场景是:
一个后台程序定时生成日志,客户想直接在网页上看到日志内容,因此我直接将后台程序根目录下的loginfo目录发布到
http://127.0.0.1:8091/loginfo 下,这样自动生成的日志可以在这个url下直接访问。当然为了显示简单,我日志是字符串拼接成html格式再写文件,这样便于控制显示样式。
package org.jeecg.modules.largeFileTransfer.util;

import lombok.SneakyThrows;
import org.apache.commons.lang3.StringUtils;
import org.eclipse.jetty.server.Server;
import org.eclipse.jetty.webapp.WebAppContext;
import org.slf4j.Logger;
import org.slf4j.LoggerFactory;

import java.net.*;
import java.util.Enumeration;


public class PreviewUtils {
    private static final Logger logger = LoggerFactory.getLogger(PreviewUtils.class);
    public final static String FileDir = "/preview";
    public final static String PreviewPort = "8091";
    public final static String PublicIp = "139.159.233.243";
    /**
     * 单网卡名称
     */
    private static final String NETWORK_CARD = "eth0";

    /**
     * 绑定网卡名称
     */
    private static final String NETWORK_CARD_BAND = "bond0";

    static String OS_NAME = System.getProperty("os.name").toLowerCase();

    private static Thread startPreviewServer;

    public static String startPreviewServer(String location) throws UnknownHostException {
        if (startPreviewServer == null ) {
            startPreviewServer = new Thread() {
                @SneakyThrows
                public void run() {
                    publishService();
                }
            };
            startPreviewServer.start();
        }
        String localPath = StringUtils.replace(location, ServletUtils.getOSName(), "");

        if (OS_NAME.contains("windows")) {
            return "http://" + getHostInfo()  + ":" + PreviewPort + FileDir + localPath;
        } else{
            return "http://" + "139.159.233.243" + ":" + PreviewPort + FileDir + localPath;
        }
    }


    private static void publishService() throws UnknownHostException {
        String hostIp = getHostInfo();
        Server server = new Server(new InetSocketAddress(hostIp, Integer.valueOf(PreviewPort)));
        // 配置要监控的本地目录和要访问的http映射url
        WebAppContext webContext = new WebAppContext(FilePreviewDir(ServletUtils.getOSName()), FileDir);
        server.setHandler(webContext);
        System.out.println("preview server is starting...");
        try {
            server.start();
            server.join();
        } catch (Exception e) {
            e.printStackTrace();
        }
    }

    // 监控的本地路径
    public static String FilePreviewDir(String location) {
        // XXX 可以修改使用配置文件获取本地监控路径,方便扩展
        return location;
    }

    private static String getHostInfo() throws UnknownHostException {
        // XXX 可以修改使用配置文件获取host地址,方便扩展
        if (OS_NAME.contains("windows")) {
            return InetAddress.getLocalHost().getHostAddress();
        } else{
            return getLocalIP();
        }
    }

    /**
     * Description: linux下获得本机IPv4 IP

     * @return
     * @see
     */
    public static String getLocalIP() {
        String ip = "";
        try {
            Enumeration e1 = (Enumeration)NetworkInterface.getNetworkInterfaces();
            while (e1.hasMoreElements()) {
                NetworkInterface ni = e1.nextElement();

                //单网卡或者绑定双网卡
                if ((NETWORK_CARD.equals(ni.getName()))
                        || (NETWORK_CARD_BAND.equals(ni.getName()))) {
                    Enumeration e2 = ni.getInetAddresses();
                    while (e2.hasMoreElements()) {
                        InetAddress ia = e2.nextElement();
                        if (ia instanceof Inet6Address)
                        {
                            continue;
                        }
                        ip = ia.getHostAddress();
                    }
                    break;
                }
                else {
                    continue;
                }
            }
        }
        catch (SocketException e) {
            logger.error("IP出现异常!异常信息:" + e.getMessage());
        }
        return ip;
    }
}
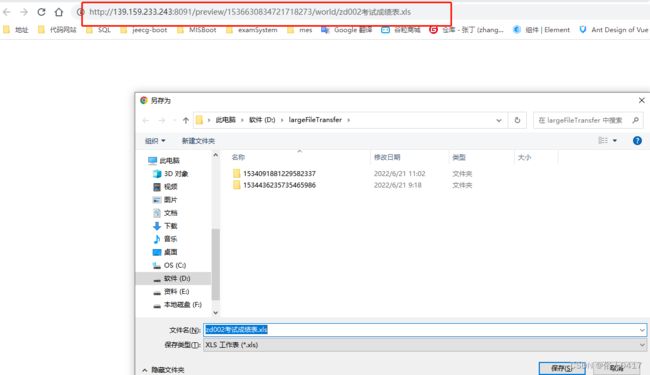
上面直接运行Application即可启动web服务,然后访问:http://192.168.2.32:8091/preview/1534436235735465986/photo/10-12.jpg,
地址,便可进入日志的监控目录:
【注意】:
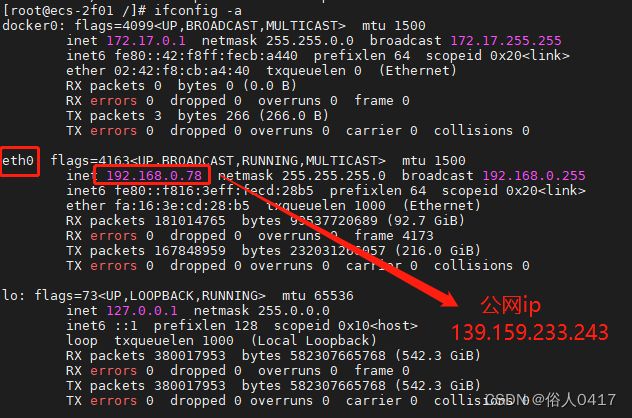
1.windows上通过InetAddress.getLocalHost().getHostAddress()获取的是局域网的ip(192.168.2.32)。
linux上通过InetAddress.getLocalHost().getHostAddress()获取的是127.0.0.1。
2.linux需要单独获取到ip(192.168.0.78)的方法,再将其映射到公网IP(139.159.233.***)上。


