selenium4+pyetsst+allure+pom进行自动化测试框架的最新设计
本期内容
1.介绍POM
2.封装通用方法
3.综合以上的方法的测试用例
4.迸发
5.报告
最新设计说明: 使用selenium4的以服务方式连接驱动,使用 selenium4唯一的两种定位方式,并加上智能流畅等待的封装。
目录
- 一.什么是POM
-
- pom继承
- 二.封装
- 三.测试用例(bing)
-
- 第一个版本 搜索框输入文字进行搜索
- 第二个版本 加入参数 加入allure
- 第三个版本 加入yaml文件
- 四.迸发 三次 或以上
- 迸发三次基础上 加入allure 生成json数据
- 报告
一.什么是POM
Page Object Model:页面对象模型
思想What:把每个页面当作一个对象类进行分层管理,一个页面对应一个类,一个类就是一个模型,通过模型生成页面对象。
为什么Why:提高自动化测试代码的复用性、可维护性、可扩展性
随着时间的推移,测试脚本越来越多,需要维护的脚本超来多庞大,页面的元素一旦发生改变势必变得繁琐不易。
怎么做How:三层模型
Base基础页面层:抽取每个页面的相同方法、相同属性(即公共方法、公共属性)到一个基础类BasePage–第一层。
例如:元素定位、输入点击操作
PO页面层:每个页面又定义其自己的page Object类,定义该页面独有的方法,属性—第二层
测试用例层:用例操作流程,用例数据—第三层
三层之间的关系:第二层继承第一层,第三层调用第二层里面的方法
pom继承
# 利用人的设计 来解释继承
# 属性 身高 年龄
# 方法(行为/功能):跑(run)打架(fight)
class Person(object):
    # init初始化,创造的时候应该有的属性 名字是后起的
    def __init__(self):
        self.height=50
        self.age=0
    def eat(self,food):
        print("吃"+food)
        self.height=self.height+1
    def run(self):
        print("玩了  累了")

class Teacher(Person):
#他又我也有
#他没有 我创造
    def teach(self,info):
        self.height=160
        self.age=20
        print("上课"+info)
#生成对象的过程,真人出现
GuoXiangYu=Teacher()
#给属性赋值
GuoXiangYu.name="GuoXiangYu"

print("我是"+GuoXiangYu.name)
GuoXiangYu.eat("牛奶,咖啡")
GuoXiangYu.teach("睡觉")
二.封装
一. 在程序设计中,封装(Encapsulation)是对具体对象的一种抽象,即将某些部分隐藏起来,在程序外部看不到,其含义是其他程序无法调用。
要了解封装,离不开“私有化”,就是将类或者是函数中的某些属性限制在某个区域之内,外部无法调用。
二、为什么要封装
封装数据的主要原因是:保护隐私(把不想别人知道的东西封装起来)
封装方法的主要原因是:隔离复杂度(比如:电视机,我们看见的就是一个黑匣子,其实里面有很多电器元件,对于用户来说,我们不需要清楚里面都有些元件,电视机把那些电器元件封装在黑匣子里,提供给用户的只是几个按钮接口,通过按钮就能实现对电视机的操作。)
提示:在编程语言里,对外提供的接口(接口可理解为了一个入口),就是函数,称为接口函数,这与接口的概念还不一样,接口代表一组接口函数的集合体。
三.测试用例(bing)
第一个版本 搜索框输入文字进行搜索
编写每个页面的属性和方法(通常一个文件包括一个模块大概4个增删改查功能的页面)以bing为 例,编写搜索页 和 结果页的 属性和 方法。
封装的方法 进行测试
首先新建两个文件
封装我们的方法
第一个封装的方法文件命名为bace_action
from selenium.webdriver.chrome.webdriver import WebDriver
from selenium.webdriver.support.wait import WebDriverWait


class BaseAction(object):
    def __init__(self,driver:WebDriver):
        #进行浏览器操作,初始化 一定有浏览器
        self.driver = driver
    #发现元素的方法封装了,加上等待步骤
    def find_element(self,location):
        #By.ID类型 ,值 加上智能等待
        local_by,local_value=location
        wait=WebDriverWait(self.driver,10,1)
        return wait.until(lambda driver: self.driver.find_element(local_by,local_value))

    def find_elements(self,location):
        #By.ID类型 ,值 加上智能等待
        local_by,local_value=location
        wait=WebDriverWait(self.driver,10,1)
        return wait.until(lambda driver: self.driver.find_elements(local_by,local_value))
    def input(self,location,text):
        #使用我们封装方法找到元素
        ele=self.find_element(location)
        #点击元素
        ele.click()
        #清楚搜索框
        ele.clear()
        #写入文本
        ele.send_keys(text)
    def click(self,location):
        self.find_element(location).click()
第二个封装的方法文件命名为page_1
from selenium.webdriver.common.by import By
from selenium.webdriver.support.wait import WebDriverWait

from .base_action import BaseAction

class BingSearchPage(BaseAction):
    # 属性 元素 元素定位
    search_text = By.ID, "sb_form_q"
    search_click = By.ID, "search_icon"

    # 方法 在搜索框中输入关键字
    def enter_keyword(self, text):
        self.input(self.search_text, text)

    # 方法 点击搜索图标
    def click_search(self):
        self.click(self.search_click)


# 浏览器
class SearchResultPage(BaseAction):
    # 没什么属性
    # 方法 返回要 验证的元素文本
    def get_source(self):
        return element.text
调用我们的方法
import os

import allure
import pytest
import yaml
from selenium import webdriver
from .page_1 import BingSearchPage, SearchResultPage
from selenium.webdriver.chrome.service import Service as ChromeService

@pytest.fixture(scope="module")
def driver():
    par_path = os.path.abspath("..")
    CHROMEDRIVER_PATH = par_path + "/driver/chromedriver.exe"
    # selenium4的最新写法
    options = webdriver.ChromeOptions()
    options.add_experimental_option("excludeSwitches", ["enable-automation"])
    options.add_experimental_option("useAutomationExtension", False)
    service = ChromeService(executable_path=CHROMEDRIVER_PATH)
    driver = webdriver.Chrome(service=service, options=options)
    driver.implicitly_wait(30)
    yield driver
    driver.close()


# 输入地址
def test_bing_soso(driver):
    # 参数driver是上面的方法名,通过传参的方式,在测试方法 前调用。
    #    输入bing地址
    driver.get("https://cn.bing.com")
    #  初始化bing搜索 页
    bing_search = BingSearchPage(driver)
    # 在搜索框输入关键 字
    bing_search.enter_keyword("selenium")
    # 点击搜索
    bing_search.click_search()
    # 初始化结果页
    result_page = SearchResultPage(driver)
    # 断言搜索结果正确
    assert "selenium" in result_page.get_source("selenium")
第二个版本 加入参数 加入allure
import os

import allure
import pytest
import yaml
from selenium import webdriver
from .page_1 import BingSearchPage, SearchResultPage
from selenium.webdriver.chrome.service import Service as ChromeService

@pytest.fixture(scope="module")
def driver():
    par_path = os.path.abspath("..")
    CHROMEDRIVER_PATH = par_path + "/driver/chromedriver.exe"
    # selenium4的最新写法
    options = webdriver.ChromeOptions()
    options.add_experimental_option("excludeSwitches", ["enable-automation"])
    options.add_experimental_option("useAutomationExtension", False)
    service = ChromeService(executable_path=CHROMEDRIVER_PATH)
    driver = webdriver.Chrome(service=service, options=options)
    driver.implicitly_wait(30)
    yield driver
    driver.close()


# 输入地址
@pytest.mark.parametrize("keyword", ["selenium", "appium", "pytest"])
def test_bing_soso(driver,keyword):
    # 参数driver是上面的方法名 通过传参的方式 ,在测试方法 前调用
    driver.get("http://cn.bing.com")
    # 初始化bing搜索页
    bing_search = BingSearchPage(driver)
    # 在搜索框输入关键字
    bing_search.enter_keyword(keyword)
    # 点击搜索
    bing_search.click_search()
    # 初始化我们的结果页
    result_page = SearchResultPage(driver)
    # 断言搜索结果正确
    assert keyword in result_page.get_source(keyword)
第三个版本 加入yaml文件
建立一个yaml文件 命名为 yaml_data
- 赑屃
- 螭吻
- 蒲牢
- 狴犴
- 饕餮
- 蚣蝮
- 睚眦
- 狻猊
- 椒图
建一个test开头的python文件 并运行
import os

import allure
import pytest
import yaml
from selenium import webdriver
from .page_1 import BingSearchPage, SearchResultPage
from selenium.webdriver.chrome.service import Service as ChromeService

@pytest.fixture(scope="module")
def driver():
    par_path = os.path.abspath("..")
    CHROMEDRIVER_PATH = par_path + "/driver/chromedriver.exe"
    # selenium4的最新写法
    options = webdriver.ChromeOptions()
    options.add_experimental_option("excludeSwitches", ["enable-automation"])
    options.add_experimental_option("useAutomationExtension", False)
    service = ChromeService(executable_path=CHROMEDRIVER_PATH)
    driver = webdriver.Chrome(service=service, options=options)
    driver.implicitly_wait(30)
    yield driver
    driver.close()


# 输入地址
@pytest.mark.parametrize("keyword",yaml.safe_load(open(r"E:\selenium_project\POM_test\test_data.yaml", encoding='utf8')))
def test_bing_soso(driver,keyword):
    # 参数driver是上面的方法名 通过传参的方式 ,在测试方法 前调用
    driver.get("http://cn.bing.com")
    # 初始化bing搜索页
    bing_search = BingSearchPage(driver)
    # 在搜索框输入关键字
    bing_search.enter_keyword(keyword)
    # 点击搜索
    bing_search.click_search()
    # 初始化我们的结果页
    result_page = SearchResultPage(driver)
    # 断言搜索结果正确
    assert keyword in result_page.get_source(keyword)
你的yaml里面如果有汉语组成 那就需要加上 encoding=‘utf8’
但是你的终端可能会乱码 那就需要在当前目录下建立pytest.ini文件写入
[pytest]
disable_test_id_escaping_and_forfeit_all_rights_to_community_support=True
四.迸发 三次 或以上
终端CD 进入 文件目录下 执行pytest -n 3 文件名

最后可以看到迸发成功
迸发三次基础上 加入allure 生成json数据
@allure.feature("bing搜索")
@pytest.mark.parametrize("keyword",yaml.safe_load(open(r"E:\selenium_project\POM_test\test_data.yaml", encoding='utf8')))
def test_bing_soso(driver,keyword):
    # 参数driver是上面的方法名 通过传参的方式 ,在测试方法 前调用
    driver.get("http://cn.bing.com")
    # 初始化bing搜索页
    bing_search = BingSearchPage(driver)
    # 在搜索框输入关键字
    bing_search.enter_keyword(keyword)
    # 点击搜索
    bing_search.click_search()
    # 初始化我们的结果页
    result_page = SearchResultPage(driver)
    # 截图
    driver.save_screenshot(keyword+".png")
    allure.attach.file(keyword+".png",attachment_type=allure.attachment_type.PNG)
    # 断言搜索结果正确
    assert keyword in result_page.get_source(keyword)
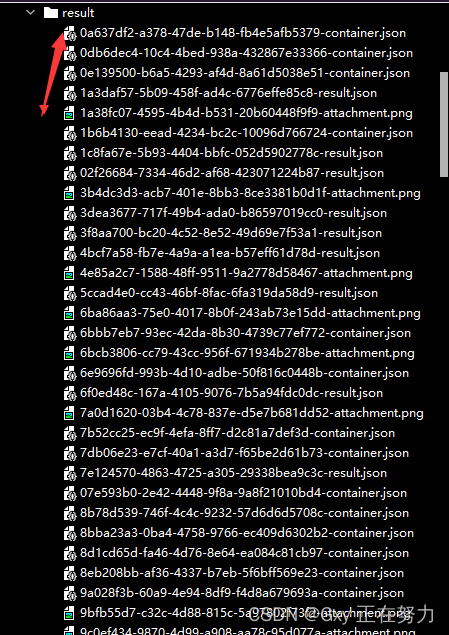
终端进入当前文件目录下 输入 pytest -n 3 文件名 --alluredir=./result
这代表迸发三次并记录成json数据 保存在 result文件里

在这里插入图片描述

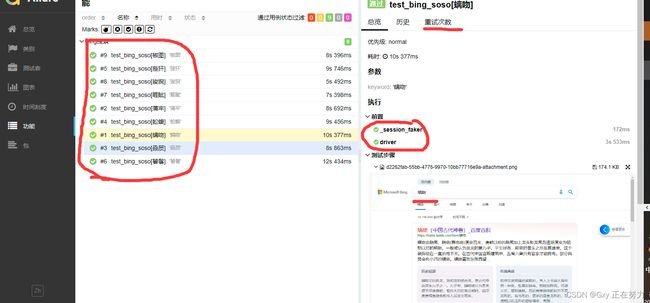
报告
终端进入当前文件目录下 输入 allure serve ./result


