2-ELK+ Elasticsearch+head+kibana、企业内部日志分析系统
Kibana部署 接上篇
在一台新的虚拟机
系统类型:Centos7.5
节点IP: 192.168.246.235
软件版本:nginx-1.14.2、kibana-6.5.4-linux-x86_64.tar.gz
- 安装配置Kibana
- (1)安装 安装包看上篇怎么下载的
[root@es-3-head-kib ~]# tar zvxf kibana-6.5.4-linux-x86_64.tar.gz -C /usr/local/
(2)配置
[root@es-3-head-kib ~]# cd /usr/local/kibana-6.5.4-linux-x86_64/config/
[root@es-3-head-kib config]# vim kibana.yml
在文件最后面,加上即可
server.port: 5601
server.host: "192.168.246.235"     #kibana本机的地址
elasticsearch.url: "http://192.168.246.234:9200"	#ES主节点地址+端口
kibana.index: ".kibana"
配置项含义:
server.port kibana 服务端口,默认5601
server.host kibana 主机IP地址,默认localhost
elasticsearch.url  用来做查询的ES节点的URL,默认http://localhost:9200
kibana.index       kibana在Elasticsearch中使用索引来存储保存的searches, visualizations和dashboards,默认.kibana
其他配置项可参考:
https://www.elastic.co/guide/en/kibana/6.5/settings.html
(3)启动
[root@es-3-head-kib config]# cd ..
[root@es-3-head-kib kibana-6.5.4-linux-x86_64]# nohup ./bin/kibana &
[1] 12054
[root@es-3-head-kib kibana-6.5.4-linux-x86_64]# nohup: ignoring input and appending output to ‘nohup.out’
- 安装配置Nginx反向代理
(1)配置YUM源:
[root@es-3-head-kib ~]# rpm -ivh http://nginx.org/packages/centos/7/noarch/RPMS/nginx-release-centos-7-0.el7.ngx.noarch.rpm
(2)安装:
[root@es-3-head-kib ~]# yum install -y nginx
(3)配置反向代理
[root@es-3-head-kib ~]# cd /etc/nginx/conf.d/
[root@es-3-head-kib conf.d]# cp default.conf nginx.conf
[root@es-3-head-kib conf.d]# mv default.conf default.conf.bak
[root@es-3-head-kib conf.d]# vim nginx.conf
server {
        listen       80;
        server_name  192.168.246.235;  #访问本机的端口

        #charset koi8-r;

       # access_log  /var/log/nginx/host.access.log  main;
       # access_log off;

         location / {
             proxy_pass http://192.168.246.235:5601; #跳转到这个端口
             proxy_set_header Host $host:5601;
             proxy_set_header X-Real-IP $remote_addr;
             proxy_set_header X-Forwarded-For $proxy_add_x_forwarded_for;
             proxy_set_header Via "nginx";
                     }
        # location /status {
        #    stub_status on; #开启网站监控状态
        #   access_log /var/log/nginx/kibana_status.log; #监控日志
        #   auth_basic "NginxStatus"; }

         location /head/{
             proxy_pass http://192.168.246.235:9100;
             proxy_set_header Host $host:9100;
             proxy_set_header X-Real-IP $remote_addr;
             proxy_set_header X-Forwarded-For $proxy_add_x_forwarded_for;
             proxy_set_header Via "nginx";
                         }
}
(4)配置Nginx
1.将原来的log_format注释掉,添加json格式的配置信息,如下:
[root@es-3-head-kib conf.d]# vim /etc/nginx/nginx.conf
log_format  json '{"@timestamp":"$time_iso8601",'
                           '"@version":"1",'
                           '"client":"$remote_addr",'
                           '"url":"$uri",'
                           '"status":"$status",'
                           '"domain":"$host",'
                           '"host":"$server_addr",'
                           '"size":$body_bytes_sent,'
                           '"responsetime":$request_time,'
                           '"referer": "$http_referer",'
                           '"ua": "$http_user_agent"'
               '}';
2.引用定义的json格式的日志:
access_log /var/log/nginx/access_json.log json;
(5)启动Nginx
root@es-3-head-kib ~]# nginx -t
root@es-3-head-kib ~]# systemctl start nginx
浏览器访问http://192.168.246.235 刚开始没有任何数据,会提示你创建新的索引。
Logstash部署
192.168.246.231 这个Logstash部署,想收集那个服务器上的web日志,哪一个服务器就必须部署一个Logstash用来收集日志
系统类型:Centos7.4
节点IP:192.168.246.231
软件版本:jdk-8u121-linux-x64.tar.gz、logstash-6.5.4.tar.gz
1.安装配置Logstash
Logstash运行同样依赖jdk,本次为节省资源,故将Logstash安装在了kafka244.231节点。
[root@es-2-zk-log ~]# tar -xvzf jdk-8u211-linux-x64.tar.gz  -C /usr/local/
[root@es-2-zk-log ~]# cd /usr/local/
[root@es-2-zk-log ~]# mv jdk1.8.0_211/ java
[root@es-2-zk-log ~]# vim /etc/profile
配置环境变量
JAVA_HOME=/usr/local/java
PATH=$JAVA_HOME/bin:$PATH
export JAVA_HOME PATH
刷新一下查看
[root@es-2-zk-log local]# source /etc/profile
[root@es-2-zk-log local]# java -version
java version "1.8.0_211"
Java(TM) SE Runtime Environment (build 1.8.0_211-b12)
Java HotSpot(TM) 64-Bit Server VM (build 25.211-b12, mixed mode)
(1)安装
解压 logstash 怎么样下载安装包的,上篇有讲
[root@es-2-zk-log ~]# tar xvzf logstash-6.5.4.tar.gz -C /usr/local/
(2)配置
创建目录,我们将所有input、filter、output配置文件全部放到该目录中。
1.安装nginx: 测试使用的是nginx
rpm -ivh http://nginx.org/packages/centos/7/noarch/RPMS/nginx-release-centos-7-0.el7.ngx.noarch.rpm
[root@es-2-zk-log ~]# yum install -y nginx
将原来的日志格式注释掉定义成json格式:
[root@es-2-zk-log conf.d]# vim /etc/nginx/nginx.conf
log_format  json '{"@timestamp":"$time_iso8601",'
                           '"@version":"1",'
                           '"client":"$remote_addr",'
                           '"url":"$uri",'
                           '"status":"$status",'
                           '"domain":"$host",'
                           '"host":"$server_addr",'
                           '"size":$body_bytes_sent,'
                           '"responsetime":$request_time,'
                           '"referer": "$http_referer",'
                           '"ua": "$http_user_agent"'
               '}';
2.引用定义的json格式的日志:
access_log /var/log/nginx/access_json.log json;
启动
[root@es-2-zk-log ~]# systemctl start nginx
[root@es-2-zk-log ~]# systemctl enable nginx
浏览器多访问几次,浏览器多访问几次,因为产生日志,后面的head刷新才会更快
创建上面配置文件里面指定的目录
[root@es-2-zk-log ~]# mkdir -p /usr/local/logstash-6.5.4/etc/conf.d
[root@es-2-zk-log ~]# cd /usr/local/logstash-6.5.4/etc/conf.d/
[root@es-2-zk-log conf.d]# vim input.conf #—在下面添加
input {                        #让logstash可以读取特定的事件源。
    file {                                       #从文件读取
    path => ["/var/log/nginx/access_json.log"]        #要输入的文件路径
#   code => "json"               #定义编码,用什么格式输入和输出,由于日志就是json格式,这里不用再写

        type => "shopweb"                       #定义一个类型,通用选项. 用于激活过滤器

    }
}
output {           #输出插件,将事件发送到特定目标
    elasticsearch {            #输出到es
    hosts => ["192.168.246.234:9200"]       #指定es服务的ip加端口
    index => ["%{type}-%{+YYYY.MM.dd}"]     #引用input中的type名称,定义输出的格式
    }
}
启动:
[root@es-2-zk-log conf.d]# cd /usr/local/logstash-6.5.4/
[root@es-2-zk-log logstash-6.5.4]# nohup bin/logstash -f etc/conf.d/  --config.reload.automatic &
这里提示一下 启动比较慢,稍微耐心等下,看看日志有没有报错,如果报错,大部分是配置文件写错拉,查看一下,如果还是报错,把解压的文件删除,从新解压一下从新开始做
查看日志出现:
[root@es-2-zk-log logstash-6.5.4]# tail -f nohup.out
[2019-08-04T01:39:24,671][INFO ][logstash.outputs.elasticsearch] Attempting to install template {:manage_template=>{"template"=>"logstash-*", "version"=>60001, "settings"=>{"index.refresh_interval"=>"5s"}, "mappings"=>{"_default_"=>{"dynamic_templates"=>[{"message_field"=>{"path_match"=>"message", "match_mapping_type"=>"string", "mapping"=>{"type"=>"text", "norms"=>false}}}, {"string_fields"=>{"match"=>"*", "match_mapping_type"=>"string", "mapping"=>{"type"=>"text", "norms"=>false, "fields"=>{"keyword"=>{"type"=>"keyword", "ignore_above"=>256}}}}}], "properties"=>{"@timestamp"=>{"type"=>"date"}, "@version"=>{"type"=>"keyword"}, "geoip"=>{"dynamic"=>true, "properties"=>{"ip"=>{"type"=>"ip"}, "location"=>{"type"=>"geo_point"}, "latitude"=>{"type"=>"half_float"}, "longitude"=>{"type"=>"half_float"}}}}}}}}
在浏览器中访问本机的nginx网站
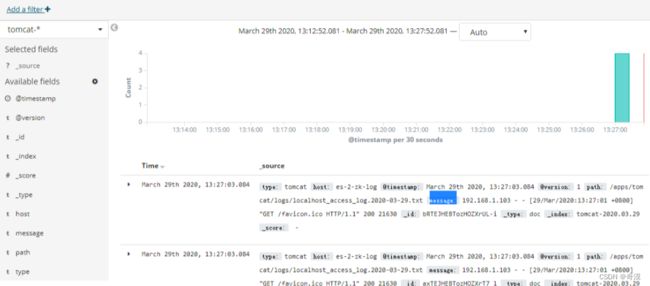
发现之后,去配置kibanna添加索引
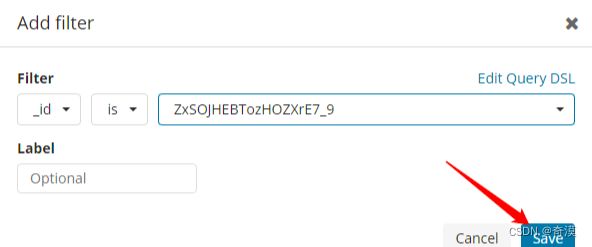
可以根据某个特定的值,来查看记录,比如
多刷新几次本机的nginx页面,可以看到相应的日志记录
收集Tomcat日志,配置文件已提供
想收集其他应用的日志都可以的,思路是一样的
首先,你想收集那个web应用的日志,要先安装部署Logstash
我这里是直接,用我的第二台机器使用拉,安装拉一个tomcat
[root@es-2-zk-log logstash-6.5.4]# cat etc/conf.d/tomcat.conf
直接在配置文件多写一个配置文件 vim tomcat.conf
这个是第一种方法,写多个conf
input {
    file {
      path => "/usr/local/tomcat/logs/localhost_access_log*.txt"
      type => "tomcat"
#      start_position => "beginning"
#      stat_interval => "2"
    }
}

output {
    elasticsearch {
      hosts => ["196.196.196.44:9200"]
      index => ["%{type}-%{+YYYY.MM.dd}"]
    }
}
第二种方法
input {                        #让logstash可以读取特定的事件源。
    file {                                       #从文件读取
    path => ["/var/log/nginx/access_json.log"]        #要输入的文件路径
#   code => "json"               #定义编码,用什么格式输入和输出,由于日志就是json格式,这里不用再写
        type => "shopweb"                       #定义一个类型,通用选项. 用于激活过滤器

    }
}
input {
    file {
      path => "/usr/local/tomcat/logs/localhost_access_log*.txt"
      type => "tomcat"
      start_position => "beginning"
            stat_interval => "2"
          }
         }
output {
    elasticsearch {
      hosts => ["196.196.196.44:9200"]
      index => ["%{type}-%{+YYYY.MM.dd}"]
    }
}
写完配置文件,强烈建议先杀死Logstash进程 重新启动
ps-ef |gerp  bashLogstash
找出pid   杀死进程
做出来应该是以下效果:
 注意:如果进程关闭,页面将会访问失败,需要重启head,kibana,logstash
注意:如果出不来通过界面提示打开时间管理器,设置时间为本星期
过程: 通过nginx的访问日志获取日志—>传输到logstach ----传输到–elasticsearch–传输到—kibana (通过nginix反代)
注意:如果出现问题
从上面截图可以看出存在5个unassigned的分片,新建索引blog5的时候,分片数为5,副本数为1,新建之后集群状态成为yellow,其根本原因是因为集群存在没有启用的副本分片,我们先来看一下官网给出的副本分片的介绍:
副本分片的主要目的就是为了故障转移,正如在 集群内的原理 中讨论的:如果持有主分片的节点挂掉了,一个副本分片就会晋升为主分片的角色。
那么可以看出来副本分片和主分片是不能放到一个节点上面的,可是在只有一个节点的集群里,副本分片没有办法分配到其他的节点上,所以出现所有副本分片都unassigned得情况。因为只有一个节点,如果存在主分片节点挂掉了,那么整个集群理应就挂掉了,不存在副本分片升为主分片的情况。
解决办法就是,在单节点的elasticsearch集群,删除存在副本分片的索引,新建索引的副本都设为0。然后再查看集群状态


