【嵌入式】基于平头哥内核的W801 WIFI SoC的OTA方案设计
系统分区表
W801是平头哥内核的WIFI芯片。给到的SDK里面没有找到中断向量表重定向的函数,类似于STM32的NVIC_SetVectorTable,所以中断向量表只能给主程序用,那么BootLoader就没法弄了。干脆不用BootLoader了,直接划一个分区用来存放Updater代码,用于解压或差分计算新固件并复制到主分区(存在变砖的可能性)。
国产芯片就是资料不全,规格书里面写了Flash的寻址空间为0x0800 0000 ~ 0x0FFF FFFF,但是在SDK里面,链接脚本是从0x080d0400开始的,0x080d0400是在tools\w800\wconfig文件里面W800_RUN_ADDRESS选项定义的默认值:

但是把W800_RUN_ADDRESS改成0x08000000之后无法运行,而且下载的时候发现芯片的MAC地址值还被冲刷了,把W800_RUN_ADDRESS改成大于0x080d0400的地址值是可以运行的,可能是前面的一些空间是用作其它用途的(后面发现擦写Flash的时候,从0x08000000开始计算2MB之后的地址是没法写入的,代码里面做了地址范围判断)。所以这里只好按照0x080d0400之后的地址值作为Flash的起始地址开始分区,由于芯片内部Flash的最小擦除单位是sector,一个sector为4KB,为了方便擦写,取一个最近的4KB对齐地址0x080D1000作为起始地址,同时每个分区的大小也设置为4KB的整数倍。2MB Flash的有效范围是0x08000000到0x08200000,那么定义用户代码的有效地址范围为0x080D1000~0x08200000,一共1212KB。
分区表设计如下图:

最开始的800KB必须作为主程序Main APP,因为中断向量表固定在这个位置。紧跟64KB为Updater程序。Updater后面的32KB的Sub APP用于其它用途,然后是4KB存放OTA参数。最后312KB存放下载的OTA固件包(全量包、全量压缩包或差分包)。
OTA工作流程
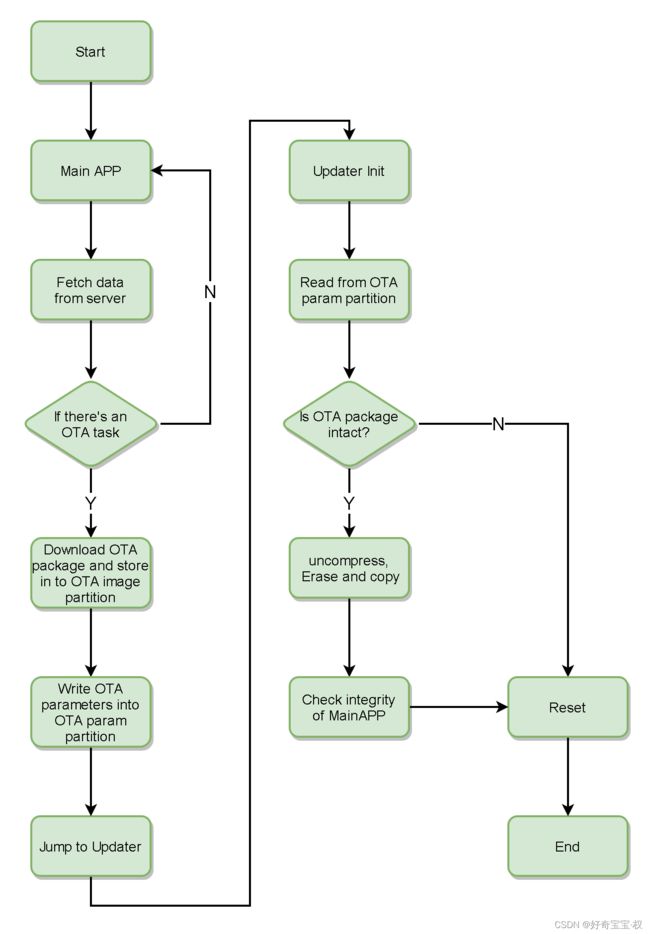
Updater工程
Updater软件为单独的一个工程,直接拷贝原来的SDK软件,修改连接脚本:
......

MEMORY
{
	I-SRAM : ORIGIN = 0x08199000 , LENGTH = 0x10000     /* I-SRAM  100KB */
	D-SRAM : ORIGIN = 0x20000100 , LENGTH = 0x47f00     /* D-SRAM  288KB */
	V-SRAM : ORIGIN = 0x20000000 , LENGTH = 0x100       /* off-chip SRAM 8MB */
}


......
I-SRAM是指令存储器,把它的起始地址修改成Updater分区的起始地址0x08199000,LENGTH为64KB。把wm_main.c里面的main函数直接改成:
int main(void)
{
    u32 value = 0;
    /*32K switch to use RC circuit & calibration*/
    tls_pmu_clk_select(0);

    /*Switch to DBG*/
    value = tls_reg_read32(HR_PMU_BK_REG);
    value &= ~(BIT(19));
    tls_reg_write32(HR_PMU_BK_REG, value);
    value = tls_reg_read32(HR_PMU_PS_CR);
    value &= ~(BIT(5));
    tls_reg_write32(HR_PMU_PS_CR, value);

    /*Close those not initialized clk except uart0,sdadc,gpio,rfcfg*/
    value = tls_reg_read32(HR_CLK_BASE_ADDR);
    value &= ~0x3fffff;
    value |= 0x1a02;
    tls_reg_write32(HR_CLK_BASE_ADDR, value);

    void disp_version_info(void);
    disp_version_info();

    tls_sys_clk_set(CPU_CLK_80M);
    UserMain(); // for updater proj, OS is not required, directly jump to UserMain

    while(1);
    return 0;
}
因为Updater不需要运行操作系统,只需要做一些解压、差分运算以及读取、擦除和写入数据到flash。另外没有在main函数里面添加Updater的核心代码,而是调用的UserMain函数,是因为编译系统将wm_main.c和其它系统层代码编译成SDK库,最后和app文件夹里面的应用层代码链接成可执行文件的,并且编译库make lib速度较慢,而Usermain函数是属于应用层的代码,直接编译更方便。
Main APP工程
由于官方没有给很好的Flash烧写工具,每次make flash或者make down好像都只能从固定地址处开始下载,没法下载文件到指定的地址,所以把Updater软件的可执行bin文件作为常量数组先放到Main APP的工程中,并指定该数组的存放段为 .updater_bin,下载Main APP的时候连带Updater一起下载进去(也可以在Main APP里面添加一个烧写功能,使用X-modem之类的通信协议下载数据到指定位置)。
__attribute__((section(".updater_bin"))) const uint8_t updater_bin[1024*64] =
 {
	0x00, 0x85, 0x19, 0x08, 0xD4, 0x85, 0x19, 0x08, 0xD4, 0x85, 0x19, 0x08, 0xD4, 0x85, 0x19, 0x08,
	0xD4, 0x85, 0x19, 0x08, 0xD4, 0x85, 0x19, 0x08, 0xD4, 0x85, 0x19, 0x08, 0xD4, 0x85, 0x19, 0x08,
	0xD4, 0x85, 0x19, 0x08, 0xD4, 0x85, 0x19, 0x08, 0xD4, 0x85, 0x19, 0x08, 0xD4, 0x85, 0x19, 0x08,
	0xD4, 0x85, 0x19, 0x08, 0xD4, 0x85, 0x19, 0x08, 0xD4, 0x85, 0x19, 0x08, 0xD4, 0x85, 0x19, 0x08,

......
修改Main APP的链接脚本:
......

MEMORY
{
	I-SRAM : ORIGIN = 0x080D1000 , LENGTH = 0x120000 /* I-SRAM  1M+128KB */
	D-SRAM : ORIGIN = 0x20000100 , LENGTH = 0x47f00   /* D-SRAM  288KB */
	V-SRAM : ORIGIN = 0x20000000 , LENGTH = 0x100   /* off-chip SRAM 8MB */
	UPDATER : ORIGIN = 0x08199000 , LENGTH = 0x10000   /* updater */
}

......

 .updater_bin :
 {
    KEEP(*main.o(.updater_bin))
 } > UPDATER

......
链接脚本里面添加一个存储器UPDATER,起始地址为Updater分区的起始地址,大小64KB。再添加一个updater_bin段,Updater的bin文件数组就放在这个段里面。这样Main APP生成的bin文件大小就变成864KB了(800KB + 64KB),下载较慢。
这样在Main APP中就可以正常跳转到Updater中去了(注意,可执行文件的前256个字节为中断向量表,第一个中断向量为复位中断,所以向量表的第一个字为reset handler的地址):
#define OTA_PARAM_START_ADDRESS         0x081B1000
#define OTA_PARAM_LENGTH                (4 * 1024)

#define OTA_PACKAGE_START_ADDRESS       0x081B2000
#define OTA_PACKAGE_LENGTH              (312 * 1024)

#define OTA_UPDATER_START_ADDRESS       0x08199000
#define OTA_UPDATER_LENGTH              (64 * 1024)

#define OTA_SUBAPP_START_ADDRESS       	0x081B1400
#define OTA_SUBAPP_LENGTH              	(32 * 1024)

#define OTA_MAINAPP_START_ADDRESS      	0x080D1000
#define OTA_MAINAPP_LENGTH             	(800 * 1024)

__attribute__((section(".updater_bin"))) const uint8_t updater_bin[1024*64] =
 {
    ......
};

void UserMain(void)
{
    uint32 *updater_start_addr = (uint32 *)OTA_UPDATER_START_ADDRESS;
    uint32 updater_reset_handler_addr = *updater_start_addr;
    LOGI("updater_bin addr:%.8X\n", (uint32)updater_bin);
    LOGI("updater_bin:%.2X %.2X %.2X %.2X\n", updater_bin[0], updater_bin[1], updater_bin[2], updater_bin[3]);
    LOGI("updater_start_addr:%.8X\n", (uint32)updater_start_addr);
    LOGI("updater_reset_handler_addr:%.8X\n", (uint32)updater_reset_handler_addr);
    void (*reset_handler)(void) = (void (*)(void))updater_reset_handler_addr;
    reset_handler();
    while (1) {
        tls_os_time_delay(5 * HZ);
    }
}附:后面发现,Updater工程中设置了W800_RUN_ADDRESS为0x08199000之后,下载是从0x08199000处开始下载,这样Main APP下载就不会影响Updater代码了,两个工程可以独立下载不干扰,所以不需要再把Updater文件作为常量数组放在Main APP里面了。但是要注意,代码的执行地址也会变成W800_RUN_ADDRESS(可能0x08000000前面的一段空间是一个BootLoader,下载的时候把W800_RUN_ADDRESS传给它了,所以BootLoader启动应用程序的时候会跳转到W800_RUN_ADDRESS处运行并且设置了中断向量表地址也为W800_RUN_ADDRESS),所以单片机复位之后是会运行最后下载的代码的,那么需要先下载Updater再下载Main APP才行。
简单的HTTP服务器
创建本地HTTP服务器用于下载OTA固件包。参考链接:快速搭建一个简易的HTTP服务器用于文件分享与下载 - 灰信网(软件开发博客聚合) https://www.freesion.com/article/2710660021/
1、使用Python脚本创建http server:
import http.server
import socketserver
PORT = 80
Handler = http.server.SimpleHTTPRequestHandler
with socketserver.TCPServer(("", PORT), Handler) as httpd:
print("serving at port", PORT)
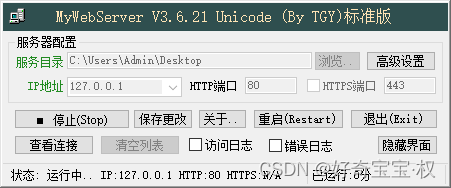
httpd.serve_forever()2、使用小工具软件MyWebServer,也很方便:
3、使用Node.js搭建一个简单的RESTful API服务器:
var express = require('express');
var app = express();
var fs = require("fs");

app.get('/ota/query', function (req, res) {
   fs.readFile( __dirname + "/resource/" + "info.json", 'utf8', function (err, data) {
       console.log( data );
       res.end( data );
   });
})

app.get('/ota/down/*', function (req, res) {
    console.log("req.params[0]:" + req.params[0]);

    fs.readFile( __dirname + "/resource/" + req.params[0], function (err, data) {
        res.end( data );
    });
})

var server = app.listen(80, function () {
//   var host = server.address().address
  var host = "127.0.0.1"
  var port = server.address().port

  console.log("Server address: http://%s:%s", host, port)
})
OTA固件压缩和解压
使用的miniz库:Miniz is a lossless, high performance data compression library in a single source file that implements the zlib (RFC 1950) and Deflate (RFC 1951) compressed data format specification standards. It supports the most commonly used functions exported by the zlib library......
PC端可以对OTA固件进行压缩,单片机端进行解压。由于单片机端没有足够的空间进行一次性数据解压,所以PC端进行一次性数据压缩,单片机端进行分批次数据解压(解压比较耗内存,单片机端代码尽量将大数组用全局变量或静态变量定义,不然heap空间不够解压算法使用会导致解压失败),代码示例:
#include
#include
#include
#include
#include
#include "string.h"
#include "debug.h"
#include "event.h"

#include
#include
#include
#include
#include "miniz.h"

typedef unsigned char uint8;
typedef unsigned short uint16;
typedef unsigned int uint;

#define my_max(a,b) (((a) > (b)) ? (a) : (b))
#define my_min(a,b) (((a) < (b)) ? (a) : (b))

#define BUF_SIZE (64 * 1024)

static uint8 s_inbuf[BUF_SIZE];
static uint8 s_outbuf[BUF_SIZE];

int my_uncompress(unsigned char *pDest, mz_ulong *pDest_len, const unsigned char *pSource, mz_ulong *pSource_len)
{
    mz_stream stream;
    int status;
    memset(&stream, 0, sizeof(stream));

    /* In case mz_ulong is 64-bits (argh I hate longs). */
    if ((*pSource_len | *pDest_len) > 0xFFFFFFFFU)
        return MZ_PARAM_ERROR;

    stream.next_in = s_inbuf;
    stream.avail_in = 0;
    stream.next_out = s_outbuf;
    stream.avail_out = BUF_SIZE;
    stream.total_out = 0;

    status = mz_inflateInit(&stream);
    if (status != MZ_OK)
        return status;


    uint remaining = *pSource_len;
    uint cursor = 0;
    uint total = 0;
    // LOGI("remaining: %d, cursor: %d\n", remaining, cursor);

    while (1) {

        // If input buffer is empty, read more bytes from input file.
        if (!stream.avail_in) {
            uint n = my_min(BUF_SIZE, remaining);

            LOGI("Reading %d bytes data...\n", n);
            memcpy(s_inbuf, pSource + cursor, n);
            // if (fread(s_inbuf, 1, n, pInfile) != n)
            // {
            //     LOGI("Failed reading from input file!\n");
            //     return EXIT_FAILURE;
            // }

            stream.next_in = s_inbuf;
            stream.avail_in = n;

            cursor += n;
            remaining -= n;
        }


        if (remaining) {
            status = mz_inflate(&stream, MZ_NO_FLUSH);
        } else {
            status = mz_inflate(&stream, Z_FINISH);
            // break;
        }
        LOGI("status: %d, remaining: %d, avail_out: %d\n", status, remaining, stream.avail_out);

        // If output buffer is full, or compression is done, write buffer to output file.
        if ((status == Z_STREAM_END) || (!stream.avail_out))    // "avail_out = 0" means output buff is full
        {
            uint n = BUF_SIZE - stream.avail_out;   // Valid data size is the length of output buff minus its remaining space
            LOGI("Writeing %d bytes of data...\n", n);
            // LOGI("n %d\n", n);
            // if (fwrite(s_outbuf, 1, n, pOutfile) != n)
            // {
            //     LOGI("Failed writing to output file!\n");
            //     return EXIT_FAILURE;
            // }
            memcpy(pDest + total, s_outbuf, n);
            total += n;

            stream.next_out = s_outbuf;
            stream.avail_out = BUF_SIZE;
        }

        if (status == Z_STREAM_END)
            break;
        else if (status != Z_OK)
        {
            LOGI("deflate() failed with status %i!\n", status);
            // return EXIT_FAILURE;
        }

        usleep(10000);

    }

    LOGI("total %d\n", total);
    LOGI("stream.total_out %d\n", stream.total_out);
    *pDest_len = stream.total_out;
    return mz_inflateEnd(&stream);
}

void miniz_test(uint8 *input, int input_len)
{
    int cmp_status;
    uLong src_len = (uLong)input_len;
    uLong cmp_len = compressBound(src_len);
    uLong uncomp_len = src_len;
    uint8 *pCmp, *pUncomp;

    LOGI("miniz.c version: %s\n", MZ_VERSION);

    do
    {
        // Allocate buffers to hold compressed and uncompressed data.
        pCmp = (mz_uint8 *)malloc((size_t)cmp_len);
        pUncomp = (mz_uint8 *)malloc((size_t)src_len);
        if ((!pCmp) || (!pUncomp))
        {
            LOGI("Out of memory!\n");
            return EXIT_FAILURE;
        }

        // ********************Compress********************
        // cmp_status = compress(pCmp, &cmp_len, (const unsigned char *)input, src_len);
        cmp_status = mz_compress2(pCmp, &cmp_len, (const unsigned char *)input, src_len, MZ_UBER_COMPRESSION);
        if (cmp_status != Z_OK)
        {
            LOGI("compress() failed!\n");
            free(pCmp);
            free(pUncomp);
            return EXIT_FAILURE;
        }

        LOGI("Compressed from %u to %u bytes\n", (mz_uint32)src_len, (mz_uint32)cmp_len);


        // ********************Decompress********************
        // cmp_status = uncompress(pUncomp, &uncomp_len, pCmp, cmp_len);
        cmp_status = my_uncompress(pUncomp, &uncomp_len, pCmp, &cmp_len);

        if (cmp_status != Z_OK)
        {
            LOGI("uncompress failed!\n");
            free(pCmp);
            free(pUncomp);
            return EXIT_FAILURE;
        }

        LOGI("Decompressed from %u to %u bytes\n", (mz_uint32)cmp_len, (mz_uint32)uncomp_len);

        // Ensure uncompress() returned the expected data.
        if ((uncomp_len != src_len) || (memcmp(pUncomp, input, (size_t)src_len)))
        {
            LOGI("Decompression failed!\n");
            free(pCmp);
            free(pUncomp);
            return EXIT_FAILURE;
        }

        free(pCmp);
        free(pUncomp);

    } while (0);

    LOGI("Success.\n");
    return EXIT_SUCCESS;
}

int main()
{
    LOGI("\n\n**********************%s, %s, %s**********************\n", __DATE__, __TIME__, VERSION);

    int fd_old, fd_new;
    fd_old  = open("old.bin", O_RDONLY);
    if(fd_old < 0)
    {
        LOGE("open source image failed! ret(%d)\n", fd_old);
        return -1;
    }
    fd_new  = open("new.bin", O_RDONLY);
    if(fd_new < 0)
    {
        LOGE("open source image failed! ret(%d)\n", fd_new);
        return -1;
    }

    lseek(fd_old, 0, SEEK_SET);
    lseek(fd_new, 0, SEEK_SET);

    uint8_t *fd_old_read_buf = malloc(1024 * 1024 * 2);
    uint8_t *fd_new_read_buf = malloc(1024 * 1024 * 2);
    uint8_t *fd_old_size = 0;
    uint8_t *fd_new_size = 0;
    fd_old_size = read(fd_old, fd_old_read_buf, 1024 * 1024 * 2);
    LOGI("fd_old read size:%d\n", fd_old_size);
    fd_new_size = read(fd_new, fd_new_read_buf, 1024 * 1024 * 2);
    LOGI("fd_new read size:%d\n", fd_new_size);

    miniz_test(fd_new_read_buf, fd_new_size);

    return 0;
}
Sub APP工程
SA(Sub APP)可以是一个和Updater一样的单独的工程,也可以整合到MA(Main APP)做一个内嵌的工程。后者是指MA和SA共存,可以同时运行,为了防止两个工程的内存使用重叠,在链接脚本里面把两个工程的RAM存储器空间分开,MA使用288KB的前256KB的RAM空间,SA使用最后32KB空间。另外还有一个很重要的,两个工程由于可以同时运行,栈空间就必须只有一个,规定使用MA的栈,运行SA的时候也是使用的MA的栈,所以在SA工程中不要设置栈指针。-R,每次MA有改动,SA需要重新编译。(勘误:由于wifi使用了RAM存储器最后面的一段内存空间,如下图,这段内存不是在C代码中创建的,而是使用了链接脚本中的__ram_end符号定义的,所以如果SA使用最后32KB的话,会被WiFi代码冲刷掉,因此这里我使用RAM的前32KB作为SA的内存空间,后面的给MA。)

使用RSA算法对固件签名
代码可以参考mbedtls库里面的参考代码 mbedtls/programs/pkey/rsa_sign.c 和mbedtls/programs/pkey/rsa_verify.c,或者W801给的SDK里面有RSA加解密和签名验证的demo代码demo/wm_rsa_demo.c(运行这个demo比较消耗栈空间)。这里我使用OpenSSL提供的指令进行测试:
1、计算固件test.bin的摘要,得到digest.txt文件,里面存放固件的hash值
tangquan@BDSHYF358758 MSYS ~/test
$ openssl sha1 test.bin > digest.txt

tangquan@BDSHYF358758 MSYS ~/test
$ cat digest.txt
SHA1(test.bin)= 5cb7698c44153c06b05847c95b55ec595bfcc4d6
2、创建私钥和公钥对:rsaprivatekey.pem,rsapublickey.pem
tangquan@BDSHYF358758 MSYS ~/test
$ openssl genrsa 1024 > rsaprivatekey.pem
Generating RSA private key, 1024 bit long modulus (2 primes)
.....+++++
.................................+++++
e is 65537 (0x010001)

tangquan@BDSHYF358758 MSYS ~/test
$ cat rsaprivatekey.pem
-----BEGIN RSA PRIVATE KEY-----
MIICXwIBAAKBgQCfT3Jb9W4xZpALyiK4S0xFMsjltpXUy0r/9eIyrwraHV8RPeWv
......
Pb+ztFOm42PaNeR+9+R9kbTy575q9Z4lhauMEggfKLGu1wg=
-----END RSA PRIVATE KEY-----

tangquan@BDSHYF358758 MSYS ~/test
$ openssl rsa -in rsaprivatekey.pem -pubout > rsapublickey.pem
writing RSA key

tangquan@BDSHYF358758 MSYS ~/test
$ cat rsapublickey.pem
-----BEGIN PUBLIC KEY-----
MIGfMA0GCSqGSIb3DQEBAQUAA4GNADCBiQKBgQCfT3Jb9W4xZpALyiK4S0xFMsjl
tpXUy0r/9eIyrwraHV8RPeWvn5+pv7nr2dQHbAnvcl46Fk+bfOe9kyriOvpAFkTj
wYbNu9DT5tnJkuhbCte46YVTvBnFSJSR83L+xo9l4WyYq+ZSiz26b11W4b+TLXLj
4cYTzCg1tXvGACr5JwIDAQAB
-----END PUBLIC KEY-----
3、使用私钥对摘要数据进行签名,得到signature.bin
tangquan@BDSHYF358758 MSYS ~/test
$ openssl rsautl -sign -inkey rsaprivatekey.pem -in digest.txt -out signature.bin

tangquan@BDSHYF358758 MSYS ~/test
$ ls
digest.txt  rsaprivatekey.pem  rsapublickey.pem  signature.bin  test.bin
4、使用公钥对签名进行验证,解码出来的结果和digest.txt文件内容一致,签名验证通过
tangquan@BDSHYF358758 MSYS ~/test
$ openssl rsautl -verify -inkey rsapublickey.pem -pubin -keyform PEM -in signature.bin
SHA1(test.bin)= 5cb7698c44153c06b05847c95b55ec595bfcc4d6