SpringBoot深入浅出阅读笔记(持续更新)
2021-1-07
@Component源码解读
@Retention(RetentionPolicy.RUNTIME)
@Target({ElementType.TYPE})
@Documented
@Repeatable(ComponentScans.class)
public @interface ComponentScan {
    @AliasFor("basePackages")
    String[] value() default {};

    @AliasFor("value")
    String[] basePackages() default {};

    ComponentScan.Filter[] includeFilters() default {};

    ComponentScan.Filter[] excludeFilters() default {};

    @Retention(RetentionPolicy.RUNTIME)
    @Target({})
    public @interface Filter {
        FilterType type() default FilterType.ANNOTATION;

        @AliasFor("classes")
        Class<?>[] value() default {};

        @AliasFor("value")
        Class<?>[] classes() default {};

        String[] pattern() default {};
    }
}
这里只截取了部分常用的源码
1. @AliasFor()这就是注解里面变量的别名,上述例子里面value和classes互为别名,这里需要注意@AliasesFor在使用的时候必须是成对出现,并且在给值的时候只能设置一个值,如果设置两个值那么互为别名的变量值必须相同否则报错.
2. includeFilters(),这里的传入的数据类型是ComponentScan.Filter(之前是单独一个@Filter注解现在在当前注解类里面单独定义了),该注解里面的Type就是要包扫描的类型有以下常用几类
- FilterType.ANNOTATION 注解类,比如@Service…
- FilterType.ASSIGNABLE特定类型,比如String…
3. classes和value互为别名,里面填写的就是要包含或者排除的内容,classes = {service.class} -> FilterType.ANNOTATION
classes = {MyPerson.class} -> FilteType.ASSIGNABLE
2021-1-08
@Autowired,@Primary,@Qualifier区别和使用
public interface Animal{}

@Component
public class Dos implement animal{
}

@Component
public class Cat implement animal{
}
注入报错!!!
public class Person{
	@Autowired
	private Animal animal;
}
 我们都知道@Autowired是通过类型进行注入,其工作原理就是
 通过当前标注的类型去ioc里面找对应类型的bean,如果找到多个
 就通过需要注解的名字去找,但是上述例子有两个animal的实现
 类,并且备注解的名字还是animal导致会找到两个类可以注入会
 报错,这时候就可以用@Parimary来进行指定优先级.
@Component
@Primary
public class Dog{
}

@Component
public class Cat{
}

public class person{
这时候注入就不会出现报错并且注入的就是Dog的实现类.
	@Autowired
	private Animal animal;
}
但是通过@Primary多多少少都有点麻烦,这时候就有了
@Qualifier("name")来指定要注入的实体类名字看例子,这样就
可以解决相同类型注入的问题.
@Component
public class Dog{
}

@Component
public class Cat{
}

public class person{
这时候注入就不会出现报错并且注入的就是Dog的实现类.
	@Qualifier("Dog")
	private Animal animal;

	// 上面两个注解可以使用@Resource代替,resource是按照名称寻找,找不到在按照类型寻找
}
但是说到底本人还是觉得
@Autowired最简单,因为
		@Autowired
		private Animal Dog;
根据@Autowored的工作原理这样就可以直接找到Dog的实现类
是不是觉得上面说了一大堆都没啥用.........
2021-1-11
@Autowired,@PostConstructor,构造方法执行顺序
之前对@Autowired的理解比较简单,今天看到一个例子,如下
@Component
public class Person{

	public Person(){
		System.out.println("Person的构造方法执行了");
	}

	public void service(){
		System.out.println("person的service执行了");
	}

	@PostConstruct
	public void personPostConst(){
		System.out.println("person的personPostConst执了");
	}
}

@Component
public class Demo(){

	public Demo{
		System.out.println("Demo的构造方法执行了");
	}

	public void service(){
	person.service();
}
	@Autowired
	public void testInDemo(Person person){
		person.service();
	}

	@PostConstruct
	public void personPostConst(){
		System.out.println("Demo的personPostConst执了");
	}
}

public void TestDemo{
	public static void main(String[] args){
// 进行上述代码的测试,创建ioc容器,传入自定义配置类字节码文件
ApplicationContext appc =
			new ApplicationContext(MyConfig.class)
		Demo demo = appc.getBean(Demo.class);
		demo.service();
	}
}

打印结果:
Person的构造方法执行了
person的personPostConst执了
Demo的构造方法执行了
Demo的personPostConst执了
person的service执行了
根据打印结果可知执行顺序是:
当前类的@Autowired所注释类的构造方法和@PostConstructor < 当前类的Constructor <
当前类的@PostConstructor < @Autowired注释类要执行的方法逻辑
值得注意的是@Autowired和@Value执行顺序是不分先后, 并且如果@Autowired注释的是方法先注入当前方法的参数之后执行被注释方法里面的逻辑
注意:@Autowired虽然最先执行但是其执行的只是被注释类的构造方法和@PostConstctor方法,如果注释的是方法那么在注入类后最后在执行
并且如果是直接new出来的对象那么对象里面的@PostConstructor是不执行的,只有交给ioc容器的对象才会执行里面的@PostConstructor
2021-1-14
@PropertySource使用和@ImportSource
再说之前一定要知道@PropertySource是注释在启动类上面的否则不生效,下面的代码要知道的是他不是只去jdbc.properties里面找配置而是,如果有Application开头的配置就先去Application里面找如果没有就会去@PropertySource配置的里面进行寻找.
注意:@ImportResource一般是用于注入xml文件的,而@PropertySource一般都是用于读取配置文件里面值使用.
@SpringBootApplication
@PropertySource(value = {"classpath:jdbc.properties"})
public class GoodsApplication{
		public static void main(String[] args) {
       	 	SpringApplication.run(EurekaApplication.class);
    }
}
@Conditional的使用
@Conditional其实就是为了判断当前要注入到ioc容器的类是否符合要求,如果不符合要求就不进行注入,其工作原理就是自定义一个Condition的实现类,之后通过判断处理当前被注解类是否有条件被注入之后返回true是注入反之不注入.
public class MyCondition implement Condition{
	@Override
    public boolean matches(ConditionContext context, AnnotatedTypeMetadata metadata) {
        // 这里的context主要是用来获取容器的个人信息和上下文配置
        // metadata是用于获取被标注对象的注解信息
这里返回的是true就代表被注解对象可以进行注入,反之不行.这里方便就直接返回false;
        return false;
    }
}

@Component
public class Person{

	@Bean
	// 这里使用的是自定义规则所以传入自定义实现Conditaional的实体类
	@Conditional(MyCondition.class)
	public Animal animal(){
		return new Animal;
	}
}

public class Test{
	@Autowired
	private Animal animal;

	public static voim main(String[] args){
		System.out.println(animal);
	}
}
// 由于自定义的condition实现类返回的是false所以不能正常注入这里打印的是null;
2021-1-19
AOP
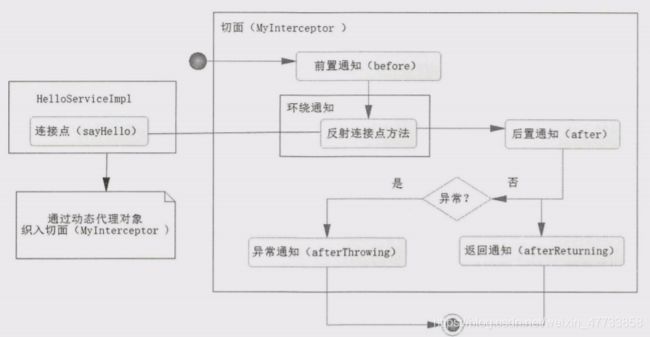
aop这个东西确实让人又爱又恨,刚开始会发现aop真的很难理解,提到aop一点时间想到的就是"面向切面编程",说到这个词我是蒙的,在说说他的底层其实就是动态代理在深入浅出springboot里面说aop就是一种约定,下面我就用代码讲解一下,代码可能有点长但是都很简单
package com.iflytek.aop;

import java.lang.reflect.InvocationHandler;
import java.lang.reflect.Method;
import java.lang.reflect.Proxy;

/**
 * @ClassName SayHelloService
 * @Author ygLiu
 * @Date 2021/1/19 9:20
 */
public interface SayHelloService {
    // 定义一个方法对名字sayHello
    void sayHello(String name);
}

class SayHellowServiceImpl implements SayHelloService {

    // 对上述接口进行实现
    @Override
    public void sayHello(String name) {
        System.out.println("hello" + name);
    }
}

class Invocation{
    Object target = null;
    Method method = null;
    Object[] args = null;

    public Invocation(Object target, Method method,Object[] args){
        this.args = args;
        this.method = method;
        this.target =target;
    }

    // 通过反射执行原有方法
    Object proceed() throws Exception{
        return method.invoke(target,args);
    }
}

// 现在我希望定义一个拦截器对sayHello方法进行拦截约定执行
interface Interceptor {
    // 前置方法返回true才能继续执行下列操作
    boolean before();

    /*before是true后执行around方法该方法主要是执行
    希望调用某个实体类的指定方法,所以我们传入一个自定义
    Invocation用于调用原方法*/
    void around(Invocation invocation) throws Exception;

    // 后置方法
    void after();

    // 出现异常执行方法
    void throwException();

    // 一切正常后执行
    void keepRunning();
}

// 对上述拦截器进行实现
class MyInterceptor implements Interceptor{

    @Override
    public boolean before() {
        System.out.println("before执行了");
        return true;
    }

    @Override
    public void around(Invocation invocation) throws Exception{
        System.out.println("around准备执行了");
        // 通过invocation的proceed()方法执行原有方法
        invocation.proceed();
        System.out.println("around执行结束了");
    }

    @Override
    public void after() {
        System.out.println("after执行了");
    }

    @Override
    public void throwException() {
        System.out.println("throwException执行了");
    }

    @Override
    public void keepRunning() {
        System.out.println("keepRunning执行了");
    }
}

// 创建InvocationHandler的实现类是很有必要的继续往下看
class ProxyBean implements InvocationHandler{

    // 这里定义被代理对象和拦截器方便下面调用
    Object target = null;
    Interceptor interceptor = null;

    // 这里自定义一个获取代理对象的静态方法,传入被代理对象
    static Object getProxyBean(Object target,Interceptor interceptor){
        ProxyBean proxyBean = new ProxyBean();
        proxyBean.interceptor = interceptor;
        proxyBean.target = target;

        /*获取代理对象的三个参数:
        1.被代理对象的类加载器,
        2.被代理对象实现所有接口的字节码文件,
        3.invocationHandler实现类,就是当前所在类*/
        return Proxy.newProxyInstance(target.getClass().getClassLoader()
                , target.getClass().getInterfaces(),proxyBean);
    }

    @Override
    public Object invoke(Object proxy, Method method, Object[] args) throws Throwable {
        // 这里就是我们书中进行约定的aop先执行拦截器的前置方法
        boolean before = interceptor.before();
        boolean findExceotion = false;
        try{
            if(before){
                // 创建一个invocation的实现类用于拦截器里面调用原方法
                Invocation invocation = new Invocation(target,method,args);
                interceptor.around(invocation);
            }else{
                // 如果前置方法是false就是直接执行原方法
                method.invoke(target,args);
            }
        }catch (Exception e){
            // 如果出了异常就执行下列操作
            findExceotion = true;
            e.printStackTrace();
        }

        // 为了保证程序的完成运行所以这里如果出了异常不是直接执行拦截器的异常方法
        interceptor.after();
        if(findExceotion){
            interceptor.throwException();
        }else{
            interceptor.keepRunning();
        }
        return null;
    }

    public static void main(String[] args) {
        // 进行测试
        SayHellowServiceImpl sayHellowService = new SayHellowServiceImpl();
        SayHelloService proxyBean = (SayHelloService) ProxyBean.getProxyBean(sayHellowService, new MyInterceptor());
        proxyBean.sayHello("world");
    }
}
说明一下:肯定有同学问为什么代理对象调用sayHello方法后会执行自定义InvocationHandler里面的invoke方法,这里强调:获取代理对象的时候传递的第三个参数就是InvocationHandler的实现类,而这个实现了我们传递的就是自定义的ProxyBean,所以当我们通过代理对象调用方法的时候就会执行其invoke方法.
- 连接点(join point):就像上述例子的sayHello方法,就是一个连接点,通过连接点就知道什么时候用到aop
- 通知(advice):前置方法(before),后置方法(after),环绕方法(around),异常后置(afterThrowing advice),事后通知方法(afterReturning advice),有点想上述例子的MyInterceptor.
- 目标对象(target):就是被代理对象,想上述例子里面的SayHelloServiceImpl就是一个被代理的对象.
- 切面(aspect):切面就是aop通过动态代理织入的一套流程,就像上述例子中的InvocationHandler实现类ProxyBean里面的invoke方法
- 切点(point cut):切点我理解的不够透彻,简单来说可能是因为有时候切面不仅仅适用于单个的方法(连接点),所以通过切点进行范围规定.
注解简化
- @Aspect:该注解注解在类上面,意思就是当前类就是切面类,就是一整套处理,就像上述例子中的InvocationHandler实现类里面的invoke方法
- @Beofore:该注解注释在方法上面,说明方法是前置方法
- @Around:方法是环绕方法
- @After:方法是后置方法
- @Pointcut:定义切点,可以在方法前,环绕,后方法上面进行注释,因为不一定所有的连接点触发aop的时候都需要执行所有的方法,所以需要进行切点定义.
2021-1-20
注解Aop
上述例子我们都知道了通过代理对象调用方法之后根据自定义的约定流程进行顺序执行,aop已经给我们封装好了一整套注解开发的aop,见代码
@Aspect
@Component
public class MyAspect {

	@Pointcut("execution(* com.example.aop.
	UserService.*(..))")
    public void pointCut(){}

    @Before("pointCut()")
    public void before(){
        System.out.println("before方法执行");
    }

    @Around("pointCut()")
    public void around(ProceedingJoinPoint
    		proceedingJoinPoint) throws Throwable {
        System.out.println("aroundBefore方法执行");
        // 这里的proceedingJoinPoint用来调用原来方法使用
        // 就像上述例子里面的Invocation里面的proceed方法.
        proceedingJoinPoint.proceed();
        System.out.println("aroundAfter方法执行");
    }

    @After("pointCut()")
    public void after(){
        System.out.println("after方法执行");
    }
}
// 测试类
public class Test{
	@Autowored
	private UserService userService;

	@Test
	public void show(){
		userService.say("张三");
	}
}
打印结果:
	aroundBefore方法执行
	beofre方法执行
	say:giao
	aroundAfter方法执行
	after方法执行
可以看到通过注解也是完全可以实现aop的但是这里有一个非常重要的点,不知道有没有同学注意到我们注入接口后并没有获取代理对象,那么他们是怎么通过动态代理去执行约定流程的呢?
答案显而易见:其实当我们调用的方法是接入点(符合切点),的时候我们注入的对象就是代理对象,通过debugger可以观察到图一:符合切点后注入的代理对象,图二:普通对象
误区
注意:aop主要是针对方法,对于类的加载aop不起作用
当new对象的时候会先加载成员变量赋值后再执行构造方法内的代码.
这里有一个简单的方式可以代替aspect就是实现对象BeanPostProcessor
@Component
public class AspectConfig implements BeanPostProcessor {
    /**
     * 当前方法代替aspect的before方法
     *
     * @param bean 实例化bean对象
     * @param beanName 实例化bean对象的名字
     * @return 返回当前实例化的对象
     * @throws BeansException
     */
    @Override
    public Object postProcessBeforeInitialization(Object bean, String beanName) throws BeansException {
        if(bean instanceof BeanConvertConfig){
            System.out.println("前置方法执行了");
        }
        return bean;
    }


    /**
     * 当前方法代替aspect的after方法
     *
     * @param bean 实例化bean对象
     * @param beanName 实例化bean对象的名字
     * @return 返回当前实例化的对象
     * @throws BeansException
     */
    @Override
    public Object postProcessAfterInitialization(Object bean, String beanName) throws BeansException {
        if(bean instanceof BeanConvert){
            System.out.println("后置方法执行了");
        }
        return bean;
    }
}
,上面代码判断如果当前实例化的对象属于BeanConvertConfig就执行对应方法
缺点:不像切面那么灵活,切面可以指定切点而BeanPostProcessor是在所有对象加载到ioc的时候都会执行
2021-1-22
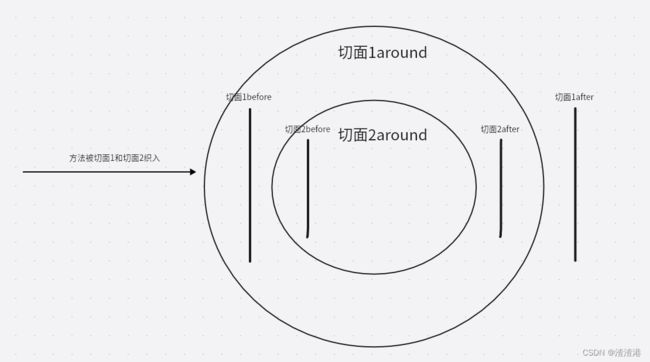
多个切面定义执行顺序及其顺序规则
定义两个切面
@Order(1)
@Aspect
@Component
public class Aspect1 {
    @Pointcut("execution(* com.example.controller.*.*(..))")
    public void pointCut(){}

    @Before("pointCut()")
    public void before(){
        System.out.println("aspect1运行before");
    }

    @After("pointCut()")
    public void after(){
        System.out.println("aspect1运行after");
    }

    @Around("pointCut()")
    public void around(ProceedingJoinPoint joinPoint) throws Throwable{
        try{
            System.out.println("aspect1运行around里面proceed之前的代码");
            joinPoint.proceed(joinPoint.getArgs());
            System.out.println("aspect1运行around里面proceed之后的代码");
        }catch (Throwable e){
            e.printStackTrace();
            throw e;
        }
    }
}

@Order(2)
@Aspect
@Component
public class Aspect2 {
    @Pointcut("execution(* com.example.controller.*.*(..))")
    public void pointCut(){}

    @Before("pointCut()")
    public void before(){
        System.out.println("aspect2运行before");
    }

    @After("pointCut()")
    public void after(){
        System.out.println("aspect2运行after");
    }

    @Around("pointCut()")
    public void around(ProceedingJoinPoint joinPoint) throws Throwable{
        try{
            System.out.println("aspect2运行around里面proceed之前的代码");
            joinPoint.proceed(joinPoint.getArgs());
            System.out.println("aspect2运行around里面proceed之后的代码");
        }catch (Throwable e){
            e.printStackTrace();
            throw e;
        }
    }
}

运行结果:
aspect1运行around里面proceed之前的代码
aspect1运行before
aspect2运行around里面proceed之前的代码
aspect2运行before
aspectController执行了
aspect2运行around里面proceed之后的代码
aspect2运行after
aspect1运行around里面proceed之后的代码
aspect1运行after
2021-2-3
数据库事务
数据库事务分为编程式事务和声明式事务,但是现在编程式事务都不猜用了,因为其内部存在大量的try catch final进行,之前学习过aop所以可以通过aop巧妙的去解决这些try catch final
也就是今天主要学习的声明式事务.
首先要注意:@Transacational可以注释到类上也可以注释到方法上,注释到类上的时候只对该类的所有public非静态方法有效,先看张图来了解一下事务的处理过程
当ioc容器创建后会自动的去加载事务的配置也就是TransactionDefinition接口的实现类(该接口后面会读到),之后当spring调用被@Transactional注释的方法或者类的时候会启动aop,也就是编程式事务里面获取connection对象和开启事务conn.setAutoCommit(false)之后通过try和catch如果没异常直接提交事务,如果发生异常,再去判断TransactionDefinition里面是否配置了当前异常正常提交的配置之后再决定是提交还是回滚,最后final释放资源.
整个过程下来其实就是数据库的事务拦截器去做着aop的动态织入,而事务管理器就是切面里面定义连接数据库,提交或者回滚的方法这些方法都是交由事务连接器去调用的.
2021-2-5
数据库事务隔离级别理解
在说事务隔离级别之前先聊一下第一类丢失和第二类丢失
第一类丢失主要是说两个事务一个提交一个回滚,导致数据库数据不准确,不过现在基本第一类丢失都已经解决不存在了
第二类丢失就是事务一和事务二都提交导致也导致数据库数据不一致问题.
允许读取事务1未提交的事务,如图:事务1扣减完库存还没提交数据事务2可以读取到事务1未提交的事务,之后事务2扣减库存提交事务导致数据库数量不对(这里事务1回滚不生效是因为第一类丢失更新已经不存在)
读已提交就是事务之间只能读取到其他事务已经提交的事务,如图:事务1扣减了库存后因为没有提交,导致事务2读取不到,只能读取最初的库存1之后事务1提交了事务现在真实库存是0,这时事务2扣减库存就会导致失败.
可重复读就是通过版本号的方式来控制数据的,举个例子事务一当前的版本号是1读取到的数据是50事务二读取数据是50版本号也是1这是事务二进行了修改操作把数值变成了100版本号变成了2之后commit这时事务一还是按照旧数据50进行操作,事务一准备提交的时候发现版本号变成了2就取消本次操作,这样就解决了不可重复读的问题
幻读:假设事务A通过某种条件查询出来3条数据,事务B这时候insert或者delete了一条事务A再次读取的时候发现少了一条或者多了一条就出现了幻读
- 串行化SERIALIZABLE
串行化就是严格指定事务执行的顺序确保数据库数据不会出现问题.
事务的传播特性
先来了解一下什么时候出现事务传播
@Autowired
private UserService userService;

@Transactional
@Service
public void insertUserOne(){
	// 当前已经存在事务的方法里面又调用其他子方法
	userService.insertUserTwo();
}

@Service
public void insertUserTwo(){
	userServiceDao.insertUser();
}
事务传播特性有7种最常用的只有3种
1:propagation.PROPAGATION.REQUIRED
默认事务,需要事务! 如果当前方法存在事务就沿用当前事务,如果不存在事务就创建一个事务设置其隔离级别执行子方法
2:propagation.PROPAGATION.REQUIRES_NEW
无论当前方法是否有事务都创建一个新的事务去执行子方法,
两个事务互不影响,在自己事务内出异常只会在自己的事务方法回滚不影响另一个
3:propagation.PROPAGATION.NESTED
事务里面嵌套一个事务,如果内部嵌套的事务出现了异常只会回滚内部嵌套的事务,外部事物出现异常那么内部和外部都会回滚.
// 看一个例子
public class Test{
	// ==========案例一===========
    public String transactionTest(){
        MyTable myTable = new MyTable();
        myTable.setAge("23");
        myTable.setName("张三");
        myTableDao.insert(myTable);
        Object s = this;
        transactionTest2();
        int i = 1/0;
        return "成功";
    }

    @Transactional(rollbackFor = Exception.class,
    					propagation = Propagation.REQUIRES_NEW)
    public void transactionTest2(){
        MyTable myTable = new MyTable();
        myTable.setAge("30");
        myTable.setName("李四");
        myTableDao.insert(myTable);
        int i = 1 / 0;
    }
结果:两条insert都会成功
结论:类的内部调用被调用被调用方法会沿用调用方法,如果调用方法没有事务
则被调用方法也不会有事务
// ==========案例二===========
@Transactional(rollbackFor = Exception.class)
    public String transactionTest(){
        MyTable myTable = new MyTable();
        myTable.setAge("23");
        myTable.setName("张三");
        myTableDao.insert(myTable);
        Object s = this;
        transactionTest2();  // 或者this.transactionTest2()
        int i = 1/0;
        return "成功";
    }

    @Transactional(rollbackFor = Exception.class,
    					propagation = Propagation.REQUIRES_NEW)
    public void transactionTest2(){
        MyTable myTable = new MyTable();
        myTable.setAge("30");
        myTable.setName("李四");
        myTableDao.insert(myTable);
    }
结果:两个insert都不成功
结论:类内部的有事务方法调用有事务方法被调用方法上面的事务注释不会生效
会沿用调用方法的事务
解决方法:可以通过在当前类注入自己然后通过注入的代理对象调用自身方法,但是这样代码很不优雅,或者通过AopContext.currentProxy()获取当前类的代理对象调用方法,在使用AonContext的时候需要在启动类上面添加@EnableAspectJAutoProxy(proxyTargetClass = true, exposeProxy = true)大致的就是使用cjlib来进行获取代理对象
拓展
如果我们在A方法使用代理对象调用B方法的时候,方法B出现了异常,那么这个时候方法A对调用的地方进行了try catch还会回滚吗? 看下代码
    @GetMapping(value = "/show")
    @Transactional(rollbackFor = Exception.class)
    public String show(HttpServletRequest request) {
        try {
            Order order = new Order();
            order.setName("zhangsan");
            itemDao.insert(order);
            try{
                System.out.println(TransactionAspectSupport.currentTransactionStatus().isRollbackOnly());
                Test1Controller test1Controller = (Test1Controller) AopContext.currentProxy();
                test1Controller.show2();
            }catch (Exception e){
                System.out.println(TransactionAspectSupport.currentTransactionStatus().isRollbackOnly());
            }
            System.out.println(TransactionAspectSupport.currentTransactionStatus().isRollbackOnly());
            return "成功";
        } catch (Exception e) {
            return "错误";
        }
    }

    @Transactional(rollbackFor = Exception.class)
    public void show2(){
        Order order = new Order();
        order.setName("lisi");
        itemDao.insert(order);
        int ii = 1/0;
    }
运行结果:
false
true
true
数据库数据全部回滚
有的同学会问 如果不使用代理对象调用方法show()2那么在打印出来会是什么结果呢? show()2不变 改造代码
@GetMapping(value = "/show")
    @Transactional(rollbackFor = Exception.class)
    public String show(HttpServletRequest request) {
        try {
            Order order = new Order();
            order.setName("zhangsan");
            itemDao.insert(order);
            try{
                System.out.println(TransactionAspectSupport.currentTransactionStatus().isRollbackOnly());
//                Test1Controller test1Controller = (Test1Controller) AopContext.currentProxy();
                show2();
            }catch (Exception e){
                System.out.println(TransactionAspectSupport.currentTransactionStatus().isRollbackOnly());
            }
            System.out.println(TransactionAspectSupport.currentTransactionStatus().isRollbackOnly());
            return "成功";
        } catch (Exception e) {
            return "错误";
        }
    }
运行结果:
false
false
false
数据库数据全部插入成功
原因
这里跟了一下代码,使用代理对象调用方法show2()的时候这里@Transactional是生效的,但是他使用的是默认的隔离级别所以会沿用之前的事务,也就是方法show()的事务,之后运行到int ii = 1/0时 ,事务判断这里面有异常所以就将当前的状态变成要回滚状态,虽然我们在show()的外层进行了try但是这时候的事务状态已经被改变所以没办法将insert提交到数据库.
而不使用代理对象调用show()就不会触发回滚的原因是因为没走aop,所以没办法被aop里面的catch进行判断是否被@Transactional所注释,所以就不能对其所在事务进行状态修改
事务反向沿用
我们都知道在代理对象里面A方法有事务B方法没事务A调用B的时候B方法会沿用A的事务
假设现在有一种情况在非代理对象里面A有事务注解 B也有事务注解 A通过AopContext.currentProxy调用B会产生事务吗?
    @GetMapping("/test-nested")
    @Transactional(rollbackFor = Exception.class)
    public int testNested(String id){
        System.out.println(this);
        itemDao.updateNameForLiSi();
        int i = 0;
        try{
            ((Test1Controller)AopContext.currentProxy()).updateNested();
        }catch (Exception e){

        }
        return i;
    }

    @Transactional(rollbackFor = Exception.class)
    public int updateNested() {
        try{
            itemDao.updateNameForWangwu();
            int i = 10 / 0;
            return i;
        }catch (Exception e){
            throw e;
        }
    }
结果:
	testNested方法回滚
	updateNested方法也回滚
这里可能是updateNested对方法testNested做了一个反向沿用事务的操作(猜测后续在观察)
2021-2-7
redis
redis是一个非常重要的服务,它是运行在内存上的所以读写速度极快,目前redis不使用原生方法,而使用其封装好的redisTemplate,但是其也有点问题继续往下看.
public class Test{

	@Autowired
	private RedisTemplate redisTemplate;

	public void test123(){
	// 这段代码存入后通过图形化界面可以发现,
	// 其存入的键和值都是二进制的见下图.
		redisTemplate.opsForValue().set("key1","value1");
	}
}
这主要的原因是因为redisTemplate默认实现的序列化接口是JdkSerializationRedisSerializer该接口是将java里面存储的键和值都进行二进制转换后再进行存储,取的时候在进行反序列化取出,注意:java里面存入的对象一定要实现Serializable
// 想要解决上述问题也很简单可以通过设置redisTemplate的序列化即可,或者直接注入StringRedisTemplate
public class Test{

	@Autowired
	private StringRedisTemplate stringRedisTemplate;

	public void show(){
	// 这种方式就不会出现存入的值是二进制的
		stringRedisTemplate.OpsForValue().set("key2","value2");
	}

	@Autowired
	private RedisTemplate redisTemplate;

	@Bean
	public RedisTemplate getRedisTemplate(){
// 序列化的接口有很多其父接口都是GenericToStringSerializer
		GenericToStringSerializer genericToStringSerializer =
			new GenericToStringSerializer(Object.class);
		// 或者
		RedisSerializer stringRedisSerializer =
				redisTemplate.getStringSerializer();

		// 进行设置redis的序列化 如:
		redisTemplate.setKeySerializer(序列化接口实现类);
		redisTemplate.setHashKeySerializer(序列化接口实现类);
		......
	}
}
所有的redis序列化接口见下图
2021-3-18
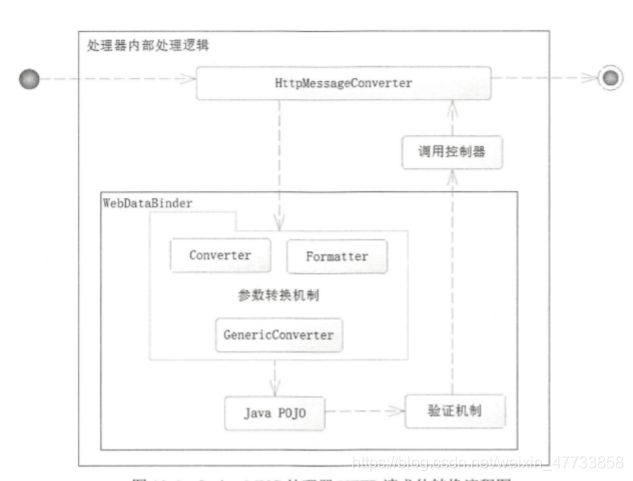
我都知道SpringMvc在运行的时候传递的参数是json或者是string类型,但是接收的时候有时候是通过对象接收有时候是通过int,或者其他类型接收这是怎么做到的呢?见下图!
当参数进来的时候会先经过转换器,springMVC已经有了转换器
Converter:转换简单类型的比如:传递进来的是String但是通过Integer接收
Formatter:格式转化:有的时候传递过来的是规定格式的字符串这个就可以通过这个转换器转换成日期,但是我本人对这个转换器存在质疑的.这里不讨论
在springMVC运行的时候会将我们自定上述转换接口的实现类自动的注册到DefaultFormattingConversionService之后就可以自动的完成类型转换了,也可以自定义转换.
@Component				// 这里指定原数据类型是String,转换成User
public class TestConverter implements Converter<String,User> {

    @Override
    public User convert(String s) {
        String[] split = s.split("-");
        User user = new User();
        user.setId(Integer.valueOf(split[0]));
        user.setName(split[1]);
        return user;
    }
}

前端传递如:localhost:8888/test/converter?user=1-张三

@Controller
@RequestMapping("/test/converter")
public String TestController(User user){
	................
}

因为传递过来的user是个字符串,但是我们自定义的转换器已经将user字符串
转换成了User对象所以这里会根据我们自定义的约定进行转换最后是
{name='张三', id=1}
2021-3-23
大家都知道springboot承诺的是尽可能的简化配置,于是就衍生出了一个接口WebMvcConfigurer,该接口里面定义了很多个空实现,这样就可以在需要使用某个实现的时候直接重写覆盖即可,比如我们要将自定义的拦截器进行注册并且指定其拦截的地址.
// 所有的拦截器都需要实现HandlerInterceptor接口
public class MyInterceptor implements HandlerInterceptor{
	@Override
    public boolean preHandle(HttpServletRequest request, HttpServletResponse response, Object handler) throws Exception {
        System.out.println("处理器执行前先执行preHandler");
        // 返回true才会继续往下运行,返回false所有的拦截器全部停止.
        return true;
    }

    @Override
    public void postHandle(HttpServletRequest request, HttpServletResponse response, Object handler, ModelAndView modelAndView) throws Exception {
        System.out.println("处理器执行后在执行这个方法");
    }

    @Override
    public void afterCompletion(HttpServletRequest request, HttpServletResponse response, Object handler, Exception ex) throws Exception {
        System.out.println("最后视图解析器之后在执行这个方法");
    }
}

public class Application implements WebMvcConfigurer{
	public static void main(String[] args){
		SpringApplication.run(Application.class,args);
	}

	@Override
	public void addInterceptors(InterceptorRegistry registry){
		InterceptorRegistration interceptorRegistration =
		   					// 自定义HandlerInterceptor的对象
				 registry.addInterceptor(new MyInterceptor());
				 // 指定test开头的controller才会执行拦截器
		interceptorRegistration.addPathPatterns("/test/*")
	}
}
注意:如果是多个拦截器的话那么执行顺序是根据注册的顺序来的,如果有一个拦截器里面的preHandle返回的是false那么下面所有的拦截器preHandle和postHandle都不会在执行了,但是afterCompletion比较特殊,preHandle返回true拦截器的afterCompletion会运行
需要注意的是,该拦截器只会拦截controller过来的请求,也就是如果请求的路劲和设置的相匹配就会进行拦截
2021-3-29
SpringMvc里面的重定向和请求转发大家都不陌生我门来聊聊他们,先上例子
- 重定向方式1
@RequestMapping("/redirect")
public String Redirect(RedirectAttribute attr){
	attr.addAttribute("name","张三");
	// 进行转发到指定位置
	return "redirect:/show/user"
}
- 重定向方式2
@RequestMapping("/redirect")
public void Redirect(RedirectAttribute
			attr,HttpServletResponse response){
	response.sendRedirect(url);
}
- 请求转发
@RequestMapping("/dispatcher")
public void dispatcherToDo(HttpServletRequest request){
	request.getRequestDispatcher(url).
						forward(request,response);
}
我们这里主要聊一下重定向怎么携带参数,这个问题网上很多都说了通过RedirectAttributes来进行参数携带,我喜欢通过session进行携带
public void RedirectAtt(RedirectAttributes attr){
// 这种方式会将参数拼接到请求路径上面
	attr.addAttribute("test",123);
// 这种凡事会将参数存入session之后转发的时候再次拿出来
// 进行拼接不过在请求路径上面看不到
	attr.addFlashAttribute("test","234");
}
- 异步处理
public void Async{
	public void show(){
		CompletableFuture.runAsync(new Runnable(){
			@Overide
			public void run(){
				// 异步处理代码
			}
		});
	}
}
异步处理需要注意的是主线程上面不能停止 否则异步也会停止
- 异常处理类的相关介绍
我们之前在讨论aop的时候有涉及到切面类的相关介绍,今天我们来聊一下springmvc的aop(我是这么理解的)话不多说先看代码
@ControllerAdvice(
			basePackages= "指定要拦截的路径",
			// 指定只拦截被controller注解的类
			annotation = Controller.class)
public void Test{
	@InitBinder // 会在controller执行之前执行
	public void initBinder(){
		..........
	}
}

	// 拦截Excetion异常
	@ExceptionHandler(value = Exceltion.class)
	public void exceptionHandler(){
	// 只要出现了exception就会进入到当前方法
}

 - RestTemplate的get和post请求
 - `public class Test {
    public static void main(String[] args) {
        RestTemplate temp = new RestTemplate();
        HttpHeaders headers = new HttpHeaders();
        // 设置请求头相关属性

        // 设置请求体
        MultiValueMap<String,String> param = new LinkedMultiValueMap<>();
        param.set("name","张三" );

        // 将请求头和参数进行整合
        HttpEntity entity = new HttpEntity(param,headers);

        // 发送post的请求
        /*
        * 参数一:请求地址
        * 参数二:真实参数
        * 参数三:返回类型
        * */
        temp.postForObject("localhost:8080/user/test",param,List.class);

        // 发送get的请求
        /*参数一:地址后面的name=#{1}第一个参数
          参数二:返回值类型
          参数三:传递的真实参数*/
        temp.getForObject("localhost:8080/usr?name=#{1}",String.class,"张三");
    }
}
2021-4-14
线程池创建和使用直接上代码
@EnableAsync
@Configuration	// 实现AsyncConfigurer为了重写方法配置线程池
public class AsyncConfiguration implement AsyncConfigurer{

	@Override
    public Executor getAsyncExecutor() {
        // 创建线程池
		ThreadPoolTaskExecutor threadPool =
									new ThreadPoolTaskExecutor();
        threadPool.setCorePoolSize(10); // 核心线程数量
        threadPool.setMaxPoolSize(30); // 线程池最大线程数量
		taskExecutor.setQueueCapacity(2000); // 线程池队列最大线程数
        threadPool.initialize(); // 初始化线程池
        return threadPool;
    }
}

@Service
public class AsyncService{
	@Async // 当前方法从线程池里面拿线程执行
    public void show() throws InterruptedException {
    	// 先睡3秒 之后打印哈哈哈和当前线程名字
        Thread.sleep(3000);
        System.out.println("哈哈哈"+Thread.currentThread().getName());
    }
}

@Controller
@RequestMapping("/test1")
public class Test{

	// 一定需要使用代理对象去调用@Async注释的方法否则线程不可用
    @Autowired
    private ServiceShow serviceShow;

    @RequestMapping("/show")
    public void show1() throws InterruptedException {
        serviceShow.show();
        System.out.println("执行了"+Thread.currentThread().getName());
    }
}

结果:
哈哈哈ThreadPoolTaskExecutor-2
执行了http-nio-9999-exec-5
2021-4-15
- springboot的定时任务
// 需要在启动类上加上@EnableScheduling
@EnableScheduling
public class Application(){
	public static void main(String[] args) {
SpringApplication.
		run(CaseFileApplicationEdas.class, args);
	}
}

// 之后去配置类里面编写定时任务
@Scheduled(core = "cron表达式")
public void taskTime(){
	.....定时任务...
}
注意:这里的@Scheduled()里面的参数有多重表达形式
一般都是用cron进行设置,因为cron比较精准还可以通过
fixedRate = 1000 这里的意思是上一个任务到下一个任务的间隔毫秒值.
- 下面是一些常用的cron表达式
2021-5-17
今天记录一下springColud的ribbon和feign的相关使用
现在springboot和cloud极大简化了编码,首先需要创建一个eureka用于服务治理,之后所有的微服务都注册到当前的这个服务治理里面,当前我们还可以通过集群的方式来进行搭建,
// 配置eureka服务端的相关配置1
eureka:
  client:
    service-url: // 这里是集群两个用逗号隔开
      defaultZone: http://127.0.0.1:6868/eureka/,
      http://127.0.0.1:6869/eureka/
    register-with-eureka: false // 不把自己注册到eureka中
    fetch-registry: false // 不从eureka里面获取数据
server:
  port: 6868

// 配置eureka服务端的相关配置2
eureka:
  client:
    service-url:
      # 多个集群配置eureka服务
      defaultZone: http://127.0.0.1:6868/eureka/,
      http://127.0.0.1:6869/eureka/
    register-with-eureka: false // 不把自己注册到eureka中
    fetch-registry: false // 不从eureka里面获取数据
server:
  port: 6869

// 唯一需要注意的点就是erueka服务要进行相互注册也就是
// service-url.defaultZone的地址要通过逗号隔开
// 服务1
server:
  port: 8888
eureka:
  client:
    service-url: // 将服务注册到多个eureka服务
      defaultZone: http://127.0.0.1:6868/eureka/,
      http://127.0.0.1:6869/eureka/
spring:
  application:
    name: TestService // 注册的服务名

// 服务2
server:
  port: 9999
eureka:
  client:
    service-url: // 将服务注册到多个eureka服务
      defaultZone: http://127.0.0.1:6868/eureka/,
      http://127.0.0.1:6869/eureka/
spring:
  application:
    name: TestService // 注册的服务名

// 需要注意的就是我们的微服务注册到eureka的时候
// application.name一定要相同否则就不是集群了
接下来我们聊一下ribbon和feign肯定有同学会问,这里是集群那么负载均衡怎么使用呢,这里要知道ribbon已经帮我们实现了负载均衡,而feign底层就是ribbon所以也是实现了,那到底怎么使用呢?
很简单 我们只要知道ribbon和feign是通过http的方式去各个服务里面请求的在添加完坐标后ribbon只需要通过@LoadBalanced就行而feign则是自动完成
@Configuration
public class configurationMy{

	@Bean
	@LoadBalanced
	public RestTemplate getRestTemplate(){
		return new RestTemplate();
	}
}

// ribbon调用服务方式

@Autowired
private RestTemplate RestTemplate;

public void show(){
// 这里的TestService就是注册到eureka的ip和端口
// /user/1就是该服务里面的Controller方法
// User就是当前方法返回值
	User user =	RestTemplate.
	getForObject("TestService/user/1",User.class);
}
feign这里就不过多介绍了 比较简简单 负载均衡
也是自动实现了不需要任何操作


