harmony鸿蒙Android安卓混合开发
harmony鸿蒙Android安卓混合开发
Android安卓端操作步骤
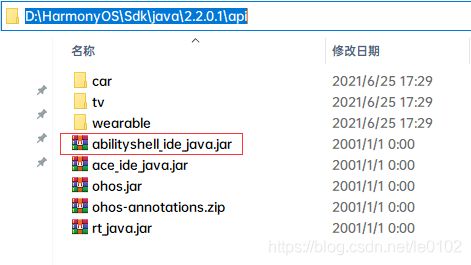
一、依赖鸿蒙兼容包,这个包可以在SDK路径下找到,如图

把这个包放到你Android项目的libs目录下,然后在项目的build.gradle中依赖,如图
compileOnly files('libs/abilityshell_ide_java.jar')

二、在AndroidManifest.xml中添加一下内容,位置如图
 <uses-feature android:name="zidane.software.ability" android:required="false" />
 <meta-data android:name="permZA" android:value="true" />
 <meta-data android:name="multiFrameworkBundle" android:value="true" />
三、把你的application改为继承HarmonyApplication
public class MyApplication extends HarmonyApplication
四、正常的打包签名
Harmony鸿蒙端操作步骤
一、entry的build.gradle里,增加混入apk文件配置。
   legacyApkOptions{
     legacyApk rootProject.file('android_entry.apk').absolutePath //android_entry.apk你安卓打包出来的apk
     signConfig{
         storeFile rootProject.file('xxx.jks')   //android打包的签名文件
     }
  }
二、把你刚才打包的Android apk和签名文件放到鸿蒙项目的根目录或者其他目录,要与上面的第一点的路径一致
ohos {
    compileSdkVersion 5
    defaultConfig {
        compatibleSdkVersion 5
    }

    legacyApkOptions {
        legacyApk rootProject.file('./android/android_entry.apk').absolutePath //混入apk的存放路径
        signConfig {
            storeFile rootProject.file('./android/xxxxx.jks')   //混入apk所用签名文件
        }
    }

    buildTypes {
        release {
            proguardOpt {
                proguardEnabled false
                rulesFiles 'proguard-rules.pro'
            }
        }
    }
三、config.json配置,把bundleName换成你Android的包名
{
  "app": {
    "bundleName": "xxxx.xxx.xxx.xx",
    "vendor": "harmony",
    "version": {
      "code": 1000000,
      "name": "1.0.0"
    }
  },
  "deviceConfig": {},
  "module": {
    "package": "xxxx.xxx.xxx.xx",
    "name": ".MyApplication",
    "deviceType": [
      "phone"
    ],
    "distro": {
      "deliveryWithInstall": true,
      "moduleName": "entry",
      "moduleType": "entry",
      "installationFree": false
    },
    "abilities": [
      {
        "skills": [
          {
            "entities": [
              "entity.system.home"
            ],
            "actions": [
              "action.system.home"
            ]
          }
        ],
        "orientation": "portrait",
        "visible": true,
        "name": "xxxx.xxx.xxx.xx.MainAbility",
        "icon": "$media:icon",
        "description": "$string:mainability_description",
        "label": "$string:entry_MainAbility",
        "type": "page",
        "launchType": "standard"
      }
    ]
  }
}
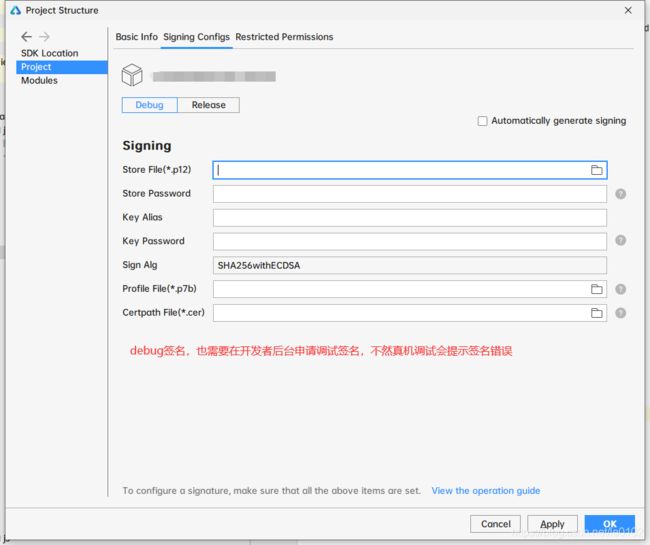
四、配置签名

注意,这里必须要与Android端的一致,特别是密码

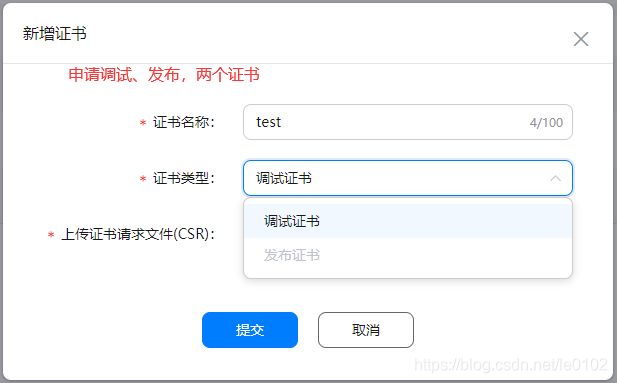
这个在个人信息–证书管理,申请

这个在我的项目–管理HAP Provision Profile,申请
在后台生成debug、release两种签名文件后,debug用于真机调试,不然会提示Password verification failed,如果你添加了module,那么也要配置module的debug签名,

以上就可以把Android项目混入鸿蒙打包了
