可视化数据同步迁移工具 CloudCanal
CloudCanal 介绍
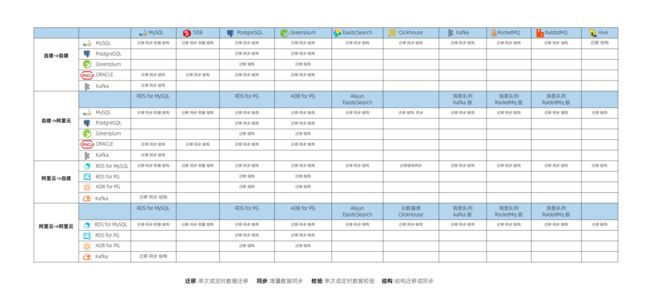
CloudCanal 是一款数据迁移同步工具,提供友好的可视化操作界面,支持多种数据源间的数据迁移、数据同步、结构迁移、数据校验。
CloudCanal 核心团队成员来自阿里巴巴中间件和数据库团队, 长期从事分布式数据库、数据库中间件、应用中间件工作。CloudCanal 在 MySQL binlog 解析使用了 Canal 部分代码,其他均为自主研发,并且对 Canal 部分代码进行了大量重构,修复诸多问题并优化性能。Canal 在 CloudCanal 中的位置,可以用以下图片简单表示,可见 Canal 代码在 CloudCanal 产品中只占很小一部分。
CloudCanal 高可用部署
准备工作
安装 Docker
不同操作系统可以参考 Docker 官网文档 进行安装。
安装 Docker Compose
这里提供一个国内的镜像站的安装命令,也可以参考 Docker-Compose 安装文档。
curl -L https://get.daocloud.io/docker/compose/releases/download/1.28.5/docker-compose-`uname -s`-`uname -m` > /usr/local/bin/docker-compose
chmod +x /usr/local/bin/docker-compose
ln -s /usr/local/bin/docker-compose /usr/bin/docker-compose
安装 7z
收到的安装包为 cloudcanal.7z,其中包含了镜像和管理脚本。需要通过安装和使用 7z 命令进行解压。
### 安装7z命令(centos系)
sudo yum install p7zip p7zip-plugins
### 安装7z命令(ubuntu系)
sudo apt-get install p7zip-full p7zip-rar
### 安装7z命令(macOS)
brew install 7z

### 进到安装包所在路径,执行以下命令进行解压缩
7z x cloudcanal.7z
如果无法通过 yum 或者 apt 等源直接安装,可以通过编译的方式安装。
wget http://nchc.dl.sourceforge.net/sourceforge/p7zip/p7zip_4.65_src_all.tar.bz2
tar -xjvf p7zip_4.65_src_all.tar.bz2
cd p7zip_4.65
make
make install
然后使用 7za 命令解压。
7za x cloudcanal.7z
解压后目录如下,主要分为三大块:
- 镜像:包含四个 tar 压缩文件。
- 脚本:启动、更新和停止,以及 scripts 运维脚本目录。
- 日志与配置文件:日志为 docker-compose 启动日志,配置文件为 docker-compose 配置文件。
[root@master1 chengzw]# ls -l cloudcanal
总用量 2939372
-rw------- 1 root awx  912166912 8月  31 19:34 console.tar
-rw-r--r-- 1 root awx   12211728 8月  31 15:27 docker-compose
-rw-r--r-- 1 root awx        320 8月  31 19:29 docker-compose-sidecar.yml
-rw-r--r-- 1 root awx       1418 8月  31 19:29 docker-compose.yml
-rw------- 1 root awx  453986816 8月  31 19:32 mysql.tar
-rw------- 1 root awx  190344192 8月  31 19:37 prometheus.tar
drwxr-xr-x 2 root awx        180 8月  31 19:29 scripts
-rwxr-xr-x 1 root awx         63 8月  31 19:29 shutdown.sh
-rw------- 1 root awx 1441171968 8月  31 19:37 sidecar.tar
-rwxr-xr-x 1 root awx       1211 8月  31 19:29 startNewSidecar.sh
-rwxr-xr-x 1 root awx       2682 8月  31 19:29 startup.sh
-rwxr-xr-x 1 root awx       2031 8月  31 19:29 upgrade.sh
-rw-r--r-- 1 root awx        376 8月  31 19:29 使用必读.txt
启动 CloudCanal
在解压的路径下可以执行以下命令启动 CloudCanal。
sh startup.sh
当终端出现 cloudcanal start 时,表示启动成功。可以访问 http://${部署机器ip}:8111 来登录 CloudCanal。
使用默认初始化好的账号登录:
- 用户名:[email protected]
- 密码:clougence2021
默认自带的测试数据库
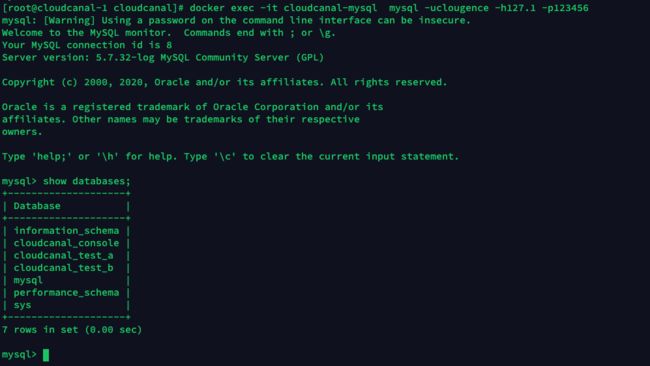
默认帮添加好了测试的 MySQL 数据源,其中 cloudcanal_test_a (源端)和cloudcanal_test_b (目标端)这两个库中已经帮准备好了用于测试的表和数据,可以方便您体验整个流程。
- 默认已经添加了一台运行机器,用于执行具体的数据同步任务,所以直接添加数据源即可开始创建同步任务。
- 遇到需要发送短信的场景,先点击获取验证码,然后输入短信验证码 777777 即可。
在宿主机上可以直接以下命令访问 MySQL 容器。
docker exec -it cloudcanal-mysql mysql -uclougence -h127.1 -p123456
添加机器
生成机器唯一标识
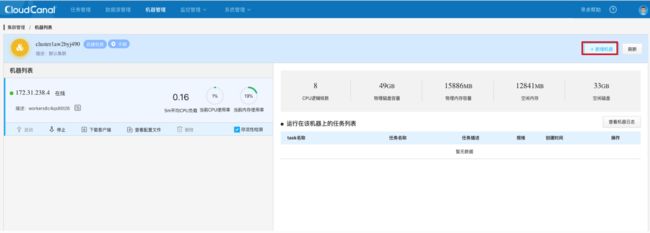
点击顶部机器管理-> 点击集群名 -> 点击新增机器。
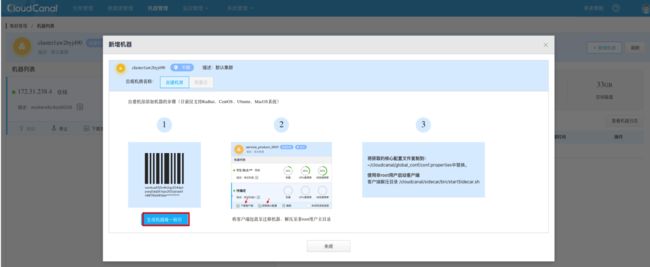
点击生成机器唯一标识。
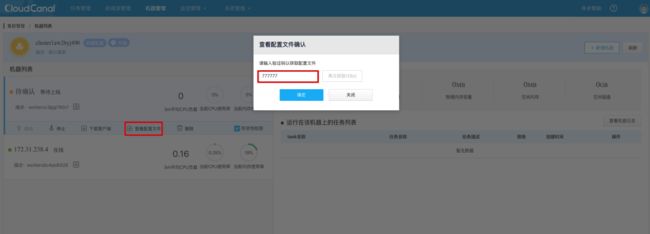
点击查看配置文件,点击获取验证码,然后输入验证码 777777。
复制机器唯一标识。
在另一台机器上启动新的 Sidecar 容器
首先将 CloudCanal 的安装包在待部署的新机器上解压。在安装包目录下,执行如下命令添加一台新的 Sidecar 容器。注意在一台机器上不允许启动两个 Sidecar 容器,请在新的机器上启动 Sidecar 容器。
sh startNewSidecar.sh
复制机器唯一标识到容器内指定配置文件内。先进入 Sidecar 容器。
docker exec -it cloudcanal-sidecar /bin/bash
在 Sidecar 容器内修改配置文件:vi /home/clougence/cloudcanal/global_conf/conf.properties。
cloudcanal.auth.ak=ak0a2c62tdo1ap2416655mpyx0v36l359p1v5rn782caw8t0qkk1s94b80lfs90
cloudcanal.auth.sk=sk6206iy4pb0eydz9hg97jo3tu5d80j97e91bbql65167u8wb75x4ej6e4v4aa4
cloudcanal.sidecar.wsn=wsnd0ndmrhsm9yu9lj06897h4cvh42br0s5c1e4iut0e93g78as46t7oe5k04fi3
# 替换 cloudcanal.console.domain 的值为 console 容器所在宿主机的内网ip
cloudcanal.console.domain=11.8.36.104
修改完成后,修改目录权限:
chown -R clougence:clougence /home/clougence/cloudcanal
然后切换到 clougence 用户启动 Sidecar 进程。
sh /home/clougence/cloudcanal/sidecar/bin/startSidecar.sh
## 查看日志,确认是否有异常。如果都为INFO或者WARN日志就是正常的
tail -f /home/clougence/logs/cloudcanal/sidecar/sidecar.log
在控制台界面可以看到机器成功注册。
CloudCanal 升级
解压新版本的 cloudcanal.7z 压缩包,覆盖原目录下相同的文件,然后依次执行以下脚本即可。
sh upgrade.sh
sh startup.sh
因为数据目录 sidecar_data 和 console_dat 不会被覆盖,因此数据不会丢失。
添加数据源
进入数据源管理界面,点击添加数据源,可以选择阿里云上的数据源或者自建数据库。
添加两个数据源,分别作为同步的源库和目标库。
准备数据
使用 Percona 公司提供工具来随机生成数据,github 地址: https://github.com/Percona-Lab/mysql_random_data_load/releases。
执行以下命令下载并解压工具。
wget https://github.com/Percona-Lab/mysql_random_data_load/releases/download/v0.1.12/mysql_random_data_load_0.1.12_Linux_x86_64.tar.gz
tar -xzvf mysql_random_data_load_0.1.12_Linux_x86_64.tar.gz
在源库创建一张表:
CREATE TABLE `acpcanaldb`.`t7` (
  `id` int(11) NOT NULL AUTO_INCREMENT,
  `tcol01` tinyint(4) DEFAULT NULL,
  `tcol02` smallint(6) DEFAULT NULL,
  `tcol03` mediumint(9) DEFAULT NULL,
  `tcol04` int(11) DEFAULT NULL,
  `tcol05` bigint(20) DEFAULT NULL,
  `tcol06` float DEFAULT NULL,
  `tcol07` double DEFAULT NULL,
  `tcol08` decimal(10,2) DEFAULT NULL,
  `tcol09` date DEFAULT NULL,
  `tcol10` datetime DEFAULT NULL,
  `tcol11` timestamp NOT NULL DEFAULT CURRENT_TIMESTAMP ON UPDATE CURRENT_TIMESTAMP,
  `tcol12` time DEFAULT NULL,
  `tcol13` year(4) DEFAULT NULL,
  `tcol14` varchar(100) DEFAULT NULL,
  `tcol15` char(2) DEFAULT NULL,
  `tcol16` blob,
  `tcol17` text,
  `tcol18` mediumtext,
  `tcol19` mediumblob,
  `tcol20` longblob,
  `tcol21` longtext,
  `tcol22` mediumtext,
  `tcol23` varchar(3) DEFAULT NULL,
  `tcol24` varbinary(10) DEFAULT NULL,
  `tcol25` enum('a','b','c') DEFAULT NULL,
  `tcol26` set('red','green','blue') DEFAULT NULL,
  `tcol27` float(5,3) DEFAULT NULL,
  `tcol28` double(4,2) DEFAULT NULL,
  `tcol29` varchar(5000) DEFAULT NULL,
  `tcol30` varchar(5000) DEFAULT NULL,
  `tcol31` varchar(5000) DEFAULT NULL,
  `tcol32` blob,
  `tcol33` blob,
  `tcol34` blob,
  `tcol35` blob,
  `tcol36` blob,
  `tcol37` blob,
  `tcol38` blob,
  `tcol39` blob,
  `tcol40` blob,
  `tcol41` blob,
  `tcol42` blob,
  `tcol43` blob,
  `tcol44` blob,
  `tcol45` blob,
  PRIMARY KEY (`id`)
) ENGINE=InnoDB;
使用工具持续往源库插入 1000w 条数据。
 ./mysql_random_data_load  acpcanaldb t7 10000000 \
 --host 11.17.6.185 --port 4679 \
 --user=acpcanaldb --password=xxxxxx
数据同步
全量同步 + 增量同步
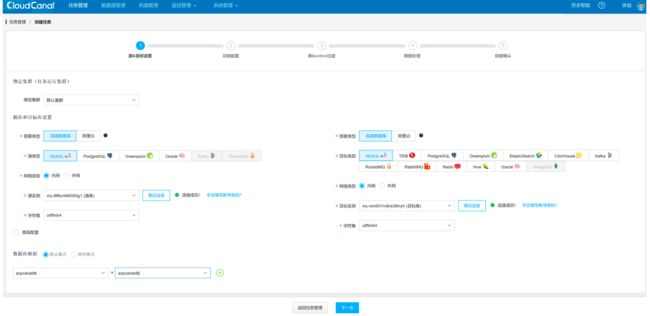
进入任务管理页面,点击创建任务。选择源实例和目标实例,指定数据库映射关系。
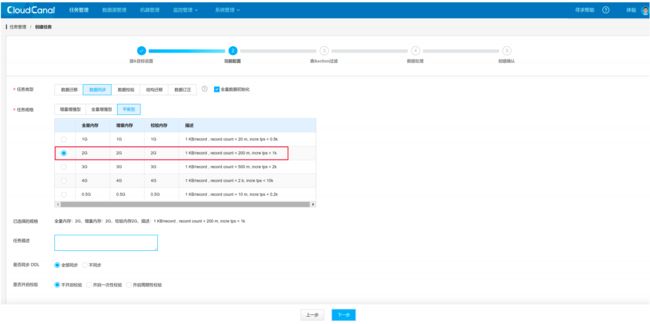
选择数据同步功能,第一次会先查表进行全量同步,之后消费 binlog 增量同步数据。
选择要同步的表,要保证目标库的 UPDATE 和 DELETE 操作和源库的一致,需要保证源库表中有主键或者唯一约束。
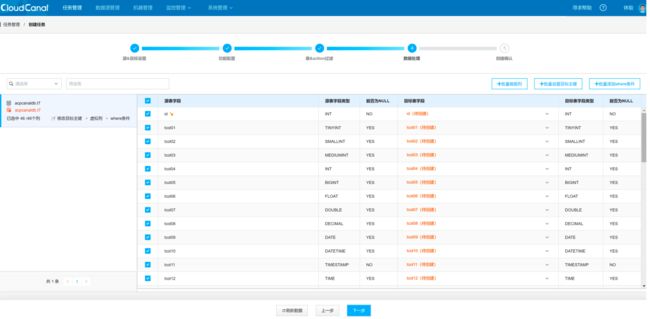
选择表中要同步的列。
确认配置无误后,点击创建任务。
查看同步进度。
源库和目标库数据一致。
源库修改表结构
后续实验可能会创建新的表或者新的任务,操作过程和前面介绍的类似,这里就省略重复的步骤了。CloudCanal 支持同步 DDL 语句修改表结构。
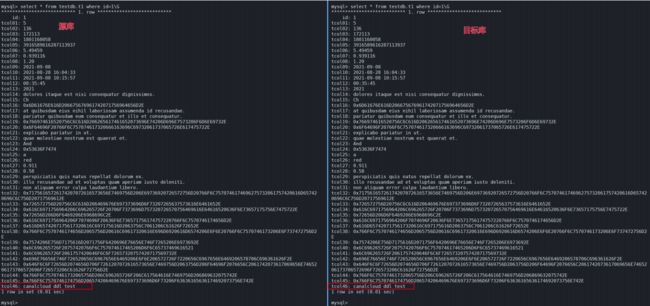
在源库新增列 tcol46 并插入一条数据:
alter table testdb.t1 add tcol46 varchar(20);
update testdb.t1 set tcol46='canalcloud ddl test' where id=1;
可以看到源库新增的列已经同步到目标库中了。
源库新增表
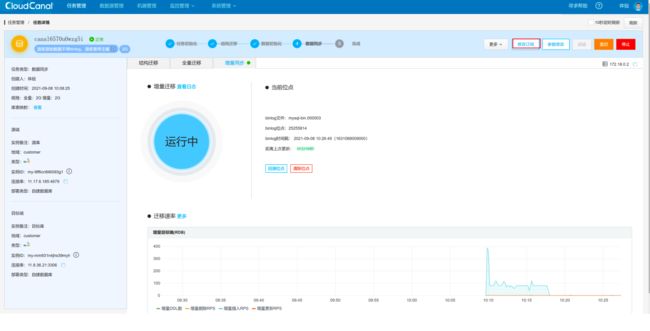
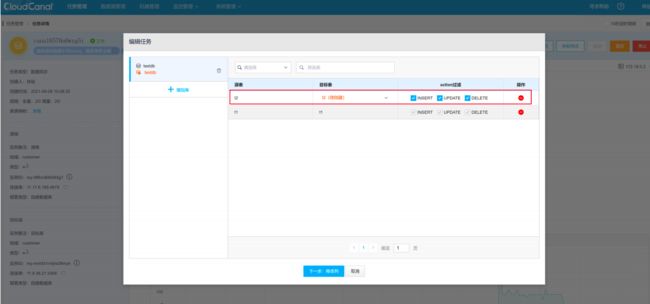
源库新增表,在 CloudCanal 上需要修改订阅,选择同步新表数据。
CloudCanal 修改订阅后,目标库可以正常同步新表。
源库删除表
源库删除表,目标库的表也会一起删除。
drop table testdb.t1;
![]()
数据校验
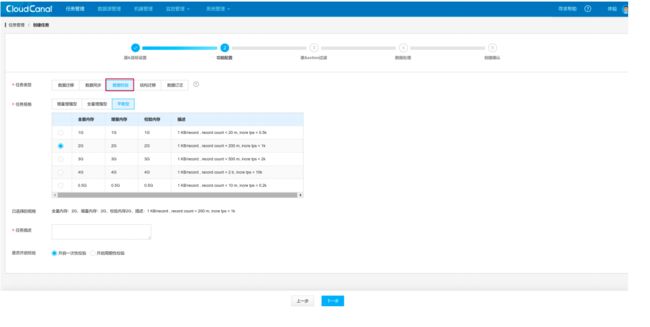
数据校验功能用于检验两个库之间的数据是否一致,进入任务管理页面,点击创建一个数据校验任务。
可以看到两个库间的数据是一致的。
高可用测试
CloudCanal 社区版自 1.0.3 开始支持用户添加机器,部署高可用集群。CloudCanal 高可用集群包含如下特性:
- 任务容灾自动切换:如果任务所在的机器 crash,在机器上的任务会自动切换到集群内其他可用的机器上。
- 任务手动调度:如果一台机器上运行了过多的任务,支持用户手动调度任务到其他机器上运行。
- 创建任务时自动分配到低负载机器上:创建任务的时候,任务会自动分配到绑定集群下负载较低的机器上。
CloudCanal 中的 Sidecar 容器负责数据同步,Console 容器负责任务的调度以及为提供管理操作。接下来分别模拟 Sidecar 容器和 Console 容器故障时,数据能否依然正常同步。
模拟 Sidecar 容器故障
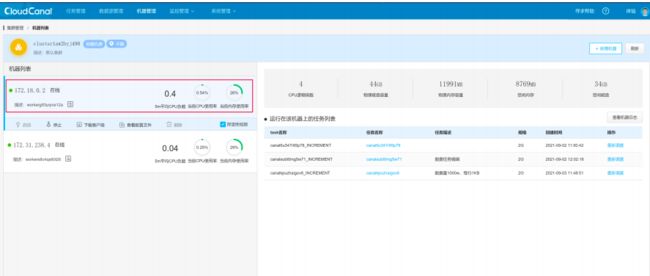
目前同步任务运行在 Sidecar 容器 172.18.0.2 上。
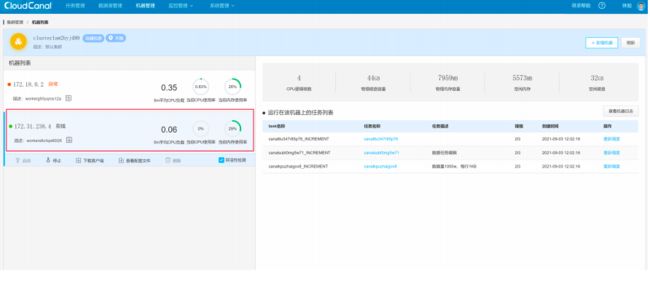
停止 Sidecar 容器。
此时同步任务已经重新调度到另一台存活的实例。
目标库依然可以正常同步数据。
模拟 Console 容器故障
停止 Console 容器。
停止 Console 容器后,Sidecar 容器依然可以正常执行同步任务。
MySQL 主从切换
通常在生产环境中,我们通常会部署双主模式的 MySQL,通过 keepalived 对外提供一个虚拟 IP,当主库发生故障时,虚拟 IP 漂移到备库上,由备库接管服务。关于MySQL 双主高可用部署可以参考 MySQL + Keepalived 双主热备搭建。
CloudCanal 使用 binlog + position 进行同步
CloudCanal 默认创建的同步任务是是基于 binlog 和 position 的方式同步的,当 MySQL 发生主从切换时,由于 MySQL 主从的 binlog 文件是不一致的,因此 MySQL 切换后 CloudCanal 基于 binlog + position 的方式无法正常同步数据。
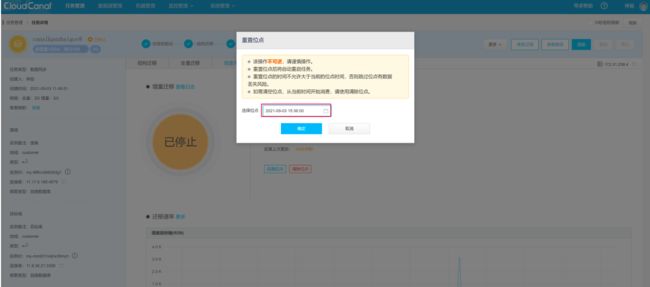
如果想在 MySQL 主从切换后 CloudCanal 可以正常同步数据,需要重新指定 CloudCanal 的位点。先停止 CloudCanal,然后根据 binlog 时间戳回溯位点。
目前位点只支持选到分钟,重复插入的数据 CloudCanal 会忽略。
重新启动 CloudCanal。
源库和目标库重新指定位点后同步正常。
使用 GTID 模式同步(推荐)
CloudCanal 使用 GTID 模式同步就可以很好地解决 binlog + position 方式同步时主从切换无法同步数据的问题。GTID 的全称是 global transaction id,表示的是全局事务 ID。
GTID 复制与普通复制最大的区别就是不需要指定二进制文件名和位置,当一个事务在主库端执行并提交时,产生 GTID,一同记录到 binlog 中;binlog 中先记录 GTID,紧跟着再记录事务相关的操作。
当发生 MySQL 主从切换时,在备库上就可以根据 GTID 继续同步数据。使用 GTID 同步的参数需要在创建任务以后在详情中修改,在创建任务时先关闭自动启动任务。
修改源 DATASOURCE 参数配置,设置 gtidMode 为 true。
MySQL 发生主从切换后依然可以正常同步数据。
日志查看
CloudCanal 的监控管理界面中提供了任务监控以及异常日志的查看。
异常日志可以查看异常堆栈信息以及该异常日志对应的任务。
告警
告警支持邮箱告警以及通过 Webhook 的方式发送告警信息。
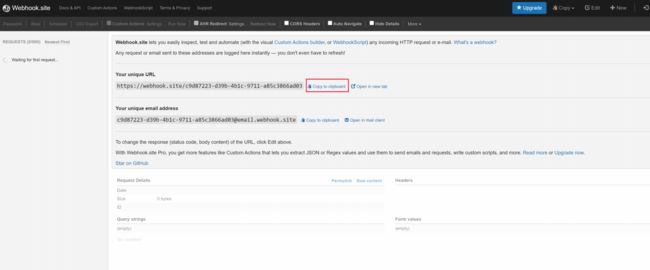
使用 https://webhook.site/ 网站来测试 Webhook 的方式发送告警。
设置 CloudCanal 将触发的告警发送到 https://webhook.site/ 网站。
停止一个 Sidecar 容器,触发告警。
在 CloudCanal 界面可以看到已经成功发送告警。
在 https://webhook.site/ 网站也可以看到 CloudCanal 发送过来的告警信息。
MySQL 同步数据到 Elasticsearch
准备数据
在源库中创建一张 student 表,并插入 5 条数据。
create table acpcanaldb.student (
`id` int(11) NOT NULL AUTO_INCREMENT PRIMARY KEY,
`name` varchar(20),
`age` int(3)
);

insert into acpcanaldb.student (name,age) values
('tom',18),
('jack',18),
('mike',20),
('cris',18),
('marry',19);
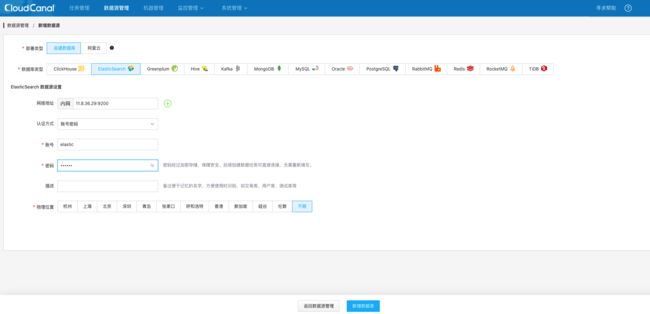
添加 Elasticsearch 数据源
查看添加的 Elasticsearch 数据源。
创建同步任务
进入任务管理界面,点击创建同步任务,目标类型选择 Elasticsearch。
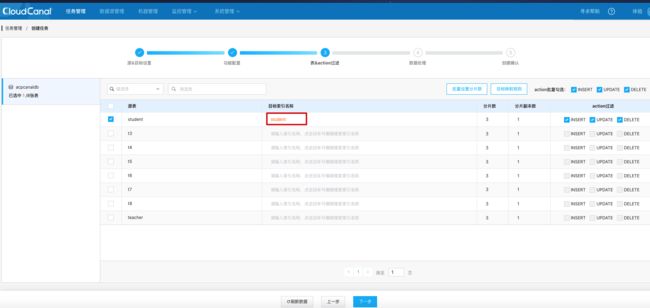
选择同步的表,设置在 Elasticsearch 上创建的索引名。
选择需要同步的字段。
确认任务参数无误后,点击创建任务。
观察数据同步
在 Elasticsearch 上查询数据,可以看到在 MySQL 中的 5 条记录已经同步到 Elasticsearch 中了。
GET student/_search
#返回结果
{
  "took" : 2,
  "timed_out" : false,
  "_shards" : {
    "total" : 3,
    "successful" : 3,
    "skipped" : 0,
    "failed" : 0
  },
  "hits" : {
    "total" : {
      "value" : 5,
      "relation" : "eq"
    },
    "max_score" : 1.0,
    "hits" : [
      {
        "_index" : "student",
        "_type" : "_doc",
        "_id" : "5",
        "_score" : 1.0,
        "_source" : {
          "name" : "marry",
          "id" : 5,
          "age" : 19
        }
      },
      {
        "_index" : "student",
        "_type" : "_doc",
        "_id" : "2",
        "_score" : 1.0,
        "_source" : {
          "name" : "jack",
          "id" : 2,
          "age" : 18
        }
      },
      {
        "_index" : "student",
        "_type" : "_doc",
        "_id" : "3",
        "_score" : 1.0,
        "_source" : {
          "name" : "mike",
          "id" : 3,
          "age" : 20
        }
      },
      {
        "_index" : "student",
        "_type" : "_doc",
        "_id" : "4",
        "_score" : 1.0,
        "_source" : {
          "name" : "cris",
          "id" : 4,
          "age" : 18
        }
      },
      {
        "_index" : "student",
        "_type" : "_doc",
        "_id" : "1",
        "_score" : 1.0,
        "_source" : {
          "name" : "tom",
          "id" : 1,
          "age" : 18
        }
      }
    ]
  }
}
往 MySQL 中再插入 1 条数据。
insert into acpcanaldb.student (name,age) values ('peter',20);
在 Elasticsearch 中也可以查到刚刚删除的数据。
GET student/_search
{
  "query": {
    "match": {
      "name": "peter"
    }
  }
}

#返回结果
{
  "took" : 732,
  "timed_out" : false,
  "_shards" : {
    "total" : 3,
    "successful" : 3,
    "skipped" : 0,
    "failed" : 0
  },
  "hits" : {
    "total" : {
      "value" : 1,
      "relation" : "eq"
    },
    "max_score" : 0.6931471,
    "hits" : [
      {
        "_index" : "student",
        "_type" : "_doc",
        "_id" : "6",
        "_score" : 0.6931471,
        "_source" : {
          "name" : "peter",
          "id" : 6,
          "age" : 20
        }
      }
    ]
  }
}
在 MySQL 中删除 age 为 18 的记录。
acpcanaldb@11.17.6.185 acpcanaldb 01:35:10>select * from acpcanaldb.student;
+----+-------+------+
| id | name  | age  |
+----+-------+------+
|  1 | tom   |   18 |
|  2 | jack  |   18 |
|  3 | mike  |   20 |
|  4 | cris  |   18 |
|  5 | marry |   19 |
|  6 | peter |   20 |
+----+-------+------+
6 rows in set (0.01 sec)

acpcanaldb@11.17.6.185 acpcanaldb 01:36:16>delete from acpcanaldb.student where age=18;
Query OK, 3 rows affected (0.02 sec)

acpcanaldb@11.17.6.185 acpcanaldb 01:36:27>select * from acpcanaldb.student;
+----+-------+------+
| id | name  | age  |
+----+-------+------+
|  3 | mike  |   20 |
|  5 | marry |   19 |
|  6 | peter |   20 |
+----+-------+------+
3 rows in set (0.01 sec)
在 Elasticsearch 上此时也已经删除了对应的数据。
GET student/_search
{
  "query": {
    "match": {
      "age": 18
    }
  }
}

#返回结果
{
  "took" : 710,
  "timed_out" : false,
  "_shards" : {
    "total" : 3,
    "successful" : 3,
    "skipped" : 0,
    "failed" : 0
  },
  "hits" : {
    "total" : {
      "value" : 0,
      "relation" : "eq"
    },
    "max_score" : null,
    "hits" : [ ]
  }
}
在 MySQL 中修改表结构。
acpcanaldb@11.17.6.185 acpcanaldb 01:38:49>update acpcanaldb.student set location='china';
Query OK, 3 rows affected (0.02 sec)
Rows matched: 3  Changed: 3  Warnings: 0

acpcanaldb@11.17.6.185 acpcanaldb 01:39:25>select * from acpcanaldb.student;
+----+-------+------+----------+
| id | name  | age  | location |
+----+-------+------+----------+
|  3 | mike  |   20 | china    |
|  5 | marry |   19 | china    |
|  6 | peter |   20 | china    |
+----+-------+------+----------+
3 rows in set (0.01 sec)
Elasticsearch 并不会修改对应的 mapping。
GET student/_mapping

#返回结果
{
  "student" : {
    "mappings" : {
      "properties" : {
        "age" : {
          "type" : "integer"
        },
        "id" : {
          "type" : "integer"
        },
        "name" : {
          "type" : "text",
          "analyzer" : "standard"
        }
      }
    }
  }
}
参考资料
- CloudCanal和Canal的区别
- CloudCanal社区版高可用部署教程
- CloudCanal社区版docker版安装(Linux/MacOS)
- 5分钟搞定 MySQL 到 MySQL "异构"在线数据迁移同步
欢迎关注
![]()
