多源数据融合 Sar & Optical(一)像素级融合
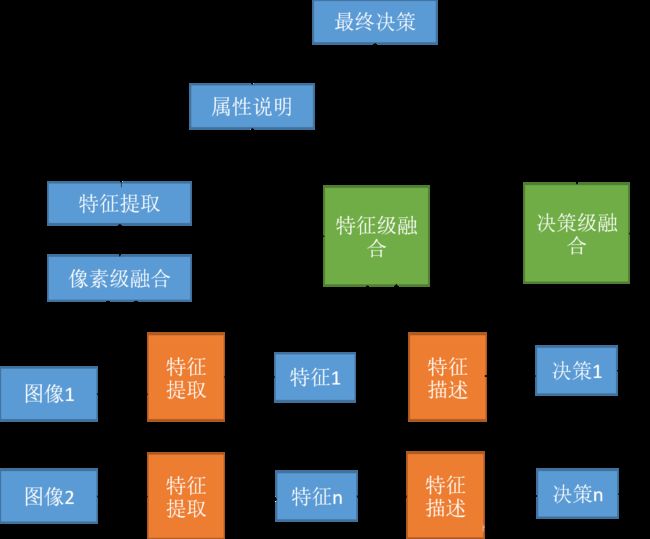
根据图像表征层次的不同,图像融合可分为三个层次的融合:像素级融合、特征级融合和决策级融合, 下图是像融合层级划分图。

其中像素级融合位于最低层,可以看作是对信息仅作特征提取并直接使用。也正是得益于其对信息最大程度上的保留,使其在准确性和鲁棒性上优于其他两级。相比之下,像素级融合获取的细节信息更丰富,是最常用的融合方式。因此,它同样是图像融合领域研究的热点。与此同时,由于其需要的配准精度高,必须达到像素级别。所以像素级图像融合技术对设备要求较高,而且融合过程耗时,不易于实时处理。像素级融合一般分为四步完成:预处理、变换、合成和逆变换。
像素级图像融合

我目前需要处理的任务是 Sar与Optical光学图像融合分割,我分别使用了两种方法进行融合:基于非多尺度变换的ISH颜色空间融合方法、基于Laplace金字塔变换的图像融合方法。
基于非多尺度变换的ISH颜色空间融合方法
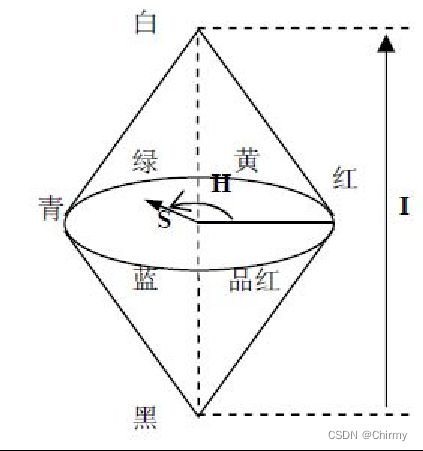
IHS颜色模型适合于人的直觉的配色方法,因而成为彩色图像处理最常用的颜色模型。强度表示光谱的整体亮度大小,对应于图像的空间分辨率,色调描述纯色的属性,决定与光谱的主波长,是光谱在质的方面的区别,饱和度表征光谱的主波长在强度中的比例,色调和饱和度代表图像的光谱分辨率。

与RGB模型相比,IHS模型更加符合人眼描述和解释颜色的方式,同时由于I、H、S三个基本特征量之间相互独立,因此,IHS模型经常被用于基于彩色描述的图像处理方法中,从而将彩色图像中携带的彩色信息(色调和饱和度)和无色光强信息(亮度)分开处理。
IHS 变换公式

IHS空间图像融合方法利用IHS模型在表示彩色图像方面的优势,常被用于对遥感图像的融合处理。为了保留多光谱图像光谱信息的同时增强其空间分辨率,可以在IHS空间融合低空间分辨率的多光谱图像和高空间分辨率的全色图像,将多光谱图像从RGB图像模型转换到IHS模型,并在IHS空间中将反应多光谱图像空间分辨率I的分量与全色图像进行融合处理,再将融合结果反变换回RGB空间,即可得到融合后空间分辨率被提高的多光谱图像。
ISH图像融合处理步骤:
① 将多光谱图像的 R 、G 、B 三个波段转换到IHS 空间,得到 I 、H 、S 三个分量;
② 将全色图像与多光谱图像经 IHS变换后得到的亮度分量 I ,在一定的融合规则下进行融合,得到新的亮度分量(融合分量) I’ ;
③ 用第 2 步得到的融合分量 I’代替亮度分量,并同 H 、S 分量图像一起转换到 RGB 空间,最后得到融合图像。
ISH图像融合程序:
img_process.py
import cv2
from PIL import Image
import numpy as np
from osgeo import gdal

class ImgProcess:
    def IHS(self, data_low, data_high):
        """
        基于IHS变换融合算法
        输入:np.ndArray格式的三维数组
        返回:可绘出图像的utf-8格式的三维数组
        """
        A = [[1. / 3., 1. / 3., 1. / 3.], [-np.sqrt(2) / 6., -np.sqrt(2) / 6., 2 * np.sqrt(2) / 6],
             [1. / np.sqrt(2), -1. / np.sqrt(2), 0.]]
        # RGB->IHS正变换矩阵
        B = [[1., -1. / np.sqrt(2), 1. / np.sqrt(2)], [1., -1. / np.sqrt(2), -1. / np.sqrt(2)], [1., np.sqrt(2), 0.]]
        # IHS->RGB逆变换矩阵
        A = np.matrix(A)
        B = np.matrix(B)
        band, w, h = data_high.shape
        pixels = w * h
        data_low = data_low.reshape(3, pixels)
        data_high = data_high.reshape(3, pixels)
        a1 = np.dot(A, np.matrix(data_high))  # 高分影像正变换
        a2 = np.dot(A, np.matrix(data_low))  # 低分影像正变换
        a2[0, :] = a2[0, :] *0.3 + a1[0, :]*0.7   # 用高分影像第一波段替换低分影像第一波段
        # a2[0, :] = a1[0, :] # 用高分影像第一波段替换低分影像第一波段
        RGB = np.array(np.dot(B, a2))  # 融合影像逆变换
        RGB = RGB.reshape((3, w, h))
        min_val = np.min(RGB.ravel())
        max_val = np.max(RGB.ravel())
        RGB = np.uint8((RGB.astype(np.float) - min_val) / (max_val - min_val) * 255)
        RGB = Image.fromarray(cv2.merge([RGB[0], RGB[1], RGB[2]]))
        return RGB

    def imresize(self, data_low, data_high):
        """
        图像缩放函数
        输入:np.ndArray格式的三维数组
        返回:np.ndArray格式的三维数组
        """
        band, col, row = data_high.shape
        data = np.zeros(((band, col, row)))
        for i in range(0, band):
            # data[i] = smi.imresize(data_low[i], (col, row))
            data[i] = cv2.resize(data_low[i], (col, row))
        return data

    def gdal_open(self, path):
        """
        读取图像函数
        输入:图像路径
        返回:np.ndArray格式的三维数组
        """
        data = gdal.Open(path)
        col = data.RasterXSize  # 读取图像长度
        row = data.RasterYSize  # 读取图像宽度
        data_array_r = data.GetRasterBand(1).ReadAsArray(0, 0, col, row).astype(np.float)  # 读取图像第一波段并转换为数组
        data_array_g = data.GetRasterBand(2).ReadAsArray(0, 0, col, row).astype(np.float)  # 读取图像第二波段并转换为数组
        data_array_b = data.GetRasterBand(3).ReadAsArray(0, 0, col, row).astype(np.float)  # 读取图像第三波段并转换为数组
        data_array = np.array((data_array_r, data_array_g, data_array_b))
        return data_array
main.py
from tools.img_process import ImgProcess

if __name__ == "__main__":
    img_p = ImgProcess()
    path_low = '/home/workstation8/Research/segformer-pytorch-diploma/VOCdevkit/DFC2023/JPEGImages'
    path_high = '/home/workstation8/Research/segformer-pytorch-diploma/VOCdevkit/DFC2023/SAR-JPEGImages-3c-temp'
    save_path = '/home/workstation8/Research/segformer-pytorch-diploma/VOCdevkit/DFC2023/IHSFusion-O-S-I/'
    img_p.makeDir(save_path)
    for img_name in os.listdir(path_high):
        data_low = img_p.gdal_open(os.path.join(path_low, img_name))
        data_high = img_p.gdal_open(os.path.join(path_high, img_name))
        data_low = img_p.imresize(data_low, data_high)
        RGB = img_p.IHS(data_low, data_high)
        RGB.save(os.path.join(save_path, img_name))
基于Laplace金字塔变换的图像融合方法
图像金字塔介绍
图像金字塔是多尺度表达的一种,是一种以多分辨率来解释图像的有效但概念简单的结构。一幅图像的金字塔是一系列以金字塔形状排列的分辨率逐渐降低并且来源于同一张原始图像的集合。通过梯次向下采样获得,直到某个终止条件才停止采样。
图像金字塔说白了就是披着金字塔外衣的图像缩放。一般有高斯图像金字塔、拉普拉斯图像金字塔。
拉普拉斯金字塔(带通金字塔)
拉普拉斯金字塔:用于重建图像,也就是预测残差,对图像进行最大程度的还原。
一幅小图像重建为一幅大图原理:用高斯金字塔的每一层图像减去其上一层图像上采样并高斯卷积之后的预测图像,得到一系列的差值图像即为 LP 分解图像。
拉普拉斯金字塔实际上是通过计算图片先下采样再上采样后的结果和原图片的残差来保存缺失信息的,公式为:
L ( i ) = G ( i ) − P y r U p ( G ( i + 1 ) ) L ( i ) = G ( i ) − P y r U p ( G ( i + 1 ) ) L ( i ) = G ( i ) − P y r U p ( G ( i + 1 ) ) L ( i ) = G ( i ) − P y r U p ( G ( i + 1 ) ) L(i) = G(i) - PyrUp(G(i + 1)) L(i)=G(i)−PyrUp(G(i+1)) L(i)=G(i)−PyrUp(G(i+1))L(i)=G(i)−PyrUp(G(i+1))L(i)=G(i)−PyrUp(G(i+1))
也就是说,拉普拉斯金字塔实际上是由上面的残差图片组成的金字塔,它为还原图片做准备。求得每个图像的拉普拉斯金字塔后需要对相应层次的图像进行融合,最终还原图像。拉普拉斯金字塔可以精确还原图片信息。还原图像的过程就是重构的过程。


Laplace金字塔融合步骤:
①分别对两图片进行高斯降采样
②分别求两图片的Laplace金字塔
③对两图片的Laplace金字塔按照一定权重融合
④对融合后的Laplace金字塔重建获取融合后的图像
L ’ = W 1 × L s + W 2 × L o L’= W~1~ × L~s~ + W~2~ × L~o~ L’=W 1 ×L s +W 2 ×L o
在本融合项目中,上面第③步的权重融合为:分别计算出SAR和OPT图像的Laplace金字塔后,然后以一定的权重w1、w2相加融合。经过多次调参,发现 w1:w2 = 0.2 : 0.8 时提取到的特征最好。
Laplace金字塔融合程序
fusion_process.py
# -*- coding:utf-8 -*-
__author__ = 'Microcosm'
import cv2
import matplotlib as mpl
import os
mpl.use('TKAgg')


class LP_Fusion():

    def makeDir(self, path):
        """
        如果path路径不存在,则创建
        :param path:
        :return:
        """
        if not os.path.exists(path):
            os.makedirs(path)

    def sameSize(self, img1, img2):
        """
        使得img1的大小与img2相同
        """
        rows, cols, dpt = img2.shape
        dst = img1[:rows, :cols]
        return dst

    def pyrDown(self, img, layer):
        """
        下采样生成高斯金字塔
        Args:
            img:
            layer:

        Returns:

        """
        G = img.copy()
        gp_img = [G]
        for i in range(layer):
            G = cv2.pyrDown(G)
            gp_img.append(G)
        return gp_img

    def get_lp(self, gp_img, layer):
        """
        生成拉普拉斯金字塔【等于「高斯金字塔中的第i层」与「高斯金字塔中的第i+1层的向上采样结果」之差】
        Args:
            gp_img:
            layer:

        Returns:

        """
        lp_img = [gp_img[layer]]
        for i in range(layer, 0, -1):  # [6, 5, 4, 3, 2, 1]
            GE = cv2.pyrUp(gp_img[i])
            L = cv2.subtract(gp_img[i - 1], self.sameSize(GE, gp_img[i - 1]))
            lp_img.append(L)
        return lp_img

    def fusion(self, lp_img_1, lp_img_2):
        """
        图像融合重建
        Args:
            lp_img_1:
            lp_img_2:

        Returns:
        """
        LS = []
        for la, lb in zip(lp_img_1, lp_img_2):
            rows, cols, dpt = la.shape
            ls = la
            # print(type(ls))
            ls = la*0.8 + lb*0.2
            LS.append(ls)
        return LS

    def pyrUp(self, LS, layer):
        """
        上采样 并与 拉普拉斯相加 恢复原始状态
        Args:
            LS:
            layer:

        Returns:

        """
        ls_reconstruct = LS[0]
        for i in range(1, layer):
            # print(LS[i])
            ls_reconstruct = cv2.pyrUp(ls_reconstruct)
            ls_reconstruct = cv2.add(self.sameSize(ls_reconstruct, LS[i]), LS[i])
            # print("ls_reconstruct {}".format(ls_reconstruct.shape))
        return ls_reconstruct
main.py
from tools.fusion_process import LP_Fusion
import cv2
import os
from tqdm import tqdm, trange
from matplotlib import pyplot as plt
if __name__ == "__main__":
    lp_p =  LP_Fusion()

    # 层数-1
    layer = 1

    # img_p = ImgProcess()
    img1_path = '/home/workstation8/Research/segformer-pytorch-diploma/VOCdevkit/DFC2023/JPEGImages'
    img2_path = '/home/workstation8/Research/segformer-pytorch-diploma/VOCdevkit/DFC2023/SAR-JPEGImages'
    save_path = '/home/workstation8/Research/segformer-pytorch-diploma/VOCdevkit/DFC2023/LPFusion/LPFusion-{}L-8O-2S'.format(layer)

    layer -= 1
    lp_p.makeDir(save_path)

    for index in tqdm(range(len(os.listdir(img2_path))), colour='BLUE'):

        img_name_list = os.listdir(img2_path)

        img_1 = cv2.imread(os.path.join(img1_path, img_name_list[index]))
        img_2 = cv2.imread(os.path.join(img2_path, img_name_list[index]))

        # 对img_1进行layer层高斯降采样
        gp_img_1 = lp_p.pyrDown(img_1, layer=layer)

        # 对img_2进行layer层高斯降采样
        gp_img_2 = lp_p.pyrDown(img_2, layer=layer)

        # 求img_1的Laplace金字塔
        lp_img_1 = lp_p.get_lp(gp_img_1, layer)

        # 求img_2的Laplace金字塔
        lp_img_2 = lp_p.get_lp(gp_img_2, layer)

        # # 对img_1和img_2的Laplace金字塔进行融合
        LS = lp_p.fusion(lp_img_1, lp_img_2)

        # 对融合后的Laplace金字塔重建获取融合后的结果
        ls_reconstruct = lp_p.pyrUp(LS, layer+1)

        # 保存
        cv2.imwrite(os.path.join(save_path, img_name_list[index]), ls_reconstruct)

        # # 可视化
        # new_img = plt.imread(os.path.join(save_path, img_name))
        # plt.imshow(new_img)
        # plt.show()
参考博客:
图像融合方法总结
像素级图像融合常用方法
图像金字塔实现图像融合