2021-09-06 黑马移动端头条项目-day07
目录
文章详情
一、创建组件并配置动态路由
二、页面布局
2.1 标题和作者信息
2.2 正文内容
2.3 请求正文内容的数据
三、内容图片预览
四、关注用户
五、收藏文章
六、文章点赞
文章详情
一、创建组件并配置动态路由
// 配置动态路由,文章详情
{
path: '/article/:articleId',
name: 'article',
component: () => import('@/views/article/')
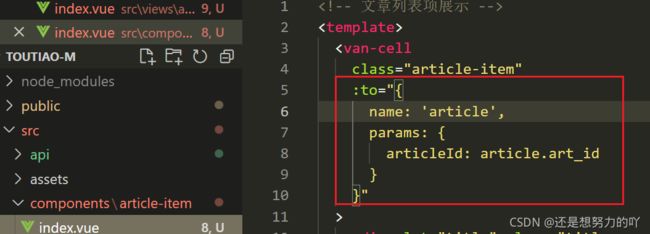
}在components/article-item.vue列表项组件中添加路由导航 to=" " 跳转至对应页面
在article/index.vue组件中获取动态路由参数:
方式一:this.$route.params.xxx
方式二:props 传参,推荐
采用方式二示范:router.js 给路由开启一个props: true
{
    path: '/article/:articleId',
    name: 'article',
    component: () => import('@/views/article/'),
    // 动态路由传参:将动态路由参数映射到组件的props中,无论是访问还是维护都很方便
    props: true
}article/index.vue组件中用props申明接收:
props: {
    articleId: {
      type: Number,
      required: true
    }
  },
二、页面布局
2.1 标题和作者信息
2.2 正文内容
使用github上正文内容封装好的样式,引入 import './github-markdown.css',直接拿过来用即可 github-markdown.css
2.3 请求正文内容的数据
api/article.js 封装数据接口
// 获取文章详情
export const getArticleById = articleId => {
  return request({
    method: 'GET',
    url: `/app/v1_0/articles/${articleId}`
  })
}
article/index.vue
加载接口配置: import { getArticleById } from "@/api/article";
页面初始化时加载方法,请求相应数据:
created() {

    this.loadArticle();

  },

methods: {

    async loadArticle() {

      const { data } = await getArticleById(this.articleId);

      console.log(data);

    }

  }
会报错:

解决:后端返回数据中的大数字问题
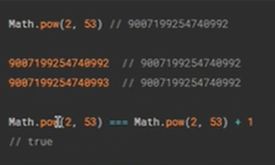
Js能够准确表示的整数范围在-2^53到2^53之间,不包含两个端点,超过这个范围则无法精确表示该值
后端返回的数据一般是JSON格式的字符串,若不做任何处理直接获取字符串的指定数据比较麻烦,所以要转换为js对象。
'{"id":"234894235395435","name":"jack","age": 18}'
转换为:
JSON.parse( '{"id":"234894235395435","name":"jack","age": 18}' )
可以看出超出安全整数范围的id无法精确表示这个问题并不是axios的错,解决办法是json-bigint
json-bigint是第三方包:
1.安装 npm i json-bigint
2.在utils/request.js中配置
- 引入 import JSONbig from 'json-bigint'
- 配置如下代码:
const request = axios.create({
  baseURL: 'http://ttapi.research.itcast.cn/', // 接口的基准路径
  transformResponse: [function (data) {
    // 后端返回的数据可能不是json格式字符串
    // 如果不是,那么 jsonbig.parse调用会报错
    // 所以用try-catch来捕获民异常,处理异常的发生
    try {
      // 如果转换成功,则直接把结果返回
      return JSONbig.parse(data)
    } catch (err) {
      console.log('转换失败', err)
      // 如果转换失败了,则进入这里
      // 把数据原封不动的直接返回给请求使用
      return data
    }
    // axios默认在内部使用JSON.parse来转换处理原始数据
    // return JSON.parse(data)
  }]
})
三、内容图片预览
点击文章里的图片可以对图片进行预览,大致步骤如下:
-
获取文章内容DOM容器,要用ref属性
先绑定ref属性
获取DOM容器
const articleContent = this.$refs['article-content']-
得到所有的img标签
      const imgs = articleContent.querySelectorAll("img");
      console.log(imgs);
从方面打印出来的数据看出: 数组为空,这是因为数据改变影响视图更新(DOM数据)不是立即的,如 this.article = data.data;已经改变了数据,但页面上未及时更新视图效果

所以如果需要在修改数据之后马上操作被该数据影响的视图DOM,需要把得到所有的img标签的代码放到$nextTick中,$nextTick是Vue提供的一个方法
    this.$nextTick(() => {
        const imgs = articleContent.querySelectorAll("img");
        console.log(imgs);
});加了$nextTick()方法之后,效果如下:

- 循环img列表,给img注册点击事件
-
在事件处理函数中调用ImagePreview()预览
该部分完整代码:
  methods: {
    async loadArticle() {
      const { data } = await getArticleById(this.articleId);
      console.log(data);
      this.article = data.data;
      this.$nextTick(() => {
        this.handlerPreviewImage();
      });
    },
    handlerPreviewImage() {
      // 进行图片预览操作
      // 1.获取文章内容DOM容器,要用ref属性
      const articleContent = this.$refs["article-content"];
      // 2.得到所有的img标签
      // 数据改变影响视图更新(DOM数据)不是立即的
      // 所以如果需要在修改数据之后马上操作被该数据影响的视图DOM,
      // 需要把得到所有的img标签的代码放到$nextTick中,
      // $nextTick是Vue提供的一个方法
      const imgs = articleContent.querySelectorAll("img");
      const imgPaths = [];  // 收集所有图片的路径

      // 3.循环img列表,给img注册点击事件
      imgs.forEach((img, index) => {
        imgPaths.push(img.src);
        img.onclick = function() {
          // 4.在事件处理函数中调用ImagePreview()预览
          ImagePreview({
            images: imgPaths, // 预览图片路径列表
            startPosition: index // 起始位置
          });
        };
      });
    }
  }
四、关注用户
1.api/user.js中配置关注用户、取消关注用户的数据接口
// 关注用户
export const addFollow = userId => {
  return request({
    method: 'POST',
    url: '/app/v1_0/user/followings',
    data: {
      target: userId
    }
  })
}
// 取消关注用户
export const deleteFollow = userId => {
  return request({
    method: 'DELETE',
    url: `/app/v1_0/user/followings/${userId}`
  })
}
这两个接口都需要传用户id,即userId

“关注”按钮绑定onFollow事件,绑定:loading事件
@click="onFollow"
 :loading="isFollowLoading"
处理onFollow事件函数
   async onFollow() {
      this.isFollowLoading = true;
      // 已关注,则取消关注
      if (this.article.is_followed) {
        await deleteFollow(this.article.aut_id);
      } else {
        // 没有关注,则添加关注
        await addFollow(this.article.aut_id);
      }
      this.article.is_followed = !this.article.is_followed;
      this.isFollowLoading = false;
    }
五、收藏文章
配置数据接口
// 收藏文章
export const addCollect = articleId => {
  return request({
    method: 'POST',
    url: '/app/v1_0/article/collections',
    data: {
      target: articleId
    }
  })
}
// 取消收藏文章
export const deleteCollect = articleId => {
  return request({
    method: 'DELETE',
    url: `/app/v1_0/article/collections/${articleId}`
  })
}
收藏与取消收藏的点击事件
    // 收藏与取消收藏
    async onCollect() {
      // this.isCollectLoading = true;
      this.$toast.loading({
        message: "操作中...",
        forbidClick: true // 禁止背景点击
      });
      // 已收藏,则取消收藏
      if (this.article.is_collected) {
        await deleteCollect(this.articleId);
      } else {
        // 没有收藏,则添加收藏
        await addCollect(this.articleId);
      }
      this.article.is_collected = !this.article.is_collected;
      // this.isCollectLoading = false;
      this.$toast.success(`${this.article.is_collected ? "" : "取消"}收藏成功`);
    }
六、文章点赞
配置数据接口
// 点赞文章
export const addLike = articleId => {
  return request({
    method: 'POST',
    url: '/app/v1_0/article/likings',
    data: {
      target: articleId
    }
  })
}
// 取消点赞文章
export const deleteLike = articleId => {
  return request({
    method: 'DELETE',
    url: `/app/v1_0/article/likings/${articleId}`
  })
}
点赞与取消点赞的点击事件
   // 对文章点赞或取消点赞
    async onLike() {
      this.$toast.loading({
        message: "操作中...",
        forbidClick: true // 禁止背景点击
      });
      if (this.article.attitude === 1) {
        // 取消点赞
        await deleteLike(this.article.art_id);
        this.article.attitude = -1;
      } else {
        // 添加点赞
        await addLike(this.article.art_id);
        this.article.attitude = 1;
      }
      this.$toast.success(
        `${this.article.attitude === 1 ? "" : "取消"}点赞成功`
      );
    }