Kaggle计算机视觉入门
1 构建卷积分类器
1.1 目标
- 使用Keras深度学习网络构建图片分类器
- 学习视觉特征提取背后的基本思想
- 学习如何提升你的模型
- 学习如何扩充你的数据
我们的计算机是如何识别一张图片的呢,下面的图非常生动形象。
在训练我们自己的分类器的时候,我们需要解决两个问题。
- 如何拆分我们图片中的特征。
- 这些特征代表这张图片是哪个种类。
1.2 例子
接下来,我们将创建分类器,试图解决以下问题:这是一张汽车还是卡车的照片?我们的数据集是大约10,000张各种汽车的图片,大约一半是汽车,一半是卡车。
数据集地址如下:
https://www.kaggle.com/datasets/ryanholbrook/car-or-truck
首先我们先来介绍一下导入数据的函数:
image_dataset_from_directory
def image_dataset_from_directory(directory: Any,
                                 labels: str = 'inferred',
                                 label_mode: str = 'int',
                                 class_names: Any = None,
                                 color_mode: str = 'rgb',
                                 batch_size: int = 32,
                                 image_size: tuple[int, int] = (256, 256),
                                 shuffle: bool = True,
                                 seed: Any = None,
                                 validation_split: {__mul__} = None,
                                 subset: {__eq__} = None,
                                 interpolation: str = 'bilinear',
                                 follow_links: bool = False,
                                 crop_to_aspect_ratio: bool = False,
                                 **kwargs: Any) -> Any
:::success
directory :传入数据集路径
labels:str类型,默认值是inferred,表示标签从目录结构中生成,子目录按照字母顺序从0开始编号
label_mode:str类型,默认值是int,指label的索引值是0~class_names.length-1 label_mode的值类型还可以是 categorica,binary(索引要么是0要么是1)
class_names:Any类型,仅当labels值为inferred时有效,存储实际标签名(按子目录字母顺序排序一一对应)的列表或元组
color_mode:str类型,默认值是rgb(3通道),还可以是grayscale(1通道),rgba(4通道)
batch_size:int类型,默认值是32,一次取样的大小
image_size:int两元组,默认值是(256,256)
shuffle:bool类型,默认值True,表示打乱数据
seed:随机数种子,int型数即可(例如123,一般验证集训练集两个函数的seed要相同)。如果使用validation_split和shuffle,则必须提供一个seed参数,确保train和validation子集之间没有重叠。
validation_split:数据集中验证集的比例,double型,0~1
subset:str类型,有"training"和"validation"两种取值,表示函数返回的是训练集还是验证集
interpolation:str类型,指定图像大小调整时的插值方法,默认值是bilinear(双线性插值),此外还有nearest(最邻近插值),bucubic(双三次插值),lanczos3,lanczos5。
:::
Step 1 导入数据集
# Imports
import os, warnings
import matplotlib.pyplot as plt
from matplotlib import gridspec

import numpy as np
import tensorflow as tf
from tensorflow.keras.preprocessing import image_dataset_from_directory

# 可复制性
def set_seed(seed=31415):
    np.random.seed(seed)
    tf.random.set_seed(seed)
    os.environ['PYTHONHASHSEED'] = str(seed)
    os.environ['TF_DETERMINISTIC_OPS'] = '1'
set_seed(31415)

# 设置Matplotlib的默认值
plt.rc('figure', autolayout=True)
plt.rc('axes', labelweight='bold', labelsize='large',
       titleweight='bold', titlesize=18, titlepad=10)
plt.rc('image', cmap='magma')
warnings.filterwarnings("ignore") # to clean up output cells


# 加载训练和验证集
ds_train_ = image_dataset_from_directory(
    './input/train',
    labels='inferred',
    label_mode='binary',
    image_size=[128, 128],
    interpolation='nearest',
    batch_size=64,
    shuffle=True,
)
ds_valid_ = image_dataset_from_directory(
    './input/valid',
    labels='inferred',
    label_mode='binary',
    image_size=[128, 128],
    interpolation='nearest',
    batch_size=64,
    shuffle=False,
)

# 数据管道
def convert_to_float(image, label):
    image = tf.image.convert_image_dtype(image, dtype=tf.float32)
    return image, label

AUTOTUNE = tf.data.experimental.AUTOTUNE
ds_train = (
    ds_train_
    .map(convert_to_float)
    .cache()
    .prefetch(buffer_size=AUTOTUNE)
)
ds_valid = (
    ds_valid_
    .map(convert_to_float)
    .cache()
    .prefetch(buffer_size=AUTOTUNE)
)
这段代码包含了一些常用的Python和深度学习库的导入,如os、warnings、matplotlib、numpy、tensorflow等。此外,代码还包含了一些函数和数据管道的设置,主要用于准备训练和验证数据集。
具体而言,代码中使用image_dataset_from_directory函数从指定的文件夹中加载图像数据集,通过指定image_size参数将图像大小缩放为128x128,label_mode参数用于指定标签的类型为二分类(即0或1),batch_size参数指定了每个批次的图像数量,并且shuffle参数用于在每个epoch开始时对训练数据集进行随机打乱操作。
接下来,定义了一个convert_to_float函数,将图像的数据类型转换为tf.float32类型。最后,使用map函数将convert_to_float函数应用于训练和验证数据集中的每个图像,并使用cache和prefetch函数对数据集进行缓存和预处理,以提高模型训练的效率。
当使用深度学习模型进行训练时,通常需要将大量的数据集加载到内存中进行训练。然而,由于计算机内存的限制,通常无法一次性将所有数据加载到内存中。此外,大型的数据集还需要进行一些预处理,如图像大小调整、数据类型转换等,以适应模型的输入。因此,使用数据管道可以更有效地准备和加载数据集,提高模型训练的效率和速度。
在这个代码中,数据管道主要由以下几个步骤构成:
convert_to_float函数:该函数将每个图像的数据类型转换为tf.float32类型,以便于后续的数据处理和模型训练。
map函数:该函数将convert_to_float函数应用于数据集中的每个元素(即每个图像),并返回一个新的数据集。因此,map函数的作用就是对数据集进行一定的转换或处理操作。
cache函数:该函数将数据集缓存在内存或者硬盘中,以避免每个epoch都重新从硬盘中读取数据,提高数据加载的效率。
prefetch函数:该函数用于预取数据,即在模型训练的同时,异步地加载和处理下一个批次的数据。这样可以避免数据加载和处理的瓶颈,并且使得模型的训练速度更快。
综上所述,通过使用数据管道,可以更高效地准备和加载数据集,从而提高模型训练的效率和速度
:::success
prefetch(buffer_size=AUTOTUNE)的参数的含义。
:::
在 TensorFlow 中,tf.data.Dataset.prefetch(buffer_size)函数可以用于预取数据。buffer_size参数指定了预取缓冲区的大小,即预取的数据批次数。该函数会在内存中预先加载下一个批次的数据,以避免数据加载和处理的瓶颈,并且使得模型的训练速度更快。
在这个代码中,buffer_size的值是AUTOTUNE,它是一个特殊的常量,其值是tf.data.experimental.AUTOTUNE,表示让 TensorFlow 自动选择合适的缓冲区大小。具体来说,当AUTOTUNE被设置为tf.data.experimental.AUTOTUNE时,TensorFlow 会根据可用的内存和计算资源自动选择合适的缓冲区大小。
因此,在这个代码中,通过使用prefetch(buffer_size=AUTOTUNE)函数,并将buffer_size设置为AUTOTUNE,可以根据可用的计算资源自动选择合适的缓冲区大小,以提高数据加载和处理的效率。
Step 2 定义预训练模型
最常用的预训练数据集是ImageNet,这是一个包含多种自然图像的大型数据集。Keras在其应用模块中包括各种在ImageNet上预训练的模型。我们将使用的预训练模型叫做VGG16。
pretrained_base = tf.keras.models.load_model(
    './cv-course-models/vgg16-pretrained-base',
)
pretrained_base.trainable = False
这段代码加载了一个预训练的 VGG16 模型作为基础模型,并将其设置为不可训练。具体来说,tf.keras.models.load_model() 函数从指定路径加载了一个已经预训练好的 VGG16 模型,并将其保存在pretrained_base变量中。
VGG16是一种经典的深度卷积神经网络,它的结构非常复杂,需要大量的训练数据和计算资源来训练,因此在实际应用中通常使用预训练模型。这里加载的 VGG16 模型是预先训练好的,意味着该模型已经在大型数据集上进行了训练,其中包括大量的图像和标签。这个预训练模型可以用于不同的计算机视觉任务,包括图像分类、目标检测等等。
在加载完预训练的 VGG16 模型之后,代码将其设置为不可训练。通过将 pretrained_base.trainable 设置为 False,我们可以保证在训练过程中不会对这个模型的权重进行调整,即冻结模型的参数,只训练我们添加的新的全连接层的参数。这样可以避免在训练过程中丢失原始的预训练模型所学到的特征。
Step 3 设置网络参数
from tensorflow import keras
from tensorflow.keras import layers

model = keras.Sequential([
    pretrained_base,
    layers.Flatten(),
    layers.Dense(6, activation='relu'),
    layers.Dense(1, activation='sigmoid'),
])
            [Pretrained VGG16]    # 预训练的VGG16模型作为第一个层
                   |
             [Flatten Layer]      # 展平层
                   |
	 [Dense Layer with 6 neurons]    # 全连接层,具有6个神经元和ReLU激活函数
                   |
	  [Dense Layer with 1 neuron]     # 输出层,具有1个神经元和Sigmoid激活函数
                   |
            [Binary Output]      # 输出预测结果为二进制分类
这段代码定义了一个 Keras 的序列模型 model,它由四个层组成:预训练的 VGG16 模型 pretrained_base、一个 Flatten 层、一个具有6个神经元和ReLU激活函数的全连接层和一个具有1个神经元和Sigmoid激活函数的输出层。
在这个模型中,pretrained_base 作为第一个层被添加到模型中。由于我们已经将预训练模型的权重冻结,因此在训练过程中它们不会被更新。Flatten 层将输入展平成一维向量,以便将其传递给全连接层。全连接层具有6个神经元,使用 ReLU 激活函数。最后,输出层是一个具有1个神经元的层,使用 Sigmoid 激活函数,将预测转换为二进制分类。
这个模型将被用于对图像进行分类,根据输入图像中是否包含汽车或卡车来输出二进制分类的预测结果。模型的训练将通过优化损失函数来调整模型的参数,以最小化模型在训练集上的预测误差。
Step 4 模型训练
model.compile(
    optimizer='adam',
    loss='binary_crossentropy',
    metrics=['binary_accuracy'],
)

history = model.fit(
    ds_train,
    validation_data=ds_valid,
    epochs=30,
    verbose=0,
)
在这里,我们使用 model.compile() 函数配置模型的训练参数,包括优化器、损失函数和评价指标。具体来说,我们使用 Adam 优化器,二分类交叉熵损失函数和二分类精度作为评价指标。然后,我们使用 model.fit() 函数对模型进行训练,传递训练数据集 ds_train 作为输入,并使用验证数据集 ds_valid 进行验证。我们将训练周期数设置为 30,以便让模型在数据集上进行多次迭代,并通过 verbose=0 参数设置不输出训练过程中的详细信息。
import pandas as pd
history_frame = pd.DataFrame(history.history)
history_frame.loc[:, ['loss', 'val_loss']].plot()
history_frame.loc[:, ['binary_accuracy', 'val_binary_accuracy']].plot();
2 卷积和ReLU
2.1 特征提取
基地进行的特征提取由三个基本操作组成:
- 为某一特定特征过滤图像(卷积)。Filter
- 在过滤后的图像中检测该特征(ReLU)。Detect
- 浓缩图像以增强特征(最大集合)。Condense
2.2 案例
import numpy as np
from itertools import product

def show_kernel(kernel, label=True, digits=None, text_size=28):
    # Format kernel
    kernel = np.array(kernel)
    if digits is not None:
        kernel = kernel.round(digits)

    # Plot kernel
    cmap = plt.get_cmap('Blues_r')
    plt.imshow(kernel, cmap=cmap)
    rows, cols = kernel.shape
    thresh = (kernel.max()+kernel.min())/2
    # Optionally, add value labels
    if label:
        for i, j in product(range(rows), range(cols)):
            val = kernel[i, j]
            color = cmap(0) if val > thresh else cmap(255)
            plt.text(j, i, val,
                     color=color, size=text_size,
                     horizontalalignment='center', verticalalignment='center')
    plt.xticks([])
    plt.yticks([])
这段代码定义了一个函数 show_kernel(),用于可视化卷积核。该函数接受以下参数:
- kernel: 卷积核矩阵
- label: 是否显示每个元素的值,默认为 True
- digits: 显示每个元素的小数位数,默认为 None,即不显示小数
- text_size: 显示每个元素的字体大小,默认为 28
该函数使用 plt.imshow() 函数显示卷积核矩阵,并使用蓝色渐变色彩映射。如果 label 为 True,则在每个元素的位置上显示其值,并根据该值与卷积核的平均值的大小关系,使用白色或黑色字体显示。最后,使用 plt.xticks([]) 和 plt.yticks([]) 函数隐藏 x 轴和 y 轴的刻度。
import tensorflow as tf
import matplotlib.pyplot as plt
plt.rc('figure', autolayout=True)
plt.rc('axes', labelweight='bold', labelsize='large',
       titleweight='bold', titlesize=18, titlepad=10)
plt.rc('image', cmap='magma')

image_path = '../input/computer-vision-resources/car_feature.jpg'
image = tf.io.read_file(image_path)
image = tf.io.decode_jpeg(image)

plt.figure(figsize=(6, 6))
plt.imshow(tf.squeeze(image), cmap='gray')
plt.axis('off')
plt.show();

:::success
plt.rc(‘figure’, autolayout=True)
plt.rc(‘axes’, labelweight=‘bold’, labelsize=‘large’,
titleweight=‘bold’, titlesize=18, titlepad=10)
plt.rc(‘image’, cmap=‘magma’)
:::
plt.rc(‘figure’, autolayout=True) 这行代码是用来设置 matplotlib 的默认参数的,更具体地说,是用来设置当前 figure 的自动布局,也就是说,在绘制图形时,matplotlib 会自动调整图形的大小、位置、边距等参数,以便更好地展示图形。这里将 autolayout 参数设置为 True,表示开启自动布局功能。
如果不进行此设置,则需要手动调整图形参数才能获得想要的展示效果,而通过使用 plt.rc 函数设置默认参数可以使得代码更加简洁和易于复用。
这行代码设置了 matplotlib 中的所有坐标轴标签(x轴标签、y轴标签等)的字体粗细为粗体,字体大小为large;设置了所有标题的字体粗细为粗体,字体大小为18,标题与图形的间距为10。
这行代码是为了设置 imshow() 方法默认使用的颜色图谱(colormap),即在图像中不同像素值对应的不同颜色。在这里,使用 ‘magma’ 颜色图谱,它是一种黑色、红色和黄色的调色板,通常用于显示温度图像。
import tensorflow as tf

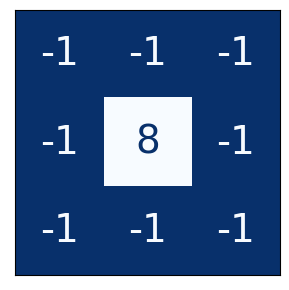
kernel = tf.constant([
    [-1, -1, -1],
    [-1,  8, -1],
    [-1, -1, -1],
])

plt.figure(figsize=(3, 3))
show_kernel(kernel)
# Reformat for batch compatibility.
image = tf.image.convert_image_dtype(image, dtype=tf.float32)
image = tf.expand_dims(image, axis=0)
kernel = tf.reshape(kernel, [*kernel.shape, 1, 1])
kernel = tf.cast(kernel, dtype=tf.float32)
首先,将读取的图像数据类型转换为tf.float32类型,并将其重新格式化为一批(batch)数据,因为卷积层的输入数据是一个batch的图像。
然后,将卷积核变成4D张量,因为卷积层的权重张量通常是4D张量,其中最后两个维度对应于内核的大小和通道数。这个处理还将内核转换为tf.float32类型,以便与输入图像数据类型匹配。
image_filter = tf.nn.conv2d(
    input=image,
    filters=kernel,
    # we'll talk about these two in lesson 4!
    strides=1,
    padding='SAME',
)

plt.figure(figsize=(6, 6))
plt.imshow(tf.squeeze(image_filter))
plt.axis('off')
plt.show();
使用 tf.nn.conv2d 函数将输入图像 image 与卷积核 kernel 进行卷积操作,并将结果保存在 image_filter 中。这里 strides 参数设置为 1,表示在水平和垂直方向上都只移动一个像素;padding 参数设置为 ‘SAME’,表示卷积后的输出和输入图像具有相同的大小(使用零填充)。最后,使用 plt.imshow 函数显示卷积后的图像。注意,在显示图像之前,使用 tf.squeeze 函数去除输出张量的所有大小为 1 的维度,这样可以得到 2D 的图像矩阵。
tf.squeeze函数的作用是将张量中所有为1的维度都删除,从而将张量的维度降低。在这里,使用tf.squeeze是因为经过卷积操作之后,输出的张量多了一个维度,即通道维度,而该图像是单通道灰度图像,因此将该维度删除,以方便后续可视化操作。
image_detect = tf.nn.relu(image_filter)

plt.figure(figsize=(6, 6))
plt.imshow(tf.squeeze(image_detect))
plt.axis('off')
plt.show();
tf.nn.relu是修正线性单元(Rectified Linear Unit)的缩写,通常作为卷积神经网络(CNN)的激活函数。它的作用是通过返回输入的正部分来对输入进行逐元素的非线性变换。在这个例子中,我们对卷积操作后的结果使用tf.nn.relu函数进行激活,得到激活后的结果image_detect。因为此时image_detect是4D张量,我们使用tf.squeeze函数将维数为1的维度去除,以便将其作为2D张量显示在图像上。
注:在TensorFlow中,张量是指任意维度的数组。在计算机视觉任务中,通常使用2D和4D张量。
2D张量是一个矩阵,例如我们读取的图像。每个像素对应于矩阵中的一个元素。
4D张量是多个图像组成的张量。它的维度表示为[batch_size, height, width, channels]。其中batch_size是指一次传递的图像数量,height和width是图像的高度和宽度,channels是图像的通道数,例如RGB图像的通道数为3。
2.3 练习
# Setup feedback system
from learntools.core import binder
binder.bind(globals())
from learntools.computer_vision.ex2 import *

import numpy as np
import tensorflow as tf
import matplotlib.pyplot as plt

plt.rc('figure', autolayout=True)
plt.rc('axes', labelweight='bold', labelsize='large',
       titleweight='bold', titlesize=18, titlepad=10)
plt.rc('image', cmap='magma')

tf.config.run_functions_eagerly(True)
展示一些图片。
image_path = '../input/computer-vision-resources/car_illus.jpg'
image = tf.io.read_file(image_path)
image = tf.io.decode_jpeg(image, channels=1)
image = tf.image.resize(image, size=[400, 400])
img = tf.squeeze(image).numpy()
plt.figure(figsize=(6, 6))
plt.imshow(img, cmap='gray')
plt.axis('off')
plt.show();
plt.figure(figsize=(6, 6))
plt.imshow(img, cmap='gray')
plt.axis('off')
plt.show();
卷积核。
import learntools.computer_vision.visiontools as visiontools
from learntools.computer_vision.visiontools import edge, bottom_sobel, emboss, sharpen

kernels = [edge, bottom_sobel, emboss, sharpen]
names = ["Edge Detect", "Bottom Sobel", "Emboss", "Sharpen"]
plt.figure(figsize=(12, 12))
for i, (kernel, name) in enumerate(zip(kernels, names)):
    plt.subplot(1, 4, i+1)
    visiontools.show_kernel(kernel)
    plt.title(name)
plt.tight_layout()

使用下一个代码单元来定义一个内核。你可以选择应用什么样的内核。需要记住的一点是,内核中的数字之和决定了最终图像的亮度。一般来说,你应该尽量将数字之和保持在0和1之间(尽管这不是正确答案的必要条件)。
一般来说,一个内核可以有任何数量的行和列。在这个练习中,让我们使用一个3×3的内核,这通常能得到最好的结果。用tf.constant定义一个内核。
3 最大池化层
3.1 案例
from tensorflow import keras
from tensorflow.keras import layers

model = keras.Sequential([
    layers.Conv2D(filters=64, kernel_size=3), # activation is None
    layers.MaxPool2D(pool_size=2),
    # More layers follow
])
这里使用了 Keras 序列模型(Sequential),并且添加了两个卷积层。第一个卷积层包含 64 个滤波器,每个滤波器的大小为 3x3。激活函数为 None,因此默认为线性激活函数。第二个层是最大池化层,它使用了 2x2 的池化窗口。
最大池化层是卷积神经网络中的一种常用层,用于减小输入特征图的尺寸和提取重要特征。其作用是将输入特征图按照固定大小的窗口进行分割,然后在每个窗口内找到最大值,最后将所有最大值组合成一个新的特征图。这个过程可以通过使用 layers.MaxPool2D() 函数来实现。在这个函数中,参数 pool_size 指定了池化窗口的大小。
import tensorflow as tf

image_condense = tf.nn.pool(
    input=image_detect, # image in the Detect step above
    window_shape=(2, 2),
    pooling_type='MAX',
    # we'll see what these do in the next lesson!
    strides=(2, 2),
    padding='SAME',
)

plt.figure(figsize=(6, 6))
plt.imshow(tf.squeeze(image_condense))
plt.axis('off')
plt.show();
这段代码使用 TensorFlow 对输入图像进行最大池化操作,输入图像存储在变量 image_detect 中。
tf.nn.pool 函数用于执行池化操作,具有以下参数:
- input:输入张量,即要进行池化的图像
- window_shape:池化窗口的形状,在这种情况下是一个 2x2 的窗口
- pooling_type:要执行的池化类型,在这种情况下是最大池化
- strides:池化窗口的步长,设置为 2x2 以缩小图像的大小
- padding:要使用的填充类型,设置为 ‘SAME’ 以确保输出图像与输入图像具有相同的大小
然后使用 matplotlib 对池化后的图像进行可视化,plt.imshow 函数用于显示图像,plt.axis(‘off’) 用于关闭坐标轴标签。
3.2 练习
# Setup feedback system
from learntools.core import binder
binder.bind(globals())
from learntools.computer_vision.ex3 import *

import numpy as np
import tensorflow as tf
import matplotlib.pyplot as plt
from matplotlib import gridspec
import learntools.computer_vision.visiontools as visiontools

plt.rc('figure', autolayout=True)
plt.rc('axes', labelweight='bold', labelsize='large',
       titleweight='bold', titlesize=18, titlepad=10)
plt.rc('image', cmap='magma')
# Read image
image_path = '../input/computer-vision-resources/car_illus.jpg'
image = tf.io.read_file(image_path)
image = tf.io.decode_jpeg(image, channels=1)
image = tf.image.resize(image, size=[400, 400])

# Embossing kernel
kernel = tf.constant([
    [-2, -1, 0],
    [-1, 1, 1],
    [0, 1, 2],
])

# Reformat for batch compatibility.
image = tf.image.convert_image_dtype(image, dtype=tf.float32)
image = tf.expand_dims(image, axis=0)
kernel = tf.reshape(kernel, [*kernel.shape, 1, 1])
kernel = tf.cast(kernel, dtype=tf.float32)

image_filter = tf.nn.conv2d(
    input=image,
    filters=kernel,
    strides=1,
    padding='VALID',
)

image_detect = tf.nn.relu(image_filter)

# Show what we have so far
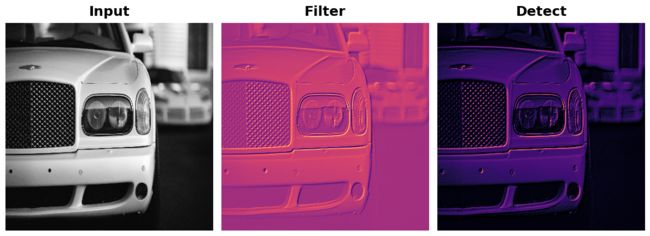
plt.figure(figsize=(12, 6))
plt.subplot(131)
plt.imshow(tf.squeeze(image), cmap='gray')
plt.axis('off')
plt.title('Input')
plt.subplot(132)
plt.imshow(tf.squeeze(image_filter))
plt.axis('off')
plt.title('Filter')
plt.subplot(133)
plt.imshow(tf.squeeze(image_detect))
plt.axis('off')
plt.title('Detect')
plt.show();
# YOUR CODE HERE
image_condense =  tf.nn.pool(
    input=image_detect, # image in the Detect step above
    window_shape=(2, 2),
    pooling_type='MAX',
    # we'll see what these do in the next lesson!
    strides=(2, 2),
    padding='SAME',
)
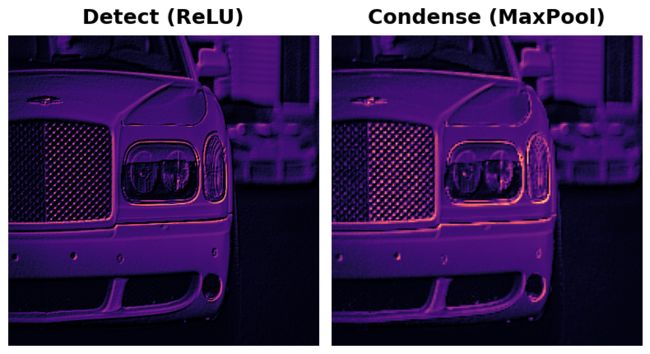
plt.figure(figsize=(8, 6))
plt.subplot(121)
plt.imshow(tf.squeeze(image_detect))
plt.axis('off')
plt.title("Detect (ReLU)")
plt.subplot(122)
plt.imshow(tf.squeeze(image_condense))
plt.axis('off')
plt.title("Condense (MaxPool)")
plt.show();
REPEATS = 4
SIZE = [64, 64]

# Create a randomly shifted circle
image = visiontools.circle(SIZE, r_shrink=4, val=1)
image = tf.expand_dims(image, axis=-1)
image = visiontools.random_transform(image, jitter=3, fill_method='replicate')
image = tf.squeeze(image)

plt.figure(figsize=(16, 4))
plt.subplot(1, REPEATS+1, 1)
plt.imshow(image, vmin=0, vmax=1)
plt.title("Original\nShape: {}x{}".format(image.shape[0], image.shape[1]))
plt.axis('off')

# Now condense with maximum pooling several times
for i in range(REPEATS):
    ax = plt.subplot(1, REPEATS+1, i+2)
    image = tf.reshape(image, [1, *image.shape, 1])
    image = tf.nn.pool(image, window_shape=(2,2), strides=(2, 2), padding='SAME', pooling_type='MAX')
    image = tf.squeeze(image)
    plt.imshow(image, vmin=0, vmax=1)
    plt.title("MaxPool {}\nShape: {}x{}".format(i+1, image.shape[0], image.shape[1]))
    plt.axis('off')

全局平均池化
我们在前面的练习中提到,在卷积基中,平均池在很大程度上已经被最大池所取代了。然而,有一种平均池仍然被广泛用于卷积网的*头。这就是全球平均池。一个 "GlobalAvgPool2D "层经常被用来替代网络头部的一些或所有隐藏的 "密集 "层,就像这样:
model = keras.Sequential([
    pretrained_base、
    layers.GlobalAvgPool2D()、
    layers.Dense(1, activation='sigmoid')、
])
这个层在做什么?请注意,我们不再有Flatten层,该层通常在基础层之后,用于将2D特征数据转化为分类器所需的1D数据。现在,"GlobalAvgPool2D "层正在执行这一功能。但是,它不是 "解叠 "特征(像Flatten),而是简单地用其平均值替换整个特征图。虽然非常具有破坏性,但它往往效果很好,而且具有减少模型中参数数量的优势。
让我们看看GlobalAvgPool2D对一些随机生成的特征图做了什么。这将有助于我们理解它是如何 "压平 "由基地产生的特征图堆的。
运行接下来的这个单元格几次,直到你对这个新层的工作原理有了感觉。
feature_maps = [visiontools.random_map([5, 5], scale=0.1, decay_power=4) for _ in range(8)]

gs = gridspec.GridSpec(1, 8, wspace=0.01, hspace=0.01)
plt.figure(figsize=(18, 2))
for i, feature_map in enumerate(feature_maps):
    plt.subplot(gs[i])
    plt.imshow(feature_map, vmin=0, vmax=1)
    plt.axis('off')
plt.suptitle('Feature Maps', size=18, weight='bold', y=1.1)
plt.show()

# reformat for TensorFlow
feature_maps_tf = [tf.reshape(feature_map, [1, *feature_map.shape, 1])
                   for feature_map in feature_maps]

global_avg_pool = tf.keras.layers.GlobalAvgPool2D()
pooled_maps = [global_avg_pool(feature_map) for feature_map in feature_maps_tf]
img = np.array(pooled_maps)[:,:,0].T

plt.imshow(img, vmin=0, vmax=1)
plt.axis('off')
plt.title('Pooled Feature Maps')
plt.show();
from tensorflow import keras
from tensorflow.keras import layers
from tensorflow.keras.preprocessing import image_dataset_from_directory

# Load VGG16
pretrained_base = tf.keras.models.load_model(
    '../input/cv-course-models/cv-course-models/vgg16-pretrained-base',
)

model = keras.Sequential([
    pretrained_base,
    # Attach a global average pooling layer after the base
    layers.GlobalAvgPool2D(),
])

# Load dataset
ds = image_dataset_from_directory(
    '../input/car-or-truck/train',
    labels='inferred',
    label_mode='binary',
    image_size=[128, 128],
    interpolation='nearest',
    batch_size=1,
    shuffle=True,
)

ds_iter = iter(ds)
注意我们是如何在预训练的VGG16基础之后附加一个 "GlobalAvgPool2D "层。通常情况下,VGG16将为每张图片产生512个特征图。GlobalAvgPool2D层将每个特征图减少到一个单一的值,如果你愿意,就是一个 “平均像素”。
下一个单元将通过VGG16运行汽车或卡车数据集中的图像,并显示由GlobalAvgPool2D创建的512个平均像素。运行该单元数次,观察汽车产生的像素和卡车产生的像素。
car = next(ds_iter)

car_tf = tf.image.resize(car[0], size=[128, 128])
car_features = model(car_tf)
car_features = tf.reshape(car_features, shape=(16, 32))
label = int(tf.squeeze(car[1]).numpy())

plt.figure(figsize=(8, 4))
plt.subplot(121)
plt.imshow(tf.squeeze(car[0]))
plt.axis('off')
plt.title(["Car", "Truck"][label])
plt.subplot(122)
plt.imshow(car_features)
plt.title('Pooled Feature Maps')
plt.axis('off')
plt.show();
4 滑动窗口
前面的内容:
- 用卷积层过滤
- 用ReLU激活进行检测
- 用最大集合层进行浓缩
卷积和池化操作有一个共同特点:它们都是在一个滑动窗口上进行的。对于卷积,这个 "窗口 "是由内核的尺寸,即参数kernel_size决定的。对于池化,它是池化窗口,由pool_size给出。
有两个额外的参数影响着卷积层和池化层–它们是窗口的步长和是否在图像边缘使用填充。strides参数表示窗口每一步应该移动多远,而padding参数描述了我们如何处理输入边缘的像素。
- 滑动
# 导入需要的库
from tensorflow import keras
from tensorflow.keras import layers

# 创建一个序列模型(Sequential),即一个线性堆叠的层
model = keras.Sequential([
    # 添加一个 2D 卷积层(Conv2D)
    layers.Conv2D(filters=64,     # 卷积核的数量为 64
                  kernel_size=3,  # 卷积核的大小为 3x3
                  strides=1,      # 卷积步长为 1
                  padding='same', # 使用 'same' 填充方式,即输出大小与输入大小相同
                  activation='relu'), # 使用 ReLU 激活函数

    # 添加一个最大池化层(MaxPool2D)
    layers.MaxPool2D(pool_size=2,   # 池化窗口的大小为 2x2
                     strides=1,    # 步长为 1
                     padding='same') # 使用 'same' 填充方式,即输出大小与输入大小相同

    # 还可以继续添加更多的层
])
这段代码创建了一个包含两层的卷积神经网络,其中第一层为卷积层,第二层为最大池化层。以下是这两层的详细解释:
卷积层(Conv2D):
卷积层是卷积神经网络的核心组成部分之一,用于从输入图像中提取特征。这里的卷积层使用了 64 个 3x3 的卷积核进行卷积操作。其中,filters=64 指定了卷积核的数量,kernel_size=3 指定了卷积核的大小,strides=1 指定了卷积操作的步长,padding=‘same’ 指定了填充方式为 ‘same’,即输出大小与输入大小相同。最后,使用了 ReLU 激活函数对卷积操作的结果进行非线性变换。
最大池化层(MaxPool2D):
池化层用于降低特征图的空间维度,减小模型的参数量和计算复杂度。这里的最大池化层使用了 2x2 的池化窗口进行最大值池化操作,strides=1 指定了池化操作的步长,padding=‘same’ 指定了填充方式为 ‘same’,即输出大小与输入大小相同。
需要注意的是,这段代码只是卷积神经网络中的一部分,如果要构建完整的卷积神经网络,还需要继续添加更多的层。
- 跨度
窗口每一步移动的距离被称为跨度。我们需要在图像的两个维度上指定步幅:一个是从左到右移动,一个是从上到下移动。这个动画显示了strides=(2, 2),每一步移动2个像素。
- 填充
在进行滑动窗口计算时,有一个问题,就是在输入的边界上该怎么做。完全停留在输入图像内意味着窗口永远不会像对输入的其他像素那样正对着这些边界像素。既然我们对所有像素的处理都不完全一样,会不会有问题?
卷积对这些边界值的处理是由它的padding参数决定的。在TensorFlow中,你有两个选择:padding='相同’或padding=‘有效’。每一个都有取舍。
当我们设置padding='valid’时,卷积窗口将完全停留在输入范围内。缺点是输出会缩小(失去像素),而且对于较大的内核来说会缩小得更多。这将限制网络可以包含的层数,特别是当输入很小的时候。
另一个方法是使用padding=‘same’。这里的诀窍是在输入的边缘用0来填充,使用足够的0来使输出的大小与输入的大小相同。然而,这可能会产生稀释边界上的像素的影响。下面的动画显示了一个具有 "相同 "填充的滑动窗口。
为了更好地理解滑动窗口参数的效果,在一张低分辨率的图像上观察特征提取会有帮助,这样我们就可以看到各个像素。让我们只看一个简单的圆。
接下来这个隐藏单元将为我们创建一个图像和内核。
import numpy as np
from itertools import product
from skimage import draw, transform

def circle(size, val=None, r_shrink=0):
    circle = np.zeros([size[0]+1, size[1]+1])
    rr, cc = draw.circle_perimeter(
        size[0]//2, size[1]//2,
        radius=size[0]//2 - r_shrink,
        shape=[size[0]+1, size[1]+1],
    )
    if val is None:
        circle[rr, cc] = np.random.uniform(size=circle.shape)[rr, cc]
    else:
        circle[rr, cc] = val
    circle = transform.resize(circle, size, order=0)
    return circle

def show_kernel(kernel, label=True, digits=None, text_size=28):
    # Format kernel
    kernel = np.array(kernel)
    if digits is not None:
        kernel = kernel.round(digits)

    # Plot kernel
    cmap = plt.get_cmap('Blues_r')
    plt.imshow(kernel, cmap=cmap)
    rows, cols = kernel.shape
    thresh = (kernel.max()+kernel.min())/2
    # Optionally, add value labels
    if label:
        for i, j in product(range(rows), range(cols)):
            val = kernel[i, j]
            color = cmap(0) if val > thresh else cmap(255)
            plt.text(j, i, val,
                     color=color, size=text_size,
                     horizontalalignment='center', verticalalignment='center')
    plt.xticks([])
    plt.yticks([])

def show_extraction(image,
                    kernel,
                    conv_stride=1,
                    conv_padding='valid',
                    activation='relu',
                    pool_size=2,
                    pool_stride=2,
                    pool_padding='same',
                    figsize=(10, 10),
                    subplot_shape=(2, 2),
                    ops=['Input', 'Filter', 'Detect', 'Condense'],
                    gamma=1.0):
    # Create Layers
    model = tf.keras.Sequential([
                    tf.keras.layers.Conv2D(
                        filters=1,
                        kernel_size=kernel.shape,
                        strides=conv_stride,
                        padding=conv_padding,
                        use_bias=False,
                        input_shape=image.shape,
                    ),
                    tf.keras.layers.Activation(activation),
                    tf.keras.layers.MaxPool2D(
                        pool_size=pool_size,
                        strides=pool_stride,
                        padding=pool_padding,
                    ),
                   ])

    layer_filter, layer_detect, layer_condense = model.layers
    kernel = tf.reshape(kernel, [*kernel.shape, 1, 1])
    layer_filter.set_weights([kernel])

    # Format for TF
    image = tf.expand_dims(image, axis=0)
    image = tf.image.convert_image_dtype(image, dtype=tf.float32)

    # Extract Feature
    image_filter = layer_filter(image)
    image_detect = layer_detect(image_filter)
    image_condense = layer_condense(image_detect)

    images = {}
    if 'Input' in ops:
        images.update({'Input': (image, 1.0)})
    if 'Filter' in ops:
        images.update({'Filter': (image_filter, 1.0)})
    if 'Detect' in ops:
        images.update({'Detect': (image_detect, gamma)})
    if 'Condense' in ops:
        images.update({'Condense': (image_condense, gamma)})

    # Plot
    plt.figure(figsize=figsize)
    for i, title in enumerate(ops):
        image, gamma = images[title]
        plt.subplot(*subplot_shape, i+1)
        plt.imshow(tf.image.adjust_gamma(tf.squeeze(image), gamma))
        plt.axis('off')
        plt.title(title)
import tensorflow as tf
import matplotlib.pyplot as plt

plt.rc('figure', autolayout=True)
plt.rc('axes', labelweight='bold', labelsize='large',
       titleweight='bold', titlesize=18, titlepad=10)
plt.rc('image', cmap='magma')

image = circle([64, 64], val=1.0, r_shrink=3)
image = tf.reshape(image, [*image.shape, 1])
# Bottom sobel
kernel = tf.constant(
    [[-1, -2, -1],
     [0, 0, 0],
     [1, 2, 1]],
)

show_kernel(kernel)
show_extraction(
    image, kernel,

    # Window parameters
    conv_stride=1,
    pool_size=2,
    pool_stride=2,

    subplot_shape=(1, 4),
    figsize=(14, 6),
)
show_extraction(
    image, kernel,

    # Window parameters
    conv_stride=3,
    pool_size=2,
    pool_stride=2,

    subplot_shape=(1, 4),
    figsize=(14, 6),
)

这似乎降低了提取的特征的质量。我们的输入圆是相当 "精细 "的,只有1像素宽。一个步长为3的卷积太粗糙了,无法从中产生一个好的特征图。
有时,一个模型会在它的初始层使用一个跨度较大的卷积。这通常也会与一个较大的内核结合起来。例如,ResNet50模型在其第一层使用7×7的内核,步长为2。这似乎可以加速大规模特征的产生,而不会牺牲掉输入的太多信息。
在本节中,我们看了卷积和池化共同的一个特征计算:滑动窗口和影响其在这些层中行为的参数。这种窗口式的计算方式贡献了卷积网络的大部分特征,是其功能的重要组成部分。
时间序列预测
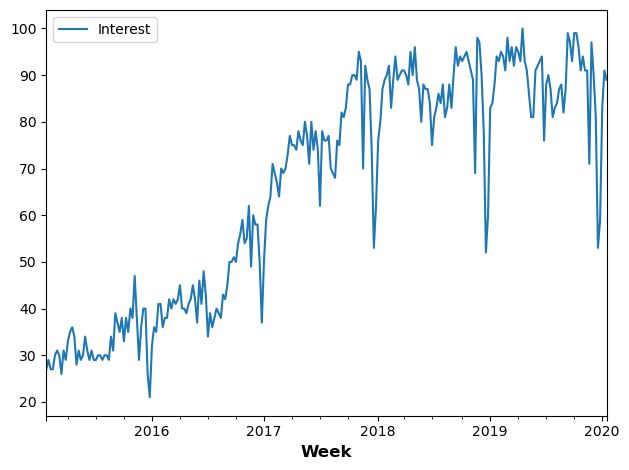
import pandas as pd

# Load the time series as a Pandas dataframe
machinelearning = pd.read_csv(
    '../input/computer-vision-resources/machinelearning.csv',
    parse_dates=['Week'],
    index_col='Week',
)

machinelearning.plot();
detrend = tf.constant([-1, 1], dtype=tf.float32)

average = tf.constant([0.2, 0.2, 0.2, 0.2, 0.2], dtype=tf.float32)

spencer = tf.constant([-3, -6, -5, 3, 21, 46, 67, 74, 67, 46, 32, 3, -5, -6, -3], dtype=tf.float32) / 320
# UNCOMMENT ONE
kernel = detrend
kernel = average
# kernel = spencer

# Reformat for TensorFlow
ts_data = machinelearning.to_numpy()
ts_data = tf.expand_dims(ts_data, axis=0)
ts_data = tf.cast(ts_data, dtype=tf.float32)
kern = tf.reshape(kernel, shape=(*kernel.shape, 1, 1))

ts_filter = tf.nn.conv1d(
    input=ts_data,
    filters=kern,
    stride=1,
    padding='VALID',
)

# Format as Pandas Series
machinelearning_filtered = pd.Series(tf.squeeze(ts_filter).numpy())

machinelearning_filtered.plot();
5 自定义网络
Step 1 - Load Data
# Imports
import os, warnings
import matplotlib.pyplot as plt
from matplotlib import gridspec

import numpy as np
import tensorflow as tf
from tensorflow.keras.preprocessing import image_dataset_from_directory

# Reproducability
def set_seed(seed=31415):
    np.random.seed(seed)
    tf.random.set_seed(seed)
    os.environ['PYTHONHASHSEED'] = str(seed)
    os.environ['TF_DETERMINISTIC_OPS'] = '1'
set_seed()

# Set Matplotlib defaults
plt.rc('figure', autolayout=True)
plt.rc('axes', labelweight='bold', labelsize='large',
       titleweight='bold', titlesize=18, titlepad=10)
plt.rc('image', cmap='magma')
warnings.filterwarnings("ignore") # to clean up output cells


# Load training and validation sets
ds_train_ = image_dataset_from_directory(
    '../input/car-or-truck/train',
    labels='inferred',
    label_mode='binary',
    image_size=[128, 128],
    interpolation='nearest',
    batch_size=64,
    shuffle=True,
)
ds_valid_ = image_dataset_from_directory(
    '../input/car-or-truck/valid',
    labels='inferred',
    label_mode='binary',
    image_size=[128, 128],
    interpolation='nearest',
    batch_size=64,
    shuffle=False,
)

# Data Pipeline
def convert_to_float(image, label):
    image = tf.image.convert_image_dtype(image, dtype=tf.float32)
    return image, label

AUTOTUNE = tf.data.experimental.AUTOTUNE
ds_train = (
    ds_train_
    .map(convert_to_float)
    .cache()
    .prefetch(buffer_size=AUTOTUNE)
)
ds_valid = (
    ds_valid_
    .map(convert_to_float)
    .cache()
    .prefetch(buffer_size=AUTOTUNE)
)
Step 2 - 定义模型

现在我们将定义模型。看看我们的模型是如何由三块Conv2D和MaxPool2D层(基础)组成的,然后是密集层的头部。我们可以把这个图或多或少地直接翻译成Keras的序列模型,只需填入适当的参数。
from tensorflow import keras
from tensorflow.keras import layers

model = keras.Sequential([

    # First Convolutional Block
    layers.Conv2D(filters=32, kernel_size=5, activation="relu", padding='same',
                  # give the input dimensions in the first layer
                  # [height, width, color channels(RGB)]
                  input_shape=[128, 128, 3]),
    layers.MaxPool2D(),

    # Second Convolutional Block
    layers.Conv2D(filters=64, kernel_size=3, activation="relu", padding='same'),
    layers.MaxPool2D(),

    # Third Convolutional Block
    layers.Conv2D(filters=128, kernel_size=3, activation="relu", padding='same'),
    layers.MaxPool2D(),

    # Classifier Head
    layers.Flatten(),
    layers.Dense(units=6, activation="relu"),
    layers.Dense(units=1, activation="sigmoid"),
])
model.summary()
注意在这个定义中,过滤器的数量是如何逐块翻倍的: 32, 64, 128. 这是一个常见的模式。由于MaxPool2D层正在减少特征图的大小,我们可以负担得起增加我们创建的数量。
Step 3 train
我们可以像第1课中的模型一样训练这个模型:用一个优化器以及适合二元分类的损失和指标来编译它。
model.compile(
    optimizer=tf.keras.optimizers.Adam(epsilon=0.01),
    loss='binary_crossentropy',
    metrics=['binary_accuracy']
)

history = model.fit(
    ds_train,
    validation_data=ds_valid,
    epochs=40,
    verbose=0,
)
import pandas as pd

history_frame = pd.DataFrame(history.history)
history_frame.loc[:, ['loss', 'val_loss']].plot()
history_frame.loc[:, ['binary_accuracy', 'val_binary_accuracy']].plot();


这个模型比第一课的VGG16模型小得多–只有3个卷积层,而VGG16是16个。不过,它还是能够相当好地适应这个数据集。我们可能仍然能够通过增加更多的卷积层来改进这个简单的模型,希望能够创造出更适合于数据集的特征。这就是我们在练习中要尝试的。
6 数据增强
提高机器学习模型性能的最好方法是在更多的数据上训练它。模型需要学习的例子越多,它就能更好地识别图像中哪些差异重要,哪些不重要。更多的数据有助于模型更好地归纳。
获得更多数据的一个简单方法是使用你已经拥有的数据。如果我们能够以保留类别的方式转换我们的数据集中的图像,我们可以教我们的分类器忽略这些类型的转换。例如,一辆汽车在照片中是朝左还是朝右并不能改变它是一辆汽车而不是一辆卡车的事实。因此,如果我们用翻转的图片来增加我们的训练数据,我们的分类器将学会 "左或右 "是一个它应该忽略的差异。
这就是数据增强背后的整个想法:添加一些额外的假数据,这些数据看起来与真实数据相当,你的分类器将得到改善。
通常情况下,在增强数据集时,会使用许多种转换方式。这些可能包括旋转图像、调整颜色或对比度、扭曲图像或其他许多东西,通常是组合应用。下面是一个单一图像可能被转换的不同方式的例子。
数据增强通常是在线进行的,也就是说,在图像被送入网络进行训练时进行。回顾一下,训练通常是在小批量的数据上完成的。当使用数据增强时,16张图像的批处理可能是这样的。
在训练过程中,每次使用图像,都会应用一个新的随机变换。这样一来,模型看到的东西总是与它以前看到的东西有一点不同。训练数据中的这种额外差异有助于模型对新数据的处理。
但重要的是要记住,并不是每一种转换都对特定的问题有用。最重要的是,无论你使用什么样的转换,都不应该混淆类别。例如,如果你正在训练一个数字识别器,旋转图像会把 "9 "和 "6 “混在一起。最后,找到好的增量的最佳方法与大多数ML问题一样:试试就知道了!”!
# Imports
import os, warnings
import matplotlib.pyplot as plt
from matplotlib import gridspec

import numpy as np
import tensorflow as tf
from tensorflow.keras.preprocessing import image_dataset_from_directory

# Reproducability
def set_seed(seed=31415):
    np.random.seed(seed)
    tf.random.set_seed(seed)
    os.environ['PYTHONHASHSEED'] = str(seed)
    #os.environ['TF_DETERMINISTIC_OPS'] = '1'
set_seed()

# Set Matplotlib defaults
plt.rc('figure', autolayout=True)
plt.rc('axes', labelweight='bold', labelsize='large',
       titleweight='bold', titlesize=18, titlepad=10)
plt.rc('image', cmap='magma')
warnings.filterwarnings("ignore") # to clean up output cells


# Load training and validation sets
ds_train_ = image_dataset_from_directory(
    '../input/car-or-truck/train',
    labels='inferred',
    label_mode='binary',
    image_size=[128, 128],
    interpolation='nearest',
    batch_size=64,
    shuffle=True,
)
ds_valid_ = image_dataset_from_directory(
    '../input/car-or-truck/valid',
    labels='inferred',
    label_mode='binary',
    image_size=[128, 128],
    interpolation='nearest',
    batch_size=64,
    shuffle=False,
)

# Data Pipeline
def convert_to_float(image, label):
    image = tf.image.convert_image_dtype(image, dtype=tf.float32)
    return image, label

AUTOTUNE = tf.data.experimental.AUTOTUNE
ds_train = (
    ds_train_
    .map(convert_to_float)
    .cache()
    .prefetch(buffer_size=AUTOTUNE)
)
ds_valid = (
    ds_valid_
    .map(convert_to_float)
    .cache()
    .prefetch(buffer_size=AUTOTUNE)
)
from tensorflow import keras
from tensorflow.keras import layers


pretrained_base = tf.keras.models.load_model(
    '../input/cv-course-models/cv-course-models/vgg16-pretrained-base',
)
pretrained_base.trainable = False

model = keras.Sequential([
    # Preprocessing
    layers.RandomFlip('horizontal'), # flip left-to-right
    layers.RandomContrast(0.5), # contrast change by up to 50%
    # Base
    pretrained_base,
    # Head
    layers.Flatten(),
    layers.Dense(6, activation='relu'),
    layers.Dense(1, activation='sigmoid'),
])
这段代码从TensorFlow中导入了Keras API,以及用于定义神经网络层的layer模块。
第一行代码加载了一个预训练的VGG16模型作为新模型的基础。预训练模型位于相对路径"…/input/cv-course-models/cv-course-models/vgg16-pretrained-base "所指定的目录中,它可以是一个文件或一个包含多个定义模型架构和权重的文件的目录。然后,预训练模型的可训练属性被设置为False,这意味着预训练模型的权重在新模型的训练中不会被更新。
该模型变量被定义为使用Keras中的Sequential类的顺序神经网络。这意味着网络的每一层都是按顺序定义的,一个层的输出被用作下一层的输入。
该模型的前两层通过随机翻转输入的图像并将对比度最多改变50%来进行图像预处理。
预训练的VGG16模型被作为一个层添加到模型中,作为特征提取器。这一层的输出被传递到下一层。
特征提取器的输出被扁平化为一个向量,并通过两个密集层与ReLU激活。第一个密集层有6个单元,第二个密集层有一个具有sigmoid激活函数的单元,用于产生二进制分类输出。
简而言之,该网络获取输入图像,进行预处理,应用预先训练好的VGG16模型来提取特征,对输出进行扁平化处理,然后使用全连接层来进行预测。该模型总共有3个可训练的层,被设计用来进行二进制分类。
model.compile(
    optimizer='adam',
    loss='binary_crossentropy',
    metrics=['binary_accuracy'],
)

history = model.fit(
    ds_train,
    validation_data=ds_valid,
    epochs=30,
    verbose=0,
)
import pandas as pd

history_frame = pd.DataFrame(history.history)

history_frame.loc[:, ['loss', 'val_loss']].plot()
history_frame.loc[:, ['binary_accuracy', 'val_binary_accuracy']].plot();


教程1中的模型的训练曲线和验证曲线分歧得相当快,这表明它可以从一些正则化中受益。这个模型的学习曲线能够保持在一起,而且我们在验证损失和准确性方面取得了一些适度的改善。这表明该数据集确实从增强中受益。


