Consul学习(一)—— 集群搭建
Consul
下载地址:Downloads | Consul by HashiCorp
参数说明:Configuration | Consul by HashiCorp
一、介绍
Consul是HashiCorp公司推出的开源软件,通过 GO 语言编写,提供服务注册和发现、配置、多数据中心的高可用方案等能力,分布式一致方面采用 raft 算法 实现,并且很容易和 Spring Cloud 等微服务框架集成,使用起来非常的简单,具有简单、易用、可插排等特点。简而言之,Consul 提供了一种完整的服务网格解决方案。
二、Consul Agent介绍
2.1 Consul Agent
Consul安装之后,代理必须运行。代理有两种运行模式,一种是服务模式,一种是客户模式。
服务模式,主要参与维护集群状态,响应RPC查询,与其他数据中心交换WAN gossip ,以及向上级或远程数据中心转发查询,并且会将数据持久化。推荐使用3到5台机器
客户模式,客户模式下ConsulAgent是一个非常轻量级的进程,它消耗最小的资源开销和少量的网络带宽,提供注册服务,运行健康检查,并将查询转发给服务器。客户端是相对无状态的,客户端执行的唯一后台活动是LANgossip池,不负责数据的持久化。客户模式不能单独存在,必须要有一个服务模式的Consul。
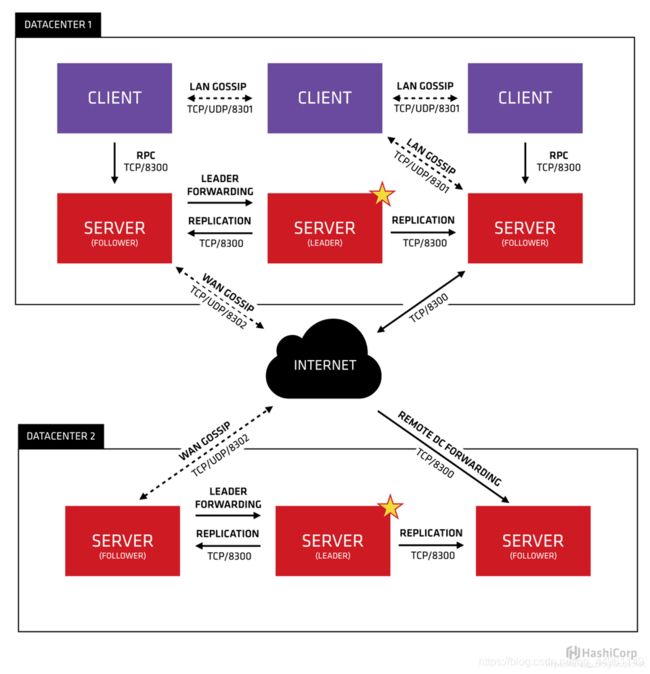
一个数据中心由多个Server和Client模式Consul组成。多个数据中心通过WAN通信。通信如下:
图一 - Consul通信
2. 2 默认端口号说明
- 8300: 只存在于Server模式,选取Leader节点(Raft协议)。为Leader节点和Client节点的提供RPC调用
- 8301: LAN网中集群数据同步的通信端口(Gossip协议),也是加入集群的通信端口。
- 8302: 只存在于Server模式,WAN网中集群数据同步的通信端口(Gossip协议),也是加入集群的通信端口。主要支持数据中心与数据中心之间交互通过WLAN(8302端口)
- 8500: 提供Http服务(或web界面)
- 8600: 提供DNS服务端口
8301和8302接口作用类似,主要区分在于8301用于LAN网络,8302用于WAN网络。它们都可以用于加入consul集群(数据中心一致就是在一个集群),将各数据中心连接则使用8302端口。
三、运行 Consul Agent
3.1 开发模式
为了简单起见,我们可以以开发模式启动Consul代理。 这种模式对于快速简单地启动单节点Consul环境非常有用。 它并不打算在生产中使用,因为它不会持续任何状态。
// 启动可以登入ip:8500访问后台界面
consul agent -dev -ui -node=consul-dev -client=主机ip
3.2 Server模式
以下为启动一个server模式consul的demo:
// 以下指令会在同一LAN网的三台服务器各启动一次,这里只展示其中之一,以构成Consul Server集群
nohup consul agent -server -data-dir=/tmp/consul/consul -node=server-zero -bind=172.16.0.2 -client=0.0.0.0 -advertise=106.52.216.126 -bootstrap-expect=3 -datacenter=myDataCenter-CentOS -ui -enable-script-checks=true -config-dir=/etc/consul.d/consul.d -server-port=8300 -serf-lan-port=8301 -serf-wan-port=8302 -http-port=8500 -dns-port=8600 > consul-server.log 2>&1 &

// 将三个Server Consul启动后,它们还互不知道对方的地址,所有需要使用命令以下来相互对方
// 进入到其中一台服务,执行以下操作就行,其他两台服务就不用执行该操作了
consul join IP:8301		// 加入到IP
consul join IP1:8301	// 加入到IP1
// 我们也可以在服务启动时添加 -join=IP:8301 来通知对方
参数解说
-server				# 表示以Server模式启动,无默认为Client方式启动
-data-dir=文件夹路径	# 数据存放目录
-node=nodeName		# 节点名称,在集群中(一个数据中心中)必须唯一
-bind=IP			# 集群通信的ip,默认0.0.0.0表示所有ip
-client=IP			# 提供Http,Dns等服务的ip,默认0.0.0.0表示所有ip
-advertise=IP		# 告诉集群其他节点你通过这个ip来和我通信,默认使用bind绑定的ip
-bootstrap-expect=3	# 表示构成集群的最小数量
-datacenter=dataCenterName	# 数据中心名称
-ui					# 启动后台管理,默认http://ip:8500访问
-enable-script-checks=true	# 允许使用脚本进行监控检查
-config-dir=文件夹路径		# 配置文件的文件夹路径
-server-port=8300			# 选取Leader节点(raft协议通信)和提供RPC调用的通信端口
-serf-lan-port=8301			# 集群通信端口,用在LAN网
-serf-wan-port=8302			# 数据中心通信端口,用在WAN网
-http-port=8500				# 提供Http服务的端口
-dns-port=8600				# 提供Dns服务的端口
3.3 Client模式
以下为启动一个client模式consul的demo:
nohup consul agent -data-dir=/tmp/consul/client/consul1 -node=client-one -datacenter myDataCenter-CentOS -bind=172.16.0.2 -client=0.0.0.0 -advertise=106.52.216.126 -serf-lan-port=48301 -http-port=48500 -dns-port=48600 -retry-join=172.16.0.2:8301 -retry-join=172.16.0.2:18301 -retry-join=172.16.0.2:28301 > consul-client1.log 2>&1 &
注意:数据中心必须要和Server consul一致
参数解说
retry-join=ip:8301 # 启动时加入的Server集群地址
四、停止 Agent
可以使用Ctrl-C(中断信号)正常停止代理。 中断代理之后,您应该看到它离开集群并关闭。 通过优雅地离开,Consul通知其他集群成员该节点离开。 如果强行杀死了代理进程,则集群的其他成员将检测到该节点失败。 成员离开时,其服务和检查将从目录中删除。 当一个成员失败时,其健康被简单地标记为关键,但不会从目录中删除。 Consul将自动尝试重新连接到失败的节点,使其能够从特定的网络条件恢复,而不再联系离开的节点。 此外,如果代理正在作为服务器运行,那么优雅的离开对于避免造成影响一致协议的潜在可用性中断很重要。 有关如何安全地添加和删除服务器的详细信息,请参阅指南部分。
也可以使用以下指令
# 平滑关闭并且退出集群
consul leave [-http-addr=http://10.0.16.11:8500  | -http-addr=10.0.16.11:8301]
五、常用指令
consul members [-detailed]
查看集群情成员
consul members -wan
查看在WAN网中所有数据中心的Server consul服务
# 获取数据中心|节点|服务节点
consul catalog [datacenters | nodes | services]
# 加入集群
consul join ip:8301
# 当前数据中心连接其他数据中心
consul join -wan ip:8032
更多参数可以使用consul --help和consul 命令 --help来查看
curl localhost:8500/v1/catalog/nodes
或者
dig @127.0.0.1 -p 8600 localhost.localdomain.node.consul
六、集群搭建
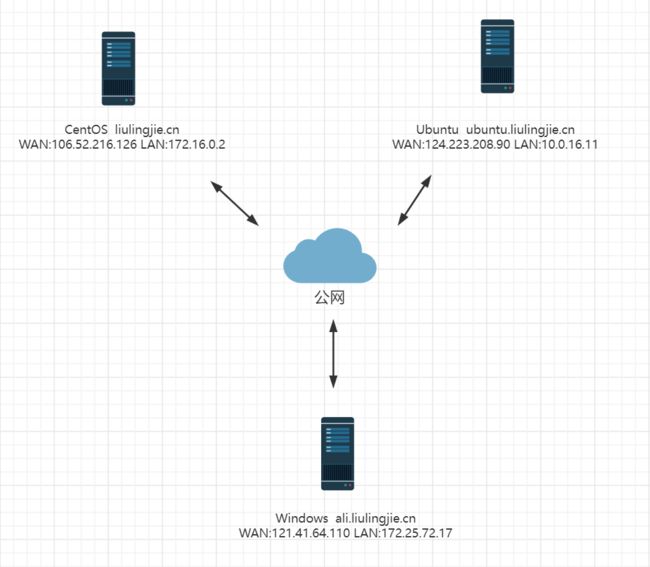
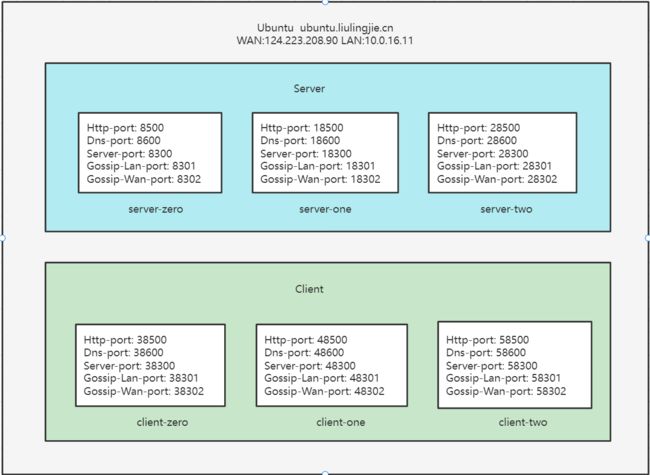
由于现在我刚好有三台现成的服务器,所以我就不使用docker来模拟了,直接跑服务器。这三台服务搭建的consul数据中心集群我已经实现过了,现在我要在每台服务器上运行3个server consul和3个client consul服务来模拟一个数据中心(集群),暂且称它为伪集群吧,然后再将这个三个数据中心实现通信。
图二 - 3台服务器
图三 - 每台服务器内部的伪集群
6.1 每台服务启动指令
6.1.1 liulingjie.cn(myDataCenter-CentOS)
启动3个server consul
nohup consul agent -server -data-dir=/tmp/consul/consul -node=server-zero -bind=172.16.0.2 -client=0.0.0.0 -advertise=106.52.216.126 -bootstrap-expect=3 -datacenter=myDataCenter-CentOS -ui -enable-script-checks=true -config-dir=/etc/consul.d/consul.d -server-port=8300 -serf-lan-port=8301 -serf-wan-port=8302 -http-port=8500 -dns-port=8600 > consul-server.log 2>&1 &

nohup consul agent -server -data-dir=/tmp/consul/consul1 -node=server-one -bind=172.16.0.2 -client=0.0.0.0 -advertise=106.52.216.126 -bootstrap-expect=3 -datacenter=myDataCenter-CentOS -ui -enable-script-checks=true -config-dir=/etc/consul.d/consul.d1 -server-port=18300 -serf-lan-port=18301 -serf-wan-port=18302 -http-port=18500 -dns-port=18600 > consul-server1.log 2>&1 &

nohup consul agent -server -data-dir=/tmp/consul/consul2 -node=server-two -bind=172.16.0.2 -client=0.0.0.0 -advertise=106.52.216.126 -bootstrap-expect=3 -datacenter=myDataCenter-CentOS -ui -enable-script-checks=true -config-dir=/etc/consul.d/consul.d2 -server-port=28300 -serf-lan-port=28301 -serf-wan-port=28302 -http-port=28500 -dns-port=28600 > consul-server2.log 2>&1 &

consul join 172.16.0.2:8301
consul join 172.16.0.2:18301
consul join 172.16.0.2:28301
启动3个client consul
nohup consul agent -data-dir=/tmp/consul/client/consul -node=client-zero -datacenter myDataCenter-CentOS -bind=172.16.0.2 -client=0.0.0.0 -advertise=106.52.216.126 -server-port=38300 -serf-lan-port=38301 -serf-wan-port=38302 -http-port=38500 -dns-port=38600 -retry-join=172.16.0.2:8301 -retry-join=172.16.0.2:18301 -retry-join=172.16.0.2:28301 > consul-client.log 2>&1 &

nohup consul agent -data-dir=/tmp/consul/client/consul1 -node=client-one -datacenter myDataCenter-CentOS -bind=172.16.0.2 -client=0.0.0.0 -advertise=106.52.216.126 -server-port=48300 -serf-lan-port=48301 -serf-wan-port=48302 -http-port=48500 -dns-port=48600 -retry-join=172.16.0.2:8301 -retry-join=172.16.0.2:18301 -retry-join=172.16.0.2:28301 > consul-client1.log 2>&1 &

nohup consul agent -data-dir=/tmp/consul/client/consul2 -node=client-two -datacenter myDataCenter-CentOS -bind=172.16.0.2 -client=0.0.0.0 -advertise=106.52.216.126 -server-port=58300 -serf-lan-port=58301 -serf-wan-port=58302 -http-port=58500 -dns-port=58600 -retry-join=172.16.0.2:8301 -retry-join=172.16.0.2:18301 -retry-join=172.16.0.2:28301 > consul-client2.log 2>&1 &
启动成功后输入consul members查看集群成员
6.1.2 ubuntu.liulingjie.cn(myDataCenter-Ubuntu)
启动3个server consul
nohup consul agent -server -data-dir=/tmp/consul/consul -node=server-zero -bind=10.0.16.11 -client=0.0.0.0 -advertise=124.223.208.90 -bootstrap-expect=3 -datacenter=myDataCenter-Ubuntu -ui -enable-script-checks=true -config-dir=/etc/consul.d/consul.d -server-port=8300 -serf-lan-port=8301 -serf-wan-port=8302 -http-port=8500 -dns-port=8600 > consul-server.log 2>&1 &

nohup consul agent -server -data-dir=/tmp/consul/consul1 -node=server-one -bind=10.0.16.11 -client=0.0.0.0 -advertise=124.223.208.90 -bootstrap-expect=3 -datacenter=myDataCenter-Ubuntu -ui -enable-script-checks=true -config-dir=/etc/consul.d/consul.d1 -server-port=18300 -serf-lan-port=18301 -serf-wan-port=18302 -http-port=18500 -dns-port=18600 > consul-server1.log 2>&1 &

nohup consul agent -server -data-dir=/tmp/consul/consul2 -node=server-two -bind=10.0.16.11 -client=0.0.0.0 -advertise=124.223.208.90 -bootstrap-expect=3 -datacenter=myDataCenter-Ubuntu -ui -enable-script-checks=true -config-dir=/etc/consul.d/consul.d2 -server-port=28300 -serf-lan-port=28301 -serf-wan-port=28302 -http-port=28500 -dns-port=28600 > consul-server2.log 2>&1 &

consul join 10.0.16.11:8301
consul join 10.0.16.11:18301
consul join 10.0.16.11:28301
启动3个server consul
nohup consul agent -data-dir=/tmp/consul/client/consul -node=client-zero -datacenter myDataCenter-Ubuntu -bind=10.0.16.11 -client=0.0.0.0 -advertise=124.223.208.90 -server-port=38300 -serf-lan-port=38301 -serf-wan-port=38302 -http-port=38500 -dns-port=38600 -retry-join=10.0.16.11:8301 -retry-join=10.0.16.11:18301 -retry-join=10.0.16.11:28301 > consul-client.log 2>&1 &

nohup consul agent -data-dir=/tmp/consul/client/consul1 -node=client-one -datacenter myDataCenter-Ubuntu -bind=10.0.16.11 -client=0.0.0.0 -advertise=124.223.208.90 -server-port=48300 -serf-lan-port=48301 -serf-wan-port=48302 -http-port=48500 -dns-port=48600 -retry-join=10.0.16.11:8301 -retry-join=10.0.16.11:18301 -retry-join=10.0.16.11:28301 > consul-client1.log 2>&1 &

nohup consul agent -data-dir=/tmp/consul/client/consul2 -node=client-two -datacenter myDataCenter-Ubuntu -bind=10.0.16.11 -client=0.0.0.0 -advertise=124.223.208.90 -server-port=58300 -serf-lan-port=58301 -serf-wan-port=58302 -http-port=58500 -dns-port=58600 -retry-join=10.0.16.11:8301 -retry-join=10.0.16.11:18301 -retry-join=10.0.16.11:28301 > consul-client2.log 2>&1 &
启动成功后输入consul members查看集群成员
6.1.3 ali.liulingjie.cn (myDataCenter-Windows)
启动3个server consul
consul agent -server -data-dir="C:\Users\Administrator\Desktop\Package\Consul\consul\consul" -node=server-zero -bind="172.25.72.17" -client="0.0.0.0" -advertise="121.41.64.110" -bootstrap-expect=3 -datacenter=myDataCenter-Windows -ui -enable-script-checks=true -config-dir="C:\Users\Administrator\Desktop\Package\Consul\consul.d\consul.d" -server-port=8300 -serf-lan-port=8301 -serf-wan-port=8302 -http-port=8500 -dns-port=8600

consul agent -server -data-dir="C:\Users\Administrator\Desktop\Package\Consul\consul\consul1" -node=server-one -bind="172.25.72.17" -client="0.0.0.0" -advertise="121.41.64.110" -bootstrap-expect=3 -datacenter=myDataCenter-Windows -ui -enable-script-checks=true -config-dir="C:\Users\Administrator\Desktop\Package\Consul\consul.d\consul.d1" -server-port=18300 -serf-lan-port=18301 -serf-wan-port=18302 -http-port=18500 -dns-port=18600

consul agent -server -data-dir="C:\Users\Administrator\Desktop\Package\Consul\consul\consul2" -node=server-two -bind="172.25.72.17" -client="0.0.0.0" -advertise="121.41.64.110" -bootstrap-expect=3 -datacenter=myDataCenter-Windows -ui -enable-script-checks=true -config-dir="C:\Users\Administrator\Desktop\Package\Consul\consul.d\consul.d2" -server-port=28300 -serf-lan-port=28301 -serf-wan-port=28302 -http-port=28500 -dns-port=28600

consul join 172.25.72.17:8301
consul join 172.25.72.17:18301
consul join 172.25.72.17:28301
启动3个server consul
consul agent -data-dir="C:\Users\Administrator\Desktop\Package\Consul\consul\client\consul" -node=client-zero -datacenter myDataCenter-Windows -bind="172.25.72.17" -client="0.0.0.0" -advertise="121.41.64.110" -server-port=38300 -serf-lan-port=38301 -serf-wan-port=38302 -http-port=38500 -dns-port=38600 -retry-join=172.25.72.17:8301 -retry-join=172.25.72.17:18301 -retry-join=172.25.72.17:28301

consul agent -data-dir="C:\Users\Administrator\Desktop\Package\Consul\consul\client\consul1" -node=client-one -datacenter myDataCenter-Windows -bind="172.25.72.17" -client="0.0.0.0" -advertise="121.41.64.110" -server-port=48300 -serf-lan-port=48301 -serf-wan-port=48302 -http-port=48500 -dns-port=48600 -retry-join=172.25.72.17:8301 -retry-join=172.25.72.17:18301 -retry-join=172.25.72.17:28301

consul agent -data-dir="C:\Users\Administrator\Desktop\Package\Consul\consul\client\consul2" -node=client-two -datacenter myDataCenter-Windows -bind="172.25.72.17" -client="0.0.0.0" -advertise="121.41.64.110" -server-port=58300 -serf-lan-port=58301 -serf-wan-port=58302 -http-port=58500 -dns-port=58600 -retry-join=172.25.72.17:8301 -retry-join=172.25.72.17:18301 -retry-join=172.25.72.17:28301
启动成功后输入consul members查看集群成员
6.2 将这3个数据中心实现通信
随机进入一台服务器,执行以下命令。且两个数据中心之间只需执行一次就行,例如A join B,B就不用join A了。
consul join -wan 106.52.216.126:8302
consul join -wan 124.223.208.90:8302
consul join -wan 121.41.64.110:8302
成功后输入consul catalog datacenters可以看到所有数据中心
输入consul members -wan可以看到所有的数据中心的server consul成员
好了,集群搭建到这就完了,接下来将会学习如何作为注册中心和配置中心。 不见不散^_^
截几个照片留念一下
启动时
新的Leader节点选取成功
有成员节点加入
![]()
其他数据中心的server consul成员加入
![]()


