【探花交友DAY 07】即时通讯模块的实现
1. 即时通讯模块设计
1.1 什么是即时通讯
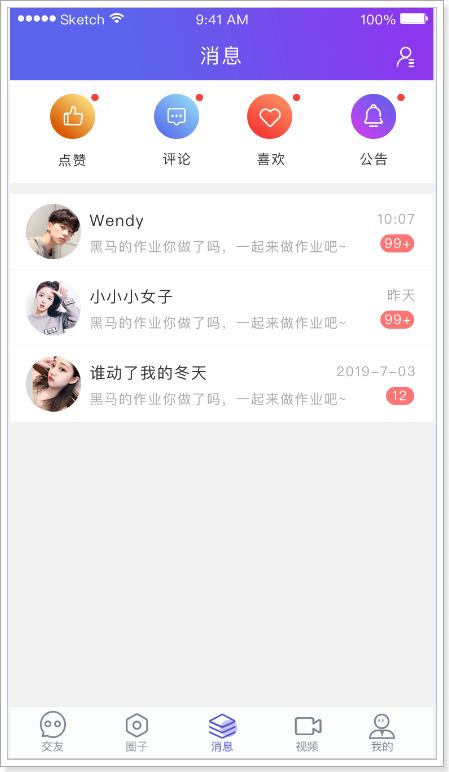
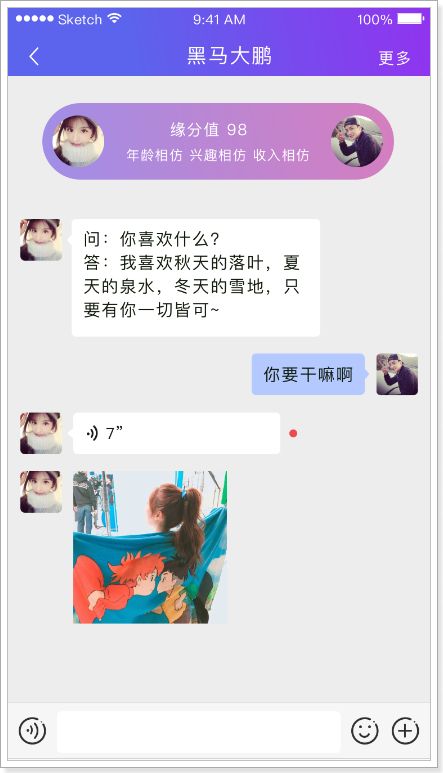
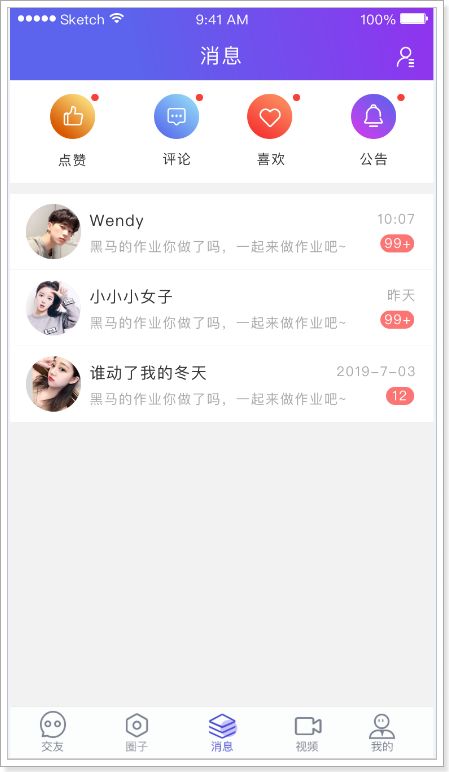
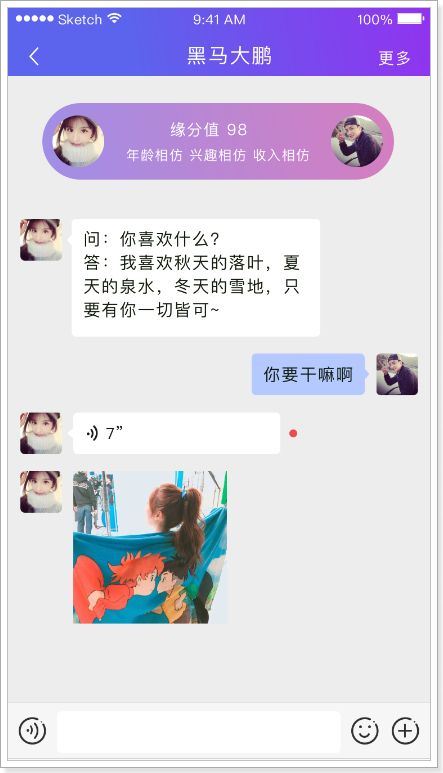
即时通讯简称IM(Instant Message),是指能够即时地发送和接受互联网消息等服务。常见的即时通讯服务有QQ,微信等。在我们探花交友项目中,也运用到了即时通讯技术。两个陌生人之间只要满足互相喜欢的条件,就可以互相发送即时通讯消息。
即时通讯模块如下图所示:
1.2 技术选型
目前实现即时通讯的方案主要有一下两种方案:
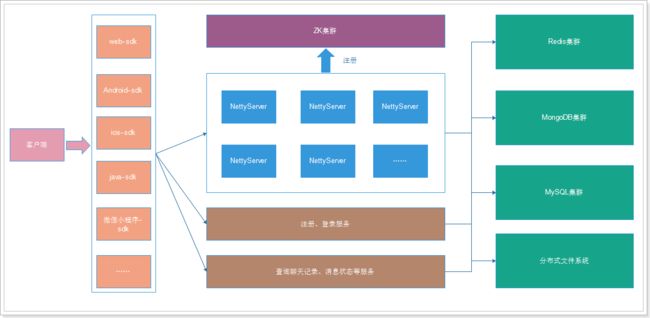
- 方案一:自主实现,技术方面会用到Netty + WebSocket + RocketMQ + MongoDB + Redis + ZooKeeper + MySQL
- 方案二:自己实现的方案比较复杂,适合于大型互联网公司,对于中小型应用来说,我们可以借助第三方服务实现即时通讯的功能,常见的服务提供商有:环信,网易等。
我们探花交友项目采取环信实现即时通讯。
1.3 环信的工作流程
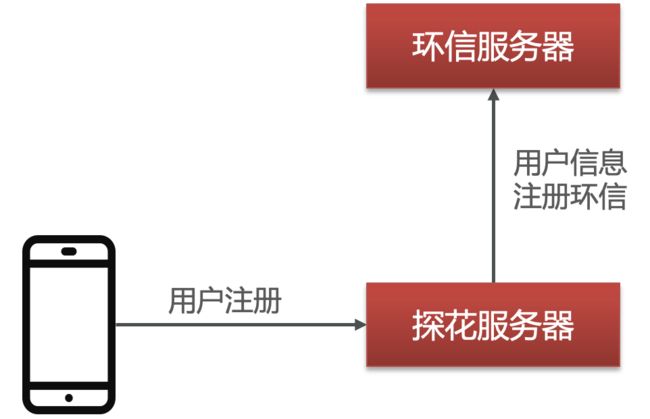
- 首先所有注册的用户都会拥有一个唯一的环信用户名和密码。也就是说在完成用户注册的同时,我们也应该为这个用户创建一个环信账号。账号和密码保存到user表中。
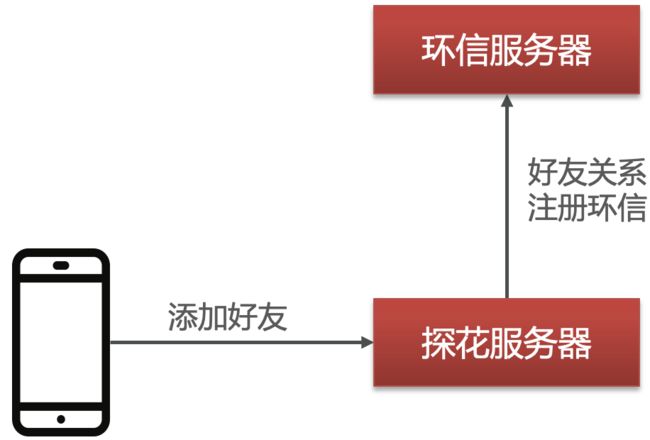
- 要想实现好友之间的通讯,环信还需要记录好友之间的关系,因此在我们添加好友的相关代码中,还需要将用户的好友信息注册到环信中。
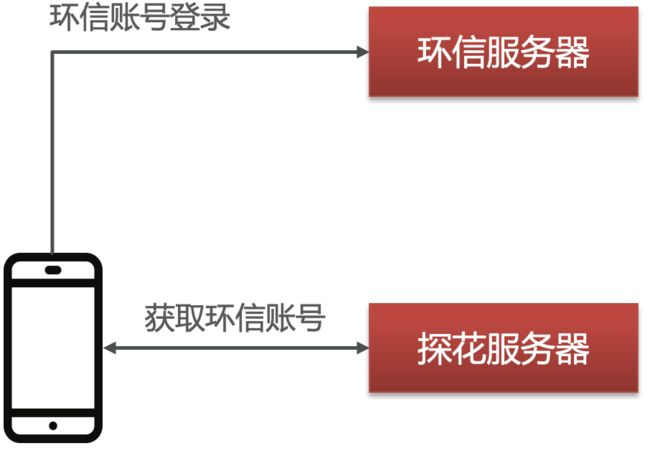
- 当用户登陆探花交友服务器时,需要获取到自己账户的环信账号和密码,然后客户端会自动登录到环信服务器。
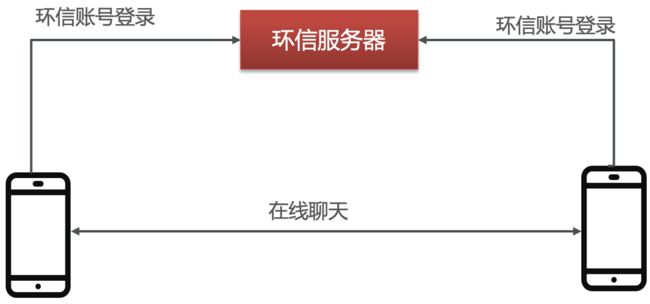
- 两个手机端都链接到环信服务器后,就可以进行实时的聊天了,聊天实际上走的是环信的服务器,和本地的探花交友服务器之间没有交互信息。
1.4 抽取环信组件
和之前阿里云短信服务一样,这些第三方服务我们通常抽取变成可以自动装配的工具类。抽取一共三个步骤,编写perperties类,编写template类,以及在配置类中创建bean对象。
@Data
@ConfigurationProperties(prefix = "tanhua.huanxin")
public class HuanXinProperties {
    private String appKey;
    private String ClientId;
    private String secretKey;
}
@Slf4j
public class HuanXinTemplate {
    private EMService service;

    public HuanXinTemplate(HuanXinProperties properties) {
        EMProperties emProperties = EMProperties.builder()
                .setAppkey(properties.getAppKey())
                .setClientId(properties.getClientId())
                .setClientSecret(properties.getSecretKey())
                .build();
        service = new EMService(emProperties);
    }

    //创建环信用户
    public Boolean createUser(String username,String password) {
        try {
            //创建环信用户
            service.user().create(username.toLowerCase(), password)
                    .block();
            return true;
        }catch (Exception e) {
            e.printStackTrace();
            log.error("创建环信用户失败~");
        }
        return false;
    }

    //添加联系人
    public Boolean addContact(String username1,String username2) {
        try {
            //创建环信用户
            service.contact().add(username1,username2)
                    .block();
            return true;
        }catch (Exception e) {
            log.error("添加联系人失败~");
        }
        return false;
    }

    //删除联系人
    public Boolean deleteContact(String username1,String username2) {
        try {
            //创建环信用户
            service.contact().remove(username1,username2)
                    .block();
            return true;
        }catch (Exception e) {
            log.error("删除联系人失败~");
        }
        return false;
    }

    //发送消息
    public Boolean sendMsg(String username,String content) {
        try {
            //接收人用户列表
            Set<String> set = CollUtil.newHashSet(username);
            //文本消息
            EMTextMessage message = new EMTextMessage().text(content);
            //发送消息  from:admin是管理员发送
            service.message().send("admin","users",
                    set,message,null).block();
            return true;
        }catch (Exception e) {
            log.error("删除联系人失败~");
        }
        return false;
    }
}
@Bean
public HuanXinTemplate huanXinTemplate(HuanXinProperties huanXinProperties) {
    return new HuanXinTemplate(huanXinProperties);
}
2. 即时通讯模块的实现
使用第三方即时通讯技术,最重要的部分就是用户体系的集成。我们改造的计划如下
-
用户注册的时候需要将用户信息注册到环信系统中
- 对于老用户,使用单元测试批量注册到环信
- 对于新用户,改在用户注册代码,在注册的时候自动注册到环信
-
用户登陆到客户端,需要获取当前登陆用户的环信账号和密码,登录到环信系统
- 编写相关接口实现
-
APP自动根据环信账户登陆到环信
2.1 注册环信用户
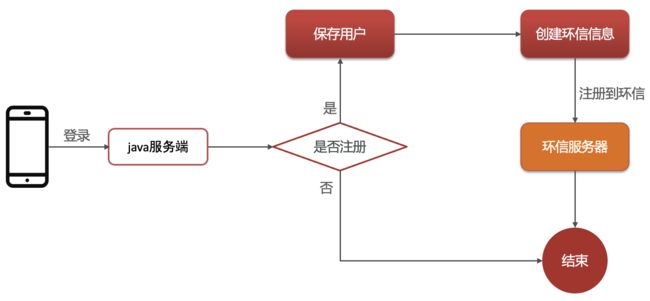
修改用户登陆逻辑,当新用户注册的时候,同时注册环信,并将用户名和密码写入到数据库中
public Map loginVerification(String phone, String code) {
    // 1.从Redis中获取到验证码
    String redisCode = this.redisTemplate.opsForValue().get(VERIFICATION_CODE_PREFIX + phone);
    // 2.比较验证码
    if (StringUtils.isEmpty(redisCode) || !redisCode.equals(code)) {
        // 验证码无效或者验证码错误
        throw new BusinessException(ErrorResult.loginError());
    }
    // 3.判断用户是否已经存在
    User user = userApi.findByMobile(phone);
    // 4.如果不存在则新建用户
    boolean isNew = false;
    if (user == null) {
        // 用户不存在
        user = new User();
        user.setMobile(phone);
        user.setPassword(DigestUtils.md5Hex("123456"));
        Long id = this.userApi.save(user);
        user.setId(id);
        isNew = true;

        // 将用户注册到环信
        // 1. 生成环信的用户名和密码
        String hxUser = Constants.HX_USER_PREFIX + user.getId();
        // 2. 保存到环信
        Boolean flag = this.huanXinTemplate.createUser(hxUser, Constants.INIT_PASSWORD);
        // 3. 如果保存成功,则将用户名密码保存到数据库中
        if(flag) {
            user.setHxUser(hxUser);
            user.setHxPassword(Constants.INIT_PASSWORD);
            this.userApi.updateHx(user);
        }

    }
    // 5.生成Token 保存id和phone
    Map tokenMap = new HashMap();
    tokenMap.put("id", user.getId());
    tokenMap.put("mobile", phone);
    String token = JwtUtils.getToken(tokenMap);
    // 6.封装结果
    Map retMap = new HashMap();
    retMap.put("token", token);
    retMap.put("isNew", isNew);
    return retMap;
}
2.2 查询登陆用户的环信账户和密码
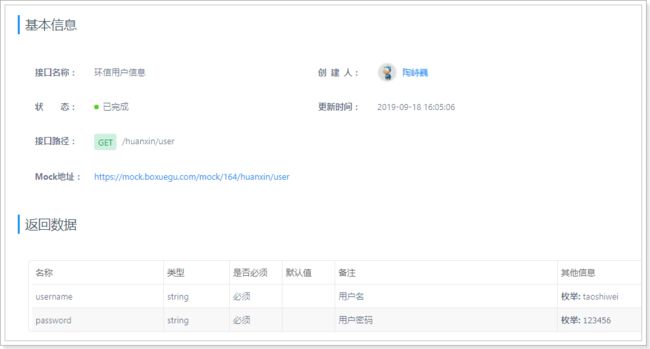
当用户登陆到APP后,前端会自动向后端发送请求,查询当前登陆用户的环信账户,然后根据账户和密码登陆到环信服务器。下面编写接口用户前端获取登陆用户的环信账号和密码。接口如下:
为了保存数据,我们创建VO对象
@Data
@NoArgsConstructor
@AllArgsConstructor
public class HuanXinUserVo {
    private String username;
    private String password;
}
下面是Controller以及Service相关代码
/**
 * 根据环信id查询出对应的用户详情
 * 这一个主要是在用户聊天时显示用户的头像等信息
 *
 * @param huanxinId 环信用户名
 * @return
 */
@GetMapping("/userinfo")
public ResponseEntity getUserInfoByHxId(String huanxinId) {
    UserInfoVo userInfo = this.messageService.getUserInfoByHxId(huanxinId);
    return ResponseEntity.ok(userInfo);
}
public UserInfoVo getUserInfoByHxId(String huanxinId) {
    // 获取到用户id
    Long userId = Long.parseLong(huanxinId.substring(2));
    // 根据用户id查询用户详情
    UserInfo userInfo = userInfoApi.getUserInfoById(userId);
    UserInfoVo vo = new UserInfoVo();
    BeanUtils.copyProperties(userInfo, vo);
    if (userInfo.getAge() != null) {
        vo.setAge(userInfo.getAge().toString());
    }

    return vo;
}
2.3 发送消息给客户端
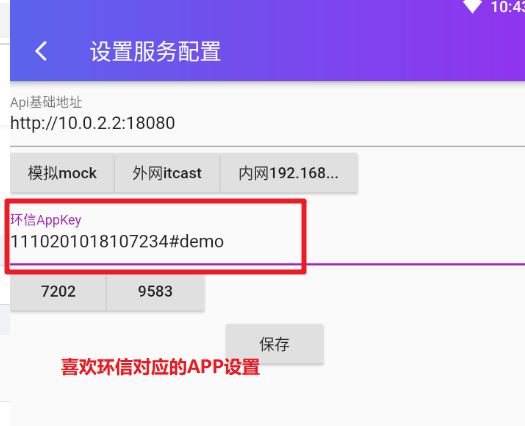
目前已经完成了用户体系的对接工作,下面来测试一下,我们需要修改客户端的相关配置信息
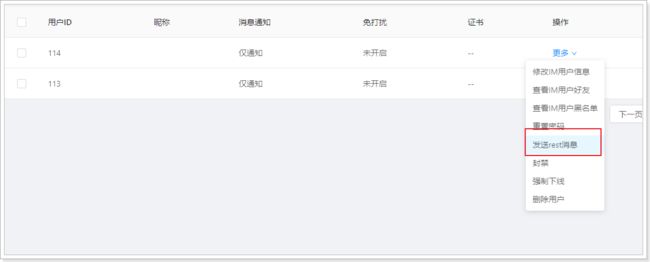
然后在页面上发送一条消息
可以看到,客户端已经可以收到消息了。
2.4 老数据的处理
目前我们的系统中已经有了一些注册的老用户,但是他没还没有注册环信,我们编写一个单元测试方法批量的注册环信,并写入数据库。
注意:使用测试账号最多支持100个用户
@Test
public void register() {
  for (int i = 1; i < 106; i++) {
    User user = userApi.findById(Long.valueOf(i));
    if(user != null) {
      Boolean create = template.createUser("hx" + user.getId(), Constants.INIT_PASSWORD);
      if (create){
        user.setHxUser("hx" + user.getId());
        user.setHxPassword(Constants.INIT_PASSWORD);
        userApi.update(user);
      }
    }
  }
}
到此为止,推送通知已经实现,接下来我们要实现的就是两个用户之间进行通讯,在实现这个功能之前,我们需要先编写联系人管理和添加好友等相关功能模块。
3. 联系人管理
联系人管理包含了一下业务:
- 当看到感兴趣的用户,可以点击进入用户详情页面查看陌生人问题
- 用户回答陌生人问题,会给目标联系人一条推送消息,显示问题回答的答案。推送消息由服务端发送
- 如果这个用户对这个答案满意,那么可以添加联系人为好友。
- 成为好友后,可以在联系人列表中查看到该好友。
- 点击该好友的头像即可开始聊天功能。
下面我们来逐一实现。
3.1 查看用户详情
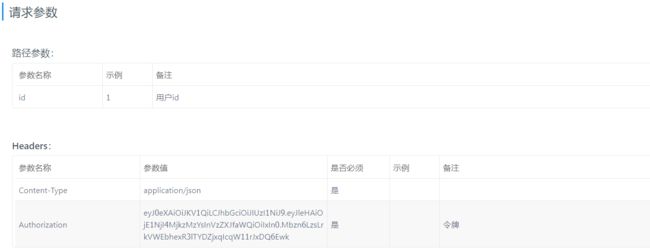
当用户对某一个用户该兴趣,那么可以点击进入用户详情页面。这个功能相对简单,只需要根据前端传递的用户id进行查询,返回对应的VO对象即可。
具体的接口描述如下图所示:
/**
 * 查询佳人详情
 *
 * @param userId 用户id
 * @return
 */
@GetMapping("/{id}/personalInfo")
public ResponseEntity getTodayBestById(@PathVariable(name = "id") Long userId) {
    TodayBest todayBest = this.tanhuaService.getTodayBestById(userId);
    return ResponseEntity.ok(todayBest);
}
public TodayBest getTodayBestById(Long userId) {
    // 1. 查询UserInfo表
    UserInfo userInfo = this.userInfoApi.getUserInfoById(userId);
    // 2. 查询RecommendUser表
    RecommendUser user = this.recommendUserApi.getRecommendUserByUserId(userId);

    // 记录访问记录
    Visitors visitors = new Visitors();
    visitors.setDate(System.currentTimeMillis());
    visitors.setVisitorUserId(UserHolder.getUserId());
    visitors.setUserId(userId);
    visitors.setVisitDate(new SimpleDateFormat("yyyyMMdd").format(new Date()));
    visitors.setScore(user.getScore());
    visitors.setFrom("圈子");

    this.visitorApi.save(visitors);
    // 3. 构建VO
    return TodayBest.init(userInfo, user);
}
3.2 查看陌生人问题
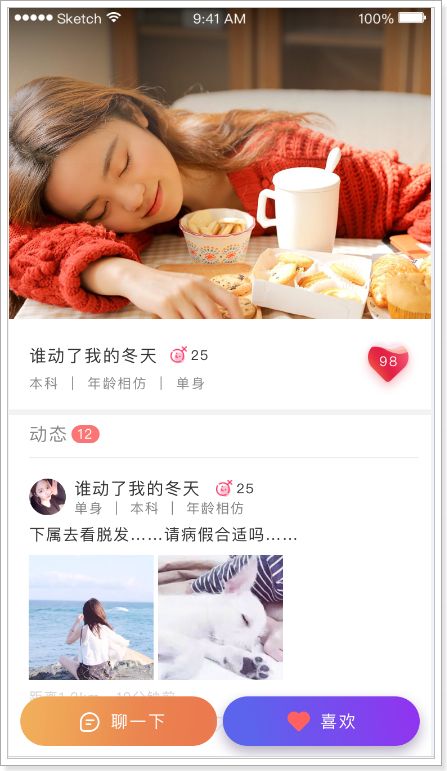
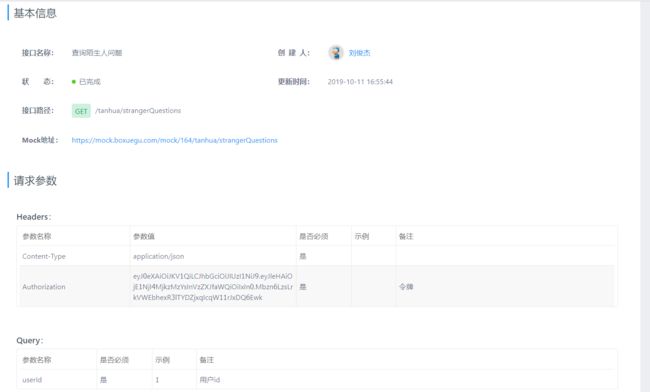
进入到用户主页后,点击聊一聊就可以查看陌生人问题。具体接口如下:
/**
 * 获取陌生人问题
 * @param userId 用户id
 * @return
 */
@GetMapping("/strangerQuestions")
public ResponseEntity strangerQuestions(Long userId) {
    String question = this.tanhuaService.getQuestionByUserId(userId);
    return ResponseEntity.ok(question);
}
public String getQuestionByUserId(Long userId) {
    return this.questionApi.getQuestionByUserId(userId);
}
3.3 回复陌生人问题
用户查询完陌生人问题后,可以进行回复,回复完成后系统会向该用户发送一条通知。接口如下:
/**
 * 回复陌生人问题
 * @param map
 * @return
 */
@PostMapping("/strangerQuestions")
public ResponseEntity replyQuestion(@RequestBody Map map) {
    Long userId = Long.parseLong(map.get("userId").toString());
    String reply = map.get("reply").toString();
    this.tanhuaService.replyQuestion(userId, reply);
    return ResponseEntity.ok(null);
}
public void replyQuestion(Long userId, String reply) {
    // 1. 发送信息包含 当前用户id 当前用户环信id,昵称,问题和回答
    Long currentUserId = UserHolder.getUserId();
    String currentHxId = HX_USER_PREFIX + currentUserId;
    String nickName = this.userInfoApi.getUserInfoById(currentUserId).getNickname();
    String question = this.questionApi.getQuestionByUserId(userId);

    Map map = new HashMap();
    map.put("userId", currentUserId);
    map.put("huanXinId", currentHxId);
    map.put("nickname", nickName);
    map.put("strangerQuestion", question);
    map.put("reply", reply);
    String msg = JSON.toJSONString(map);
    // 2. 调用template发送消息
    Boolean flag = this.huanXinTemplate.sendMsg(HX_USER_PREFIX + userId, msg);
    if (!flag) {
        throw new BusinessException(ErrorResult.error());
    }
}
3.4 添加联系人
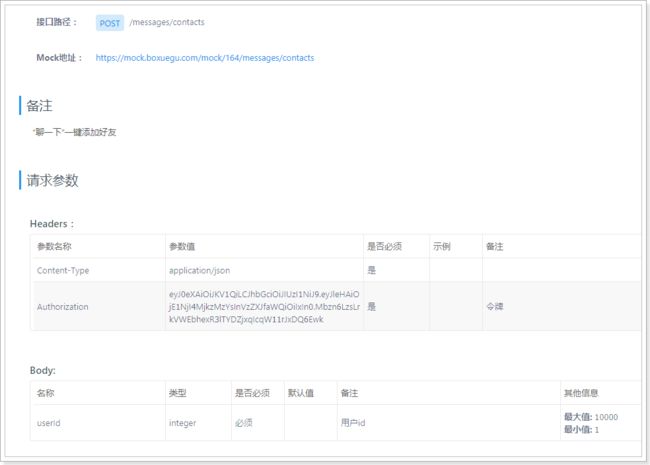
用户获取到陌生人问题的回答后,如果感兴趣,则可以加好友。具体要完成两项工作
- 将好友信息保存到MongoDB的好友表中
- 将好友关系注册到环信
具体的接口如下:
/**
 * 添加好友
 *
 * @param userId 申请人的用户id
 * @return
 */
@PostMapping("/contacts")
public ResponseEntity contacts(Long userId) {
    this.messageService.contacts(userId);
    return ResponseEntity.ok(null);
}
public void contacts(Long userId) {
    // 1. 保存好友信息到环信
    this.huanXinTemplate.addContact(Constants.HX_USER_PREFIX + userId, Constants.HX_USER_PREFIX + UserHolder.getUserId());
    // 2. 保存到MongoDB
    this.friendApi.save(UserHolder.getUserId(), userId);
}
@Override
public void save(Long userId, Long userId1) {
    saveFriend(userId, userId1);
    saveFriend(userId1, userId);
}
private void saveFriend(Long userId, Long userId1) {
  Query query = new Query(
    Criteria.where("userId").is(userId).
    and("friendId").is(userId1)
  );
  boolean flag = this.mongoTemplate.exists(query, Friend.class);
  if (!flag) {
    Friend friend = new Friend();
    friend.setUserId(userId);
    friend.setFriendId(userId1);
    friend.setCreated(System.currentTimeMillis());
    this.mongoTemplate.save(friend);
  }
}
注意在添加用户关系的需要判断关系是否已经存在,如果已经存在则不需要重复添加。此外在数据库中保存好友关系的时候需要保存两份,是双向好友关系
3.5 查询联系人列表
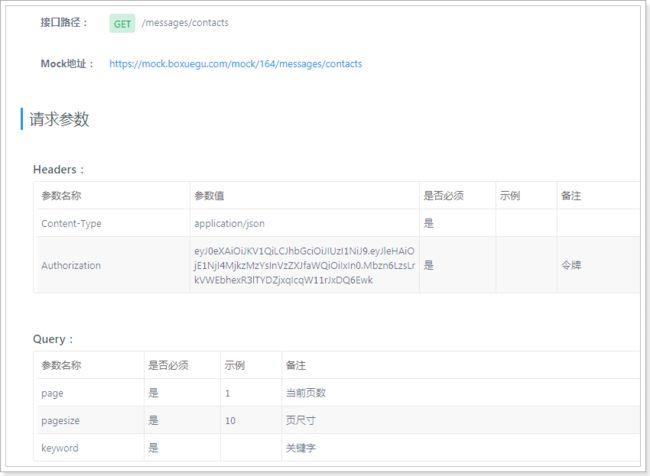
用户可以查询所有好友的联系人列表,这个功能比较简单,只是从MongoDB中查询到好友的用户id,然后到数据库中查询用户详情表即可。具体接口如下:
为了返回数据,这里定义一个VO类
@Data
@NoArgsConstructor
@AllArgsConstructor
public class ContactVo implements Serializable {

    private Long id;
    private String userId;
    private String avatar;
    private String nickname;
    private String gender;
    private Integer age;
    private String city;

    public static ContactVo init(UserInfo userInfo) {
        ContactVo vo = new ContactVo();
        if(userInfo != null) {
           BeanUtils.copyProperties(userInfo,vo);
           vo.setUserId("hx"+userInfo.getId().toString());
        }
        return vo;
    }
}
/**
 * 获取联系人列表
 *
 * @param page     页号
 * @param pagesize 页大小
 * @param keyword  关键字
 * @return
 */
@GetMapping("/contacts")
public ResponseEntity getContactList(@RequestParam(defaultValue = "1") Integer page,
                                     @RequestParam(defaultValue = "10") Integer pagesize,
                                     String keyword) {
    PageResult pageResult = this.messageService.getContactList(page, pagesize, keyword);
    return ResponseEntity.ok(pageResult);
}
public PageResult getContactList(Integer page, Integer pagesize, String keyword) {
    // 1. 获取当前用户id
    Long userId = UserHolder.getUserId();
    // 2. 根据用户id在friend表中查询出所有的好友id
    List<Friend> friendList = this.friendApi.getFriendList(userId);
    List<Long> ids = CollUtil.getFieldValues(friendList, "friendId", Long.class);
    // 3. 根据好友id,查询出所有好友的用户详情
    Map<Long, UserInfo> userInfoByIds = this.userInfoApi.getUserInfoByIds(ids, null);
    // 4. 封装VO
    List<ContactVo> voList = new ArrayList<>();
    for (Friend friend : friendList) {
        Long friendId = friend.getFriendId();
        UserInfo userInfo = userInfoByIds.get(friendId);
        if (userInfo != null) {
            voList.add(ContactVo.init(userInfo));
        }
    }
    // 5. 封装实现类
    return new PageResult(page, pagesize, 0, voList);
}
3.6 用户之间的实时通讯
当完成了上述的获取联系人列表后,用户点击某一个好友,就可以开始聊天了。此时的数据通讯是客户端和环信服务器之间的通讯,和探花交友服务器已经没有关系了。到此为止,即时通讯模块的所有功能均已实现。
