探花交友day02
今天主要实现的功能:
上传用户头像,修改用户资料,人脸识别功能
1.上传用户头像功能
1.1第三方阿里云OSS储存 (我已经把上传图片的功能抽取成了一个自动装配类)
   private OssProperties ossProperties;

    public OssTemplate(OssProperties ossProperties) {
        this.ossProperties = ossProperties;
    }

    //上传文件。文件名
    public String upload(String filename, InputStream is) {


        //拼写文件路径
        filename = new SimpleDateFormat("yyyy/MM/dd").format(new Date()) +
                "/" + UUID.randomUUID().toString() + filename.substring(filename.lastIndexOf("."));

        // 创建OSSClient实例。
        OSS ossClient = new OSSClientBuilder().build(ossProperties.getEndpoint(),
                ossProperties.getAccessKey(), ossProperties.getSecret());


        // 创建PutObject请求。//第一个参数好像是bucketName
        //参数三是文件原本的名字
        ossClient.putObject(ossProperties.getBucketName(), filename, is);


        return ossProperties.getUrl() + filename;
1.2百度人脸识别功能 返回结果如果是0就代表有人脸
/**
     * 检测图片中是否包含人脸
     * @param imageUrl
     * @return
     */
    public boolean detect(String imageUrl) {


        String imageType = "URL";
        // 传入可选参数调用接口
        HashMap options = new HashMap();
        options.put("face_field", "age");
        options.put("max_face_num", "2");
        options.put("face_type", "LIVE");
        options.put("liveness_control", "LOW");


        // 人脸检测 图片路径,图片类型,图片限制参数
        JSONObject res = aipFace.detect(imageUrl, imageType, options);
        System.out.println(res.toString(2));


        Integer error_code = (Integer) res.get("error_code");

   return error_code==0?true:false;

    }
1.3上传用户头像
1.先调用阿里云上传图片文件获得图片的url地址
2.把获取到的图片路径传递给百度人脸识别
3.判断是否存在人脸
//注入远程调用的Api
    @DubboReference
    private UserInfoApi userInfoApi;

    //注入Oss文件储存的类
    @Autowired
    private OssTemplate ossTemplate;

    //注入百度人脸识别的工具类
    @Autowired
    private AipFaceTemplate aipFaceTemplate;


    /**
     *
     * @param userInfo 用户资料信息
     */
    public void save(UserInfo userInfo) {
         //远程调用方法完成添加用户资料
        userInfoApi.save(userInfo);

    }

    /** 更新用户头像,
     *
     * @param headPhoto 用户头像文件的名称和他的文件输入流
     * @param id 用户id
     */
    public void updateHead(MultipartFile headPhoto, Long id) throws IOException {
        //1调用阿里云oss进行图片的上传
        String imageUrl = ossTemplate.upload(headPhoto.getOriginalFilename(), headPhoto.getInputStream());
        //2.判断用户的头像是否有人脸
        boolean detect = aipFaceTemplate.detect(imageUrl);
         if (!detect){
             //抛出一个异常
             throw new BusinessException(ErrorResult.faceError());
         }
         else { //2.2 包含人脸,调用API更新
             UserInfo userInfo = new UserInfo();
             userInfo.setId(id);
             userInfo.setAvatar(imageUrl);
             userInfoApi.update(userInfo);}

    }
2.代码优化
2.1Token优化统一Token处理
利用SpringMvc拦截器拦截验证Token
1.这里思路和代码很简单,首先获取到Token,然后统一判断,也就是说mvc拦截了所有的访问路径,一Controller层就进入过滤器进行身份验证
2.获取验证码和登录接口我们给他设了白名单
3.验证完毕Token合法之后就需要把他里面的用户id和用户手机号提取出来,这里就需要用到一个
ThreadLocal 这个类
线程内部的存储类,赋予了线程存储数据的能力。
-
线程内调用的方法都可以从ThreadLocal中获取同一个对象。
-
多个线程中ThreadLocal数据相互隔离
我们把Token里面的用户信息提取出来然后封装到User对象里面方便对用户资料的一个增删改查
    @Override
    public boolean preHandle(HttpServletRequest request, HttpServletResponse response, Object handler) throws Exception {
        //获取请求头
        String authorization = request.getHeader("Authorization");
        //解析用户对象
        boolean token = JwtUtils.verifyToken(authorization);
        if (!token) {
            response.setStatus(401);
            return false;
        }
        //获取到Token里面的值并且存入到对象中
        Claims claims = JwtUtils.getClaims(authorization);
        String mobile = (String) claims.get("mobile");
        Integer id = (Integer) claims.get("id");

        User user=new User();
        user.setId(Long.valueOf(id));
        user.setMobile(mobile);
        //把对象存入线程当中
        UserHolder.setUSer(user);


        return true;

    }


    //清空
    @Override
    public void afterCompletion(HttpServletRequest request, HttpServletResponse response, Object handler, Exception ex) throws Exception {
        UserHolder.remove();
    }
ThreadLocal 获取Token封装到user里面然后user对象又给到ThreadLocal线程储存类
public class UserHolder {

    public static ThreadLocal tl=new ThreadLocal();

    public static void setUSer(User user){
        tl.set(user);

    }

    /**
     * 获取线程中的用户信息
     */
    public static User get() {
        return tl.get();
    }


    /**
     * 从当前线程,获取用户对象的id
     */
    public static Long getUserId() {
        if (tl.get() == null) {
            return null;
        }
        return tl.get().getId();
    }

    /**
     * 从当前线程,获取用户对象的手机号码
     */
    public static String getMobile() {
        if (tl.get() == null) {
            return null;
        }
        return tl.get().getMobile();
    }

    /**
     * 移除线程中数据
     */
    public static void remove() {
        tl.remove();
    }
}
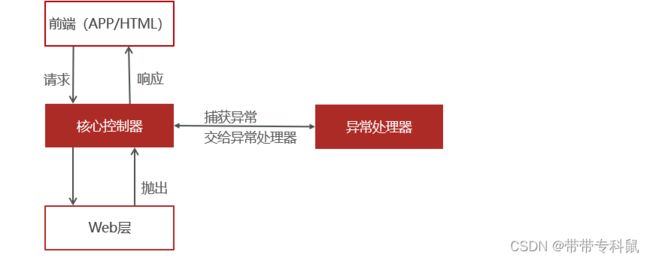
2.2优化异常处理
软件开发过程中,不可避免的是需要处理各种异常,对程序员来说,至少有一半以上的时间都是在处理各种异常情况,所以代码中就会出现大量的try {...} catch {...} finally {...} 代码块,不仅有大量的冗余代码,而且还影响代码的可读性。Spring在3.2版本增加了一个注解@ControllerAdvice,可以与@ExceptionHandler注解配套使用,已异常处理器的形式简化异常配置
在tanhua-server工程定义统一异常处理类ExceptionAdvice
-
定义java类
-
定义方法(和controller中方法一样)
-
类上配置注解@ControllerAdvice
-
方法上配置注解@ExceptionAdvice(处理的异常类型)
/**
 * 自定义统一异常处理
 *  1、通过注解,声明异常处理类
 *  2、编写方法,在方法内部处理异常,构造响应数据
 *  3、方法上编写注解,指定此方法可以处理的异常类型
 */
@ControllerAdvice
public class ExceptionAdvice {

    //处理业务异常
    @ExceptionHandler(BusinessException.class)
    public ResponseEntity handlerException(BusinessException be) {
        be.printStackTrace();
        ErrorResult errorResult = be.getErrorResult();
        return ResponseEntity.status(HttpStatus.INTERNAL_SERVER_ERROR).body(errorResult);
    }

    //处理不可预知的异常
    @ExceptionHandler(Exception.class)
    public ResponseEntity handlerException1(Exception be) {
        be.printStackTrace();
        return ResponseEntity.status(HttpStatus.INTERNAL_SERVER_ERROR).body(ErrorResult.error());
    }
}
