2022-07-04 vue项目-通用后台管理系统(三) 其他页面路由守卫回login页,使用ElementUI进行home主页布局,主页设置登录退出功能,对Aside侧边栏的菜单数据进行动态绑定
文章目录
-
-
- 零.设置路由守卫:需要先登录才能访问其他页面
- 一.使用ElementUI进行home主页快速布局,并设置登录退出功能
- 二.左侧菜单Aside布局
-
- 1.编写一个mock接口到vue.config.js
- 2.使用Element-UI的NavMenu功能进行Aside样式布局:抽屉式导航菜单
-
- 教程
- 代码
- 3.Aside侧边栏菜单数据的绑定:动态遍历数据[难点]
-
- 3.1.先绑死
- 3.2.再动态绑定
-
- step1:第一层v-for,对一级菜单进行动态绑定,获取menulist的第一层数组
- step2:第二层v-for,对二级菜单进行动态绑定,获取child子数组的数据
- step3:对`:index="item.id+''"`的解释
- step4:左边的数据来自于vue.config.js的这部分:
- step5:然后它在home.vue中是这样获取的:
- 3.3.完整代码:Home.vue
- 3.4.效果
- 三.知识点
-
- 1.路由导航守卫有哪些?
-
- 1.全局守卫:`router.beforeEach((to,from,next)=>{})`
- 2.组件内的守卫:
- 3.路由独享的守卫:`beforeEnter:(to,from,next)=>{}`
- 2.vue插槽的用法
-
零.设置路由守卫:需要先登录才能访问其他页面
router.index.js
import Vue from "vue"
import VueRouter from "vue-router"
import Login from "./views/Login.vue"
import Home from "./views/Home.vue"

Vue.use(VueRouter);

// 在routes里配置路径
const routes=[{
    path:"/",
    component:Login
},{
    path:"/Login",
    name:"Login",
    component:Login
},{
    path:"/Home",
    name:"Home",
    component:Home
}];

// 注册路由
const router=new VueRouter({
    routes
});

/*****路由守卫:如果没有登录,就跳转到登录页*****/
router.beforeEach((to,from,next)=>{
    // 已在登录页
    if(to.path=="/Login") return next();
    // 获取在登录页提交的token
    const tokenStr=window.sessionStorage.getItem("token");
    // 判断token是否存在,否:返回到登录页
    if(!tokenStr){
        next("./Login");
        return;
    }
    next();
});

// 暴露接口
export default router;
效果:若未登录,在地址栏输入http://localhost:8080/#/Home是打不开首页的
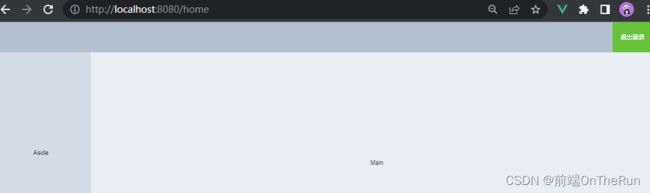
一.使用ElementUI进行home主页快速布局,并设置登录退出功能
<template>
  <div class="home">
  <el-container>
    <el-header>
      <el-button type="success" @click="logOut()" size="mini">退出登录</el-button>
    </el-header>
    <el-container>
      <el-aside width="200px">Aside</el-aside>
      <el-main>Main</el-main>
    </el-container>
  </el-container>
  </div>
</template>
<script>
export default {
  name: 'Home',
  data(){
    return{
      loginObj:{
        username:"admin",
        password:123456
      }
    }
  },
  methods:{
    logOut(){
      // 清空数据
      window.sessionStorage.clear();
      // 点击"退出登录"后:跳转到登录界面
      this.$router.push("/");
    }
  }
}
</script>
<style scoped>
.el-container{
  height:100vh;
}
.el-header{
  display: flex;
  /* el-header下的唯一子元素el-button退出登录会显示在右上角 */
  justify-content: end;
  background: #b3c0d1;
  line-height: 60px;
}
.el-aside{
  background: #d3dce6;
  line-height: 400px;
}
.el-main{
  background: #e9eef3;
  line-height: 400px;
}
</style>
二.左侧菜单Aside布局
1.编写一个mock接口到vue.config.js
module.exports = {
  lintOnSave: false,
  configureWebpack: {
    devServer: {
      /*****mock编写的接口(模拟后台返回的接口)*****/
      before(app) {
        app.get("/api/menu", (req, res) => {
          res.json({
            status: "ok",
            data: [
              {
                id: 1,
                name: "用户管理",
                child: [
                  {
                    id: 1,
                    name: "用户列表",
                    path: "/home/users",
                  },
                ],
              },
              {
                id: 2,
                name: "员工管理",
                child: [
                  {
                    id: 2,
                    name: "员工列表",
                    path: "/home/rote",
                  },
                ],
              },
              {
                id: 3,
                name: "商品管理",
                child: [
                  {
                    id: 4,
                    name: "商品列表",
                    path: "/home/product",
                  },
                  {
                    id: 5,
                    name: "分类参数",
                    path: "/home/userss",
                  },
                  {
                    id: 6,
                    name: "商品分类",
                    path: "/home/producttype",
                  },
                ],
              },
              {
                id: 4,
                name: "订单管理",
                child: [],
              },
              {
                id: 5,
                name: "数据统计",
                child: [],
              },
            ],
          });
        });
        /****模拟一个登录接口(此处跟public/index.js的登录守卫呼应)*****/
        const tokenStr = "dhclass";
        app.get("/api/login", (req, res) => {
          const { username, password } = req.query;
          if (
            (username == "admin" && password == "123456") ||
            (username == "admin2" && password == "123456")
          ) {
            res.json({
              code: 1,
              message: "登录成功",
              token: tokenStr + "username" + username,
            });
          } else {
            res.json({
              code: 0,
              message: "登录失败",
            });
          }
        });
      },
    },
  },
};
2.使用Element-UI的NavMenu功能进行Aside样式布局:抽屉式导航菜单
教程
https://element.eleme.cn/#/zh-CN/component/menu#navmenu-dao-hang-cai-dan
代码
<template>
  <div class="home">

    <el-container>

      <el-header>
        <div>
          <img src="https://s3.bmp.ovh/imgs/2023/01/27/d44acfed1a1f8b1b.jpg" />
          <span class="title">Gaara网络科技有限公司后台管理系统span>
        div>
        <el-button type="success" @click="logOut()" size="mini"
          >退出登录el-button
        >
      el-header>

      <el-container>

        <el-aside width="200px">


          <el-menu default="2" class="el-menu-vertival-deme">

            <el-submenu index="1">

              <template slot="title">

                <i class="el-icon-location">i>

                <span>导航1span>
              template>

              <el-submenu index="1-4">

                <template slot="title">

                  <i class="el-icon-location">i>

                  <span>二级菜单span>
                template>
              el-submenu>
            el-submenu>
          el-menu>
        el-aside>

        <el-main>Mainel-main>
      el-container>
    el-container>
  div>
template>

<script>
export default {
  name: "Home",
  components: {},
  props: {},
  data() {
    return {
      loginObj: {
        username: "admin",
        password: 123456,
      },
    };
  },
  watch: {},
  computed: {},
  methods: {
    logOut() {
      // 清空数据
      window.sessionStorage.clear();
      // 点击退出登录后自动跳转到登录页
      this.$router.push("/");
    },
  },
  created() {},
  mounted() {},
};
script>
<style lang="scss" scoped>
/*home主页的样式 */
.home {
}
.el-container {
  height: 100vh;
}
/*头部header的样式*/
.el-header {
  display: flex;
  /* el-header下的子元素会显示在两边 */
  justify-content: space-between;
  align-items: center;
  background: #0c212b;
  height: 80px !important;
}
.el-header>div{
  display: flex;
  align-items: center;
}
.el-header img{
  width: 60px;
  height: 60px;
  padding-right:16px;
}
.el-header .title{
  color:#fff;
  font-size: 30px;
}
/* Aisde侧边栏的样式*/
.el-aside {
  background: #d3dce6;
  line-height: 400px;
}
/*Main主体样式*/
.el-main {
  background: #e9eef3;
  line-height: 400px;
}
style>

3.Aside侧边栏菜单数据的绑定:动态遍历数据[难点]
3.1.先绑死
看上面的home.vue,它的Aside数据是写死的
绑定前:index=1和导航一

3.2.再动态绑定
Aside数据从vue.config.js数据中动态获取和绑定
动态绑定后::index="item in menulist"
step1:第一层v-for,对一级菜单进行动态绑定,获取menulist的第一层数组

step2:第二层v-for,对二级菜单进行动态绑定,获取child子数组的数据
  <el-menu-item
	 :index="subitem.path"
	 v-for="subitem in item.child"
	 :key="subitem.id"
  >
注意原先写死的侧边栏文字:导航一现在可以用{{subitem.name}}来表示了

step3:对:index="item.id+''"的解释
前面的冒号说明这是一个动态绑定,后面的单引号是为了将数据变成字符串(隐式转换)
step4:左边的数据来自于vue.config.js的这部分:
/* *api/menu */
app.get("/api/menu", (req, res) => {
  res.json({
    status: "ok",
    data: [
      {
        id: 1,
        name: "用户管理",
        child: [
          {
            id: 11,
            name: "用户列表",
            path: "/home/users",
          },
        ],
      },
      {
        id: 2,
        name: "员工管理",
        child: [
          {
            id: 21,
            name: "员工列表",
            path: "/home/rote",
          },
        ],
      },
      {
        id: 3,
        name: "商品管理",
        child: [
          {
            id: 31,
            name: "商品列表",
            path: "/home/product",
          },
          {
            id: 32,
            name: "分类参数",
            path: "/home/userss",
          },
          {
            id: 33,
            name: "商品分类",
            path: "/home/producttype",
          },
        ],
      },
      {
        id: 4,
        name: "订单管理",
        child: [],
      },
      {
        id: 5,
        name: "数据统计",
        child: [],
      },
    ],
  });
});
step5:然后它在home.vue中是这样获取的:
 data() {
    return {
      menulist:[]
    };
  },
  methods: {
    async getmenus() {
      // 这里对标的是vue.config.js中的"./api/menu"
      const res = await this.$http.get("/api/menu");
      console.log(res.data);
      if (!res.status == "ok") return;
      this.menulist = res.data.data;
    },
  },
  created() {
    this.getmenus();
  },
3.3.完整代码:Home.vue
<template>
  <div class="home">

    <el-container>

      <el-header>
        <div>
          <img src="https://s3.bmp.ovh/imgs/2023/01/27/d44acfed1a1f8b1b.jpg" />
          <span class="title">Gaara网络科技有限公司后台管理系统span>
        div>
        <el-button type="success" @click="logOut" size="mini"
          >退出登录el-button
        >
      el-header>

      <el-container>


        <el-aside class="elaside" :width="isopen ? '200px' : '69px'">

          <div class="togglebtn" @click="switchMenu">
              <i :class="isopen?'el-icon-s-fold':'el-icon-s-unfold'">i>
            div>


          <el-menu
            :unique-opened="true"
            background-color="#121a2a"
            text-color="#fff"
            :router="true"
          >


              <el-submenu :index="item.id+''" v-for="item in menulist" :key="item.id">

              <template slot="title">


                <i :class="iconObj[item.id]">i>


                <span>{{item.name}}span>
              template>


                <el-menu-item :index="subitem.path" v-for="subitem in item.child" :key="subitem.id">

                <template slot="title">


                  <i :class="iconObj2[subitem.name]">i>


                  <span>{{subitem.name}}span>
                template>
              el-menu-item>
            el-submenu>
          el-menu>
        el-aside>

        <el-main>Mainel-main>
      el-container>
    el-container>
  div>
template>

<script>
export default {
  name: "Home",
  components: {},
  props: [],
  data() {
    return {
      // loginObj: {
      //   username: "admin",
      //   password: 123456,
      // },
      menulist:[],
      isopen: true,
      iconObj: {
        1: "iconfont icon-user",
        2: "iconfont icon-gengduo",
        3: "iconfont icon-shouye",
        4: "iconfont icon-yanzhengma1",
        5: "iconfont icon-shoucang",
        6: "iconfont icon-fenxiang1",
      },
        iconObj2:{
        '用户管理':'iconfont icon-Management',
        '员工管理':'iconfont icon-quanxianguanli',
        '商品管理':'iconfont icon-shangpinguanli',
        '订单管理':'iconfont icon-dingdanguanli',
        '数据统计':'iconfont icon-shujutongji',
        '用户列表':'iconfont icon-yonghuliebiao',
        '员工列表':'iconfont icon-role-list',
        '权限列表':'iconfont icon-permissions-list',
        '商品列表':'iconfont icon-shangpinliebiao',
        '分类参数':'iconfont icon-quanbu',
        '商品分类':'iconfont icon-fenleigongnengleimu',
      }
    };
  },
  watch: {},
  computed: {},
  methods: {
    logOut() {
      // 清空数据
      window.sessionStorage.clear();
      // 点击退出登录后自动跳转到登录页
      this.$router.push("/Login");
    },
    async getmenus() {
      // 这里对标的是vue.config.js中的"./api/menu"
      const res = await this.$http.get("/api/menu");
      console.log(res.data);
      if (!res.status == "ok") return;
      this.menulist = res.data.data;
    },
    switchMenu(){
      this.isopen=!this.isopen;
    }
  },
  created() {
    this.getmenus();
  },
  mounted() {},
};
script>
<style lang="scss" scoped>
/*home主页的样式 */
.home {
}
.el-container {
  height: 100vh;
}
/*头部header的样式*/
.el-header {
  display: flex;
  /* el-header下的子元素会显示在两边 */
  justify-content: space-between;
  align-items: center;
  background: #0c212b;
  height: 80px !important;
}
.el-header > div {
  display: flex;
  align-items: center;
}
.el-header img {
  width: 60px;
  height: 60px;
  padding-right: 16px;
}
.el-header .title {
  color: #fff;
  font-size: 30px;
}
/* Aisde侧边栏的样式*/
.el-aside {
  background: #d3dce6;
  line-height: 400px;
}
.togglebtn{
  color:#fff;
  text-align: left;
  line-height: 24px;
  font-size:16px;
  padding-left:10px;
  background: darkcyan;
  cursor:pointer;
}
.elaside{
  transition:all .3s ease;
}
/*Main主体样式*/
.el-main {
  background: #e9eef3;
}
style>
3.4.效果

三.知识点
1.路由导航守卫有哪些?
2022-11-15 vue笔记-路由vue-router(四) 路由守卫(又称路由拦截,导航守卫)的定义以及示例
回答
路由导航守卫有全局守卫,组件内守卫,路由独享守卫
1.全局守卫:router.beforeEach((to,from,next)=>{})
其中,
to:进入到哪个路由去,
from:从哪个路由离开,
next:函数,决定是否展示你要看到的路由页面。
2.组件内的守卫:
进入组件:beforeRouteEnter:(to,from,next)=>{},回调参数同上,
离开组件:beforeRouteLeave:(to,from,next)=>{}
3.路由独享的守卫:beforeEnter:(to,from,next)=>{}
用法与全局守卫一致。只是,将其写进其中一个路由对象中,只在这个路由下起作用
*项目应用的位置:public/index.js中设置登录守卫
2.vue插槽的用法
2021-08-06 vue笔记-插槽:匿名插槽,具名插槽和作用域插槽的定义和使用,在vue项目中使用插槽