谷粒商城-分布式基础【业务编写】
- 谷粒商城-分布式基础篇【环境准备】
- 谷粒商城-分布式基础【业务编写】
- 谷粒商城-分布式高级篇【业务编写】持续更新
- 谷粒商城-分布式高级篇-ElasticSearch
- 谷粒商城-分布式高级篇-分布式锁与缓存
- 项目托管于gitee
一、三级分类
此处三级分类最起码得启动renren-fast、nacos、gateway、product
pms_category表说明
代表商品的分类
cat_id:分类id,cat代表分类,bigint(20)name:分类名称parent_cid:在哪个父目录下cat_level:分类层级show_status:是否显示,用于逻辑删除sort:同层级同父目录下显示顺序ico图标,product_unit商品计量单位,InnoDB表,自增大小1437,utf编码,动态行格式
# 导入数据,在对应的数据库下执行资料里的 `pms_catelog.sql` 文件
# /Users/hgw/Documents/Data/Project/谷粒商城/1.分布式基础篇/docs/代码/sql/pms_catelog.sql
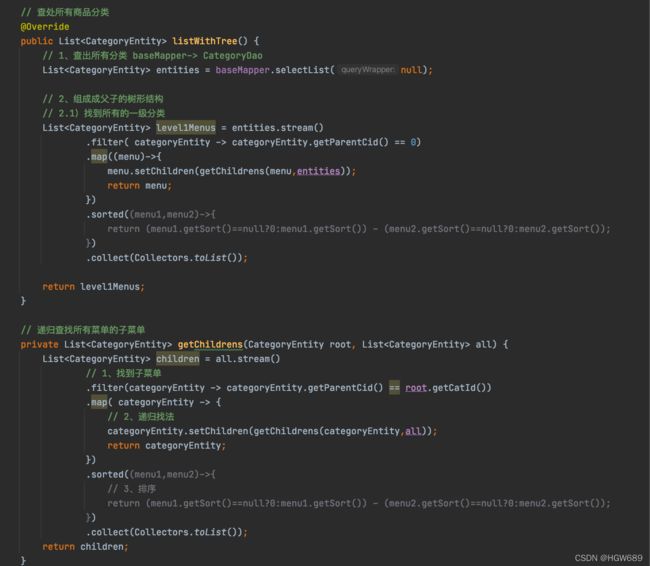
1.1、业务编写 (查询、递归树形结构获取)
第一步、编写Controller层
在分类Controller层加上一个三级分类的业务
@RestController
@RequestMapping("product/category")
public class CategoryController {
    @Autowired
    private CategoryService categoryService;

    /**
     * 查处所有分类以及子分类,以树形结构组装起来
     */
    @RequestMapping("/list/tree")
    public R list(){
        List entities =  categoryService.listWithTree();

        return R.ok().put("data", entities);
    }
  //......
}
第二步、编写Service层
CategoryService 接口:
/**
 * 商品三级分类
 *
 * @author hgw
 * @email [email protected]
 * @date 2022-03-07 13:28:36
 */
public interface CategoryService extends IService<CategoryEntity> {

    PageUtils queryPage(Map<String, Object> params);

    List<CategoryEntity> listWithTree();
}
CategoryServiceImpl 实现类 :
Stream 的 map()方法: 转换流数据返回, 当前流的泛型变为返回值的类型,
Stream 的 peek()方法: 修饰流数据, 无返回值
1.2、配置路由网关 与 路径重写 (实现三级分类查询操作)
启动 renren-fast、nacos、product 还有前端项目 renren-fast-vue
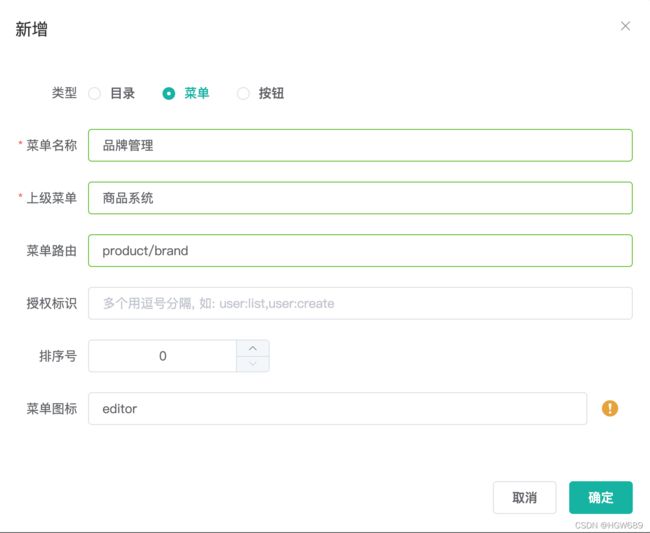
1.2.1、创建 菜单目录
创建一个一级目 :
商品系统
添加的这个菜单其实是添加到了guli-admin.sys_menu表里
(新增了memu_id=31 parent_id=0 name=商品系统 icon=editor )
在 商品系统 下创建一个菜单:
分类维护
guli-admin.sys_menu表又多了一行,父id是刚才的商品系统id
1.2.2、菜单路由
在左侧点击【商品系统-分类维护】,希望在此展示3级分类。可以看到
- url是
http://localhost:8001/#/product-category - 填写的菜单路由是 product/category
- 对应的视图是 src/view/modules/product/category.vue
再如sys-role具体的视图在renren-fast-vue/views/modules/sys/role.vue
所以要自定义我们的product/category视图的话,就是创建 mudules/product/category.vue
输入vue快捷生成模板,然后去https://element.eleme.cn/#/zh-CN/component/tree. 看如何使用多级目录
创建
mudules/product/category.vue
1.2.3、网关配置
第一步、修改Api接口请求地址
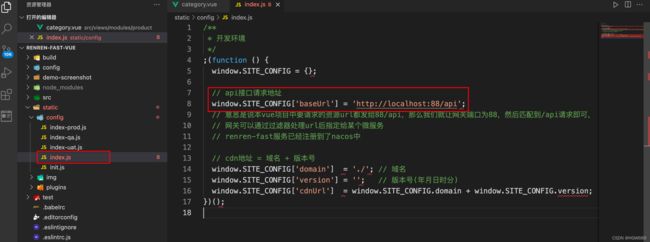
第一步、在
/static/config/index.js文件中修改Api接口请求地址指向网关端口:88
在登录管理后台的时候,我们会发现,他要求localhost:8080/renrenfast/product/category/list/tree这个url, 但是报错404找不到,此处就解决登录页验证码不显示的问题。
他要给8080发请求读取数据,但是数据是在10000端口上,如果找到了这个请求改端口那改起来很麻烦。
- 方法1: 是改vue项目里的全局配置,
- 方法2: 是搭建个网关,让网关路由到10000(即将vue项目里的请求都给网关,网关经过url处理后,去nacos里找到管理后台的微服务,就可以找到对应的端口了,这样我们就无需管理端口,统一交给网关管理端口接口)
// api接口请求地址
window.SITE_CONFIG['baseUrl'] = 'http://localhost:88/api';
// 意思是说本vue项目中要请求的资源url都发给88/api,那么我们就让网关端口为88,然后匹配到/api请求即可,
// 网关可以通过过滤器处理url后指定给某个微服务
// renren-fast服务已经注册到了nacos中
问题:他要去nacos中查找api服务,但是nacos里有的是fast服务,就通过网关过滤器把api改成fast服务
所以让fast注册到服务注册中心,这样请求88网关转发到8080fast
第二步、将fast注册到服务注册中心
第二步、将fast注册到服务注册中心,这样请求88网关转发到8080fast
-
在fast里加入注册中心的依赖
<dependency> <groupId>com.alibaba.cloudgroupId> <artifactId>spring-cloud-starter-alibaba-nacos-discoveryartifactId> <version>2.1.0.RELEASEversion> dependency> <dependency> <groupId>com.alibaba.cloudgroupId> <artifactId>spring-cloud-starter-alibaba-nacos-configartifactId> <version>2.1.0.RELEASEversion> dependency> -
在renren-fast项目中
src/main/resources/application.yml添加nacos配置spring: application: name: renren-fast # 意思是把renren-fast项目也注册到nacos中(后面不再强调了),这样网关才能转发给 cloud: nacos: discovery: server-addr: 127.0.0.1:8848 # nacos -
然后在fast启动类上加上注解
@EnableDiscoveryClient,重启@EnableDiscoveryClient @SpringBootApplication public class RenrenApplication { public static void main(String[] args) { SpringApplication.run(RenrenApplication.class, args); } }然后在nacos的服务列表里看到了renren-fast
问题解决:
-
如果报错gson依赖,就导入google的gson依赖
-
如果一直获取不到nacos信息, 则在
resources路径下创建一个 bootstrap.propertiesspring.application.name=renren-fast spring.cloud.nacos.config.server-addr=127.0.0.1:8848
第三步、添加网关
第三步、配置**gateway(网关)**模块中的
application.yml文件, 添加网关
        - id: admin_route
          uri: lb://renren-fast # 路由给renren-fast (lb)负载均衡
          predicates:  # 什么情况下路由给它
            - Path=/api/**  # 默认前端项目都带上api前缀,就是我们前面题的localhost:88/api
          filters:
            - RewritePath=/api/(?>.*),/renren-fast/$\{segment}  # 把/api/* 改变成 /renren-fast/*fast找
- lb代表负载均衡
修改过vue的api之后, 此时验证码请求的是 http://localhost:88/api/captcha.jpg?uuid=72b9da67-0130-4d1d-8dda-6bfe4b5f7935
也就是说, 他请求网关, 路由到了renren-fast , 然后去nacos里找fast.
找到后拼接成了: http://renren-fast:8080/api/captcha.jpg
但是正确的是: localhost:8080/renren-fast/captcha.jpg
所以要利用网关带路径重写, 参考https://docs.spring.io/spring-cloud-gateway/docs/current/reference/html/#the-rewritepath-gatewayfilter-factory
照猫画虎,在网关里写了如上,把api换成renren-fast,
登录,还是报错:(出现了跨域的问题,就是说vue项目是8001端口,却要跳转到88端口,为了安全性,不可以)
:8001/#/login:1 Access to XMLHttpRequest at ‘http://localhost:88/api/sys/login’ from origin ‘http://localhost:8001’ has been blocked by CORS policy: Response to preflight request doesn’t pass access control check: No ‘Access-Control-Allow-Origin’ header is present on the requested resource.
从8001访问88,引发CORS跨域请求,浏览器会拒绝跨域请求。具体来说当前页面是8001端口,但是要跳转88端口,这是不可以的(post请求json可以)
问题描述:已拦截跨源请求:同源策略禁止8001端口页面读取位于 http://localhost:88/api/sys/login 的远程资源。(原因:CORS 头缺少 ‘Access-Control-Allow-Origin’)。
问题分析:这是一种跨域问题。访问的域名或端口和原来请求的域名端口一旦不同,请求就会被限制
第四步、网关统一配置跨域
第四步、网关统一配置跨域
解决方法:在网关中定义“GulimallCorsConfiguration”类,该类用来做过滤,允许所有的请求跨域。
package com.hgw.gulimall.gateway.config;

import org.springframework.context.annotation.Bean;
import org.springframework.context.annotation.Configuration;
import org.springframework.web.cors.CorsConfiguration;
import org.springframework.web.cors.reactive.CorsWebFilter;
import org.springframework.web.cors.reactive.UrlBasedCorsConfigurationSource;

/**
 * Data time:2022/3/14 21:17
 * StudentID:2019112118
 * Author:hgw
 * Description: 配置跨域,该类用来做过滤,允许所有的请求跨域。
 */
@Configuration
public class GulimallCorsConfiguration {

    @Bean		// 添加过滤器
    public CorsWebFilter corsWebFilter() {
        // 基于url跨域,选择reactive包下的
        UrlBasedCorsConfigurationSource source = new UrlBasedCorsConfigurationSource();

        // 配置跨域信息
        CorsConfiguration configuration = new CorsConfiguration();
        // 允许跨域的头 *:表示所有
        configuration.addAllowedHeader("*");
        // 允许跨域的请求方式
        configuration.addAllowedMethod("*");
        // 允许跨域的请求来源
        configuration.addAllowedOrigin("*");
        // 是否允许携带cookie跨域
        configuration.setAllowCredentials(true);

        // `/**` :任意url都要进行跨域配置
        source.registerCorsConfiguration("/**",configuration);
        return new CorsWebFilter(source);
    }
}
再次访问:http://localhost:8001/#/login
已拦截跨源请求:同源策略禁止读取位于 http://localhost:88/api/sys/login 的远程资源。
(原因:不允许有多个 ‘Access-Control-Allow-Origin’ CORS 头)
renren-fast/captcha.jpg?uuid=69c79f02-d15b-478a-8465-a07fd09001e6
出现了多个请求,并且也存在多个跨源请求。因为在renren-fast项目下有过滤器 .
为了解决这个问题,需要修改renren-fast项目,注释掉“io.renren.config.CorsConfig”类。然后再次进行访问。
第五步、Product 请求路径重写
之前解决了登陆验证码的问题,
/api/请求重写成了/renren-fast, 但是vue项目中或者你自己写的数据库中有些是以/product为前缀的, 它要请求 product微服务, 这里也会让它请求renren-fast 显然是不合适的.
- 解决办法是把请求在网关中以更小的范围先拦截一下,剩下的请求再交给renren-fast
在显示商品系统/分类信息的时候,出现了404异常,请求的http://localhost:88/api/product/category/list/tree不存在
这是因为网关上所做的路径映射不正确,映射后的路径为http://localhost:8001/renren-fast/product/category/list/tree
但是只有通过http://localhost:10000/product/category/list/tree路径才能够正常访问,所以会报404异常。
- 原本请求:
http://localhost:88/api/product/category/list/tree - 映射请求:
http://localhost:8001/renren-fast/product/category/list/tree - 真实请求:
http://localhost:10000/product/category/list/tree
1.2.3.5.1、将 gulimall-product 加入到注册中心nacos中
- 首先将
gulimall-product加入到注册中心nacos中
修改: 在product项目的application.yml
spring:
  datasource:
    driver-class-name: com.mysql.cj.jdbc.Driver
    username: root
    password: root
    url: jdbc:mysql://124.222.223.222:3306/gulimall_pms?useSSL=false&useUnicode=true&characterEncoding=utf-8&serverTimezone=GMT%2B8
  cloud:
    nacos:
      discovery:
        server-addr: 127.0.0.1:8848
  application:
    name: gulimall-product

mybatis-plus:
  mapper-locations: classpath:/mapper/**/*.xml
  global-config:
    db-config:
      # 设置表主键自增
      id-type: auto

server:
  port: 10000
如果要使用nacos配置中心,可以这么做
-
在nacos中新建命名空间,用命名空间隔离项目,(可以在其中新建gulimall-product.yml)
-
在product项目中新建bootstrap.properties并配置
spring.application.name=gulimall-product
spring.cloud.nacos.config.server-addr=127.0.0.1:8848
spring.cloud.nacos.config.namespace=502fa214-0e44-47d4-91c4-2d4589720c76
为了让product注册到主类上加上注解@EnableDiscoveryClient
1.2.3.5.2、定义路由规则, 进行路径重写
- 定义路由规则, 进行路径重写
修改 gulimall-gateway 的 application.yml 文件, 在后面加上以下路由规则
        - id: product_route
          uri: lb://gulimall-product  # 注册中心的服务
          predicates:
            - Path=/api/product/**
          filters:
            - RewritePath=/api/(?>.*),/$\{segment}	# 将/api/替换为空
此时 访问 localhost:88/api/product/category/list/tree invalid token,非法令牌,后台管理系统中没有登录,所以没有带令牌
原因:先匹配的先路由,fast和product路由重叠,fast要求登录
修正:在路由规则的顺序上,将精确的路由规则放置到模糊的路由规则的前面,否则的话,精确的路由规则将不会被匹配到,类似于异常体系中try catch子句中异常的处理顺序。
spring:
  cloud:
    gateway:
      routes:
        - id: product_route
          uri: lb://gulimall-product  # 注册中心的服务
          predicates:
            - Path=/api/product/**
          filters:
            - RewritePath=/api/(?>.*),/$\{segment}

        - id: admin_route
          uri: lb://renren-fast # 路由给renren-fast (lb)负载均衡
          predicates:  # 什么情况下路由给它
            - Path=/api/**  # 默认前端项目都带上api前缀,就是我们前面题的localhost:88/api
          filters:
            - RewritePath=/api/(?>.*),/renren-fast/$\{segment}  # 把/api/* 改变成 /renren-fast/*fast找
此时请求已可请求到数据!
补充: 跨域问题
跨域概括
https://developer.mozilla.org/zh-CN/docs/Web/HTTP/CORS
- 跨域: 指的是浏览器不能执行其他网站的脚本. 它是由浏览器的同源策略造成的, 是浏览器对js施加的安全措施. (ajax可以)
- 同源策略: 是指
协议、域名、端口都要相同, 其中有一个不同都会产生跨域
| URL | 说明 | 是否允许通信 |
|---|---|---|
| http://www.a.com/a.js http://www.a.com/b.js |
同一域名下 | 允许 |
| http://www.a.com/lab/a.js http://www.a.com/script/b.js |
同一域名下不同文件夹 | 允许 |
| http://www.a.com:8000/a.js http://www.a.com/b.js |
同一域名,不同端口 | 不允许 |
| http://www.a.com/a.js https://www.a.com/b.js |
同一域名,不同协议 | 不允许 |
| http://www.a.com/a.js http://70.32.92.74/b.js |
域名和域名对应ip | 不允许 |
| http://www.a.com/a.js http://script.a.com/b.js |
主域相同,子域不同 | 不允许 |
| http://www.a.com/a.js http://a.com/b.js |
同一域名,不同二级域名(同上) | 不允许(cookie这种情况下也不允许访问) |
| http://www.cnblogs.com/a.js http://www.a.com/b.js |
不同域名 | 不允许 |
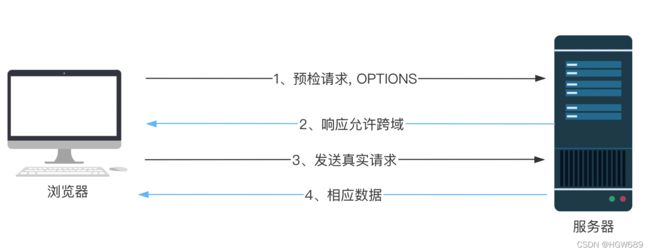
跨域流程
跨域流程
这个跨域请求的实现是通过预检请求实现的, 发送一个OPSTIONS探路, 收到响应允许跨域后再发送真实请求
什么意思呢?
- 跨域是要请求的、新的端口那个服务器限制的, 不是浏览器限制的
跨域请求流程: 非简单请求(PUT、DELETE)等,需要先发送预检请求
跨域的解决方案
跨域的解决方案
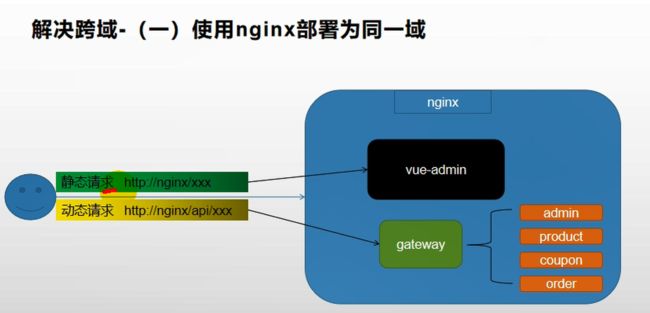
- 方法一: 使用Nginx部署为同一域
- 方法二: 让服务器告诉预检请求能跨域
-
方法一: 使用Nginx部署为同一域
设置Nginx包含admin 和 gateway. 都先请求nginx, 这样端口就统一了
-
方法二: 配置当次请求允许跨域
在响应头中添加:参考:https://blog.csdn.net/qq_38128179/article/details/84956552Access-Control-Allow-Origin: 支持哪些来源的请求跨域Access-Control-Allow-Method: 支持那些方法跨域Access-Control-Allow-Credentials:跨域请求默认不包含cookie,设置为true可以包含cookieAccess-Control-Expose-Headers: 跨域请求暴露的字段- CORS请求时,XMLHttpRequest对象的getResponseHeader()方法只能拿到6个基本字段:
Cache-Control、Content-Language、Content-Type、Expires、Last-Modified、Pragma
如果想拿到其他字段,就必须在Access-Control-Expose-Headers里面指定。 - Access-Control-Max-Age :表明该响应的有效时间为多少秒。在有效时间内,浏览器无须为同一请求再次发起预检请求。请注意,浏览器自身维护了一个最大有效时间,如果该首部字段的值超过了最大有效时间,将失效
1.2.4、三级分类-查询-树形展示三级分类数据
接着修改前端category.vue,这里改的是点击分类维护后的右侧显示
- data解构,加上{},取出我们想要的数据
//方法集合
  methods: {
    handleNodeClick(data) {
      console.log(data);
    },
    getMenus() {
      this.$http({
        url: this.$http.adornUrl("/product/category/list/tree"),
        method: "get",
      }).then(({ data }) => {
        console.log("成功获取到菜单数据", data.data);
        this.menus = data.data;
      });
    },
  },
- 此时有了3级结构,但是没有数据,在category.vue的模板中,数据是menus,而还有一个props。这是element-ui的规则,
<template>
  <el-tree
    :data="menus"
    :props="defaultProps"
    @node-click="handleNodeClick"
  ></el-tree>
</template>

而在data中
	defaultProps: {
        children: "children",
        label: "name"
      }
整个代码 :
1.3、三级分类 增删改操作
1.3.1、三级分类 [删除]
1.3.1.1、实现页面效果
这里采用ElementUI 的自定义节点内容 的
scoped slot方式来实现 ElementUI组件
1.3.1.1.1、[效果一]: 实现增加、删除的效果, 点击节点的时候不展开或者收缩节点
      {{ node.label }}


          Append


          Delete


export default {
    append(data) {
      console.log("append", data);
    },

    remove(node, data) {
      console.log("remove", node, data);
    },
  },
}
| 参数 | 说明 | 类型 | 可选值 | 默认值 |
|---|---|---|---|---|
| expand-on-click-node | 是否在点击节点的时候展开或者收缩节点, 默认值为 true, 如果为 false,则只有点箭头图标的时候才会展开或者收缩节点。 |
boolean | — | true |
:expand-on-click-node="false": 即设置为在点击节点的时候不展开或者收缩节点
1.3.1.1.2、[效果二]: 实现在规定的地方显示 增删按钮
- 没有子节点的时候才显示 Delete按钮
- 解决:
v-if="node.level <= 2"
- 解决:
- 只有一级菜单和二级菜单才显示 Append按钮
- 解决:
v-if="node.childNodes.length == 0"
- 解决:
        Append
        Delete
1.3.1.1.3、[效果三]: 实现多选
<el-tree
    :data="menus"
    :props="defaultProps"
    :expand-on-click-node="false"
    show-checkbox
    node-key="catId"
  >

		//......

</el-tree>
| 参数 | 说明 | 类型 | 可选值 | 默认值 |
|---|---|---|---|---|
| show-checkbox | 节点是否可被选择 | boolean | — | false |
| node-key | 每个树节点用来作为唯一标识的属性,整棵树应该是唯一的 | String | — | — |
1.3.1.2、逻辑删除
这里使用MyBatis-Plus的逻辑删除 官网使用方法
逻辑删除是为了方便数据恢复和保护数据本身价值等等的一种方案,但实际就是删除。在表中应当编写一个字段标记是否被删除. 在进行删除的时候并不是执行delete命令, 而是执行update命令 , 如下 :
update user set deleted=1 where id = 1 and deleted=0
-
1、配置全局的逻辑删除规则(可省略)
-
2、配置逻辑删除的组件Bean(mybatis-plus3之后可省略)
-
3、实体类字段上加上@TableLogic注解
第一步、配置
application.yml全局的逻辑删除规则
mybatis-plus:
  mapper-locations: classpath:/mapper/**/*.xml
  global-config:
    db-config:
      # 设置表主键自增
      id-type: auto
      logic-delete-value: 1   # 逻辑已删除值(默认为 1)
      logic-not-delete-value: 0 # 逻辑未删除值(默认为 0)
第二步、给
product.entity路径下的 CategoryEntity类的 showStatus属性加上注解
/**
	 * 是否显示[0-不显示,1显示]
	 */
	@TableLogic(value = "1",delval = "0")
	private Integer showStatus;
表中
1显示的是 删除0显示的是 不删除
和全局配置是反的, 这里通过 @TableLogic(value = "1",delval = "0") 配置自己的规则 !
String value() default "": 默认逻辑未删除值 (该值可无、会自动获取全局配置)String delval() default "": 默认逻辑删除值 (该值可无、会自动获取全局配置)
故前面配置 application.yml 全局的逻辑删除规则并没有做效, 而是 1(未删除), 0(删除)
第三步、修改Controller层
/**
     * 删除
     * @RequestBody: 获取请求体,必须发送POST请求
     * SpringMVC自动将请求体的数据(json),转为对应的对象
     */
    @RequestMapping("/delete")
    // @RequiresPermissions("product:category:delete")
    public R delete(@RequestBody Long[] catIds){
        // 1、检查当前删除的菜单,是否被别的地方引用
		// categoryService.removeByIds(Arrays.asList(catIds));

		categoryService.removeMenuByIds(Arrays.asList(catIds));
        return R.ok();
    }
第四步、修改Service层
接口 :
public interface CategoryService extends IService<CategoryEntity> {

    PageUtils queryPage(Map<String, Object> params);

    List<CategoryEntity> listWithTree();

  	// 加上删除方法
    void removeMenuByIds(List<Long> asList);
}
实现类 :
@Override
public void removeMenuByIds(List<Long> asList) {
    //TODO 1、检查当前删除的菜单,是否被别的地方引用

    // 逻辑删除
    baseMapper.deleteBatchIds(asList);
}
这里留下了一个待完成事项: 等以后业务来完成
//TODO 注释内容- todo默认不区分大小写,todo、Todo、ToDO、TODO都是可以的。也可以修改为区分。
- todo后面必须要使用一个空格隔开注释内容。
- 我们在某个地方加上了todo注释之后,我们可以通过任务列表快速定位到某个todo注释位置
1.3.1.3、删除效果细化
效果一: 实现逻辑删除功能
remove(node, data) {
      var ids = [data.catId];
      this.$confirm(`是否删除当前[${data.name}]菜单?`, "提示", {
        confirmButtonText: "确定",
        cancelButtonText: "取消",
        type: "warning",
      })
        .then(() => {
          this.$http({
            url: this.$http.adornUrl("/product/category/delete"),
            method: "post",
            data: this.$http.adornData(ids, false),
          }).then(({ data }) => {
            this.$message({
              message: "菜单删除成功",
              type: "success",
            });
            // 刷新出新的菜单
            this.getMenus();
            // 设置需要默认展开的菜单
            this.expandedKey = [node.parent.data.catId];
          });
        })
        .catch(() => {
          this.$message("取消删除");
        });

      console.log("remove", node, data);
    },
- 点击
delete按钮弹出提示框确定: 向 /product/category/delete 发出post请求, 并带着请求体 data.catId(当前菜单的id)- then :
- 则删除成功, 弹出提示框.
- 并刷新出新的菜单.
:default-expanded-keys="expandedKey"修改动态绑定expandedKey数组的值为当前删除菜单的母菜单id, 从而实现删除后默认展开删除的菜单
- catch :
- 取消删除, 弹出提示框
- then :
| 参数 | 说明 | 类型 | 可选值 | 默认值 |
|---|---|---|---|---|
| default-expanded-keys | 默认展开的节点的 key 的数组 | array | — | — |
全部代码附上:
{{ node.label }}
Append
Delete
1.3.2、三级分类[新增]
需求一: 点击append 按钮之后, 弹出一个对话框输入子分类的信息
在 中添加一个弹框组件 :
    <el-dialog title="提示" :visible.sync="dialogVisible" width="30%">
      <el-form :model="category">
        <el-form-item label="分类名称">
          <el-input v-model="category.name" autocomplete="off"></el-input>
        </el-form-item>
      </el-form>
      <span slot="footer" class="dialog-footer">
        <el-button @click="dialogVisible = false">取 消</el-button>
        <el-button type="primary" @click="addCategory">确 定</el-button>
      </span>
    </el-dialog>
- 动态绑定一个变量
category, 里面存放着 name、parentCid、catLevel、showStatus、sort属性 dialogVisible: 对话框是否显示- false : 对话框不显示
- true : 对话框显示
addCategory: 点击确定则触发这个时间, 保存事件
export default {
  data() {
    //这里存放数据
    return {
      category: {
        name: "",
        parentCid: 0,
        catLevel: 0,
        showStatus: 1,
        sort: 0,
      },
      dialogVisible: false, // 对话框是否显示
      menus: [], // 用来存放数据
      expandedKey: [], // 默认展开的节点的 key 的数组
      defaultProps: {
        children: "children",
        label: "name",
      },
    };
  },
  //方法集合
  methods: {
    getMenus() {
      this.$http({
        url: this.$http.adornUrl("/product/category/list/tree"),
        method: "get",
      }).then(({ data }) => {
        console.log("成功获取到菜单数据", data.data);
        this.menus = data.data;
      });
    },
    append(data) {
      console.log("append", data);
      this.dialogVisible = true;
      this.category.parentCid = data.catId;
      this.category.catLevel = data.catLevel * 1 + 1;
    },
    // 添加三级分类的方法
    addCategory() {
      console.log("提交的三级分类数据", this.category);
      this.$http({
        url: this.$http.adornUrl("/product/category/save"),
        method: "post",
        data: this.$http.adornData(this.category, false),
      }).then(({ data }) => {
        this.$message({
          message: "菜单保存成功",
          type: "success",
        });
        // 关闭提示框
        this.dialogVisible = false;
        // 刷新出新的菜单
        this.getMenus();
        // 设置需要默认展开的菜单
        this.expandedKey = [this.category.parentCid];
      });
    },
};
- 点击
append按钮,dialogVisible值修改为true(即对话框可见), 此时并计算出category.parentCid、category.catLevel的值, 其他属性使用默认值- 点击
确定按钮, 则执行 addCategory()方法- 向 /product/category/save发出post请求, 请求体为: category
- 提示菜单保存成功
- 刷新出新的菜单
- 设置需要默认展开的菜单
- 向 /product/category/save发出post请求, 请求体为: category
- 点击
后端逆向工程生成了save接口方法
    @RequestMapping("/save")
    // @RequiresPermissions("product:commentreplay:save")
    public R save(@RequestBody CommentReplayEntity commentReplay){
		commentReplayService.save(commentReplay);

        return R.ok();
    }
1.3.3、三级分类[修改]
需求一: 点击update 按钮之后, 弹出一个对话框修改分类的信息
- 通过
submitData方法进行判断 ,此对话框供修改 和 增加分类使用- dialogType: “”, 对话框的方法
- add: 则增加;
- edit: 则修改;
- title: “”, 提示框的标题
- dialogType: “”, 对话框的方法
    <el-dialog
      :title="title"
      :visible.sync="dialogVisible"
      width="30%"
      :close-on-click-modal="false"
    >
      <el-form :model="category">
        <el-form-item label="分类名称">
          <el-input v-model="category.name" autocomplete="off"></el-input>
        </el-form-item>
      </el-form>
      <el-form :model="category">
        <el-form-item label="图标">
          <el-input v-model="category.icon" autocomplete="off"></el-input>
        </el-form-item>
      </el-form>
      <el-form :model="category">
        <el-form-item label="计量单位">
          <el-input
            v-model="category.productUnit"
            autocomplete="off"
          ></el-input>
        </el-form-item>
      </el-form>
      <span slot="footer" class="dialog-footer">
        <el-button @click="dialogVisible = false">取 消</el-button>
        <el-button type="primary" @click="submitData">确 定</el-button>
      </span>
    </el-dialog>
- 点击
edit修改按钮title属性修改为 “修改分类” ,dialogType属性修改为 “edit", 则对话框执行的是 修改方法- 发送请求获取当前节点最新的数据 (因为防止多人同时操控后台, 脏读现象. 这里采用重新发送请求获取当前节点最新数据)
- 将当前节点的最新数据, 赋值给
category,即要回显的数据
- 通过
submitData方法判断执行哪个操作- add : 增加分类
- edit : 修改分类
- 修改三级分类的方法
- { catId, name, icon, productUnit } : 获取我们要回显的数据
- 带着回显的数据向
/product/category/update发送post请求 - 菜单修复成功
- 弹出提示框
- 关闭对话框
- 刷新出新的菜单
- 设置需要默认展开的菜单
export default {
  data() {
    //这里存放数据
    return {
      title: "", //提示框的标题
      dialogType: "", //对话框的方法 add: 则增加; edit: 则修改
      category: {
        name: "",
        parentCid: 0,
        catLevel: 0,
        showStatus: 1,
        sort: 0,
        catId: null,
        icon: "",
        productUnit: "",
      },
      dialogVisible: false, // 对话框是否显示
      menus: [], // 用来存放数据
      expandedKey: [], // 默认展开的节点的 key 的数组
      defaultProps: {
        children: "children",
        label: "name",
      },
    };
  },
  //方法集合
  methods: {
    getMenus() {
      this.$http({
        url: this.$http.adornUrl("/product/category/list/tree"),
        method: "get",
      }).then(({ data }) => {
        console.log("成功获取到菜单数据", data.data);
        this.menus = data.data;
      });
    },
    append(data) {
      console.log("append", data);
      this.title = "添加分类";
      this.dialogType = "add";
      this.dialogVisible = true;
      this.category.parentCid = data.catId;
      this.category.catLevel = data.catLevel * 1 + 1;
      this.category.catId = null;
      this.category.name = null;
      this.category.icon = "";
      this.category.productUnit = "";
      this.category.showStatus = 1;
      this.category.sort = "";
    },
    edit(data) {
      console.log("要修改的数据", data);
      this.title = "修改分类";
      this.dialogType = "edit";
      this.dialogVisible = true;
      // 发送请求获取当前节点最新的数据
      this.$http({
        url: this.$http.adornUrl(`/product/category/info/${data.catId}`),
        method: "get",
      }).then(({ data }) => {
        // 请求成功
        console.log("要回显的数据", data);
        this.category.catId = data.data.catId;
        this.category.name = data.data.name;
        this.category.icon = data.data.icon;
        this.category.productUnit = data.data.productUnit;
        this.category.parentCid = data.data.parentCid;
        this.category.catLevel = data.data.catLevel;
        this.category.showStatus = data.data.showStatus;
        this.category.sort = data.data.sort;
      });
    },
    submitData(data) {
      if (this.dialogType == "add") {
        this.addCategory();
      }
      if (this.dialogType == "edit") {
        this.editCategory();
      }
    },
    // 添加三级分类的方法
    addCategory() {
      console.log("提交的三级分类数据", this.category);
      this.$http({
        url: this.$http.adornUrl("/product/category/save"),
        method: "post",
        data: this.$http.adornData(this.category, false),
      }).then(({ data }) => {
        this.$message({
          message: "菜单保存成功",
          type: "success",
        });
        // 关闭提示框
        this.dialogVisible = false;
        // 刷新出新的菜单
        this.getMenus();
        // 设置需要默认展开的菜单
        this.expandedKey = [this.category.parentCid];
      });
    },
    // 修改三级分类的方法
    editCategory() {
      var { catId, name, icon, productUnit } = this.category;
      var data = {
        catId: catId,
        name: name,
        icon: icon,
        productUnit: productUnit,
      };
      this.$http({
        url: this.$http.adornUrl("/product/category/update"),
        method: "post",
        data: this.$http.adornData(data, false),
      }).then(({ data }) => {
        this.$message({
          message: "菜单修改成功",
          type: "success",
        });
        // 关闭提示框
        this.dialogVisible = false;
        // 刷新出新的菜单
        this.getMenus();
        // 设置需要默认展开的菜单
        this.expandedKey = [this.category.parentCid];
      });
    },
};
完整代码:
{{ node.label }}
Append
edit
Delete
1.3.4、三级分类[修改-拖拽效果]
需求: 通过拖拽节点改变节点顺序以及节点之间关系的业务
1.3.4.1、拖拽页面的效果
拖拽页面的效果
| 参数 | 说明 | 类型 | 可选值 | 默认值 |
|---|---|---|---|---|
draggable |
是否开启拖拽节点的功能 | boolean | — | false |
| allow-drop | 拖拽时判定目标节点能否被放置。type 参数有三种情况:‘prev’、‘inner’ 和 ‘next’,分别表示放置在目标节点前、插入至目标节点和放置在目标节点后 |
Function(draggingNode, dropNode, type) | — | — |
Function(draggingNode, dropNode, type)draggingNode: 可拖拽节点dropNode: 目标节点type: 拖拽目标节点的哪些位置prev: 目标节点前inner: 插入至目标节点next: 目标节点后
给组件加上 draggable属性, 并绑定allowDrop()方法
    <el-tree
      :data="menus"
      :props="defaultProps"
      :expand-on-click-node="false"
      show-checkbox
      node-key="catId"
      :default-expanded-keys="expandedKey"
      draggable
      :allow-drop="allowDrop"
    >
    // ....此处省略代码
    </el-tree>
- 拖拽时判定目标节点能否被放置, 调用
allowDrop(draggingNode, dropNode, type)方法- 被拖动的当前节点以及所在的父节点总层数不能大于3
- 调用
countNodeLevel(node)方法求出被拖动的当前节点总层数(也就是叶子最大结点的层数)maxLevel:属性用来存放最大叶子结点的层数- 通过递归遍历求出大于
maxLevel的叶子结点层数并赋值给maxLevel并返回
- 求出当前正在拖拽节点的深度(也就是把它看成一棵树有几层)
当前节点总层数 - 当前节点的层级 +1, 比如说手机通讯的层级是2, 下面有1个节点(也就是节点的层次是3),拖拽到层级为2, 则 (3-2+1)=2)
- 进行两种情况判断
- 插入到目标节点里面 :
deep + dropNode.level <= 3 - 插入到目标节点的前后 :
deep + dropNode.level - 1 <= 3
- 插入到目标节点里面 :
- 调用
- 被拖动的当前节点以及所在的父节点总层数不能大于3
export default {
  data() {
    //这里存放数据
    return {
      updateNodes: [],
      maxLevel: 1, // 当前节点子节点的最大深度
    };
  },
  //方法集合
  methods: {
    // 判断能否拖动
    allowDrop(draggingNode, dropNode, type) {
      // 1、被拖动的当前节点以及所在的父节点总层数不能大于3
      // 被拖动的当前节点总层数(也就是叶子结点的层数)
      this.countNodeLevel(draggingNode.data);

      // 当前正在拖拽的节点 + 父节点所在深度不大于3即可
      //求出当前正在拖拽节点的深度 ((当前节点的深度 - 当前节点的层级 +1) , 比如说手机通讯的层级是2, 下面有1个节点,拖拽到层级为2, 则 (3-2+1)=2)
      let deep = this.maxLevel - draggingNode.data.catLevel + 1;

      if (type == "inner") {
        // 插入到目标节点里面
        return deep + dropNode.level <= 3;
      } else {
        // 插入到目标节点的前后
        return deep + dropNode.level - 1 <= 3;
      }
    },
    countNodeLevel(node) {
      // 找出所有子节点,求出最大深度(也就是当前节点的叶子结点的层级)
      if (node.children != null && node.children.length > 0) {
        for (let i = 0; i < node.children.length; i++) {
          if (node.children[i].catLevel > this.maxLevel) {
            this.maxLevel = node.children[i].catLevel;
          }
          this.countNodeLevel(node.children[i]);
        }
      }
    },
};
</script>
1.3.4.2、拖拽数据收集
拖追移动后数据收集:
-
拖拽分类的 :
-
拖拽分类的id :
catId -
拖拽分类的层级:
catLevel -
拖拽分类父节点的id :
parentCid -
拖拽分类的排序 :
sort
-
-
拖拽分类子节点的 :
- 拖拽分类子节点id:
catId - 拖拽分类子节点的层级:
catLevel
- 拖拽分类子节点id:
-
拖拽分类后兄弟节点的 :
- 拖拽分类后兄弟节点的id :
catId - 拖拽分类后兄弟节点的排序:
sort
- 拖拽分类后兄弟节点的id :
| 事件名称 | 说明 | 回调参数 |
|---|---|---|
| node-drop | 拖拽成功完成时触发的事件 | 共四个参数,依次为: 被拖拽节点对应的 Node、 结束拖拽时最后进入的节点、 被拖拽节点的放置位置(before、after、inner)、 event |
代码解说
- 求出拖拽分类父节点的id :
parentCid- 如果他是放在了前后/后面,
- 则
parentCid就为拖追后最后进入的节点的 父节点的id siblings存放拖追后最后进入的节点的父节点的所有子类(这里是拖拽后的所有子类)
- 则
- 如果他是放在了里面,
- 则
parentCid就为 最后进入的节点的catId siblings存放拖追后最后进入的节点的所有子类 (这里是拖拽后的所有子类)
- 则
- 如果他是放在了前后/后面,
- 当前拖拽节点的最新顺序(将当前页面的顺序遍历出来保存, 在数据库中更改新的顺序)
- 遍历拖拽分类父节点的所有子类
- 如果遍历的是当前正在拖拽的节点
- 如果当前正在拖拽的节点层级 和 拖拽前节点层级 不同
- 当前节点的层级发生变化,
catLevel修改为拖拽后节点层级 - 修改其子节点的层级: 调用
updateChildNodeLevel方法进行递归遍历更新子节点层级
- 当前节点的层级发生变化,
- 根据catID 更改 父节点parentCid,排序sort
- 如果当前正在拖拽的节点层级 和 拖拽前节点层级 不同
- 兄弟节点则只需要(根据catId更改排序sort)
- 如果遍历的是当前正在拖拽的节点
- 遍历拖拽分类父节点的所有子类
export default {
  data() {
    //这里存放数据
    return {
      updateNodes: [],
      maxLevel: 1, // 当前节点子节点的最大深度
    };
  },
  // 方法集合
  methods: {
    // 拖拽数据收集
    handleDrop(draggingNode, dropNode, dropType, ev) {
      console.log("handleDrop: ", draggingNode, dropNode, dropType);
      // 1、当前节点最新的父节点id
      let pCid = 0;
      let siblings = null;
      if (dropType == "before" || dropType == "after") {
        pCid =
          dropNode.parent.data.catId == undefined
            ? 0
            : dropNode.parent.data.catId;
        siblings = dropNode.parent.childNodes;
      } else {
        pCid = dropNode.data.catId;
        siblings = dropNode.childNodes;
      }

      // 包装回显类
      // 2、当前拖拽节点的最新顺序(将当前页面的顺序遍历出来保存, 在数据库中更改新的顺序)
      for (let i = 0; i < siblings.length; i++) {
        // 如果遍历的是当前正在拖拽的节点
        if (siblings[i].data.catId == draggingNode.data.catId) {
          let catLevel = draggingNode.level;
          if (siblings[i].level != draggingNode.level) {
            // 当前节点的层级发生变化
            catLevel = siblings[i].level;
            // 修改其子节点的层级
            this.updateChildNodeLevel(siblings[i]);
          }
          // (根据catID 更改 父节点parentCid,排序sort)
          this.updateNodes.push({
            catId: siblings[i].data.catId,
            sort: i,
            parentCid: pCid,
            catLevel: catLevel,
          });
        } else {
          // 兄弟节点则只需要(根据catId更改排序sort)
          this.updateNodes.push({ catId: siblings[i].data.catId, sort: i });
        }
      }

      // 3、当前拖拽节点的最新层级

      console.log("updateNodes", this.updateNodes);
    },
    // 更新子节点层级方法
    updateChildNodeLevel(node) {
      if (node.childNodes.length > 0) {
        for (let i = 0; i < node.childNodes.length; i++) {
          var cNode = node.childNodes[i].data;
          this.updateNodes.push({
            catId: cNode.catId,
            catLevel: node.childNodes[i].level,
          });
          this.updateChildNodeLevel(node.childNodes[i]);
        }
      }
    },
    allowDrop(draggingNode, dropNode, type) {
      // 1、被拖动的当前节点以及所在的父节点总层数不能大于3
      // 被拖动的当前节点总层数(也就是叶子结点的层数)
      this.countNodeLevel(draggingNode.data);

      // 当前正在拖拽的节点 + 父节点所在深度不大于3即可
      //求出当前正在拖拽节点的深度 ((当前节点的深度 - 当前节点的层级 +1) , 比如说手机通讯的层级是2, 下面有1个节点,拖拽到层级为2, 则 (3-2+1)=2)
      let deep = this.maxLevel - draggingNode.data.catLevel + 1;

      if (type == "inner") {
        // 插入到目标节点里面
        return deep + dropNode.level <= 3;
      } else {
        // 插入到目标节点的前后
        return deep + dropNode.level - 1 <= 3;
      }
    },
    countNodeLevel(node) {
      // 找出所有子节点,求出最大深度(也就是当前节点的叶子结点的层级)
      if (node.children != null && node.children.length > 0) {
        for (let i = 0; i < node.children.length; i++) {
          if (node.children[i].catLevel > this.maxLevel) {
            this.maxLevel = node.children[i].catLevel;
          }
          this.countNodeLevel(node.children[i]);
        }
      }
    },
};
</script>
1.3.4.3、拖拽功能完成
在后端编写一个批量修改方法
第一步、Controller层编写
在 product模块下的CategoryController中加入批量修改方法:
@RestController
@RequestMapping("product/category")
public class CategoryController {
    @Autowired
    private CategoryService categoryService;

    /**
     * 批量修改
     */
    @RequestMapping("/update/sort")
    // @RequiresPermissions("product:category:update")
    public R updateSort(@RequestBody CategoryEntity[] category){
        // 调用逆向工程生成的批量修改方法
        categoryService.updateBatchById(Arrays.asList(category.clone()));
        return R.ok();
    }
}
- 底层使用逆向工程生成的方法
测试成功:
第二步、前端修改
<script>
export default {
  data() {
    //这里存放数据
    return {
      updateNodes: [],
      maxLevel: 1, // 当前节点子节点的最大深度
      title: "", //提示框的标题
      dialogType: "", //对话框的方法 add: 则增加; edit: 则修改
      category: {
        name: "",
        parentCid: 0,
        catLevel: 0,
        showStatus: 1,
        sort: 0,
        catId: null,
        icon: "",
        productUnit: "",
      },
    };
  },
  //方法集合
  methods: {
    handleDrop(draggingNode, dropNode, dropType, ev) {
      console.log("handleDrop: ", draggingNode, dropNode, dropType);
      // 本次一共要修改拖拽类的 父Id、sort排序、自己以及子节点的层级; 兄弟分类的排序sort
      // 1、当前节点最新的父节点id
      let pCid = 0;
      let siblings = null; // 子节点
      if (dropType == "before" || dropType == "after") {
        pCid =
          dropNode.parent.data.catId == undefined
            ? 0
            : dropNode.parent.data.catId;
        siblings = dropNode.parent.childNodes;
      } else {
        pCid = dropNode.data.catId;
        siblings = dropNode.childNodes;
      }

      // 包装回显类
      // 2、当前拖拽节点的最新顺序(将当前页面的顺序遍历出来保存, 在数据库中更改新的顺序)
      // 3、当前拖拽节点及其子节点的最新层级
      for (let i = 0; i < siblings.length; i++) {
        // 如果遍历的是当前正在拖拽的节点
        if (siblings[i].data.catId == draggingNode.data.catId) {
          let catLevel = draggingNode.level;
          if (siblings[i].level != draggingNode.level) {
            // 当前节点的层级发生变化
            catLevel = siblings[i].level;
            // 修改其子节点的层级
            this.updateChildNodeLevel(siblings[i]);
          }
          // (根据catID 更改 父节点parentCid,排序sort)
          this.updateNodes.push({
            catId: siblings[i].data.catId,
            sort: i,
            parentCid: pCid,
            catLevel: catLevel,
          });
        } else {
          // 兄弟节点则只需要(根据catId更改排序sort)
          this.updateNodes.push({ catId: siblings[i].data.catId, sort: i });
        }
      }
      console.log("updateNodes", this.updateNodes);

      // 向后端接口发出请求, 保存至数据库
      this.$http({
        url: this.$http.adornUrl("/product/category/update/sort"),
        method: "post",
        data: this.$http.adornData(this.updateNodes, false),
      }).then(({ data }) => {
        this.$message({
          message: "菜单顺序修改成功",
          type: "success",
        });
        // 刷新出新的菜单
        this.getMenus();
        // 设置需要默认展开的菜单
        this.expandedKey = [pCid];

        // 初始化数据
        (this.updateNodes = []), (this.maxLevel = 0);
      });
    },
};
</script>
- 向后端接口发出请求, 保存至数据库
- 保存成功之后,弹出提示框
- 刷新出新的菜单
- 设置需要默认展开的菜单
- 初始化数据
1.3.4.4、批量拖拽效果[优化]
效果一 : 实现按钮开启是否拖拽功能
<template>
  <div>
    <el-switch
      v-model="draggable"
      active-text="开启拖拽"
      inactive-text="关闭拖拽"
    >
    </el-switch>
    <el-tree
      :data="menus"
      :props="defaultProps"
      :expand-on-click-node="false"
      show-checkbox
      node-key="catId"
      :default-expanded-keys="expandedKey"
      :draggable="draggable"
      :allow-drop="allowDrop"
      @node-drop="handleDrop"
    >
        //.....
    </el-tree>
<template>

 draggable: false, // 是否开启拖拽功能
加入组件, 绑定 draggable属性, 该属性并和el-tree组件的draggable属性动态绑定
效果二: 实现按钮点击保存才提交至数据库保存
- 加上新组件 :
<el-button v-if="draggable" @click="batchSave">批量保存</el-button>
- 在变量区申请一个变量数组
- 因为原本
pCid是在handleDrop方法中定义的一个局部变量, 并在handleDrop方法中获取到父节点id的时候给存入this.pCid.push(pCid);
 data() {
    //这里存放数据
    return {
      pCid: [],
    }
 }

handleDrop(draggingNode, dropNode, dropType, ev) {
      // 此处省略 当前节点最新的父节点id 代码
  		// ...
      this.pCid.push(pCid);
}
- 将发送请求重构成 批量拖拽保存功能方法 batchSave(), 点击
保存按钮才触发
// 批量拖拽保存功能
    batchSave() {
      // 向后端接口发出请求, 保存至数据库
      this.$http({
        url: this.$http.adornUrl("/product/category/update/sort"),
        method: "post",
        data: this.$http.adornData(this.updateNodes, false),
      }).then(({ data }) => {
        this.$message({
          message: "菜单顺序修改成功",
          type: "success",
        });
        // 刷新出新的菜单
        this.getMenus();
        // 设置需要默认展开的菜单
        this.expandedKey = this.pCid;

        // 初始化数据
        (this.updateNodes = []), (this.maxLevel = 0), (this.pCid = 0);
      });
    },
- 重写 拖拽时判定目标节点能否被放置 方法,
- 不再使用从数据库中读取的数据做比较, 因为批量拖拽存在数据不一致性
/ 拖拽时判定目标节点能否被放置
    allowDrop(draggingNode, dropNode, type) {
      // 1、被拖动的当前节点以及所在的父节点总层数不能大于3
      // 被拖动的当前节点总层数(也就是叶子结点的层数)
      this.countNodeLevel(draggingNode);

      // 当前正在拖拽的节点 + 父节点所在深度不大于3即可
      //求出当前正在拖拽节点的层级 ((当前节点的深度 - 当前节点的层级 +1) , 比如说手机通讯的层级是2, 下面有1个节点,拖拽到层级为2, 则 (3-2+1)=2)
      let deep = Math.abs(this.maxLevel - draggingNode.level) + 1;

      if (type == "inner") {
        // 插入到目标节点里面
        return deep + dropNode.level <= 3;
      } else {
        // 插入到目标节点的前后
        return deep + dropNode.level - 1 <= 3;
      }
    },
完整代码附上:
批量保存
{{ node.label }}
Append
edit
Delete
1.3.5、三级分类 [批量删除]
前端效果: 批量删除按钮
// 批量保存

<el-button type="danger" @click="batchDelete">批量删除</el-button>

// | 方法名 | 说明 | 参数 |
|---|---|---|
| getCheckedNodes | 若节点可被选择(即 show-checkbox 为 true),则返回目前被选中的节点所组成的数组 |
(leafOnly, includeHalfChecked) 接收两个 boolean 类型的参数,1. 是否只是叶子节点,默认值为 false 2. 是否包含半选节点,默认值为 false |
-
增加个批量删除的按钮 组件
<el-button type="danger" @click="batchDelete">批量删除</el-button> -
给
el-tree组件加上属性, 通过它可以获得选中分类的数据<el-tree // ... ref="menuTree" > -
编写批量删除功能
// 批量删除功能 batchDelete() { let catIds = []; let checkedNodes = this.$refs.menuTree.getCheckedNodes(); console.log("被选中的元素", checkedNodes); for (let i = 0; i < checkedNodes.length; i++) { catIds.push(checkedNodes[i].catId); } this.$confirm(`是否删除当前[${catIds}]菜单?`, "提示", { confirmButtonText: "确定", cancelButtonText: "取消", type: "warning", }) .then(() => { this.$http({ url: this.$http.adornUrl("/product/category/delete"), method: "post", data: this.$http.adornData(catIds, false), }).then(({ data }) => { this.$message({ message: "菜单批量删除成功", type: "success", }); this.getMenus(); }); }) .catch(() => { this.$message("取消删除"); }); }, -
使用后端提供的批量删除接口
二、品牌管理
使用 pms_brand 表 :
2.1、使用逆向工程的前后端代码
- 把生成的前端代码复制到前端工程下
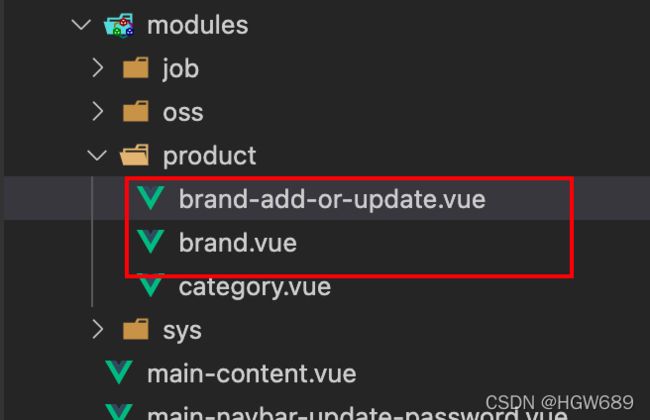
将逆向工程生成的
brand.vue、brand-add-or-update.vue文件复制到前端项目:/renren-fast-vue/src/views/modules/product下
本机放置路径: /Users/hgw/Documents/Data/Project/GuliMALL/逆向生成代码/gulimall-product/main/resources/src/views/modules/product下
- 没有新增删除按钮: 修改权限,Ctrl+Shift+F查找
isAuth,全部返回为true
修改src/utils/index.js路径下的 isAuth方法
/**
 * 是否有权限
 * @param {*} key
 */
export function isAuth (key) {
  // return JSON.parse(sessionStorage.getItem('permissions') || '[]').indexOf(key) !== -1 || false
  return true;
}
- 查看效果
2.2、效果优化-快速显示开关
这里因为EsLint规则太严格了, 一直报错. 这里并没有错. 对
build/webpack.base.conf.js下文件进行修改, 注释掉createLintingRule方法, 并重启项目
const createLintingRule = () => ({
  // test: /\.(js|vue)$/,
  // loader: 'eslint-loader',
  // enforce: 'pre',
  // include: [resolve('src'), resolve('test')],
  // options: {
  //   formatter: require('eslint-friendly-formatter'),
  //   emitWarning: !config.dev.showEslintErrorsInOverlay
  // }
})
2.2.1、前端修改
需求一: 在品牌管理页面 显示状态处加上一个开关按钮, 管控该品牌是否显示
在列表中添加自定义列:中间加标签。可以通过 Scoped slot 可以获取到 row, column, $index 和 store(table 内部的状态管理)的数据
<el-table-column prop="showStatus" header-align="center" align="center" label="显示状态">
  <template slot-scope="scope">
    <el-switch v-model="scope.row.showStatus" active-color="#13ce66" inactive-color="#ff4949">
    </el-switch>
  </template>
</el-table-column>
需求二: 在新增/修改对话框中 显示状态改成 开关按钮, 管控该品牌是否显示
修改src/views/modules/product/brand-add-or-update.vue 文件
      <el-form-item label="显示状态" prop="showStatus">
        <el-switch
          v-model="dataForm.showStatus"
          active-color="#13ce66"
          inactive-color="#ff4949"
					:active-value="1"
          :inactive-value="0"
        >
        </el-switch>
      </el-form-item>
2.2.2、修改开关状态,发送修改请求
| 事件名称 | 说明 | 回调参数 |
|---|---|---|
| change | switch 状态发生变化时的回调函数 | 新状态的值 |
| 参数 | 说明 | 类型 | 可选值 | 默认值 |
|---|---|---|---|---|
| active-text | switch 打开时的文字描述 | string | — | — |
| inactive-text | switch 关闭时的文字描述 | string | — | — |
      <el-table-column
        prop="showStatus"
        header-align="center"
        align="center"
        label="显示状态"
      >
        <template slot-scope="scope">
          <el-switch
            v-model="scope.row.showStatus"
            active-color="#13ce66"
            inactive-color="#ff4949"
            @change="updateBrandStatus(scope.row)"
            :active-value="1"
            :inactive-value="0"
          >
          </el-switch>
        </template>
      </el-table-column>
- 将 switch 打开时的文字描述绑定成 1
- 将 switch 关闭时的文字描述绑定成 0
组件change绑定方法 updateBrandStatus(), 并传入整行的数据scope.row.
scope.row 包括一下信息
- brandId : 品牌id
- descript : 介绍
- firstLetter : 检索首字母
- logo : 品牌logo地址
- name : 品牌名称
- showStatus : 显示状态
- true : 显示
- false : 不限时
- sort : 排序
    // 显示现状按钮触发事件
    updateBrandStatus(data) {
      console.log("最新信息", data);
      let { brandId, showStatus } = data; // 从data中解构出brandId,showStatus
      // 发送请求修改状态
      this.$http({
        url: this.$http.adornUrl("/product/brand/update"),
        method: "post",
        data: this.$http.adornData(
          { brandId, showStatus }, // 因为数据库中showStatus是int类型的, 这里通过一个三元运算符转换
          false
        ),
      }).then(({ data }) => {
        this.$message({
          type: "success",
          message: "状态更新成功",
        });
      });
    },
2.3、文件上传技术
和传统的单体应用不同,这里我们选择将数据上传到分布式文件服务器上。
介绍
阿里云对象存储服务(Object Storage Service,简称OSS),是阿里云对外提供的海量、安全、低成本、高可靠的云存储服务。您可以通过本文档提供的简单的REST接口,在任何时间、任何地点、任何互联网设备上进行上传和下载数据。基于OSS,您可以搭建出各种多媒体分享网站、网盘、个人和企业数据备份等基于大规模数据的服务。
| 中文 | 英文 | 说明 |
|---|---|---|
| 存储空间 | Bucket | 存储空间是您用于存储对象(Object)的容器, 所有的对象都必须隶属于某个存储空间。 |
| 对象/文件 | Object | 对象是 OSS 存储数据的基本单元,也被称为 OSS的文件。对象由元信息(Object Meta) 、用户数据(Data)和文件名(Key)组成。 对象由存储空间内部唯一的Key来标识。 |
| 地域 | Region | 地域表示 OSS 的数据中心所在物理位置。 您可以根据费用、请求来源等综合选择数据存储 的地域。详情请查看OSS已经开通的Region。 |
| 访问域名 | Endpoint | Endpoint 表示OSS对外服务的访问域名。 OSS以HTTP RESTful API的形式对外提供服务, 当访问不同地域的时候,需要不同的域名。通过 内网和外网访问同一个地域所需要的域名也是 不同的。具体的内容请参见各个Region对应的Endpoint。 |
| 访问密钥 | AccessKey | AccessKey,简称 AK,指的是访问身份验证中 用到的AccessKeyId 和AccessKeySecret。OSS通过 使用AccessKeyId 和AccessKeySecret对称加密的方法 来验证某个请求的发送者身份。AccessKeyId用于标识 用户,AccessKeySecret是用户用于加密签名字符串 和OSS用来验证签名字符串的密钥,其中AccessKeySecret 必须保密。 |
2.3.1、开通阿里云OSS对象存储服务,创建新的Bucket
1、开通阿里云OSS对象存储服务,创建新的Bucket
2.3.2、oos整合测试
2.3.1、导入依赖
<dependency>
  <groupId>com.aliyun.ossgroupId>
  <artifactId>aliyun-sdk-ossartifactId>
  <version>3.5.0version>
dependency>
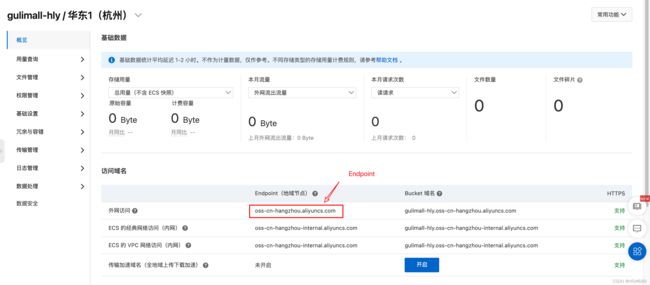
2.3.2、获取Endpoint、AccessKey ID、AccessKey Secret
Endpoint 获取:
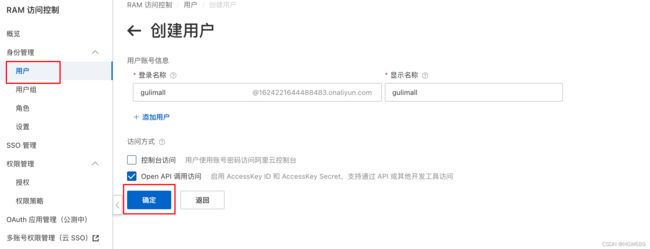
新建成功后得到==AccessKey ID、AccessKey Secret==
(这里不提供截图)
2.3.2.2、对子账户分配权限,管理OSS对象存储服务
(这里不提供截图)
2.3.3.3、测试上传
@Test
public void testUpload() throws IOException {
    // 指定Endpoint
    String endpoint = "你的Endpoint";

    // 阿里云账号子用户
    String accessKeyId = "你的accessKeyId";
    String accessKeySecret = "你的accessKeySecret";

    // 创建OSSClient实例
    OSS ossClient = new OSSClientBuilder().build(endpoint, accessKeyId, accessKeySecret);

    // 上传文件流
    FileInputStream inputStream = new FileInputStream("/Users/hgw/Downloads/login.png");

    ossClient.putObject("gulimall-hly", "login.png", inputStream);

    // 关闭OSSClient
    ossClient.shutdown();
    inputStream.close();

    System.out.println("上传成功");
}
2.3.3、对象存储测试
第一步、引入oss-starter依赖 (在 gulimall-common 模块中导入第三方依赖)
<dependency>
    <groupId>com.alibaba.cloudgroupId>
    <artifactId>spring-cloud-starter-alicloud-ossartifactId>
dependency>
第二步、配置
Endpoint、AccessKey ID、AccessKey Secret等信息
修改 gulimall-product 模块下 application.yml文件
spring:
    alicloud:
      access-key: 你的access-key
      secret-key: 你的secret-key
      oss:
        endpoint: 你的endpoint
第三步、使用OSSClient 进行相关操作
/**
 * 1、引入oss-starter
 * 2、配置key、endpoint相关信息
 * 3、使用OSSClient 进行相关操作
 */
@RunWith(SpringRunner.class)
@SpringBootTest
public class GulimallProductApplicationTests {
    @Autowired
    OSSClient ossClient;

    @Test
    public void testUpload3() throws IOException {
        // 上传文件流
        FileInputStream inputStream = new FileInputStream("/Users/hgw/Downloads/1615260734059578.jpeg");
        ossClient.putObject("gulimall-hly", "dog.png", inputStream);
        // 关闭OSSClient
        ossClient.shutdown();
        inputStream.close();

        System.out.println("上传成功");
    }
2.3.4、建立第三方工程 (gulimall-third-party)
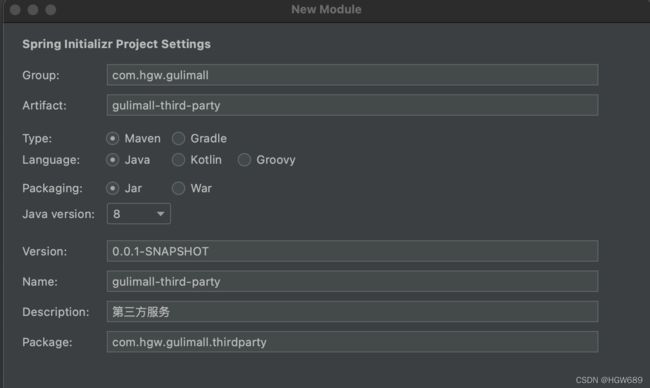
2.3.4.1、新建一个module gulimall-third-party
随后对其进行, 降版本处理
第一步、引入依赖
<dependency>
    <groupId>com.alibaba.cloudgroupId>
    <artifactId>spring-cloud-starter-alibaba-nacos-discoveryartifactId>
    <version>2.1.0.RELEASEversion>
dependency>


<dependency>
    <groupId>com.alibaba.cloudgroupId>
    <artifactId>spring-cloud-starter-alibaba-nacos-configartifactId>
    <version>2.1.0.RELEASEversion>
dependency>


<dependency>
    <groupId>com.alibaba.cloudgroupId>
    <artifactId>spring-cloud-starter-alicloud-ossartifactId>
    <version>2.2.0.RELEASEversion>
dependency>
第二步、注册到注册中心
- nacos新建命名空间
third-party - 项目创建
application.yml用来配置nacos信息
spring:
  cloud:
    nacos:
      config:
        server-addr: 127.0.0.1:8848
  application:
    name: gulimall-third-party

server:
  port: 30000
- 在主启动类上加上
@EnableDiscoveryClient注解
第三步、加入控制中心并配置oss.yml
-
nacos在
third-party命名空间下创建oss.yml,配置oss信息spring: cloud: alicloud: access-key: 你的 secret-key: 你的 oss: endpoint: 你的 bucket: gulimall-hly -
本地项目新建
bootstrap.properties, 配置注册中心信息spring.application.name=gulimall-third-party spring.cloud.nacos.config.server-addr=127.0.0.1:8848 spring.cloud.nacos.config.namespace=104f67d0-dfb8-46e6-aec5-09efe9e7eae0 spring.cloud.nacos.config.ext-config[0].data-id=oss.yml spring.cloud.nacos.config.ext-config[0].group=DEFAULT_GROUP spring.cloud.nacos.config.ext-config[0].refresh=true -
测试成功文件上传成功 !
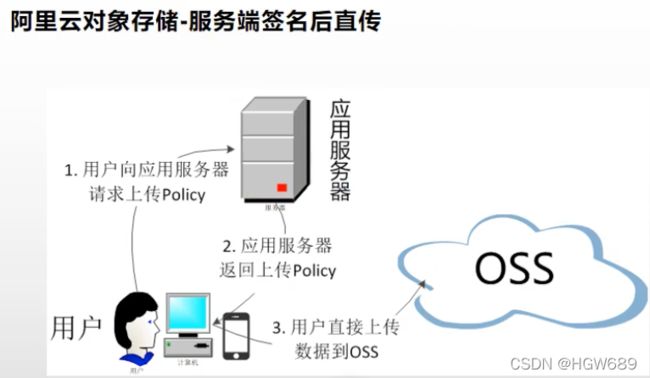
2.3.4.2、OSS获取服务端签名
第四步、编写一个Controller请求
package com.hgw.gulimall.thirdparty.controller;

import com.aliyun.oss.OSS;
import com.aliyun.oss.common.utils.BinaryUtil;
import com.aliyun.oss.model.MatchMode;
import com.aliyun.oss.model.PolicyConditions;
import org.springframework.beans.factory.annotation.Autowired;
import org.springframework.beans.factory.annotation.Value;
import org.springframework.web.bind.annotation.RequestMapping;
import org.springframework.web.bind.annotation.RestController;

import java.text.SimpleDateFormat;
import java.util.Date;
import java.util.LinkedHashMap;
import java.util.Map;

/**
 * Data time:2022/3/18 10:40
 * StudentID:2019112118
 * Author:hgw
 * Description:
 */
@RestController
public class OssController {

    @Autowired
    OSS ossClient;

    @Value("${spring.cloud.alicloud.oss.endpoint}")
    String endpoint;

    @Value("${spring.cloud.alicloud.oss.bucket}")
    String bucket;

    @Value("${spring.cloud.alicloud.access-key}")
    String accessId;
    @Value("${spring.cloud.alicloud.secret-key}")
    String accessKey;

    @RequestMapping("/oss/policy")
    public Map<String, String> policy() {

        String host = "https://" + bucket + "." + endpoint; // host的格式为 bucketname.endpoint

        String format = new SimpleDateFormat("yyyy-MM-dd").format(new Date());
        String dir = format; // 用户上传文件时指定的前缀。

        Map<String, String> respMap=null;
        try {
            long expireTime = 30;
            long expireEndTime = System.currentTimeMillis() + expireTime * 1000;
            Date expiration = new Date(expireEndTime);
            PolicyConditions policyConds = new PolicyConditions();
            policyConds.addConditionItem(PolicyConditions.COND_CONTENT_LENGTH_RANGE, 0, 1048576000);
            policyConds.addConditionItem(MatchMode.StartWith, PolicyConditions.COND_KEY, dir);

            String postPolicy = ossClient.generatePostPolicy(expiration, policyConds);
            byte[] binaryData = postPolicy.getBytes("utf-8");
            String encodedPolicy = BinaryUtil.toBase64String(binaryData);
            String postSignature = ossClient.calculatePostSignature(postPolicy);

            respMap= new LinkedHashMap<String, String>();
            respMap.put("accessid", accessId);
            respMap.put("policy", encodedPolicy);
            respMap.put("signature", postSignature);
            respMap.put("dir", dir);
            respMap.put("host", host);
            respMap.put("expire", String.valueOf(expireEndTime / 1000));

        } catch (Exception e) {
            // Assert.fail(e.getMessage());
            System.out.println(e.getMessage());
        } finally {
            ossClient.shutdown();
        }
        return respMap;
    }
}
 @RequestMapping("/oss/policy")
    public R policy() {

        String host = "https://" + bucket + "." + endpoint; // host的格式为 bucketname.endpoint

        String format = new SimpleDateFormat("yyyy-MM-dd").format(new Date());
        String dir = format; // 用户上传文件时指定的前缀。

        Map<String, String> respMap=null;
        try {
            long expireTime = 30;
            long expireEndTime = System.currentTimeMillis() + expireTime * 1000;
            Date expiration = new Date(expireEndTime);
            PolicyConditions policyConds = new PolicyConditions();
            policyConds.addConditionItem(PolicyConditions.COND_CONTENT_LENGTH_RANGE, 0, 1048576000);
            policyConds.addConditionItem(MatchMode.StartWith, PolicyConditions.COND_KEY, dir);

            String postPolicy = ossClient.generatePostPolicy(expiration, policyConds);
            byte[] binaryData = postPolicy.getBytes("utf-8");
            String encodedPolicy = BinaryUtil.toBase64String(binaryData);
            String postSignature = ossClient.calculatePostSignature(postPolicy);

            respMap= new LinkedHashMap<String, String>();
            respMap.put("accessid", accessId);
            respMap.put("policy", encodedPolicy);
            respMap.put("signature", postSignature);
            respMap.put("dir", dir);
            respMap.put("host", host);
            respMap.put("expire", String.valueOf(expireEndTime / 1000));

        } catch (Exception e) {
            // Assert.fail(e.getMessage());
            System.out.println(e.getMessage());
        } finally {
            ossClient.shutdown();
        }
        return R.ok().put("data",respMap);
    }
2.3.4.3、配置网关
第五步、配置网关
spring:
  cloud:
    gateway:
      routes:
        - id: product_route
          uri: lb://gulimall-product  # 注册中心的服务
          predicates:
            - Path=/api/product/**
          filters:
            - RewritePath=/api/(?>.*),/$\{segment}

        - id: third_party_route
          uri: lb://gulimall-third-party
          predicates: # 什么情况下路由给它
            - Path=/api/thirdparty/**
          filters:
            - RewritePath=/api/thirdparty/(?>.*),/$\{segment}

        - id: admin_route
          uri: lb://renren-fast # 路由给renren-fast (lb)负载均衡
          predicates:  # 什么情况下路由给它
            - Path=/api/**  # 默认前端项目都带上api前缀,就是我们前面题的localhost:88/api
          filters:
            - RewritePath=/api/(?>.*),/renren-fast/$\{segment}  # 把/api/* 改变成 /renren-fast/*fast找
测试连接: http://localhost:88/api/thirdparty/oss/policy
2.3.5、前端联调, 实现文件上传功能
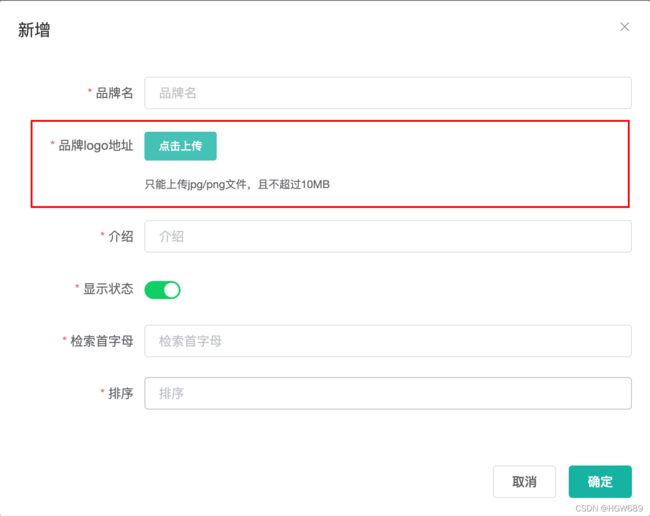
需求: 实现在 新增/修改对话框中 品牌logo地址位置处 通过点击或者拖拽上传文件
文件上传组件在/renren-fast-vue/src/components中, 将资料中的upload文件夹复制到该路径下

