Springboot 注解总结(包含lombok 注解,swagger注解)
一、启动注解 @SpringBootApplication
@Target(ElementType.TYPE)
@Retention(RetentionPolicy.RUNTIME)
@Documented
@Inherited
@SpringBootConfiguration
@EnableAutoConfiguration
@ComponentScan(excludeFilters = { @Filter(type = FilterType.CUSTOM, classes = TypeExcludeFilter.class),
		@Filter(type = FilterType.CUSTOM, classes = AutoConfigurationExcludeFilter.class) })
public @interface SpringBootApplication {
    // ... 此处省略源码
}
查看源码可发现,@SpringBootApplication是一个复合注解,包含了@SpringBootConfiguration,@EnableAutoConfiguration,@ComponentScan这三个注解
@SpringBootConfiguration 注解,继承@Configuration注解,主要用于加载配置文件
@SpringBootConfiguration继承自@Configuration,二者功能也一致,标注当前类是配置类, 并会将当前类内声明的一个或多个以@Bean注解标记的方法的实例纳入到spring容器中,并且实例名就是方法名。
@EnableAutoConfiguration 注解,开启自动配置功能
@EnableAutoConfiguration可以帮助SpringBoot应用将所有符合条件的@Configuration配置都加载到当前SpringBoot创建并使用的IoC容器。借助于Spring框架原有的一个工具类:SpringFactoriesLoader的支持,@EnableAutoConfiguration可以智能的自动配置功效才得以大功告成
@ComponentScan 注解,主要用于组件扫描和自动装配
@ComponentScan的功能其实就是自动扫描并加载符合条件的组件或bean定义,最终将这些bean定义加载到容器中。我们可以通过basePackages等属性指定@ComponentScan自动扫描的范围,如果不指定,则默认Spring框架实现从声明@ComponentScan所在类的package进行扫描,默认情况下是不指定的,所以SpringBoot的启动类最好放在root package下。
二、Controller 相关注解
@Controller
控制器,处理http请求。
@RestController 复合注解
查看@RestController源码
@Target(ElementType.TYPE)
@Retention(RetentionPolicy.RUNTIME)
@Documented
@Controller
@ResponseBody
public @interface RestController {

	/**
	 * The value may indicate a suggestion for a logical component name,
	 * to be turned into a Spring bean in case of an autodetected component.
	 * @return the suggested component name, if any (or empty String otherwise)
	 * @since 4.0.1
	 */
	@AliasFor(annotation = Controller.class)
	String value() default "";
}
从源码我们知道,@RestController注解相当于@ResponseBody+@Controller合在一起的作用,RestController使用的效果是将方法返回的对象直接在浏览器上展示成json格式.
@RequestBody
通过HttpMessageConverter读取Request Body并反序列化为Object(泛指)对象
@RequestMapping
@RequestMapping 是 Spring Web 应用程序中最常被用到的注解之一。这个注解会将 HTTP 请求映射到 MVC 和 REST 控制器的处理方法上
@GetMapping用于将HTTP get请求映射到特定处理程序的方法注解
注解简写:@RequestMapping(value = “/say”,method = RequestMethod.GET)等价于:@GetMapping(value = “/say”)
GetMapping源码
@Target(ElementType.METHOD)
@Retention(RetentionPolicy.RUNTIME)
@Documented
@RequestMapping(method = RequestMethod.GET)
public @interface GetMapping {
//...
}
是@RequestMapping(method = RequestMethod.GET)的缩写
@PostMapping用于将HTTP post请求映射到特定处理程序的方法注解
@Target(ElementType.METHOD)
@Retention(RetentionPolicy.RUNTIME)
@Documented
@RequestMapping(method = RequestMethod.POST)
public @interface PostMapping {
    //...
}
是@RequestMapping(method = RequestMethod.POST)的缩写
三、取请求参数值
@PathVariable:获取url中的数据
@Controller
@RequestMapping("/User")
public class HelloWorldController {

    @RequestMapping("/getUser/{uid}")
    public String getUser(@PathVariable("uid")Integer id, Model model) {
        System.out.println("id:"+id);
        return "user";
    }
}
请求示例:http://localhost:8080/User/getUser/123
@RequestParam:获取请求参数的值
@Controller
@RequestMapping("/User")
public class HelloWorldController {
@RequestMapping("/getUser")
public String getUser(@RequestParam("uid")Integer id, Model model) {
    System.out.println("id:"+id);
    return "user";
}
}
请求示例:http://localhost:8080/User/getUser?uid=123
@RequestHeader 把Request请求header部分的值绑定到方法的参数上
@CookieValue 把Request header中关于cookie的值绑定到方法的参数上
四、注入bean相关
@Repository
DAO层注解,DAO层中接口继承JpaRepository
Repository注解源码
@Target({ElementType.TYPE})
@Retention(RetentionPolicy.RUNTIME)
@Documented
@Component
public @interface Repository {

	/**
	 * The value may indicate a suggestion for a logical component name,
	 * to be turned into a Spring bean in case of an autodetected component.
	 * @return the suggested component name, if any (or empty String otherwise)
	 */
	@AliasFor(annotation = Component.class)
	String value() default "";

}
@Service
源码
@Target({ElementType.TYPE})
@Retention(RetentionPolicy.RUNTIME)
@Documented
@Component
public @interface Service {

	/**
	 * The value may indicate a suggestion for a logical component name,
	 * to be turned into a Spring bean in case of an autodetected component.
	 * @return the suggested component name, if any (or empty String otherwise)
	 */
	@AliasFor(annotation = Component.class)
	String value() default "";
}
• @Service是@Component注解的一个特例,作用在类上
• @Service注解作用域默认为单例
• 使用注解配置和类路径扫描时,被@Service注解标注的类会被Spring扫描并注册为Bean
• @Service用于标注服务层组件,表示定义一个bean
• @Service使用时没有传参数,Bean名称默认为当前类的类名,首字母小写
• @Service(“serviceBeanId”)或@Service(value=”serviceBeanId”)使用时传参数,使用value作为Bean名字
@Scope作用域注解
@Scope作用在类上和方法上,用来配置 spring bean 的作用域,它标识 bean 的作用域
@Scope源码
@Target({ElementType.TYPE, ElementType.METHOD})
@Retention(RetentionPolicy.RUNTIME)
@Documented
public @interface Scope {

	/**
	 * Alias for {@link #scopeName}.
	 * @see #scopeName
	 */
	@AliasFor("scopeName")
	String value() default "";

	@AliasFor("value")
	String scopeName() default "";

	ScopedProxyMode proxyMode() default ScopedProxyMode.DEFAULT;
}
属性介绍
value
singleton 表示该bean是单例的。(默认)
prototype 表示该bean是多例的,即每次使用该bean时都会新建一个对象。
request 在一次http请求中,一个bean对应一个实例。
session 在一个httpSession中,一个bean对应一个实例。
proxyMode
DEFAULT 不使用代理。(默认)
NO 不使用代理,等价于DEFAULT。
INTERFACES 使用基于接口的代理(jdk dynamic proxy)。
TARGET_CLASS 使用基于类的代理(cglib)。
@Entity实体类注解
@Table(name =“数据库表名”),这个注解也注释在实体类上,对应数据库中相应的表。
@Id、@Column注解用于标注实体类中的字段,pk字段标注为@Id,其余@Column。
@Bean产生一个bean的方法
@Bean明确地指示了一种方法,产生一个bean的方法,并且交给Spring容器管理。支持别名@Bean(“xx-name”)
@Autowired 自动导入
• @Autowired注解作用在构造函数、方法、方法参数、类字段以及注解上
• @Autowired注解可以实现Bean的自动注入
@Component
把普通pojo实例化到spring容器中,相当于配置文件中的
虽然有了@Autowired,但是我们还是要写一堆bean的配置文件,相当麻烦,而@Component就是告诉spring,我是pojo类,把我注册到容器中吧,spring会自动提取相关信息。那么我们就不用写麻烦的xml配置文件了
五、导入配置文件
@PropertySource注解
引入单个properties文件:
@PropertySource(value = {"classpath : xxxx/xxx.properties"})
引入多个properties文件:
@PropertySource(value = {"classpath : xxxx/xxx.properties","classpath : xxxx.properties"})
@ImportResource导入xml配置文件
可以额外分为两种模式 相对路径classpath,绝对路径(真实路径)file
注意:单文件可以不写value或locations,value和locations都可用
相对路径(classpath)
•	引入单个xml配置文件:@ImportSource("classpath : xxx/xxxx.xml")
•	引入多个xml配置文件:@ImportSource(locations={"classpath : xxxx.xml" , "classpath : yyyy.xml"})
绝对路径(file)
•	引入单个xml配置文件:@ImportSource(locations= {"file : d:/hellxz/dubbo.xml"})
•	引入多个xml配置文件:@ImportSource(locations= {"file : d:/hellxz/application.xml" , "file :
d:/hellxz/dubbo.xml"})
取值:使用@Value注解取配置文件中的值
@Value("${properties中的键}")
private String xxx;
@Import 导入额外的配置信息
功能类似XML配置的,用来导入配置类,可以导入带有@Configuration注解的配置类或实现了ImportSelector/ImportBeanDefinitionRegistrar。
使用示例
@SpringBootApplication
@Import({SmsConfig.class})
public class DemoApplication {
    public static void main(String[] args) {
        SpringApplication.run(DemoApplication.class, args);
    }
}
六、事务注解 @Transactional
在Spring中,事务有两种实现方式,分别是编程式事务管理和声明式事务管理两种方式
• 编程式事务管理: 编程式事务管理使用TransactionTemplate或者直接使用底层的PlatformTransactionManager。对于编程式事务管理,spring推荐使用TransactionTemplate。
• 声明式事务管理: 建立在AOP之上的。其本质是对方法前后进行拦截,然后在目标方法开始之前创建或者加入一个事务,在执行完目标方法之后根据执行情况提交或者回滚事务,通过@Transactional就可以进行事务操作,更快捷而且简单。推荐使用
七、全局异常处理
@ControllerAdvice 统一处理异常
@ControllerAdvice 注解定义全局异常处理类
@ControllerAdvice
public class GlobalExceptionHandler {
}
@ExceptionHandler 注解声明异常处理方法
@ControllerAdvice
public class GlobalExceptionHandler {
@ExceptionHandler(Exception.class)
@ResponseBody
String handleException(){
    return "Exception Deal!";
}
}
八 lombok注解

@Getter/@Setter
这一对注解从名字上就很好理解,用在成员变量前面,相当于为成员变量生成对应的get和set方法,同时还可以为生成的方法指定访问修饰符,当然,默认为public。
@ToString/@EqualsAndHashCode
自动重写 生成toString,equals和hashcode方法,同时后者还会生成一个canEqual方法,用于判断某个对象是否是当前类的实例,生成方法时只会使用类中的非静态和非transient成员变量,这些都比较好理解,就不举例子了。
当然,这两个注解也可以添加限制条件,例如用@ToString(exclude={“param1”,“param2”})来排除param1和param2两个成员变量,或者用@ToString(of={“param1”,“param2”})来指定使用param1和param2两个成员变量,@EqualsAndHashCode注解也有同样的用法。
@NoArgsConstructor/@RequiredArgsConstructor/@AllArgsConstructor
这三个注解都是用在类上的,第一个和第三个都很好理解,就是为该类产生无参的构造方法和包含所有参数的构造方法,第二个注解则使用类中所有带有@NonNull注解的或者带有final修饰的成员变量生成对应的构造方法,当然,和前面几个注解一样,成员变量都是非静态的,另外,如果类中含有final修饰的成员变量,是无法使用@NoArgsConstructor注解的。
三个注解都可以指定生成的构造方法的访问权限,同时,第二个注解还可以用@RequiredArgsConstructor(staticName=”methodName”)的形式生成一个指定名称的静态方法,返回一个调用相应的构造方法产生的对象
@Data/@Value
@Data注解综合了3,4,5和6里面的@RequiredArgsConstructor注解,其中@RequiredArgsConstructor使用了类中的带有@NonNull注解的或者final修饰的成员变量,它可以使用@Data(staticConstructor=”methodName”)来生成一个静态方法,返回一个调用相应的构造方法产生的对象。
整合包,只要加了 @Data 这个注解,等于同时加了以下注解
@Getter/@Setter
@ToString
@EqualsAndHashCode
@RequiredArgsConstructor
@Value注解和@Data类似,区别在于它会把所有成员变量默认定义为private final修饰,并且不会生成set方法。
也是整合包,但是他会把所有的变量都设成 final 的,其他的就跟 @Data 一样,等于同时加了以下注解
@Getter (注意没有setter)
@ToString
@EqualsAndHashCode
@RequiredArgsConstructor
@SneakyThrows
这个注解用在方法上,可以将方法中的代码用try-catch语句包裹起来,捕获异常并在catch中用Lombok.sneakyThrow(e)把异常抛出,可以使用@SneakyThrows(Exception.class)的形式指定抛出哪种异常,很简单的注解。
@Synchronized
这个注解用在类方法或者实例方法上,效果和synchronized关键字相同,区别在于锁对象不同,对于类方法和实例方法,synchronized关键字的锁对象分别是类的class对象和this对象,而@Synchronized得锁对象分别是私有静态final对象LOCK和私有final对象LOCK和私有final对象lock,当然,也可以自己指定锁对象
@Log
这个注解用在类上,可以省去从日志工厂生成日志对象这一步,直接进行日志记录,具体注解根据日志工具的不同而不同,同时,可以在注解中使用topic来指定生成log对象时的类名。
@NonNull
这个注解可以用在成员方法或者构造方法的参数前面,会自动产生一个关于此参数的非空检查,如果参数为空,则抛出一个空指针异常,举个例子来看看:
//成员方法参数加上@NonNull注解
public String getName(@NonNull Person p){
    return p.getName();
}
实际效果相当于:
public String getName(@NonNull Person p){
    if(p==null){
        throw new NullPointerException("person");
    }
    return p.getName();
}
@Cleanup
这个注解用在变量前面,可以保证此变量代表的资源会被自动关闭,默认是调用资源的close()方法,如果该资源有其它关闭方法,可使用@Cleanup(“methodName”)来指定要调用的方法,就用输入输出流来举个例子:
public static void test(String[] args) throws IOException {
     @Cleanup InputStream in = new FileInputStream(args[0]);
     @Cleanup OutputStream out = new FileOutputStream(args[1]);
     byte[] b = new byte[1024];
     while (true) {
       int r = in.read(b);
       if (r == -1) break;
       out.write(b, 0, r);
     }
 }
@Builder
自动生成流式 set 值写法,从此之后再也不用写一堆 setter 了
注意,虽然只要加上 @Builder 注解,我们就能够用流式写法快速设定对象的值,但是 setter 还是必须要写不能省略的,因为 Spring 或是其他框架有很多地方都会用到对象的 getter/setter 对他们取值/赋值
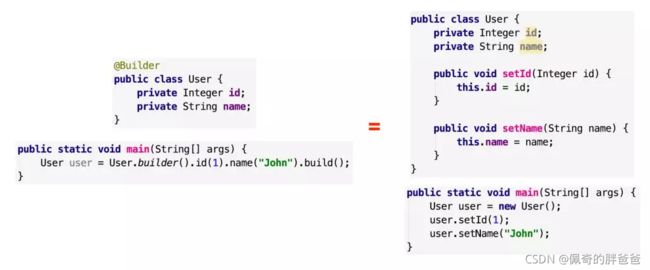
所以通常是 @Data 和 @Builder 会一起用在同个类上,既方便我们流式写代码,也方便框架做事
@Slf4j
自动生成该类的 log 静态常量,要打日志就可以直接打,不用再手动 new log 静态常量了

九 swagger注解
1、@Api():用在请求的类上,表示对类的说明,也代表了这个类是swagger2的资源
参数:
tags:说明该类的作用,参数是个数组,可以填多个。
value=“该参数没什么意义,在UI界面上不显示,所以不用配置”
description = “用户基本信息操作”
2、@ApiOperation():用于方法,表示一个http请求访问该方法的操作
参数:
value=“方法的用途和作用”
notes=“方法的注意事项和备注”
tags:说明该方法的作用,参数是个数组,可以填多个。
格式:tags={“作用1”,“作用2”}
(在这里建议不使用这个参数,会使界面看上去有点乱,前两个常用)
3、@ApiModel():用于响应实体类上,用于说明实体作用
参数:
description=“描述实体的作用”
4、@ApiModelProperty:用在属性上,描述实体类的属性
参数:
value=“用户名” 描述参数的意义
name=“name” 参数的变量名
required=true 参数是否必选
5、@ApiImplicitParams:用在请求的方法上,包含多个@ApiImplicitParam
6、@ApiImplicitParam:用于方法,表示单独的请求参数
参数:
name=“参数ming”
value=“参数说明”
dataType=“数据类型”
paramType=“query” 表示参数放在哪里
· header 请求参数的获取:@RequestHeader
· query 请求参数的获取:@RequestParam
· path(用于restful接口) 请求参数的获取:@PathVariable
· body(不常用)
· form(不常用)
defaultValue=“参数的默认值”
required=“true” 表示参数是否必须传
7、@ApiParam():用于方法,参数,字段说明 表示对参数的要求和说明
参数:
name=“参数名称”
value=“参数的简要说明”
defaultValue=“参数默认值”
required=“true” 表示属性是否必填,默认为false
8、@ApiResponses:用于请求的方法上,根据响应码表示不同响应
一个@ApiResponses包含多个@ApiResponse
9、@ApiResponse:用在请求的方法上,表示不同的响应
参数:
code=“404” 表示响应码(int型),可自定义
message=“状态码对应的响应信息”