【项目实战20】k8s(6)—configmap服务(利用configmap进行热更新)
configmap
- 一、configmap简介
- 二、创建configmap
-
- 一、使用字面值创建
- 二、使用文件创建
- 三、使用目录创建
- 四、编写configmap的yaml文件
- 三、configmap的使用
-
- 一、使用configmap设置环境变量
- 二、通过在pod的命令行下运行的方式
- 三、使用conigmap设置命令行参数
- 四、通过数据卷使用configmap
- 四、configmap热更新
一、configmap简介
    configmap用于保存配置数据,以键值对形式存储。
    configmap 资源提供了向 Pod 注入配置数据的方法。
    旨在让镜像和配置文件解耦,以便实现镜像的可移植性和可复用性。
    典型的使用场景:
       1.填充环境变量的值
       2.设置容器内的命令行参数
       3.填充卷的配置文件
二、创建configmap
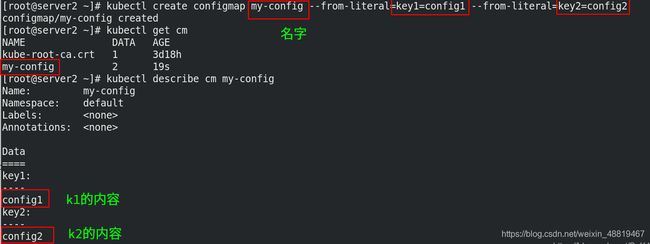
一、使用字面值创建
kubectl create configmap my-config --from-literal=key1=config1 --from-literal=key2=config2
kubectl get cm
kubectl describe cm my-config
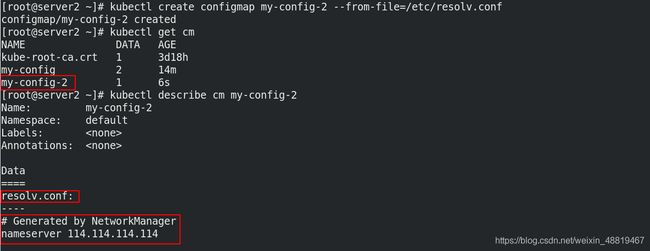
二、使用文件创建
key的名称是文件名称,value的值是这个文件的内容
kubectl create configmap my-config-2 --from-file=/etc/resolv.conf
kubectl get cm
kubectl describe cm my-config-2
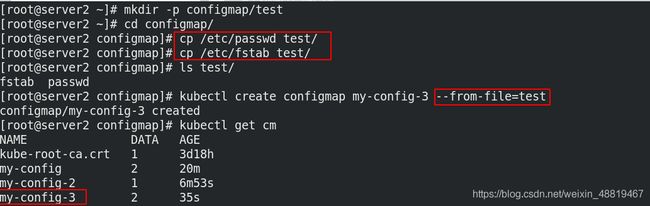
三、使用目录创建
目录中的文件名为key,文件内容是value
mkdir -p configmap/test
cd configmap/
cp /etc/passwd test/
cp /etc/fstab test/
kubectl create configmap my-config-3 --from-file=test
kubectl get cm
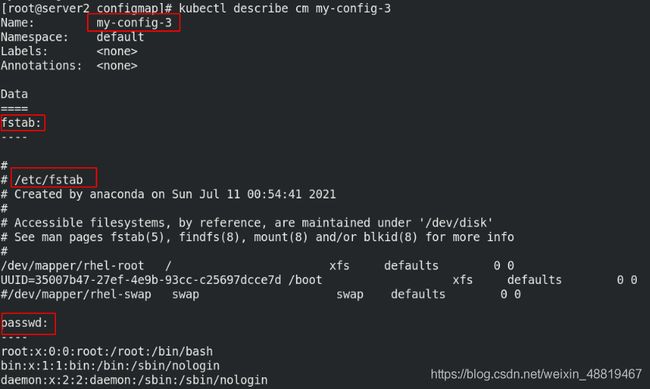
kubectl describe cm my-config-3
四、编写configmap的yaml文件
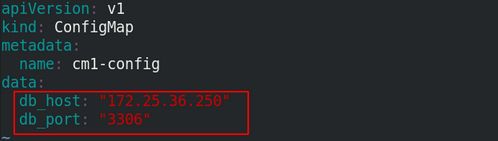
vim cm1.yaml
apiVersion: v1
kind: ConfigMap
metadata:
name: cm1-config
data: 此部分是configmap的内容
db_host: "172.25.36.250"
db_port: "3306"
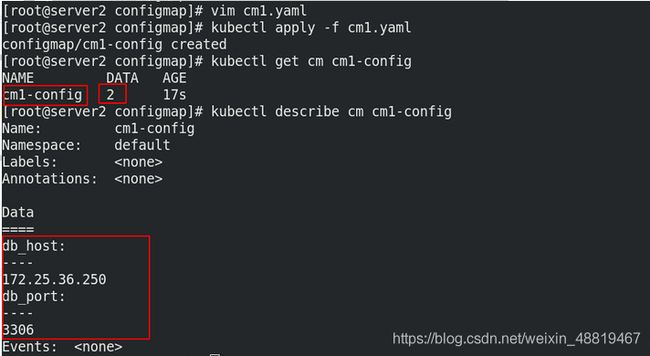
kubectl apply -f cm1.yaml
kubectl get cm cm1-config
kubectl describe cm cm1-config
三、configmap的使用
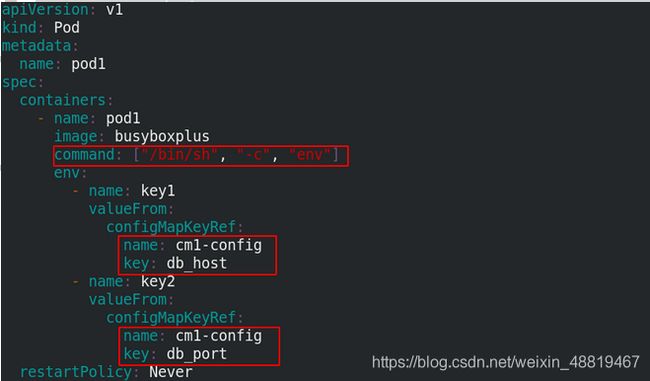
一、使用configmap设置环境变量
这里使用的是第四种yaml文件编写的configmap。
vim pod.yaml

apiVersion: v1
kind: Pod
metadata:
  name: pod1
spec:
  containers:
    - name: pod1
      image: busyboxplus
      command: ["/bin/sh", "-c", "env"]
      env:                                                                            指定环境
        - name: key1
          valueFrom:
            configMapKeyRef:
              name: cm1-config                                             之前的cm1-config文件
              key: db_host                                                      key指定之前的db_host
        - name: key2
          valueFrom:
            configMapKeyRef:
              name: cm1-config
              key: db_port                                                      key指定之前的db_port
  restartPolicy: Never
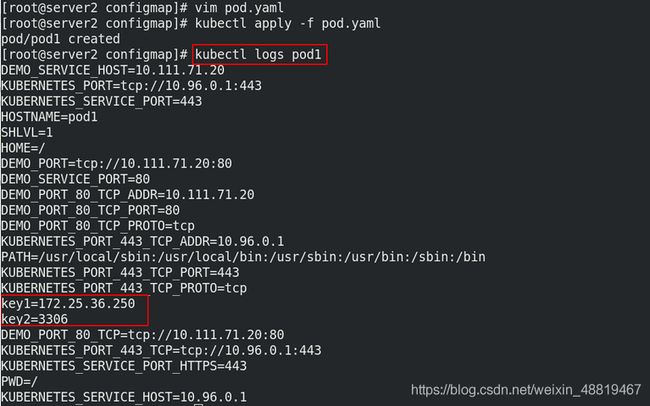
 运行清单查看日志
kubectl apply -f pod.yaml
kubectl logs pod1
这样就可以在pod1里加入之前我们写入configmap里面的内容
二、通过在pod的命令行下运行的方式
vim pod2.yaml

apiVersion: v1
kind: Pod
metadata:
  name: pod2
spec:
  containers:
    - name: pod2
      image: busyboxplus
      command: ["/bin/sh", "-c", "env"]
      envFrom:
        - configMapRef:
            name: cm1-config
  restartPolicy: Never

运行清单,查看日志
kubectl apply -f pod2.yaml
kubectl get pod pod2
kubectl logs pod2
同样能获取到db_port和db_host
三、使用conigmap设置命令行参数
vim pod2.yaml

apiVersion: v1
kind: Pod
metadata:
  name: pod2
spec:
  containers:
    - name: pod2
      image: busyboxplus
      command: ["/bin/sh", "-c", "echo $(db_host) $(db_port)"]      输出给定的db_host和db_port
      envFrom:
        - configMapRef:
            name: cm1-config
  restartPolicy: Never
 运行清单,查看输出结果
kubectl delete -f pod2.yaml
kubectl apply -f pod2.yaml
kubectl logs pod2
能成功查看到输出的db_host和db_port结果

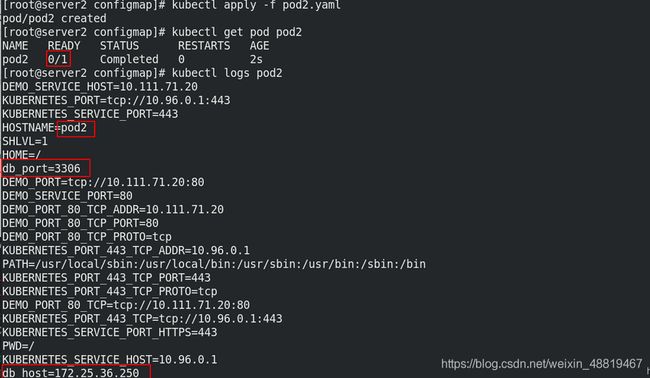
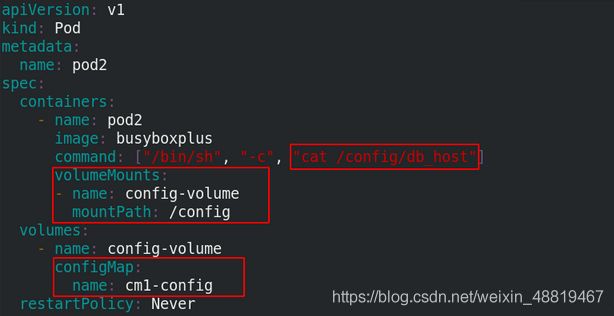
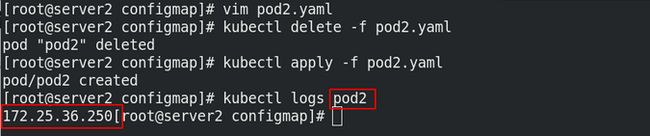
四、通过数据卷使用configmap
将configmap的信息挂载到卷上,容器
vim pod2.yaml

apiVersion: v1
kind: Pod
metadata:
  name: pod2
spec:
  containers:                                                       容器
    - name: pod2
      image: busyboxplus
      command: ["/bin/sh", "-c", "cat /config/db_host"]     查看db_host
      volumeMounts:
      - name: config-volume                                 容器指定挂载卷为下面新建的config-volume卷
        mountPath: /config
  volumes:                                                      将configMap的内容加入volumes里面
    - name: config-volume
      configMap:
        name: cm1-config
  restartPolicy: Never
 运行清单,查看输出结果
kubectl delete -f pod2.yaml
kubectl apply -f pod2.yaml
kubectl logs pod2
四、configmap热更新
1、编辑nginx的配置文件,修改端口为8000
vim nginx.conf

server {
    listen       8000;
    server_name  _;

    location / {
        root /usr/share/nginx/html;
        index  index.html index.htm;
    }
}
2、通过文件创建configmap
创建的名为nginxconf 的configmap,将刚才创建的nginx.conf作为其内容
kubectl create configmap nginxconf --from-file=nginx.conf
kubectl describe cm nginxconf

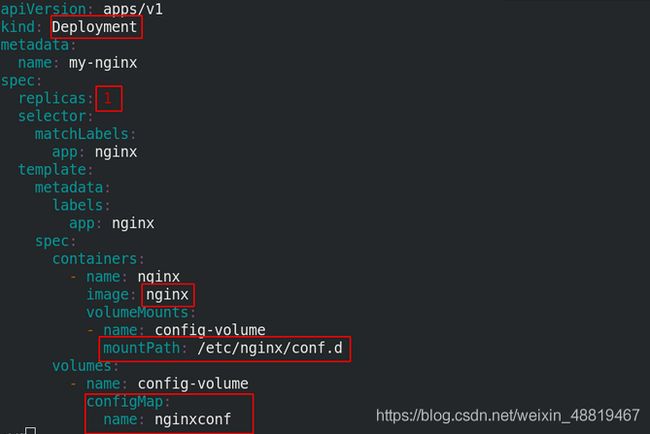
3、编辑nginx.yaml文件,使其包含刚修改的nginx的配置文件
vim nginx.yaml

apiVersion: apps/v1
kind: Deployment                                                    新建控制器
metadata:
  name: my-nginx
spec:
  replicas: 1                                                            新建副本数量为1
  selector:
    matchLabels:
      app: nginx
  template:
    metadata:
      labels:
        app: nginx
    spec:
      containers:
        - name: nginx
          image: nginx
          volumeMounts:                                          容器指定卷为下面兴建的卷
          - name: config-volume
            mountPath: /etc/nginx/conf.d                   指定挂载路径
      volumes:                                                     新建的卷包括nginxconf文件
        - name: config-volume
          configMap:
            name: nginxconf
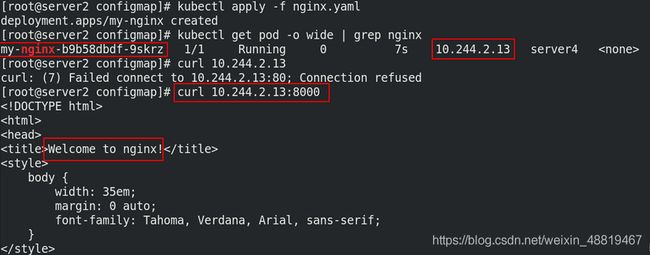
4、查看清单,访问8000端口
访问8000端口,发现成功
kubectl apply -f nginx.yaml
kubectl get pod -o wide | grep nginx
curl 10.244.2.13:8000
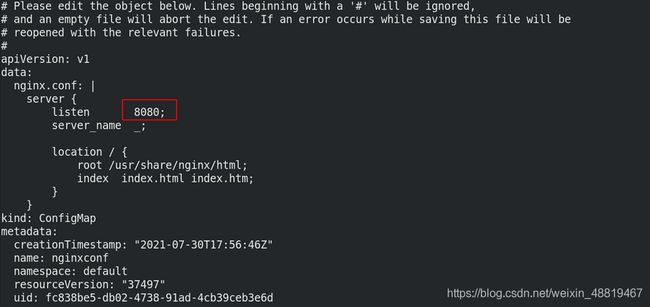
4、更改nginxconf的cm内容
为和前面实验做对比,改变端口为8080
kubectl edit cm nginxconf

apiVersion: v1
data:
  nginx.conf: |
    server {
        listen       8080;
        server_name  _;

        location / {
            root /usr/share/nginx/html;
            index  index.html index.htm;
        }
    }
kind: ConfigMap
metadata:
  creationTimestamp: "2021-07-30T17:56:46Z"
  name: nginxconf
  namespace: default
  resourceVersion: "37497"
  uid: fc838be5-db02-4738-91ad-4cb39ceb3e6d
 6、对8080端口进行访问
访问是8080端口发现失败,但从pod中查询nginx的配置文件,发现已经更改为8080。
curl 10.244.2.13:8080
kubectl exec my-nginx-b9b58dbdf-9skrz cat /etc/nginx/conf.d/nginx.conf
 7、上面现象说明configmap热更新已生效,但访问Pod的8080端口是无效的
这时就需要手动触发Pod滚动更新, 这样才能再次加载nginx的配置文件
kubectl patch deployments.apps my-nginx --patch '{"spec": {"template": {"metadata": {"annotations": {"version/config": "20210731"}}}}}'
8、重新访问8080,发现成功
kubectl get pod -o wide | grep nginx
curl 10.244.2.16:8080
