Swagger 源码解析
Swagger 源码解析
文章目录
- Swagger 源码解析
-
- 前言
- Swagger2整合
- 源码解析
-
- DocumentationPluginsBootstrapper 加载插件
- buildContext
- scanDocumentation
- Swagger2Controller
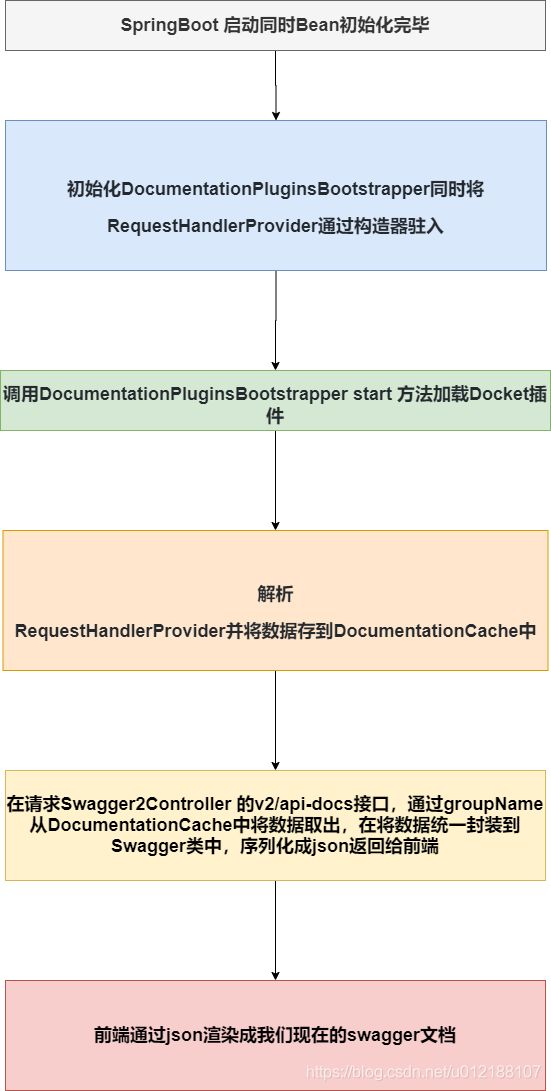
- 总结执行步骤
前言
最近要改造公司的Swagger2,在改造前肯定要先了解下Swagger2的源码啦,通过Docket类定位并查看Swagger2的源码包,大致了解了Swagger2是如何运作了,了解了原理,改造起来就得心应手了~
首先,还是先从整合开始讲解。
Swagger2整合
Swagger2的整合非常简单,3步搞定:
- 导maven包
        <dependency>
            <groupId>io.springfoxgroupId>
            <artifactId>springfox-swagger2artifactId>
            <version>2.9.2version>
        dependency>
        <dependency>
            <groupId>io.springfoxgroupId>
            <artifactId>springfox-swagger-uiartifactId>
            <version>2.9.2version>
        dependency>
- 配置Swagger2
SpringBoot中创建配置类
/**
 * @program: lemon-wst
 * @author: Mr.Lemon
 * @create: 2020/7/11
 **/
@Configuration
//@EnableSwaggerBootstrapUI
@EnableSwagger2
public class Swagger2Config {

    @Bean
    public Docket createRestApi() {
        return new Docket(DocumentationType.SWAGGER_2)
                .apiInfo(apiInfo())
                .select()
                .apis(RequestHandlerSelectors.basePackage("com.lemon.lemonwst.controller"))
                .paths(PathSelectors.any())
                .build();
    }

    private ApiInfo apiInfo() {
        return new ApiInfoBuilder()
                .title("测试 APIs")
                .description("测试文档")
                .termsOfServiceUrl("http://localhost:8001/")
                .contact(new Contact("Mr.Lemon", "http://www.iamlucky.top/", "[email protected]"))
                .version("1.0")
                .build();
    }
}
- 静态资源配置(现在版本的SpringBoot不需要了~)
最新版的SpringBoot版本中已经不需要配置也能成功了,但是还是记录下。
在 WebConfig 中配置静态资源服务。
/**
 * @program: lemon-wst
 * @author: Mr.Lemon
 * @create: 2020/7/11
 **/
@Configuration
public class WebConfig implements WebMvcConfigurer {

    @Override
    public void addResourceHandlers(ResourceHandlerRegistry registry) {
            registry.addResourceHandler("swagger-ui.html").addResourceLocations("classpath:/META-INF/resources/");
            registry.addResourceHandler("/webjars/**").addResourceLocations("classpath:/META-INF/resources/webjars/");
    }
}
源码解析
DocumentationPluginsBootstrapper 加载插件
包中有个类叫 DocumentationPluginsBootstrapper ,其实现了Spring 的 SmartLifecycle 接口, 这个接口的作用是在Spring Bean都加载和初始化完毕时执行。
这里只放出类中的关键代码。
/**
 * After an application context refresh, builds and executes all DocumentationConfigurer instances found in the
 * application context.
 *
 * If no instances DocumentationConfigurer are found a default one is created and executed.
 */
@Component
public class DocumentationPluginsBootstrapper implements SmartLifecycle {
    ... ...

      @Override
  public void start() {
    if (initialized.compareAndSet(false, true)) {
      log.info("Context refreshed");
      List<DocumentationPlugin> plugins = pluginOrdering()
          .sortedCopy(documentationPluginsManager.documentationPlugins());
      log.info("Found {} custom documentation plugin(s)", plugins.size());
      for (DocumentationPlugin each : plugins) {
        DocumentationType documentationType = each.getDocumentationType();
        if (each.isEnabled()) {
          scanDocumentation(buildContext(each));
        } else {
          log.info("Skipping initializing disabled plugin bean {} v{}",
              documentationType.getName(), documentationType.getVersion());
        }
      }
    }
  }

  ... ...

}
在将几段关键代码单独拎出来早放一起(看文中代码注释):
// 这是我们一开始创建的 Docket 对象
@Bean
public Docket createRestApi() {
    return new Docket(DocumentationType.SWAGGER_2)
            .apiInfo(apiInfo())
            .select()
            .apis(RequestHandlerSelectors.basePackage("com.lemon.lemonwst.controller"))
            .paths(PathSelectors.any())
            .build();
}

// Docket 的实现如下,是springfox定义的一个Documentation插件

public class Docket implements DocumentationPlugin {
    ... ...
}

// Sping Bean初始化完毕后循环获取插件

for (DocumentationPlugin each : plugins) {
        DocumentationType documentationType = each.getDocumentationType();
        if (each.isEnabled()) {
          scanDocumentation(buildContext(each));
        } else {
          log.info("Skipping initializing disabled plugin bean {} v{}",
              documentationType.getName(), documentationType.getVersion());
        }
}
在来看下DocumentationPluginsBootstrapper 他的构造函数:
  @Autowired
  public DocumentationPluginsBootstrapper(
      DocumentationPluginsManager documentationPluginsManager,
      List<RequestHandlerProvider> handlerProviders,
      DocumentationCache scanned,
      ApiDocumentationScanner resourceListing,
      TypeResolver typeResolver,
      Defaults defaults,
      ServletContext servletContext,
      Environment environment) {

    this.documentationPluginsManager = documentationPluginsManager;
    this.handlerProviders = handlerProviders;
    this.scanned = scanned;
    this.resourceListing = resourceListing;
    this.environment = environment;
    this.defaultConfiguration = new DefaultConfiguration(defaults, typeResolver, servletContext);
  }
在初始化时将 List handlerProviders,通过构造器驻入,驻入了进来,记住这个变量,后面有用
buildContext
Spring Bean初始化完成后,将Controller的信息都存到了List handlerProviders 里去,这里的信息包括 Controller类、他上面的注解、类和方法的requestMapping、方法注解等,那么springfox 在拿到这个之后,就可以拿到我们平时在写代码时放的swagger注解,这样后面不用我说也知道,信息都有了剩下的就是解析数据的问题了。这里不再深入,可以看下 springfox.documentation.spring.web.plugins.DocumentationPluginsBootstrapper#buildContext 的源码。
发出关键代码:
  private DocumentationContextBuilder defaultContextBuilder(DocumentationPlugin plugin) {
    DocumentationType documentationType = plugin.getDocumentationType();
    List<RequestHandler> requestHandlers = from(handlerProviders)
        .transformAndConcat(handlers())
        .toList();
    List<AlternateTypeRule> rules = from(nullToEmptyList(typeConventions))
          .transformAndConcat(toRules())
          .toList();
    return documentationPluginsManager
        .createContextBuilder(documentationType, defaultConfiguration)
        .rules(rules)
        .requestHandlers(combiner().combine(requestHandlers));
  }
这里总结起来就是把requestHandler的消息 解析到DocumentContext里
scanDocumentation
这块这是将 DocumentContext的消息放到 DocumentationCache 中去:
  private final DocumentationCache scanned;


  // 将 DocumentContext的消息放到 DocumentationCache 中去:
   private void scanDocumentation(DocumentationContext context) {
    try {
      scanned.addDocumentation(resourceListing.scan(context));
    } catch (Exception e) {
      log.error(String.format("Unable to scan documentation context %s", context.getGroupName()), e);
    }
  }


  public Documentation scan(DocumentationContext context) {
    ApiListingReferenceScanResult result = apiListingReferenceScanner.scan(context);
    ApiListingScanningContext listingContext = new ApiListingScanningContext(context,
        result.getResourceGroupRequestMappings());

    Multimap<String, ApiListing> apiListings = apiListingScanner.scan(listingContext);
    Set<Tag> tags = toTags(apiListings);
    tags.addAll(context.getTags());
    DocumentationBuilder group = new DocumentationBuilder()
        .name(context.getGroupName())
        .apiListingsByResourceGroupName(apiListings)
        .produces(context.getProduces())
        .consumes(context.getConsumes())
        .host(context.getHost())
        .schemes(context.getProtocols())
        .basePath(context.getPathProvider().getApplicationBasePath())
        .extensions(context.getVendorExtentions())
        .tags(tags);

    Set<ApiListingReference> apiReferenceSet = newTreeSet(listingReferencePathComparator());
    apiReferenceSet.addAll(apiListingReferences(apiListings, context));

    ResourceListing resourceListing = new ResourceListingBuilder()
        .apiVersion(context.getApiInfo().getVersion())
        .apis(from(apiReferenceSet).toSortedList(context.getListingReferenceOrdering()))
        .securitySchemes(context.getSecuritySchemes())
        .info(context.getApiInfo())
        .build();
    group.resourceListing(resourceListing);
    return group.build();
  }
Swagger2Controller
最后在来看下 Swagger2Controller,这块就是 swagger 接口数据请求的 Controller,我们Spring中编写的Controller 的swagger信息都是通过这个接口打包成json传输给前端在进行渲染的: /v2/api-docs。整个信息获取的流程就是:
- 从DocumentationCache
- 解析数据,并组装成Swagger对象
- 序列化成json传到前端
关键代码整合:
@Controller
@ApiIgnore
public class Swagger2Controller {
     public static final String DEFAULT_URL = "/v2/api-docs";


    // json参数组装
     @RequestMapping(
          value = DEFAULT_URL,
          method = RequestMethod.GET,
          produces = { APPLICATION_JSON_VALUE, HAL_MEDIA_TYPE })
      @PropertySourcedMapping(
          value = "${springfox.documentation.swagger.v2.path}",
          propertyKey = "springfox.documentation.swagger.v2.path")
      @ResponseBody
      public ResponseEntity<Json> getDocumentation(
          @RequestParam(value = "group", required = false) String swaggerGroup,
          HttpServletRequest servletRequest) {

        String groupName = Optional.fromNullable(swaggerGroup).or(Docket.DEFAULT_GROUP_NAME);

        // 获取我们前面花了大量篇幅说的 Documentation
        Documentation documentation = documentationCache.documentationByGroup(groupName);
        if (documentation == null) {
          LOGGER.warn("Unable to find specification for group {}", groupName);
          return new ResponseEntity<Json>(HttpStatus.NOT_FOUND);
        }

        // 解析转成Swagger类
        Swagger swagger = mapper.mapDocumentation(documentation);
        UriComponents uriComponents = componentsFrom(servletRequest, swagger.getBasePath());
        swagger.basePath(Strings.isNullOrEmpty(uriComponents.getPath()) ? "/" : uriComponents.getPath());
        if (isNullOrEmpty(swagger.getHost())) {
          swagger.host(hostName(uriComponents));
        }

        // 序列化传到前端
        return new ResponseEntity<Json>(jsonSerializer.toJson(swagger), HttpStatus.OK);
      }
}

// 转成swagger类的方法
@Override
public Swagger mapDocumentation(Documentation from) {
    if ( from == null ) {
        return null;
    }

    Swagger swagger = new Swagger();

    swagger.setVendorExtensions( vendorExtensionsMapper.mapExtensions( from.getVendorExtensions() ) );
    swagger.setSchemes( mapSchemes( from.getSchemes() ) );
    swagger.setPaths( mapApiListings( from.getApiListings() ) );
    swagger.setHost( from.getHost() );
    swagger.setDefinitions( modelMapper.modelsFromApiListings( from.getApiListings() ) );
    swagger.setSecurityDefinitions( securityMapper.toSecuritySchemeDefinitions( from.getResourceListing() ) );
    ApiInfo info = fromResourceListingInfo( from );
    if ( info != null ) {
        swagger.setInfo( mapApiInfo( info ) );
    }
    swagger.setBasePath( from.getBasePath() );
    swagger.setTags( tagSetToTagList( from.getTags() ) );
    List<String> list2 = from.getConsumes();
    if ( list2 != null ) {
        swagger.setConsumes( new ArrayList<String>( list2 ) );
    }
    else {
        swagger.setConsumes( null );
    }
    List<String> list3 = from.getProduces();
    if ( list3 != null ) {
        swagger.setProduces( new ArrayList<String>( list3 ) );
    }
    else {
        swagger.setProduces( null );
    }

    return swagger;
}
