vue-双向绑定
实现过程
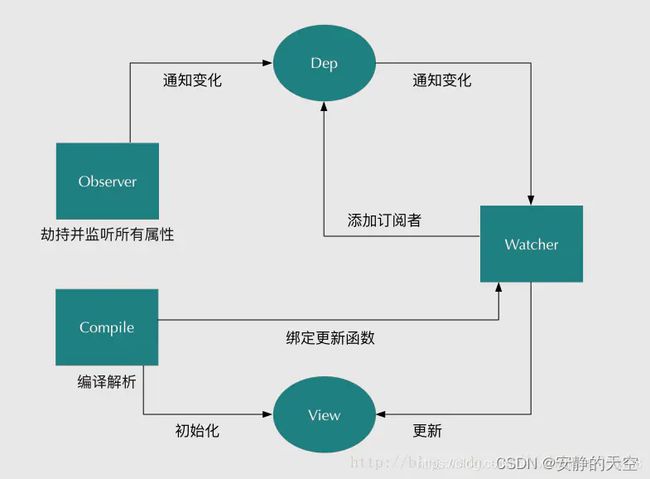
我们已经知道如何实现数据的双向绑定了,那么首先要对数据进行劫持监听,所以我们首先要设置一个监听器Observer,用来监听所有的属性,当属性变化时,就需要通知订阅者Watcher,看是否需要更新。因为属性可能是多个,所以会有多个订阅者,故我们需要一个消息订阅器Dep来专门收集这些订阅者,并在监听器Observer和订阅者Watcher之间进行统一的管理。因为在节点元素上可能存在一些指令,所以我们还需要有一个指令解析器Compile,对每个节点元素进行扫描和解析,将相关指令初始化成一个订阅者Watcher,并替换模板数据并绑定相应的函数,这时候当订阅者Watcher接受到相应属性的变化,就会执行相对应的更新函数,从而更新视图。
整理上面的思路,我们需要实现几个步骤,来完成双向绑定:
- Observer 监听器,用来劫持并监听所有属性,如果有变动的,就通知订阅者。
- Dep 存储依赖和派发更新,监听器和订阅者的桥梁。
- Watcher 订阅者,可以收到属性的变化通知并执行相应的函数,从而更新视图。
- Compile 解析器,可以扫描和解析每个节点的相关指令,并根据初始化模板数据以及初始化相应的订阅器
一、实现一个监听器
- 数据监听器的核心方法就是Object.defineProperty( ),通过遍历循环对所有属性值进行监听劫持监听
- 在属性的 get里面判断是否需要需要添加订阅者,这是为了让Watcher在初始化时触发
- 在属性的 set方法中,如果函数变化,就会通知对应的所有订阅者,订阅者们将会执行相对应的更新函数
class Observe {
  constructor(data) {
    this.walk(data)
  }

  // 遍历对象属性
  walk(data) {
    Object.keys(data).forEach(key => {
      // 如果是对象则继续遍历
      if (typeof data[key] === 'object') {
        this.walk(data[key])
      }
      this.define(data, key, data[key])
    })
  }

  // 劫持对象对应的值
  define(data, key, val) {
    let dep = new Dep()
    Object.defineProperty(data, key, {
      get: () => {
        if (Dep.target) {
          dep.add()
        }
        return val
      },
      set: (newVal) => {
        if (newVal === val) return
        val = newVal
        dep.notify()
      }
    })
  }
}
二、实现一个Dep
- addSub方法 用于收集订阅者
- notify方法 执行相对应的更新函数
- Dep.target 的作用在Watch类中有详细说明
class Dep {
  constructor() {
    this.depArray = []
  }

  // 添加依赖到数组中
  add() {
    this.depArray.push(Dep.target)
  }

  // 执行依赖中的更新函数
  notify() {
    this.depArray.forEach((item) => {
      item.update()
    })
  }
}
三、实现一个 Watch
- 缓存Watch中this 到 Dep.target
- 强制执行监听器里的get函数
- update用于执行更新方法
class Watch {
  constructor(vm, key, callback) {
    this.vm = vm
    this.key = key
    this.callback = callback
    this.val = this.get()
  }

  // 更新函数
  update() {
    let newVal = this.vm.data[this.key]
    let oldVal = this.val
    if (newVal !== oldVal) {
      this.callback(newVal, oldVal)
    }
  }

  // 绑定依赖
  get() {
    Dep.target = this
    let val = this.vm.data[this.key]
    Dep.target = null
    return val
  }
}
四、实现一个 VueNew
- 实现observer和watcher的关联
class VueNew {
  constructor(dom, data, key) {
    this.data = data
    new Observe(data)
    dom.innerHTML = this.data[key]
    new Watch(this, key, (newVal, oldVal) => {
      dom.innerHTML = newVal
    })
  }
}
五、index.html
- 以上步骤完成数据驱动双向绑定,测试下
<body>
    <h1 id="name">{{name}}</h1>
</body>

<script src="./router.js"></script>

<script>
     var ele = document.querySelector('#name');
     var selfVue = new VueNew({
         name:'hello world'
     },ele,'name');

     window.setTimeout(function() {
         console.log('name值改变了');
         selfVue.name = 'byebye world';
     },2000);
</script>
六、实现指令解析器Compile
- 解析模板指令,并替换模板数据,初始化视图
- 将模板指令对应的节点绑定对应的更新函数,初始化相应的订阅器
class Compile {
  constructor(el, vm) {
    this.vm = vm
    this.el = document.querySelector(el)
    this.fragment = null
    this.init()
  }

  init() {
    if (this.el) {
      this.fragment = this.nodeToFragment(this.el)
      this.compileElement(this.fragment)
      this.el.appendChild(this.fragment)
    } else {
      console.log('Dom元素不存在')
    }
  }

  // 为了解析模板,首先要获得dom元素,然后对含有dom元素上含有指令的节点进行处理
  // 这个过程对dom元素的操作比较繁琐,所以我们可以先建一个fragment片段
  // 将需要解析的dom元素存到fragment片段中在做处理:
  nodeToFragment(el) {
    // createdocumentfragment()方法创建了一虚拟的节点对象,节点对象包含所有属性和方法。
    let fragment = document.createDocumentFragment()
    let child = el.firstChild
    while (child) {
      // 将Dom元素移入fragment中
      fragment.appendChild(child)
      child = el.firstChild
    }
    return fragment
  }

  // 遍历各个节点,对含有相关指定的节点进行特殊处理
  compileElement(el) {
    // childNodes属性返回节点的子节点集合,以 NodeList 对象。
    let childNodes = el.childNodes
    let self = this;
    // slice() 方法可从已有的数组中返回选定的元素。
    [].slice.call(childNodes).forEach((node) => {
      let reg = /\{\{(.*)\}\}/
      // textContent 属性设置或返回指定节点的文本内容
      let text = node.textContent
      // 判断是否符合{{}}的指令
      if (this.isTextNode(node) && reg.test(text)) {
        // exec() 方法用于检索字符串中的正则表达式的匹配。
        // 返回一个数组,其中存放匹配的结果。如果未找到匹配,则返回值为 null。
        self.compileText(node, reg.exec(text)[1])
      }
      if (node.childNodes && node.childNodes.length) {
        // 继续递归遍历子节点
        self.compileElement(node)
      }
    })
  }

  compileText(node, exp) {
    let initText = this.vm[exp]
    // 将初始化的数据初始化到视图中
    this.updateText(node, initText)
    new Watch(this.vm, exp, (value) => {
      this.updateText(node, value)
    })
  }

  updateText(node, value) {
    node.textContent = typeof value == 'undefined' ? '' : value
  }

  isTextNode(node) {
    return node.nodeType == 3
  }
}
七、改造下VueNew
class VueNew {
  constructor(options) {
    this.data = options.data
    this.methods = options.methods
    Object.keys(this.data).forEach((key) => {
      this.proxyKeys(key)
    })
    new Observe(this.data)
    new Compile(options.el, this)
  }

  proxyKeys(key) {
    Object.defineProperty(this, key, {
      enumerable: false,
      configurable: true,
      get: () => {
        return this.data[key]
      },
      set: (newVal) => {
        this.data[key] = newVal
      }
    })
  }
}
八、改造下index.html
- 至此已经简单实现了vue双向绑定的方法了,大功告成
<div id="app">
  <h1>{{title}}</h1>
  <h2>{{name}}</h2>
  <h3>{{content}}</h3>
</div>
</body>
<script src="./router.js"></script>
<script>
  var selfVue = new VueNew({
    el:'#app',
    data:{
      title:'aaa',
      name:'bbb',
      content:'ccc'
    }
  });
  window.setTimeout(function() {
    selfVue.title = 'ddd';
    selfVue.name = 'eee';
    selfVue.content = 'fff'
  },2000);
</script>
