Tomcat架构【官网翻译】
文章目录
-
- 1.总览
- 2.Tomcat启动过程
-
- 2.1源码解析
-
-
- 序列1:从命令行启动
- 序列2:处理命令行参数
-
- 2.2时序图
- 3.请求处理流程
-
- 3.1请求处理时序图
- 3.2权限认证时序图:
- 4.源码编译
Tomcat架构【官网翻译】–以tomcat9.0.31版本分析
首先,我们看下一个tomcat的server.xml配置【 https://github.com/apache/tomcat/blob/9.0.x/conf/server.xml】
<Server port="8005" shutdown="SHUTDOWN">
  <Listener className="org.apache.catalina.startup.VersionLoggerListener" />


  <Listener className="org.apache.catalina.core.AprLifecycleListener" SSLEngine="on" />

  <Listener className="org.apache.catalina.core.JreMemoryLeakPreventionListener" />
  <Listener className="org.apache.catalina.mbeans.GlobalResourcesLifecycleListener" />
  <Listener className="org.apache.catalina.core.ThreadLocalLeakPreventionListener" />


  <GlobalNamingResources>

    <Resource name="UserDatabase" auth="Container"
              type="org.apache.catalina.UserDatabase"
              description="User database that can be updated and saved"
              factory="org.apache.catalina.users.MemoryUserDatabaseFactory"
              pathname="conf/tomcat-users.xml" />
  GlobalNamingResources>


  <Service name="Catalina">


    <Connector port="8080" protocol="HTTP/1.1"
               connectionTimeout="20000"
               redirectPort="8443" />


    <Engine name="Catalina" defaultHost="localhost">


      <Realm className="org.apache.catalina.realm.LockOutRealm">

        <Realm className="org.apache.catalina.realm.UserDatabaseRealm"
               resourceName="UserDatabase"/>
      Realm>

      <Host name="localhost"  appBase="webapps"
            unpackWARs="true" autoDeploy="true">


        <Valve className="org.apache.catalina.valves.AccessLogValve" directory="logs"
               prefix="localhost_access_log" suffix=".txt"
               pattern="%h %l %u %t "%r" %s %b" />

      Host>
    Engine>
  Service>
Server>
1.总览
【https://tomcat.apache.org/tomcat-9.0-doc/architecture/overview.html】
术语
- Server
Server代表整个tomcat容器,tomcat自身提供了一个实现,很少用户会去自定义自己的实现
- Service
Service是位于Server下的一个直接组件,它绑定了一个或者多个Connector到一个Engine。这个接口也很少用户会去自定义
- Engine
Engine代表为特定Service提供服务的管道。Service可能会有多个Connector,Engine接收和处理从这些Connector来的所有请求,然后返回Response给Connector,继而再返回给Client
- Host
通过Host,Tomcat Server可以关联上一个域名,比如www.yourcompany.com。一个Engine可能会包含多个Host,Host可以支持二级域名,比如yourcompany.com和abc.yourcompany.com
- Connector
Connector用于处理与客户端的通讯。Tomcat里面提供了一些Connector。例如Http Connector,当tomcat作为一个标准的服务器时,用于处理http请求。另外,AJP Connector,它实现了AJP协议,用于连接Tomcat到一个web服务器,比如Apache HTTPD server
- Context
一个Context代表一个web应用。一个Host里面可能包含多个Context,每个Context有一个唯一的路劲
2.Tomcat启动过程
2.1源码解析
【https://tomcat.apache.org/tomcat-9.0-doc/architecture/startup/serverStartup.txt】
序列1:从命令行启动
类:org.apache.catalina.startup.Bootstrap
a)设置classloaders
        commonLoader (common)-> System Loader
        sharedLoader (shared)-> commonLoader -> System Loader
        catalinaLoader(server) -> commonLoader -> System Loader
源码如下Bootstrap类:
    private void initClassLoaders() {
        try {
            commonLoader = createClassLoader("common", null);
            if (commonLoader == null) {
                // no config file, default to this loader - we might be in a 'single' env.
                commonLoader = this.getClass().getClassLoader();
            }
            catalinaLoader = createClassLoader("server", commonLoader);
            sharedLoader = createClassLoader("shared", commonLoader);
        } catch (Throwable t) {
            handleThrowable(t);
            log.error("Class loader creation threw exception", t);
            System.exit(1);
        }
    }
b)加载启动类(通过反射)
        org.apache.catalina.startup.Catalina
        setParentClassloader -> sharedLoader
        Thread.contextClassloader -> catalinaLoader
源码如下Bootstrap类:
    public void init() throws Exception {

        initClassLoaders();

        Thread.currentThread().setContextClassLoader(catalinaLoader);

        SecurityClassLoad.securityClassLoad(catalinaLoader);

        // Load our startup class and call its process() method
        if (log.isDebugEnabled())
            log.debug("Loading startup class");
        Class<?> startupClass = catalinaLoader.loadClass("org.apache.catalina.startup.Catalina");
        Object startupInstance = startupClass.getConstructor().newInstance();

        // Set the shared extensions class loader
        if (log.isDebugEnabled())
            log.debug("Setting startup class properties");
        String methodName = "setParentClassLoader";
        Class<?> paramTypes[] = new Class[1];
        paramTypes[0] = Class.forName("java.lang.ClassLoader");
        Object paramValues[] = new Object[1];
        paramValues[0] = sharedLoader;
        Method method =
            startupInstance.getClass().getMethod(methodName, paramTypes);
        method.invoke(startupInstance, paramValues);

        catalinaDaemon = startupInstance;
    }
c)Bootstrap.daemon.init()完成
序列2:处理命令行参数
类org.apache.catalina.startup.Bootstrap 这里我们假设命令参数是start
a)Catalina.setAwait(true);
b)Catalina.load()
b1)initDirs()
原文说设置一些属性,如catalina.home,但源码没看到
源码如下Catalina类:
    protected void initDirs() {
        String temp = System.getProperty("java.io.tmpdir");
        if (temp == null || (!(new File(temp)).isDirectory())) {
            log.error(sm.getString("embedded.notmp", temp));
        }
    }
b2)initNaming设置系统属性
b3)createStartDigester()配置digester用于解析server.xml
例如org.apache.catalina.core.StandardServer代表整个tomcat,org.apache.catalina.deploy.NamingResources用于处理JNDI相关,org.apache.catalina.LifecycleListener用于主要组件的start/stop事件监听,org.apache.catalina.core.StandardService,org.apache.catalina.Connector用于处理请求等
源码如下(原方法是在太长,我删减了些)Catalina类:
    protected Digester createStartDigester() {
        long t1=System.currentTimeMillis();
        // Initialize the digester
        Digester digester = new Digester();
        digester.setValidating(false);
        digester.setRulesValidation(true);
        Map<Class<?>, List<String>> fakeAttributes = new HashMap<>();
        // Ignore className on all elements
        List<String> objectAttrs = new ArrayList<>();
        objectAttrs.add("className");
        fakeAttributes.put(Object.class, objectAttrs);
        // Ignore attribute added by Eclipse for its internal tracking
        List<String> contextAttrs = new ArrayList<>();
        contextAttrs.add("source");
        fakeAttributes.put(StandardContext.class, contextAttrs);
        // Ignore Connector attribute used internally but set on Server
        List<String> connectorAttrs = new ArrayList<>();
        connectorAttrs.add("portOffset");
        fakeAttributes.put(Connector.class, connectorAttrs);
        digester.setFakeAttributes(fakeAttributes);
        digester.setUseContextClassLoader(true);

        // Configure the actions we will be using
        digester.addObjectCreate("Server",
                                 "org.apache.catalina.core.StandardServer",
                                 "className");
        digester.addSetProperties("Server");
        digester.addSetNext("Server",
                            "setServer",
                            "org.apache.catalina.Server");

...

        // Add RuleSets for nested elements
        digester.addRuleSet(new NamingRuleSet("Server/GlobalNamingResources/"));
        digester.addRuleSet(new EngineRuleSet("Server/Service/"));
        digester.addRuleSet(new HostRuleSet("Server/Service/Engine/"));
        digester.addRuleSet(new ContextRuleSet("Server/Service/Engine/Host/"));
        addClusterRuleSet(digester, "Server/Service/Engine/Host/Cluster/");
        digester.addRuleSet(new NamingRuleSet("Server/Service/Engine/Host/Context/"));

        // When the 'engine' is found, set the parentClassLoader.
        digester.addRule("Server/Service/Engine",
                         new SetParentClassLoaderRule(parentClassLoader));
        addClusterRuleSet(digester, "Server/Service/Engine/Cluster/");

        long t2=System.currentTimeMillis();
        if (log.isDebugEnabled()) {
            log.debug("Digester for server.xml created " + ( t2-t1 ));
        }
        return digester;

    }
b4)加载server.xml,并通过上方创建的digester解析,生成对象,但实际还没有start
例如Http11NioProtocol的生成,debug截图

源码如下Digester类:
    public Object parse(InputSource input) throws IOException, SAXException {
        configure();
        getXMLReader().parse(input);
        return root;
    }
b5)设置System.out和System.err到SystemLogHandler类
源码如下Catalina类:
    protected void initStreams() {
        // Replace System.out and System.err with a custom PrintStream
        System.setOut(new SystemLogHandler(System.out));
        System.setErr(new SystemLogHandler(System.err));
    }
b6)层层调用所有的组件调用初始化方法
例如StandardServer的init
    public final synchronized void init() throws LifecycleException {
        if (!state.equals(LifecycleState.NEW)) {
            invalidTransition(Lifecycle.BEFORE_INIT_EVENT);
        }

        try {
            setStateInternal(LifecycleState.INITIALIZING, null, false);
            initInternal();
            setStateInternal(LifecycleState.INITIALIZED, null, false);
        } catch (Throwable t) {
            handleSubClassException(t, "lifecycleBase.initFail", toString());
        }
    }

		protected void initInternal() throws LifecycleException {

        super.initInternal();

        // Initialize utility executor
        reconfigureUtilityExecutor(getUtilityThreadsInternal(utilityThreads));
        register(utilityExecutor, "type=UtilityExecutor");

        // Register global String cache
        // Note although the cache is global, if there are multiple Servers
        // present in the JVM (may happen when embedding) then the same cache
        // will be registered under multiple names
        onameStringCache = register(new StringCache(), "type=StringCache");

        // Register the MBeanFactory
        MBeanFactory factory = new MBeanFactory();
        factory.setContainer(this);
        onameMBeanFactory = register(factory, "type=MBeanFactory");

        // Register the naming resources
        globalNamingResources.init();//globalNamingResources的初始化

        // Populate the extension validator with JARs from common and shared
        // class loaders
        if (getCatalina() != null) {
            ClassLoader cl = getCatalina().getParentClassLoader();
            // Walk the class loader hierarchy. Stop at the system class loader.
            // This will add the shared (if present) and common class loaders
            while (cl != null && cl != ClassLoader.getSystemClassLoader()) {
                if (cl instanceof URLClassLoader) {
                    URL[] urls = ((URLClassLoader) cl).getURLs();
                    for (URL url : urls) {
                        if (url.getProtocol().equals("file")) {
                            try {
                                File f = new File (url.toURI());
                                if (f.isFile() &&
                                        f.getName().endsWith(".jar")) {
                                    ExtensionValidator.addSystemResource(f);
                                }
                            } catch (URISyntaxException e) {
                                // Ignore
                            } catch (IOException e) {
                                // Ignore
                            }
                        }
                    }
                }
                cl = cl.getParent();
            }
        }
        // Initialize our defined Services
        for (int i = 0; i < services.length; i++) {
            services[i].init();//services的初始化
        }
    }
c)Catalina.start()
c1)启动NamingContext,并绑定所有JNDI
c2)启动services
StandardService -> starts Engine (ContainerBase -> Realm,Cluster etc)
源码如下StandardServer类:
    protected void startInternal() throws LifecycleException {

        fireLifecycleEvent(CONFIGURE_START_EVENT, null);
        setState(LifecycleState.STARTING);

        globalNamingResources.start();

        // Start our defined Services
        synchronized (servicesLock) {
            for (int i = 0; i < services.length; i++) {
                services[i].start();//Services启动
            }
        }

        if (periodicEventDelay > 0) {
            monitorFuture = getUtilityExecutor().scheduleWithFixedDelay(
                    new Runnable() {
                        @Override
                        public void run() {
                            startPeriodicLifecycleEvent();
                        }
                    }, 0, 60, TimeUnit.SECONDS);
        }
    }
c3)StandardHost的启动
作用:
1.配置一个ErrorReportValve根据HTTP的错误码输出对应HTML
2.开启Valves(例如前面这个ErrorReportValve)
3.配置StandardHostValve,用于绑定WebappClassLoader到线程上下文,为request查找session
4.启动HostConfig组件,这个组件会去部署所有的webapps
源码如下HostConfig类:
    protected void deployApps() {

        File appBase = host.getAppBaseFile();
        File configBase = host.getConfigBaseFile();
        String[] filteredAppPaths = filterAppPaths(appBase.list());
        // Deploy XML descriptors from configBase
        deployDescriptors(configBase, configBase.list());
        // Deploy WARs
        deployWARs(appBase, filteredAppPaths);
        // Deploy expanded folders
        deployDirectories(appBase, filteredAppPaths);

    }
HostConfig之后会创建Digester,Digester会调用ContextConfig.start()用于处理web.xml
c4)在StandardEngine容器的生命周期内,会启动一个后台线程监控context是否有变更。如果context变更了(根据war文件/context.xml文件/web.xml文件的时间戳),热加载将会被触发(stop/remove/deploy/start)
d)Tomcat接收http请求
d1)通过ServerSocket.accept()接收请求,接收是在一个单独的线程中进行的。
其实应该是在Acceptor这个类的run方法中,这个文档可能是很久之前的,还用BIO
源码如下Acceptor类:
@Override
    public void run() {

        int errorDelay = 0;

        // Loop until we receive a shutdown command
        while (endpoint.isRunning()) {

            // Loop if endpoint is paused
            while (endpoint.isPaused() && endpoint.isRunning()) {
                state = AcceptorState.PAUSED;
                try {
                    Thread.sleep(50);
                } catch (InterruptedException e) {
                    // Ignore
                }
            }

            if (!endpoint.isRunning()) {
                break;
            }
            state = AcceptorState.RUNNING;

            try {
                ...
                try {
                    // Accept the next incoming connection from the server
                    // socket
                    socket = endpoint.serverSocketAccept();//接收请求
                } catch (Exception ioe) {
                    ...
                }
                ...
            } catch (Throwable t) {
                ...
            }
        }
        state = AcceptorState.ENDED;
    }
d2)线程池ThreadPoolExecutor指派TaskThread线程处理
源码如下AbstractEndpoint类:
    public boolean processSocket(SocketWrapperBase<S> socketWrapper,
            SocketEvent event, boolean dispatch) {
        try {
            if (socketWrapper == null) {
                return false;
            }
            SocketProcessorBase<S> sc = null;
            if (processorCache != null) {
                sc = processorCache.pop();
            }
            if (sc == null) {
                sc = createSocketProcessor(socketWrapper, event);
            } else {
                sc.reset(socketWrapper, event);
            }
            Executor executor = getExecutor();
            if (dispatch && executor != null) {
                executor.execute(sc);//提交线程池执行处理
            } else {
                sc.run();
            }
        } catch (RejectedExecutionException ree) {
            getLog().warn(sm.getString("endpoint.executor.fail", socketWrapper) , ree);
            return false;
        } catch (Throwable t) {
            ExceptionUtils.handleThrowable(t);
            // This means we got an OOM or similar creating a thread, or that
            // the pool and its queue are full
            getLog().error(sm.getString("endpoint.process.fail"), t);
            return false;
        }
        return true;
    }
d3)Http11Processor调用process处理
d4)这个http会使用Http11InputBuffer来解析。解析请求头、请求行等信息,然后把这些信息存储到一个Coyote request(不是HTTP request)中,这个request包含所有HTTP信息,如主机,端口,scheme等
源码如下(原方法太长了,我删了很多代码)Http11InputBuffer类:
    boolean parseRequestLine(boolean keptAlive, int connectionTimeout, int keepAliveTimeout)
            throws IOException {
    ...
            if ((end - parsingRequestLineStart) > 0) {
                request.protocol().setBytes(byteBuffer.array(), parsingRequestLineStart,
                        end - parsingRequestLineStart);//设置请求的协议,如HTTP/1.1
            } else {
                request.protocol().setString("");
            }
            parsingRequestLine = false;
            parsingRequestLinePhase = 0;
            parsingRequestLineEol = false;
            parsingRequestLineStart = 0;
            return true;
        ...
    }
d5)Processor有一个Adapter的引用,对于http请求来说,它就是CoyoteAdapter。上方的解析完成之后,Adapter.service()会被调用。在这个service方法中,会创建实现了接口HttpServletRequest的Request对象,和实现了HttpServletResponse接口的Response对象,把cookies和context等关联给到request对象
源码如下(删了部分代码)Mapper类:
    private final void internalMap(CharChunk host, CharChunk uri,
            String version, MappingData mappingData) throws IOException {
       ...
        mappingData.context = contextVersion.object;
        mappingData.contextSlashCount = contextVersion.slashCount;

        // Wrapper mapping
        if (!contextVersion.isPaused()) {
            internalMapWrapper(contextVersion, uri, mappingData);
        }

    }
d6)CoyoteAdapter调用容器StandardEngine的invoke(request,response)方法
其实这里一句语句connector.getService().getContainer().getPipeline().getFirst().invoke(request, response);直接调用StandardEngineValve的invoke(Request request, Response response)方法了
源码如下CoyoteAdapter类:
    public void service(org.apache.coyote.Request req, org.apache.coyote.Response res)
            throws Exception {

        Request request = (Request) req.getNote(ADAPTER_NOTES);
        Response response = (Response) res.getNote(ADAPTER_NOTES);

        if (request == null) {
            // Create objects
            request = connector.createRequest();//创建request对象
            request.setCoyoteRequest(req);
            response = connector.createResponse();//创建response对象
            response.setCoyoteResponse(res);

            // Link objects
            request.setResponse(response);
            response.setRequest(request);

            // Set as notes
            req.setNote(ADAPTER_NOTES, request);
            res.setNote(ADAPTER_NOTES, response);

            // Set query string encoding
            req.getParameters().setQueryStringCharset(connector.getURICharset());
        }

        if (connector.getXpoweredBy()) {
            response.addHeader("X-Powered-By", POWERED_BY);
        }

        boolean async = false;
        boolean postParseSuccess = false;

        req.getRequestProcessor().setWorkerThreadName(THREAD_NAME.get());

        try {
            // Parse and set Catalina and configuration specific
            // request parameters
            postParseSuccess = postParseRequest(req, request, res, response);//传递cookie,context等相关信息到request中
            if (postParseSuccess) {
                //check valves if we support async
                request.setAsyncSupported(
                        connector.getService().getContainer().getPipeline().isAsyncSupported());
                // Calling the container
                connector.getService().getContainer().getPipeline().getFirst().invoke(
                        request, response);//调用StandardEngine的invoke方法
            }
            if (request.isAsync()) {
                async = true;
                ReadListener readListener = req.getReadListener();
                if (readListener != null && request.isFinished()) {
                    // Possible the all data may have been read during service()
                    // method so this needs to be checked here
                    ClassLoader oldCL = null;
                    try {
                        oldCL = request.getContext().bind(false, null);
                        if (req.sendAllDataReadEvent()) {
                            req.getReadListener().onAllDataRead();
                        }
                    } finally {
                        request.getContext().unbind(false, oldCL);
                    }
                }

                Throwable throwable =
                        (Throwable) request.getAttribute(RequestDispatcher.ERROR_EXCEPTION);

                // If an async request was started, is not going to end once
                // this container thread finishes and an error occurred, trigger
                // the async error process
                if (!request.isAsyncCompleting() && throwable != null) {
                    request.getAsyncContextInternal().setErrorState(throwable, true);
                }
            } else {
                request.finishRequest();
                response.finishResponse();
            }

        } catch (IOException e) {
            // Ignore
        } finally {
            ...
        }
    }
d7)d8)调用StandardEngineValve的invoke(Request request, Response response)方法
d9)StandardHost默认有两个valves,一个StandardHostValve,另一个ErrorReportValve
其实加上server.xml中配置的org.apache.catalina.valves.AccessLogValve,总计有三个,他们都是通过getNext().invoke(request,response);调用下一个处理
源码如下AbstractAccessLogValve类:
    public void invoke(Request request, Response response) throws IOException,
            ServletException {
        if (tlsAttributeRequired) {
            // The log pattern uses TLS attributes. Ensure these are populated
            // before the request is processed because with NIO2 it is possible
            // for the connection to be closed (and the TLS info lost) before
            // the access log requests the TLS info. Requesting it now causes it
            // to be cached in the request.
            request.getAttribute(Globals.CERTIFICATES_ATTR);
        }
        for (CachedElement element : cachedElements) {
                element.cache(request);
        }
        getNext().invoke(request, response);//调用下一个valve
    }
d10)StandardHostValve关联合适的classloader到当前线程。同时也会检索session关联给到request,如果有session的话,session的acess()方法会被调用来keep alive
d11)StandardHostValve调用pipeline的invoke(request, response)方法
d12)首先是FormAuthenticator的invoke(Request request, Response response)被调用,然后再调用getNext().invoke(request, response);,继而走到StandardContextValve的invoke(Request request, Response response)
源码如下StandardContextValve类:
    public final void invoke(Request request, Response response)
        throws IOException, ServletException {
        ...
        // Select the Wrapper to be used for this Request
        Wrapper wrapper = request.getWrapper();//wrapper会关联一个servlet
        ...
        wrapper.getPipeline().getFirst().invoke(request, response);
    }
d13)StandardWrapperValve的invoke方法中,jsp会被编译成servlet,然后调用真正的servlet
e)servlet被调用
补充:
在d13)调用过程中,其实是构造了一个filterChain,调用filterChain.doFilter(ServletRequest request, ServletResponse response),在这个方法中最终会调用到servlet.service(request, response);,这之后就是根据请求的方法调用doGet/doPost之类的方法了
源码如下ApplicationFilterChain类:
    private void internalDoFilter(ServletRequest request,
                                  ServletResponse response)
        throws IOException, ServletException {
				...
        // We fell off the end of the chain -- call the servlet instance
        try {
            if (ApplicationDispatcher.WRAP_SAME_OBJECT) {
                lastServicedRequest.set(request);
                lastServicedResponse.set(response);
            }

            if (request.isAsyncSupported() && !servletSupportsAsync) {
                request.setAttribute(Globals.ASYNC_SUPPORTED_ATTR,
                        Boolean.FALSE);
            }
            // Use potentially wrapped request from this point
            if ((request instanceof HttpServletRequest) &&
                    (response instanceof HttpServletResponse) &&
                    Globals.IS_SECURITY_ENABLED ) {
                final ServletRequest req = request;
                final ServletResponse res = response;
                Principal principal =
                    ((HttpServletRequest) req).getUserPrincipal();
                Object[] args = new Object[]{req, res};
                SecurityUtil.doAsPrivilege("service",
                                           servlet,
                                           classTypeUsedInService,
                                           args,
                                           principal);
            } else {
                servlet.service(request, response);//调用servlet,如果是jsp,其实是在这个方法才编译的
            }
        } catch (IOException | ServletException | RuntimeException e) {
            throw e;
        } catch (Throwable e) {
            e = ExceptionUtils.unwrapInvocationTargetException(e);
            ExceptionUtils.handleThrowable(e);
            throw new ServletException(sm.getString("filterChain.servlet"), e);
        } finally {
            if (ApplicationDispatcher.WRAP_SAME_OBJECT) {
                lastServicedRequest.set(null);
                lastServicedResponse.set(null);
            }
        }
    }
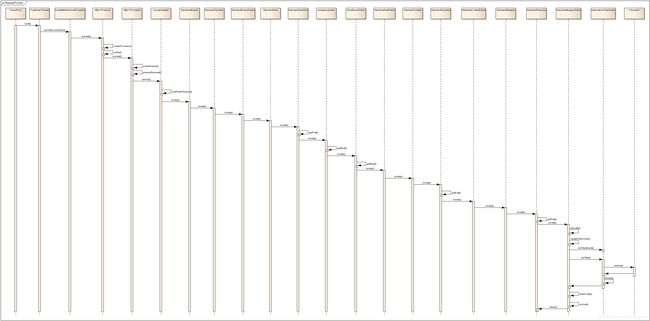
2.2时序图
可以直接下载官方的
https://tomcat.apache.org/tomcat-9.0-doc/architecture/startup/serverStartup.pdf
3.请求处理流程
3.1请求处理时序图
https://tomcat.apache.org/tomcat-9.0-doc/architecture/requestProcess/request-process.png
3.2权限认证时序图:
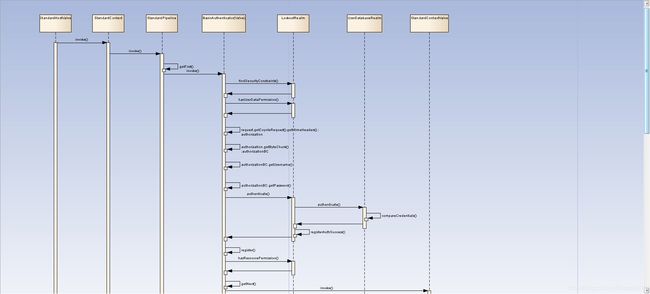
https://tomcat.apache.org/tomcat-9.0-doc/architecture/requestProcess/authentication-process.png
4.源码编译
如果想编译源码,可以查看这篇(https://tomcat.apache.org/tomcat-9.0-doc/building.html)文章,但Tomcat默认是用ant编译的,如果想用maven编译,大家另外再找参考教程吧。我个人是用ant编译的,改了不少地方才编译成功…