Linux
目录
⼀、Linux介绍
1.1 Linux系统介绍
1.2 Linux系统特点
1.3 Linux系统版本
⼆、虚拟机
2.1 虚拟机介绍
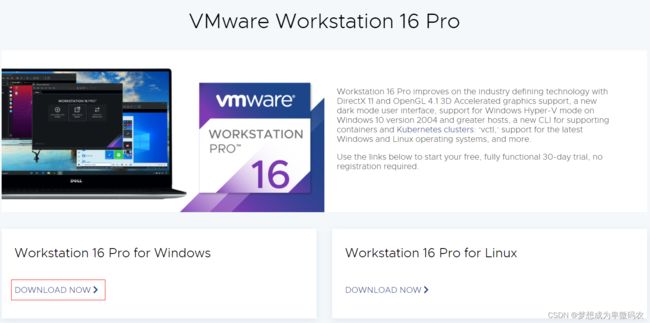
2.2 下载安装vmware
2.2.1 下载
2.2.2 安装
2.2.3 激活
2.3 创建虚拟机
2.4 安装CentOS
三、Linux远程⼯具
3.1 Linux资源管理⼯具
3.1.1 xftp下载
3.1.2 安装
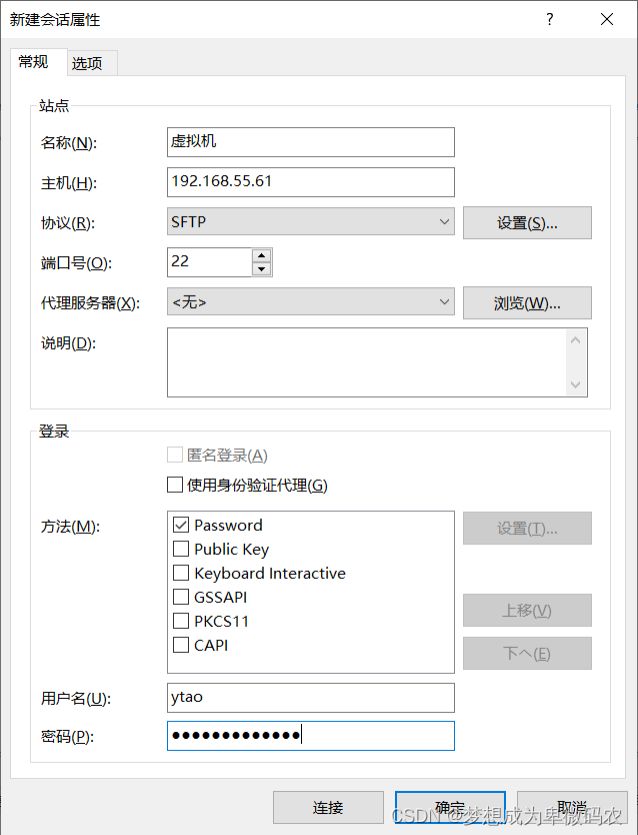
3.1.3 创建xftp与linux的连接
3.2 Linux远程终端
3.2.1 xshell下载
3.2.2 xshell安装
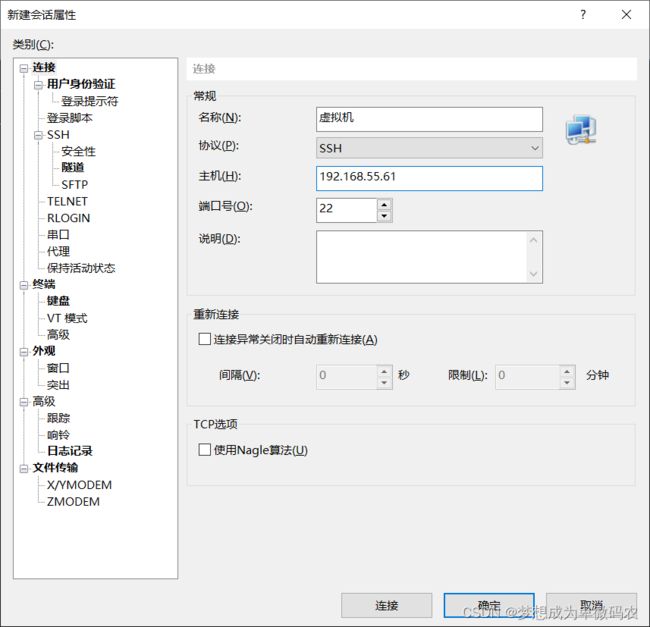
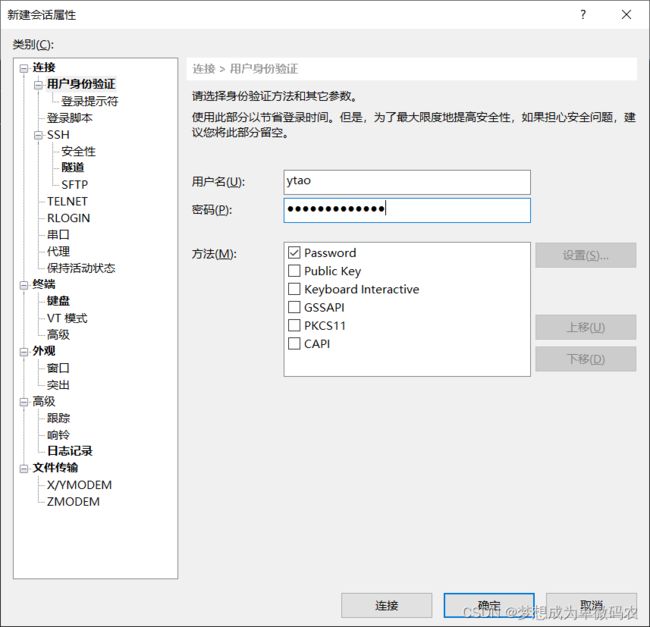
3.2.3 创建xshell与Linux的连接
四、云主机
4.1 什么是云主机?
4.2 购买云主机
4.3 云主机管理
4.3.1 轻量级服务器管理
4.3.2 ECS服务器管理
4.4 远程⼯具连接云主机
4.4.1 xftp远程连接云主机
4.4.2 xshell远程连接云主机
五、Linux常⽤操作指令
5.1 如何学习Linux?
5.2 Linux⽂件系统
5.3 Linux系统指令语法
5.4 ⽂件管理
5.4.1 ⽬录操作指令
5.4.2 ⽂件操作指令
5.4.3 ⽂件压缩和解压
5.5 ⽤户及权限管理
5.6 系统与进程
六、软件管理相关的指令(wget, rpm,yum)
6.1 wget指令
6.1.1 wget介绍
6.1.2 wget使⽤
6.2 rpm指令
6.2.1 rpm介绍
6.3 yum指令
6.3.1 yum介绍
6.3.2 yum指令
七、JDK安装(离线安装)
7.1 下载JDK(Linux版)
7.2 使⽤xftp将下载的安装包上传到linux的/usr/local⽬录
7.3 解压JDK安装包
7.4 查看JDK⼯具
7.5 配置环境变量
7.6 让配置⽣效
⼋、Tomcat安装
8.1 下载离线tar
8.2 上传到Linux
8.3 解压tar⽂件
8.4 启动tomcat
8.5 关闭防⽕墙
8.6 访问云主机上的tomcat
8.7 停⽌tomcat
九、安装MySQL
9.1 在线安装(推荐)
9.1.1 通过wget指令下载mysql的rpm⽂件
9.1.2 rpm安装mysql
9.1.3 通过yum安装mysql服务
9.1.4 加⼊开机启动
9.1.5 启动MySQL服务
5.1.5 停⽌MySQL服务
9.2 离线下载安装
9.2.2 将安装包上传到linux(/usr/local)
9.2.3 清除centos⾃带的mariaDB包
9.2.4 安装mysql的服务和客户端
9.3 MySQL基本使⽤
⼗、安装Nginx(在线安装)
10.1 安装编译⼯具(nginx安装之前需要编译)
10.2 安装PCRE
10.4 安装zlib库
10.5 安装Nginx
10.6 配置Nginx
10.7 启动Nginx
⼀、Linux介绍
1.1 Linux系统介绍
- Linux和windows⼀样是⼀个操作系统(就如同android和ios⼿机系统⼀样)
- Linux是⼀套免费使⽤、可以⾃由传播的类unix操作系统
- Linux可以⽀持多⽤户、多任务、⽀持多线程及多CPU的操作系统
- Linux通常作为专⽤服务器系统(应⽤服务器、数据库服务器)使⽤——Java
1.2 Linux系统特点
- 系统稳定性⽐windows要好(宕机概率⽐较低)
- 完全开源、⽤户可以进⾏⾃由的系统裁剪、灵活性⾼、使⽤成本低
- Linux核⼼防⽕墙组件性能⾼、配置简单、安全性⾼
- Linux提供了纯命令⾏系统(也可以带有界⾯)、进⼀步减⼩系统本身的开销
- Linux使⽤⾮常⼴泛、技术社区⽐较发达、学习资源也很丰富
- 综上,Linux⽐windows更适合⽤于服务器系统
1.3 Linux系统版本
- RedHat (RedHat公司发⾏的Linux版本:效率⾼、扩展性好、⾼可靠性)
- SUSE (德国的SUSE公司发⾏的版本)
- 红旗Linux
- CentOS (基于RedHat源码编译⽽成、完全开源)
- DEbian(有很对社区进⾏维护的⾮官⽅版本,商业可⽤性不⾼)
- Ubuntu (乌班图,基于DEbian的发⾏,提供了优化后的桌⾯系统)
⼆、虚拟机
- 基于硬件安装Linux(双系统)
- 安装虚拟机,基于虚拟机安装linux系统
- 租⽤云主机(linux)
2.1 虚拟机介绍
2.2 下载安装vmware
2.2.1 下载
2.2.2 安装
2.2.3 激活
2.3 创建虚拟机
- 桥接⽹络和转换⽹络
- 桥接⽹络
- 转换⽹络
2.4 安装CentOS
- 打开终端:application -- Terminal(终端)
- 查看⽹络配置:
ifconfig
- 切换⽤户:
su username## 输⼊密码 (低级权限⽤户切换到⾼级权限⽤户是需要输⼊密码的)
- 重启Linux
reboot
- 系统状态切换
## 切换到命令⾏模式init 3## 切换到桌⾯模式init 5
三、Linux远程⼯具
3.1 Linux资源管理⼯具
xftp SSH
3.1.1 xftp下载
3.1.2 安装
3.1.3 创建xftp与linux的连接
3.2 Linux远程终端
3.2.1 xshell下载
3.2.2 xshell安装
3.2.3 创建xshell与Linux的连接
四、云主机
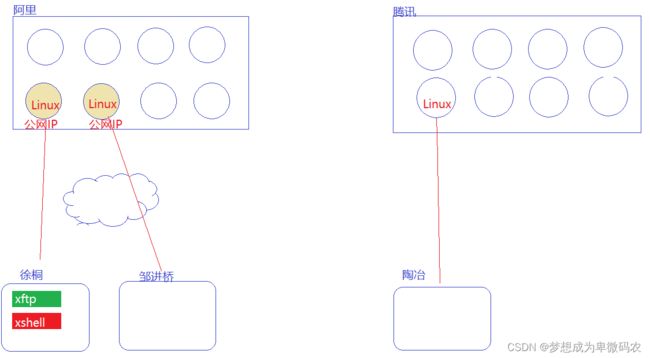
4.1 什么是云主机?
4.2 购买云主机
4.3 云主机管理
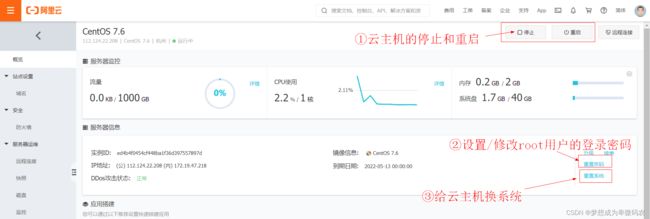
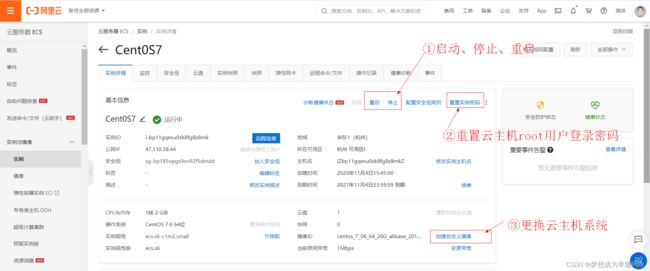
- 阿⾥云/腾讯云都提供了⼀个管理系统,⽤户对云主机进⾏配置和管理
- 阿⾥云控制中⼼: https://console.aliyun.com
4.3.1 轻量级服务器管理
- 常规管理
- 防⽕墙设置
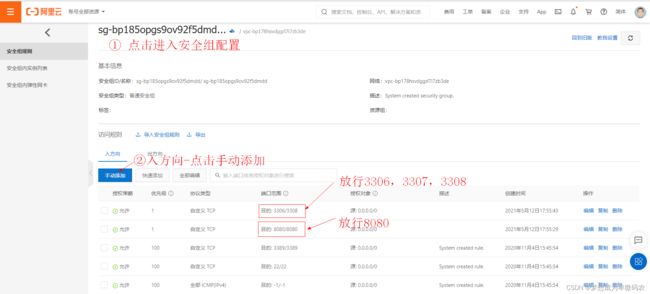
4.3.2 ECS服务器管理
- 常规管理
- 安全组管理(防⽕墙)
4.4 远程⼯具连接云主机
- 云主机公⽹IP:*
- root帐号的密码:*
4.4.1 xftp远程连接云主机
4.4.2 xshell远程连接云主机
五、Linux常⽤操作指令
5.1 如何学习Linux?
- Linux的⽂件系统
- Linux⽂件管理
- ⽬录:进退、创建、删除
- ⽂件:创建与编辑、复制和粘贴、移动和删除、压缩和解压
- ⽤户及权限的管理
- 在windows中,通常都是⾃⼰使⽤⾃⼰的机器,很少出现多个⼈使⽤同⼀台机器的 情况,所以在我们⽇常使⽤windows都只有⼀个账号,也就不会关注不同账号之间的权限问题
- 但是在linux系统使⽤过程中,通常是作为服务器系统使⽤,所以通常都会在⼀个Linux系统中创建多个不同权限的⽤户(root就是⼀个超级管理员身份的⽤户)
- 软件管理
- 软件安装
- 软件配置
- 软件卸载
5.2 Linux⽂件系统
[root@theo ~]# cd /[root@theo /]# lsbin boot dev etc home lib lib64 lost+found media mnt opt procroot run sbin srv sys tmp usr var[root@theo /]#
|
⽬录
|
说明
|
|
bin
|
系统⽂件夹,存放 linux 的系统⽂件
|
|
sbin
|
超级管理员的系统命令
|
|
boot
|
系统所需⽬录(系统启动相关⽂件)
|
|
etc
|
存放系统配置相关的⽂件(环境变量) |
|
lib/lib64
|
library 存放系统所需的依赖库
|
|
home
|
⼀般⽤户所在⽂件夹(此⽬录包含了所有普通⽤户的⽤户⽬
录)
|
|
root
|
超级管理员⽬录( root ⽤户⽬录)
|
|
media
|
媒体 ( 光驱 )
|
|
mnt
|
挂载( U 盘、移动硬盘)
|
|
tmp 、 opt
|
临时的⽂件存储⽬录,⽐如⽇志存储在 tmp 或者 opt 中
|
|
usr
|
⽤户⽬录,我们通常安装的软件、⽤户的⼀些⽂件都在此⽬
录下
|
|
run srv sys var proc
dev
|
系统相关⽬录
|
5.3 Linux系统指令语法
tar -zcvf b.tar otp_src_20.1
- 指令,决定了当前的动作
- 选项,可有可⽆(对于有些指令,选项是必须的)
- “-” 表示短选项,⼀个字⺟代表⼀个选项
- “--”表示⻓选项,⼀个单词代表⼀个选项
- 参数,指令正常执⾏所需的数据
- man 指令
- 点击q退出说明书
5.4 ⽂件管理
5.4.1 ⽬录操作指令
- 进⼊⽂件夹及退出⽂件夹
- cd ⽬录名称 进⼊指定的⽬录(当我们输⼊⽬录名称的时候,可以通过Tab进⾏⾃动补全)
## 进⼊到Linux系统跟路径
cd /## 进⼊到当前⽤户的⽬录(如果是 root ⽤户则进⼊到 /root, 如果是其他⽤户则进⼊到 /home/ 中的⽤户⽬录)cd ~
cd .. 退出当前⽬录
## 绝对路径: cd 指令参数的路径如果是以 / 开头,表示从系统的根路径下去查找cd /path## 相对路径: cd 指令参数的路径如果没有 / ,则表示从当前⽬录去查找cd path
- 显示当前⽬录下的⽂件列表
- ⽬录的创建和删除
5.4.2 ⽂件操作指令
- 创建和修改⽂件
# 打开⽬标⽂件;如果此⽂件不存在,则表示先创建此⽂件再打开vi a.txt
- 阅读⽂件
- 查询⽂件和查询内容
- 管道命令
- 删除⽂件
- 复制和移动
5.4.3 ⽂件压缩和解压
- windows系统下压缩⽂件通常是zip、rar等格式;Linux系统压缩⽂件通常为tar.gz(tar包)
- tar 指令 完成linux系统的⽂件压缩和解压
# 对 test1 ⽬录进⾏压缩,压缩到 test1.tar ⽂件tar -zcvf test1.tar test1# 将 test1 和 test2 进⾏压缩,压缩到 test.tar ⽂件tar -zcvf test.tar test1 test2
# 解压指定的压缩⽂件tar -zxvf test.tar
- 指令说明:
5.5 ⽤户及权限管理
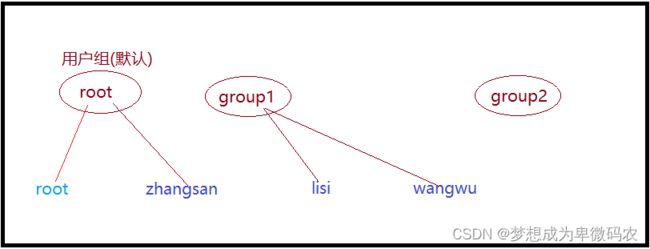
- ⽤户组
- ⽤户
- 切换⽤户
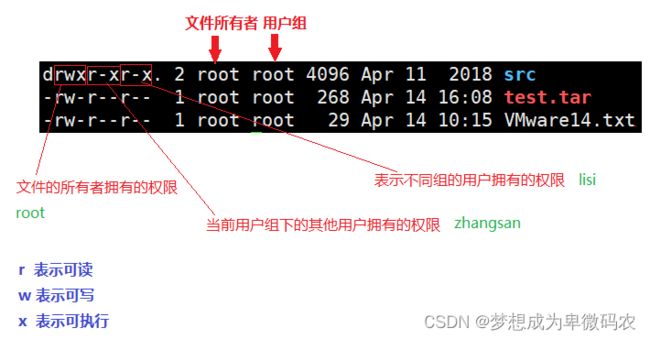
- 权限管理
- 说明:
- 修改权限 chmod
5.6 系统与进程
- 查询进程 top
- ps -ef | grep java 通过进程名称查找进程
- 根据端⼝查找进程
lsof -i:port 通过端⼝查询进程信息
如果此指令不可以⽤,则需要通过 yum install -y lsof 安装指令
- 强杀进程
- 系统注销和重启
六、软件管理相关的指令(wget, rpm,yum)
6.1 wget指令
- 在windows中进⾏下载(百度搜索—下载),通过xftp将windows现在的安装包上 传到Linux系统
- 直接在linux系统中,通过wget进⾏下载
6.1.1 wget介绍
6.1.2 wget使⽤
6.2 rpm指令
6.2.1 rpm介绍
- 查询: rpm -qa | grep 关键字
- 卸载: rpm -e --nodeps 软件名称
- 安装: rpm -ivh 安装包.rpm
- 更新: rpm -Uvh 安装包.rpm
6.3 yum指令
6.3.1 yum介绍
6.3.2 yum指令
七、JDK安装(离线安装)
7.1 下载JDK(Linux版)
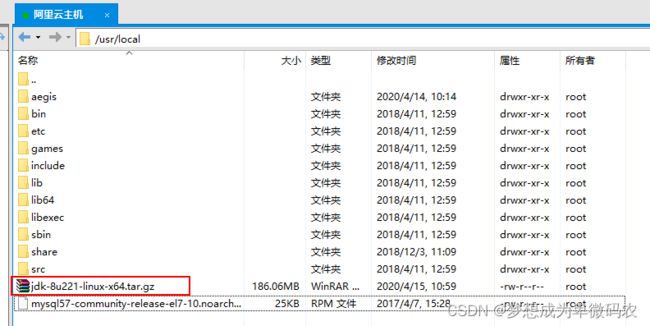
7.2 使⽤xftp将下载的安装包上传到linux的/usr/local⽬录
7.3 解压JDK安装包
7.4 查看JDK⼯具
JDK⽬录结构
7.5 配置环境变量
- 进⼊到/etc⽬录,找到profile⽂件
- 编辑profile⽂件 : vim profile
在profile⽂件最后配置以下内容
export JAVA_HOME=/usr/local/jdk1.8.0_221export JRE_HOME=$JAVA_HOME/jreexport CLASSPATH=.:$JAVA_HOME/lib:$JRE_HOME/libexport PATH=$JAVA_HOME/bin:$PATH
7.6 让配置⽣效
# 让配置⽣效[root@theo etc] # source /etc/profile# 显示 jdk 版本[root@theo etc] # java -versionjava version "1.8.0_221"Java(TM) SE Runtime Environment (build 1.8.0_221-b11)Java HotSpot(TM) 64-Bit Server VM (build 25.221-b11, mixed mode)
⼋、Tomcat安装
8.1 下载离线tar
8.2 上传到Linux
8.3 解压tar⽂件
tar -zxvf apache-tomcat-8.5.46.tar.gz
8.4 启动tomcat
[root@theo apache-tomcat-8.5.46] # cd /usr/local/apache-tomcat-8.5.46/bin[root@theo bin] # lsbootstrap.jar catalina-tasks.xml commons-daemon.jarconfigtest.sh digest.sh shutdown.bat startup.shtool-wrapper.bat version.shcatalina.bat ciphers.bat commons-daemon-native.tar.gzdaemon.sh setclasspath.bat shutdown.sh tomcat-juli.jartool-wrapper.shcatalina.sh ciphers.sh configtest.batdigest.bat setclasspath.sh startup.bat tomcat-native.tar.gzversion.bat[root@theo bin] # ./startup.shUsing CATALINA_BASE : /usr/local/apache-tomcat-8.5.46Using CATALINA_HOME : /usr/local/apache-tomcat-8.5.46Using CATALINA_TMPDIR : /usr/local/apache-tomcat-8.5.46/tempUsing JRE_HOME : /usr/local/jdk1.8.0_221/jreUsing CLASSPATH : /usr/local/apache-tomcat-8.5.46/bin/bootstrap.jar : /usr/local/apache-tomcat-8.5.46/bin/tomcatjuli.jarTomcat started.
8.5 关闭防⽕墙
# 查看防⽕墙状态[root@theo bin] # systemctl status firewalld● firewalld.service - firewalld - dynamic firewall daemonLoaded : loaded (/usr/lib/systemd/system/firewalld.service; disabled;vendor preset : enabled)Active : inactive (dead)Docs : man : firewalld(1)# 关闭防⽕墙[root@theo bin] # systemctl stop firewalld# 启动防⽕墙[root@theo bin] # systemctl start firewalld
8.6 访问云主机上的tomcat
8.7 停⽌tomcat
[root@theo bin] # lsof -i:8080COMMAND PID USER FD TYPE DEVICE SIZE/OFF NODE NAMEjava 30394 root 53u IPv4 64248 0t0 TCP * : webcache (LISTEN)[root@theo bin] # kill -9 30394
九、安装MySQL
9.1 在线安装(推荐)
9.1.1 通过wget指令下载mysql的rpm⽂件
[root@theo local] # pwd/usr/local[root@theo local] # lsaegis apache-tomcat-8.5.46 bin etc games include jdk1.8.0_221 liblib64 libexec sbin share src[root@theo local] # wget http://dev.mysql.com/get/mysql57-communityrelease-el7-10.noarch.rpm
9.1.2 rpm安装mysql
[root@theo local]# rpm -ivh mysql57-community-release-el7-10.noarch.rpm
9.1.3 通过yum安装mysql服务
[root@theo local] # yum -y install mysql-community-server
9.1.4 加⼊开机启动
[root@theo local]# systemctl enable mysqld
9.1.5 启动MySQL服务
[root@theo local] # systemctl start mysqld[root@theo local] # lsof -i:3306COMMAND PID USER FD TYPE DEVICE SIZE/OFF NODE NAMEmysqld 8430 mysql 17u IPv6 70095 0t0 TCP * : mysql (LISTEN)
5.1.5 停⽌MySQL服务
[root@theo local]# systemctl stop mysqld
9.2 离线下载安装
MySQL-server-5.6.45-1.el7.x86_64.rpmMySQL-client-5.6.45-1.el7.x86_64.rpm
9.2.2 将安装包上传到linux(/usr/local)
9.2.3 清除centos⾃带的mariaDB包
[root@theo local] # rpm -qa | grep mariadb[root@theo local] # rpm -e --nodeps mariadb-libs-...
9.2.4 安装mysql的服务和客户端
[root@theo local] #rpm -ivh MySQL-server-5.6.45-1.el7.x86_64.rpm[root@theo local] #rpm -ivh MySQL-client-5.6.45-1.el7.x86_64.rpm
9.3 MySQL基本使⽤
# 1. 查找初始密码cat /var/log/mysqld.log | grep password# 2. 登录到 mysql[root@theo log] # mysql -uroot -pEnter password :# 3. 修改密码# 3-1 设置密码的检查机制为 LOWset global validate_password_policy = LOW;# 3-2 修改密码set password = password('admin123');# 4. 授权远程登录GRANT ALL PRIVILEGES on *.* to 'root'@'%' IDENTIFIED by 'admin123' WITH GRANT OPTION;flush PRIVILEGES;
⼗、安装Nginx(在线安装)
10.1 安装编译⼯具(nginx安装之前需要编译)
[root@theo local]# yum install -y gcc gcc-c++
10.2 安装PCRE
# 1. 下载[root@theo local] # wgethttp://downloads.sourceforge.net/project/pcre/pcre/8.35/pcre-8.35.tar.gz# 2. 解压[root@theo local] # tar -zxvf pcre-8.35.tar.gz# 3. 进⼊ pcre ⽬录[root@theo local] # cd pcre-8.35# 4. 配置[root@theo pcre-8.35] #./configure# 5. 编译安装[root@theo pcre-8.35] # make && make install
[root@theo pcre-8.35] # cd /usr/local[root@theo local] # wget http://www.openssl.org/source/openssl-1.0.1j.tar.gz[root@theo local] # tar -zxvf openssl-1.0.1j.tar.gz[root@theo local] # cd openssl-1.0.1j[root@theo openssl-1.0.1j] # ./config[root@theo openssl-1.0.1j] # make && make install
10.4 安装zlib库
[root@theo openssl-1.0.1j] # cd /usr/local[root@theo local] # wget http://zlib.net/zlib-1.2.11.tar.gz[root@theo local] # tar -zxvf zlib-1.2.11.tar.gz[root@theo local] # cd zlib-1.2.11[root@theo zlib-1.2.11] # ./configure[root@theo zlib-1.2.11] # make && make install
10.5 安装Nginx
[root@theo zlib-1.2.11] # cd /usr/local[root@theo local] # wget http://nginx.org/download/nginx-1.16.1.tar.gz[root@theo local] # tar -zxvf nginx-1.16.1.tar.gz[root@theo local] # mkdir -p server/nginx[root@theo local] # cd nginx-1.16.1[root@theo nginx-1.16.1] # ./configure --prefix=/usr/local/server/nginx--with-http_stub_status_module --with-http_ssl_module --with-pcre=/usr/local/pcre-8.35[root@theo nginx-1.16.1] # make && make install# 如果在配置过程中出现了以下错误 :./configure : error : SSL modules require the OpenSSL library.You can either do not enable the modules, or install the OpenSSLlibraryinto the system, or build the OpenSSL library statically from thesourcewith nginx by using --with-openssl =option. # 执⾏: yum -y install openssl openssl-devel
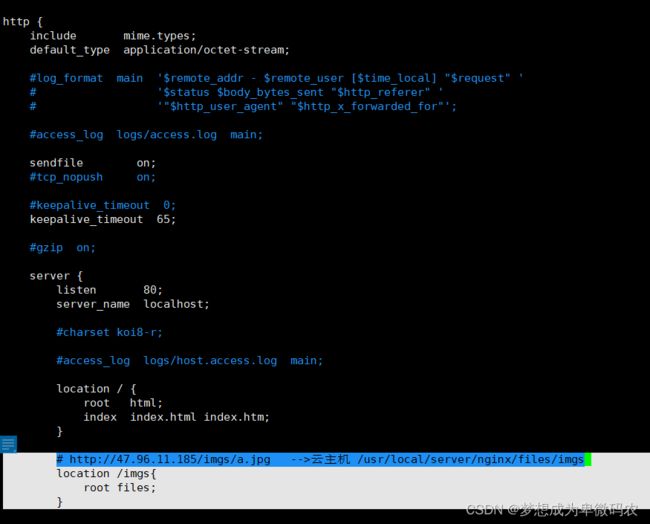
10.6 配置Nginx

