Spring Boot + vue-element 开发个人博客项目实战教程(十七、登录功能实现(下))
文章目录
- 前言
- 一、后端登录功能
-
- 1、新建登录接口
- 2、shiro的引入
-
- 2.1、简介
- 2.2、架构
- 2.3、添加shiro依赖
- 3、配置shiro
-
- 3.1、MyShiroRealm.java
- 3.2、ShiroConfiguration.java
- 3.3、登录接口login
- 3.4、登录info接口
- 4、跨域
- 二、前后端分离会话问题解决
-
- 1、导入shiro整合redis的jar包
- 2、自定义SessionManager类
- 3、ShiroConfig配置文件注入SessionManager
-
- 3.1、什么是redis?
- 3.2、下载(文件版)
- 3.3、下载(安装版)
- 3.4、注入SessionManager
- 3.5、SessionManager注入安全管理器
- 三、计划
前言
我们接着前一章写,前面一章我们已经将前端搭建完成,还做了一些简单的修改,下面我们开始做后台的接口,还有一些逻辑需要写。
一、后端登录功能
1、新建登录接口
接下来我们来写后端的接口,前端先告一段落,通过上边前端模板的登录流程来分析,我们现在先写两个接口。
在前端我们看到api的文件中那个接口地址为/user/login 和/user/info这两个接口,我们打开后端代码,打开UserController,找到最上边我们就会看到,当初我们写接口的时候正好定义的/user。
@RequestMapping("/user")
public class UserController {
}
所以我们只要写login即可。在写之前还要写一个实体类,用于接收前端传来的用户和密码。
在entity包中新建一个LoginModel.java实体类,里面定义两个属性,用户名和密码
package com.blog.personalblog.entity;

import lombok.Data;

/**
 * @author: SuperMan
 * @create: 2022-03-25
 **/

@Data
public class LoginModel {

    /**
     * username: admin
     * password: 123456
     */

    private String username;
    private String password;
}
然后新建两个空的接口。
/**
     * 登录
     * @param loginModel
     * @return
     */
    @PostMapping("/login")
    public JsonResult<Object> login(@RequestBody LoginModel loginModel){
        logger.info("{} 在请求登录! ", loginModel.getUsername());

        return JsonResult.success();
    }

    /**
     * 登录info信息
     * @return
     */
    @GetMapping("/info")
    public JsonResult<Object> info(){
        return JsonResult.success();
    }
此时login方法中的logger会报错,这个是我们自己定义的,在类的最上边定义一下,会在控制台打印日志信息。
private Logger logger = LoggerFactory.getLogger(this.getClass());
2、shiro的引入
这里我们要引入了后台登录最重要的技术shiro,首先我们要先了解这个是干嘛的,才能去引用,有些东西我们要多了解,这样在别人谈论某件事的时候,我们才会有谈资。
2.1、简介
Apache Shiro 是 Java 的一个安全框架。目前,使用 Apache Shiro 的人越来越多,因为它相当简单,对比 Spring Security,可能没有 pring Security 做的功能强大,但是在实际工作时可能并不需要那么复杂的东西,所以使用小而简单的 Shiro 就足够了。对于它俩到底哪个好,这个不必纠结,能更简单的解决项目问题就好了。

● Authentication:身份认证 / 登录,验证用户是不是拥有相应的身份;
● Authorization:授权,即权限验证,验证某个已认证的用户是否拥有某个权限;即判断用户是否能做事情,常见的如:验证某个用户是否拥有某个角色。或者细粒度的验证某个用户对某个资源是否具有某个权限;
● Session Management:会话管理,即用户登录后就是一次会话,在没有退出之前,它的所有信息都在会话中;会话可以是普通 JavaSE 环境的,也可以是如 Web 环境的;
● Cryptography:加密,保护数据的安全性,如密码加密存储到数据库,而不是明文存储;
● Web Support:Web 支持,可以非常容易的集成到 Web 环境;
● Caching:缓存,比如用户登录后,其用户信息、拥有的角色 / 权限不必每次去查,这样可以提高效率;
● Concurrency:shiro 支持多线程应用的并发验证,即如在一个线程中开启另一个线程,能把权限自动传播过去;
● Testing:提供测试支持;
● Run As:允许一个用户假装为另一个用户(如果他们允许)的身份进行访问;
● Remember Me:记住我,这个是非常常见的功能,即一次登录后,下次再来的话不用登录了。
2.2、架构
记住一点,Shiro 不会去维护用户、维护权限;这些需要我们自己去设计 / 提供;然后通过相应的接口注入给 Shiro 即可。
关于 Shiro,需要理解三个核心概念:Subject、SecurityManager 和 Realms。

可以看到:应用代码直接交互的对象是 Subject,也就是说 Shiro 的对外 API 核心就是 Subject;其每个 API 的含义:
Subject:主体,代表了当前 “用户”,这个用户不一定是一个具体的人,与当前应用交互的任何东西都是 Subject,如网络爬虫,机器人等;即一个抽象概念;所有 Subject 都绑定到 SecurityManager,与 Subject 的所有交互都会委托给 SecurityManager;可以把 Subject 认为是一个门面;SecurityManager 才是实际的执行者;
SecurityManager:安全管理器;即所有与安全有关的操作都会与 SecurityManager 交互;且它管理着所有 Subject;可以看出它是 Shiro 的核心,它负责与后边介绍的其他组件进行交互,如果学习过 SpringMVC,你可以把它看成 DispatcherServlet 前端控制器;
Realm:域,Shiro 从 Realm 获取安全数据(如用户、角色、权限),就是说 SecurityManager 要验证用户身份,那么它需要从 Realm 获取相应的用户进行比较以确定用户身份是否合法;也需要从 Realm 得到用户相应的角色 / 权限进行验证用户是否能进行操作;可以把Realm看成 DataSource,即安全数据源。
也就是说对于我们而言,最简单的一个 Shiro 应用:
- 应用代码通过
Subject来进行认证和授权,而Subject又委托给SecurityManager; - 我们需要给
Shiro的SecurityManager注入Realm,从而让SecurityManager
能得到合法的用户及其权限进行判断。
从以上也可以看出,Shiro 不提供维护用户 / 权限,而是通过 Realm 让开发人员自己注入。
好啦,我就先放这些知识吧,大家看一看了解怎么回事就行,具体的还得我们实际的应用才能掌握。
想要了解更多的,可以看看这个基础的:https://www.w3cschool.cn/shiro/andc1if0.html
2.3、添加shiro依赖
我们想要使用shiro就要引入maven依赖
<dependency>
     <groupId>org.apache.shiro</groupId>
     <artifactId>shiro-spring</artifactId>
     <version>1.4.0</version>
</dependency>
然后我们再去这个根据用户名查询用户对象的接口,我们打开UserService.java,然后添加一个接口
    /**
     * username
     * @param userName
     * @return
     */
    User getUserByUserName(String userName);
实现类UserServiceImpl.java:
@Override
public User getUserByUserName(String userName) {
    if (userName == null) {
            return null;
    }
    User user = userMapper.findByUsername(userName);
    return user;
}
然后写Mapper接口,打开UserMapper.java
    /**
     * username
     * @param userName
     * @return
     */
    User findByUsername(String userName);
再去写sql语句,UserMapper.java
  <select id="findByUsername" parameterType="java.lang.String" resultMap="BaseResultMap">
        select * from person_user where username = #{userName, jdbcType=VARCHAR}
    </select>
准备工作写完后,我们去配置shiro环境
3、配置shiro
配置的顺序如下:
- 创建 Realm 并重写获取认证与授权信息的方法。
- 创建配置类,包括创建并配置 SecurityManager 等。
3.1、MyShiroRealm.java
在我们的项目上新建一个shiro包,在这个包里新建一个MyShiroRealm.java。前面在介绍shiro的时候也说了Realm,我们创建 Realm 并重写获取认证与授权信息的方法。

我们创建完之后,然后再继承一下AuthorizingRealm父类。UserRealm 父类 AuthorizingRealm 将获取 Subject 相关信息分成两步:获取身份验证信息(doGetAuthenticationInfo)及授权信息(doGetAuthorizationInfo)我们来验证下是不是有这两个方法。

鼠标浮上去,然后看到我上方框起来的Implment methods,点击,弹出一个框,看这就是我上边说的那两个重写的方法,全选中然后点Ok即可。(代码我讲完这个类下面再贴)


我找了些资料,看着讲解的还挺详细,大家可以看一下对着两个方法的讲解。
doGetAuthenticationInfo获取身份验证相关信息:首先根据传入的用户名获取 User 信息;然后如果 user 为空,那么抛出没找到帐号异常UnknownAccountException;如果 user 找到但锁定了抛出锁定异常LockedAccountException;最后生成AuthenticationInfo信息,交给间接父类AuthenticatingRealm使用CredentialsMatcher进行判断密码是否匹配,如果不匹配将抛出密码错误异常IncorrectCredentialsException;另外如果密码重试此处太多将抛出超出重试次数异常ExcessiveAttemptsException;在组装SimpleAuthenticationInfo信息时,需要传:身份信息(用户名)、凭据(密文密码)、盐(username+salt),CredentialsMatcher使用盐加密传入的明文密码和此处的密文密码进行匹配。doGetAuthorizationInfo获取授权信息:PrincipalCollection是一个身份集合,因为我们现在就一个 Realm,所以直接调用getPrimaryPrincipal得到之前传入的用户名即可;然后根据用户名调用 UserService 接口获取角色及权限信息。
我们这里没有写权限,所以不存在权限验证,我在这里给他拟定了个测试的数据,不影响我们的登录,下面实现了doGetAuthorizationInfo方法,结合上边对方法的讲解,相信大家可以看懂。
 @Override
    protected AuthorizationInfo doGetAuthorizationInfo(PrincipalCollection principalCollection) {
        SimpleAuthorizationInfo authorizationInfo = new SimpleAuthorizationInfo();
        User user  = (User) principalCollection.getPrimaryPrincipal();
        //模拟数据库查询出来的用户角色对应的权限
        String rolePermission = "/admin";
        authorizationInfo.addStringPermission(rolePermission);
        return authorizationInfo;
    }
另一个doGetAuthenticationInfo方法:
@Override
    protected AuthenticationInfo doGetAuthenticationInfo(AuthenticationToken authenticationToken) throws AuthenticationException {
        System.out.println("进行身份认证中...");
        //获取输入的账号
        String userName = (String) authenticationToken.getPrincipal();
        //获取输入的密码
        //shiro会把密码转为字符,所以这里需要把字符转字符串
        String password = new String((char[]) authenticationToken.getCredentials());

        //通过userName从数据库中查找 User对象
        User user = userService.getUserByUserName(userName);

        String s = MD5Util.MD5(password);
        if (user == null || !user.getPassWord().equals(s)) {
            throw new AccountException("用户名或密码不正确");
        }
        SimpleAuthenticationInfo authenticationInfo = new SimpleAuthenticationInfo(
                user.getUserName(),
                user.getPassWord(),
                null,
                getName()
        );
        return authenticationInfo;
    }
这个地方有几点要说一下的:
- shiro会把密码转为字符,所以这里需要把字符转字符串。
String password = new String((char[]) authenticationToken.getCredentials());
- 密码比较,我们数据库存储的密码为MD5加密的,我们在核对前端传入的密码时也要加密判断。
String s = MD5Util.MD5(password);
if (user == null || !user.getPassWord().equals(s)) {
   throw new AccountException("用户名或密码不正确");
}
- 最后组装
SimpleAuthenticationInfo
SimpleAuthenticationInfo authenticationInfo = new SimpleAuthenticationInfo(
     user.getUserName(),
     user.getPassWord(),
     null,
     getName()
);
3.2、ShiroConfiguration.java
我们新建一个shiro的配置类,这个配置类要和我们的启动类在同一个层中。
接下来进行配置
package com.blog.personalblog;


import com.blog.personalblog.shiro.MyShiroRealm;
import org.apache.shiro.authc.credential.HashedCredentialsMatcher;
import org.apache.shiro.mgt.SecurityManager;
import org.apache.shiro.spring.security.interceptor.AuthorizationAttributeSourceAdvisor;
import org.apache.shiro.spring.web.ShiroFilterFactoryBean;
import org.apache.shiro.web.mgt.DefaultWebSecurityManager;
import org.springframework.context.annotation.Bean;
import org.springframework.context.annotation.Configuration;

import java.util.LinkedHashMap;
import java.util.Map;

/**
 * @author: SuperMan
 * @create: 2022-03-14
 **/
@Configuration
public class ShiroConfiguration {

    /**
     * 配置过滤规则
     *
     */
    @Bean
    public ShiroFilterFactoryBean shirFilter(SecurityManager securityManager) {
        System.out.println("ShiroConfiguration.shirFilter()");
        ShiroFilterFactoryBean shiroFilterFactoryBean = new ShiroFilterFactoryBean();
        shiroFilterFactoryBean.setSecurityManager(securityManager);

        //拦截器
        Map<String, String> filterChainDefinitionMap = new LinkedHashMap<>();
        filterChainDefinitionMap.put("/user/logout", "logout");
        // 配置不会被拦截的链接 顺序判断
        filterChainDefinitionMap.put("/static/**", "anon");
        filterChainDefinitionMap.put("/user/login", "anon");
        filterChainDefinitionMap.put("/user/info", "anon");
        filterChainDefinitionMap.put("/**", "authc");
        //配置shiro默认登录界面地址,前后端分离中登录界面跳转应由前端路由控制,后台仅返回json数据
        filterChainDefinitionMap.put("/user/unauth", "anon");

        shiroFilterFactoryBean.setFilterChainDefinitionMap(filterChainDefinitionMap);
        return shiroFilterFactoryBean;
    }

    /**
     * 凭证匹配器
     * (由于我们的密码校验交给Shiro的SimpleAuthenticationInfo进行处理了
     * )
     *
     * @return
     */
    @Bean
    public HashedCredentialsMatcher hashedCredentialsMatcher() {
        HashedCredentialsMatcher hashedCredentialsMatcher = new HashedCredentialsMatcher();
        //散列算法:这里使用MD5算法;
        hashedCredentialsMatcher.setHashAlgorithmName("md5");
        //散列的次数,比如散列两次,相当于 md5(md5(""));
        hashedCredentialsMatcher.setHashIterations(1);
        return hashedCredentialsMatcher;
    }

    /**
     * 创建 Realm
     * @Bean 的作用: 将该方法返回的对象放入spring容器
     */
    @Bean
    public MyShiroRealm myShiroRealm() {
        MyShiroRealm myShiroRealm = new MyShiroRealm();
        myShiroRealm.setCredentialsMatcher(hashedCredentialsMatcher());
        return myShiroRealm;
    }

    @Bean
    public SecurityManager securityManager() {
        DefaultWebSecurityManager securityManager =  new DefaultWebSecurityManager();
        securityManager.setRealm(myShiroRealm());
        return securityManager;
    }

    /**
     * 开启aop注解支持
     * @param securityManager
     * @return
     */
    @Bean
    public AuthorizationAttributeSourceAdvisor authorizationAttributeSourceAdvisor(SecurityManager securityManager) {
        AuthorizationAttributeSourceAdvisor authorizationAttributeSourceAdvisor = new AuthorizationAttributeSourceAdvisor();
        authorizationAttributeSourceAdvisor.setSecurityManager(securityManager);
        return authorizationAttributeSourceAdvisor;
    }
}
配置完成后,接下来我们开始写我们的登录接口的功能,打开UserController.java,我们原来写好的两个接口,现在补充完整。
我们先创建一个错误码类,用来统一规范我们返回的错误信息。使用枚举类。
package com.blog.personalblog.entity;

/**
 * 错误码
 * @author: SuperMan
 * @create: 2022-03-14
 **/
public enum ErrorCode {
    SUCCESS("成功", 200),
    NOT_LOGIN("未登录", 100),
    ERROR_CODE("未定义错误", 101),
    USER_NOT_EXIST("用户不存在", 102);

    private int code;
    private String msg;
    private ErrorCode(String msg,int code){
        this.code = code;
        this.msg = msg;
    }

    public int getCode() {
        return code;
    }

    public String getMsg() {
        return msg;
    }

}
3.3、登录接口login
然后,我们的login方法:
 /**
     * 登录
     * @param loginModel
     * @return
     */
    @PostMapping("/login")
    public JsonResult<Object> login(@RequestBody LoginModel loginModel){
        logger.info("{} 在请求登录! ", loginModel.getUsername());
        Subject subject = SecurityUtils.getSubject();
        UsernamePasswordToken token = new UsernamePasswordToken(loginModel.getUsername(), loginModel.getPassword(), false);
        try {
            subject.login(token);
            Map<String, Object> ret = new HashedMap();
            ret.put("token", subject.getSession().getId());
            logger.info("{} login success", loginModel.getUsername());
            return JsonResult.success(ret);
        } catch (IncorrectCredentialsException e) {
            logger.info("login fail {}", e.getMessage());
            return JsonResult.error(ErrorCode.NOT_LOGIN);
        } catch (LockedAccountException e) {
            logger.info("login fail {}", e.getMessage());
            return JsonResult.error(ErrorCode.ERROR_CODE);
        } catch (AuthenticationException e) {
            logger.info("login fail {}", e.getMessage());
            return JsonResult.error(ErrorCode.USER_NOT_EXIST);
        } catch (Exception e) {
            e.printStackTrace();
            logger.info("login fail {}", e.getMessage());
            return JsonResult.error(ErrorCode.ERROR_CODE);
        }

    }
下面将上边的代码拆解一下。
(1)这一句是获得当前用户到登录对象,现在状态为未认证。
Subject subject = SecurityUtils.getSubject();
(2)这个是获得用户名密码令牌
UsernamePasswordToken token = new UsernamePasswordToken(loginModel.getUsername(), loginModel.getPassword(), false);
(3)shiro 使用异常捕捉登录失败消息,然后将令牌传到shiro提供的login方法验证,需要自定义realm。
try {
    subject.login(token);
    Map<String, Object> ret = new HashedMap();
    ret.put("token", subject.getSession().getId());
    logger.info("{} login success", loginModel.getUsername());
    return JsonResult.success(ret);
} catch (IncorrectCredentialsException e) {
    logger.info("login fail {}", e.getMessage());
    return JsonResult.error(ErrorCode.NOT_LOGIN);
}
我们在上一篇分析前端登录的时候说过,login接口后边还带了token,我们在登录验证后,再将token返回给前端。
Map<String, Object> ret = new HashedMap();
ret.put("token", subject.getSession().getId());
logger.info("{} login success", loginModel.getUsername());
return JsonResult.success(ret);
3.4、登录info接口
我们写完登录,然后前端还需要一个info接口,我们将info接口补充完整。
/**
     * 登录info信息
     * @return
     */
    @GetMapping("/info")
    public JsonResult<Object> info(){
        Map<String, Object> ret = new HashMap<>(3);
        ret.put("roles", "[admin]");
        ret.put("name", "admin");
        ret.put("avatar","https://wpimg.wallstcn.com/f778738c-e4f8-4870-b634-56703b4acafe.gif");
        return JsonResult.success(ret);
    }
这个就是返回了一个Map,这个地方数据写死的,本来可以展示用户名的,我再shiro配置的时候不给info加验证就获取不到用户名,加了验证就会出现重定向到错误接口,所以为了简单我就直接写死了,想搞的可以自己看一下,我就不实现了。
还有两个接口,一个是退出的,还有一个登录地址错误的直接重定向到这个接口,看一下就可以了。
   @PostMapping("/logout")
    public JsonResult<Object> logout(){
        Subject subject =SecurityUtils.getSubject();
        subject.logout();
        return JsonResult.success("成功登出");
    }

    @RequestMapping("/unauth")
    public JsonResult<Object> unauth(){
        return JsonResult.error(ErrorCode.NOT_LOGIN);
    }
好啦,基本上登录的流程都写完了,对了,还有一个跨域需要处理,我们配置一下全局跨域的问题。
4、跨域
我们先说一下什么是跨域:
当一个请求url的协议、域名、端口三者之间任意一个与当前页面url不同即为跨域。
出于浏览器的同源策略限制。同源策略(Sameoriginpolicy)是一种约定,它是浏览器最核心也最基本的安全功能,如果缺少了同源策略,则浏览器的正常功能可能都会受到影响。可以说Web是构建在同源策略基础之上的,浏览器只是针对同源策略的一种实现。同源策略会阻止一个域的javascript脚本和另外一个域的内容进行交互。所谓同源(即指在同一个域)就是两个页面具有相同的协议(protocol),主机(host)和端口号(port)

我们后端进行解决一下,其实只需要一个注解即可@CrossOrigin,我们可以在Controller类或其方法上加@CrossOrigin注解,来使之支持跨域。例如:
@CrossOrigin(origins = "*", maxAge = 3600)
@RestController
@RequestMapping("/User")
public class UserController {
}
但是我们先不这样做,我们写一个全局的,适用整个项目的接口。
和项目的启动类同级别的新建一个ResourcesConfig.java,重要的我都加了注释,可以自己看一下。
package com.blog.personalblog;

import org.springframework.context.annotation.Bean;
import org.springframework.context.annotation.Configuration;
import org.springframework.web.cors.CorsConfiguration;
import org.springframework.web.cors.UrlBasedCorsConfigurationSource;
import org.springframework.web.filter.CorsFilter;
import org.springframework.web.servlet.config.annotation.WebMvcConfigurer;

/**
 * @author: SuperMan
 * @create: 2022-03-14
 **/
@Configuration
public class ResourcesConfig implements WebMvcConfigurer {

    /**
     * 配置全局跨域
     */
    private CorsConfiguration buildConfig() {
        CorsConfiguration corsConfiguration = new CorsConfiguration();
        //同源配置,*表示任何请求都视为同源,若需指定ip和端口可以改为如“localhost:8080”,多个以“,”分隔;
        corsConfiguration.addAllowedOriginPattern("*");
        //header,允许哪些header,本案中使用的是token,此处可将*替换为token;
        corsConfiguration.addAllowedHeader("*");
        //允许的请求方法,POST、GET等
        corsConfiguration.addAllowedMethod("*");
        corsConfiguration.setAllowCredentials(true);
        return corsConfiguration;
    }

    @Bean
    public CorsFilter corsFilter() {
        UrlBasedCorsConfigurationSource source = new UrlBasedCorsConfigurationSource();
        source.registerCorsConfiguration("/**", buildConfig());
        return new CorsFilter(source);
    }

}
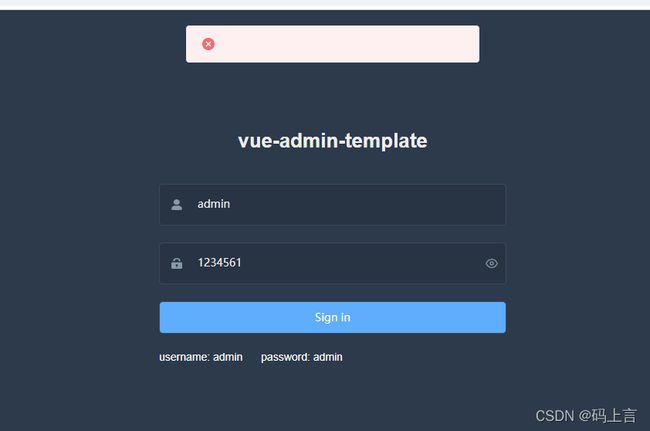
此时,我们的功能做的差不多了,我们先将后台的代码启动,然后再去将前端项目启动,然后打开登录的页面,我们先输入一个错误的密码或者用户名试一下。

密码不对,会弹出一个错误的框,现在没有错误提示,我们给它加上错误的提示。
handleLogin() {
this.$refs.loginForm.validate(valid => {
if (valid) {
this.loading = true
this.$store.dispatch('Login', this.loginForm).then(() => {
this.loading = false
this.$router.push({ path: this.redirect || '/' })
}).catch(() => {
this.loading = false
})
} else {
console.log('error submit!!')
return false
}
})
this.$notify.error({
title: '登录失败',
message: '请输入正确的用户名或密码!'
})
    }
然后我对页面做了一些调整,我把代码贴出了来,你们直接粘贴过去就可以了,在/views/login/index.vue的文件里,直接复制粘贴即可。
<template>
  <div class="login-container">
    <el-form ref="loginForm" :model="loginForm" :rules="loginRules" class="login-form" auto-complete="on" label-position="left">
      <h3 class="title">个 人 博 客 管 理 系 统</h3>
      <el-form-item prop="username">
        <span class="svg-container">
          <svg-icon icon-class="user" />
        </span>
        <el-input v-model="loginForm.username" name="username" type="text" auto-complete="on" placeholder="账号" />
      </el-form-item>
      <el-form-item prop="password">
        <span class="svg-container">
          <svg-icon icon-class="password" />
        </span>
        <el-input
          :type="pwdType"
          v-model="loginForm.password"
          name="password"
          auto-complete="on"
          placeholder="密码"
          @keyup.enter.native="handleLogin" />
        <span class="show-pwd" @click="showPwd">
          <svg-icon :icon-class="pwdType === 'password' ? 'eye' : 'eye-open'" />
        </span>
      </el-form-item>
      <el-form-item>
        <el-button :loading="loading" type="primary" style="width:100%;" @click.native.prevent="handleLogin">
          登录
        </el-button>
      </el-form-item>
    </el-form>
  </div>
</template>

<script>
import { isvalidUsername } from '@/utils/validate'

export default {
  name: 'Login',
  data() {
    const validateUsername = (rule, value, callback) => {
      if (!isvalidUsername(value)) {
        callback(new Error('请输入正确的用户名'))
      } else {
        callback()
      }
    }
    const validatePass = (rule, value, callback) => {
      if (value.length < 5) {
        callback(new Error('密码不能小于5位'))
      } else {
        callback()
      }
    }
    return {
      loginForm: {
        username: undefined,
        password: undefined
      },
      loginRules: {
        username: [{ required: true, trigger: 'blur', validator: validateUsername }],
        password: [{ required: true, trigger: 'blur', validator: validatePass }]
      },
      loading: false,
      pwdType: 'undefined',
      redirect: undefined
    }
  },
  watch: {
    $route: {
      handler: function(route) {
        this.redirect = route.query && route.query.redirect
      },
      immediate: true
    }
  },
  methods: {
    showPwd() {
      if (this.pwdType === 'password') {
        this.pwdType = ''
      } else {
        this.pwdType = 'password'
      }
    },
    handleLogin() {
      this.$refs.loginForm.validate(valid => {
        if (valid) {
          this.loading = true
          this.$store.dispatch('Login', this.loginForm).then(() => {
            this.loading = false
            this.$router.push({ path: this.redirect || '/' })
          }).catch(() => {
            this.loading = false
          })
        } else {
          console.log('error submit!!')
          return false
        }
      })
      this.$notify.error({
        title: '登录失败',
        message: '请输入正确的用户名或密码!'
      })
    }
  }
}
</script>

<style rel="stylesheet/scss" lang="scss">
$bg:#2d3a4b;
$light_gray:#eee;

/* reset element-ui css */
.login-container {
  .el-input {
    display: inline-block;
    height: 47px;
    width: 85%;
    input {
      background: transparent;
      border: 0px;
      -webkit-appearance: none;
      border-radius: 0px;
      padding: 12px 5px 12px 15px;
      color: $light_gray;
      height: 47px;
      &:-webkit-autofill {
        -webkit-box-shadow: 0 0 0px 1000px $bg inset !important;
        -webkit-text-fill-color: #fff !important;
      }
    }
  }
  .el-form-item {
    border: 1px solid rgba(255, 255, 255, 0.1);
    background: rgba(0, 0, 0, 0.1);
    border-radius: 5px;
    color: #454545;
  }
}

</style>

<style rel="stylesheet/scss" lang="scss" scoped>
$bg:#2d3a4b;
$dark_gray:#889aa4;
$light_gray:#eee;
.login-container {
  position: fixed;
  height: 100%;
  width: 100%;
  background-color: $bg;
  .login-form {
    position: absolute;
    left: 0;
    right: 0;
    width: 520px;
    max-width: 100%;
    padding: 35px 35px 15px 35px;
    margin: 120px auto;
  }
  .tips {
    font-size: 14px;
    color: #fff;
    margin-bottom: 10px;
    span {
      &:first-of-type {
        margin-right: 16px;
      }
    }
  }
  .svg-container {
    padding: 6px 5px 6px 15px;
    color: $dark_gray;
    vertical-align: middle;
    width: 30px;
    display: inline-block;
  }
  .title {
    font-size: 26px;
    font-weight: 400;
    color: $light_gray;
    margin: 0px auto 40px auto;
    text-align: center;
    font-weight: bold;
  }
  .show-pwd {
    position: absolute;
    right: 10px;
    top: 7px;
    font-size: 16px;
    color: $dark_gray;
    cursor: pointer;
    user-select: none;
  }
}
</style>
现在基本上完成了我们的登录,接下来我们会前后端联调接口,通过页面来添加文章、删除等功能。后边我再对页面进行优化吧,现在先这样。今天看到一句话,我感觉讲的很实际,在这里分享一下:不以实战为目的的任何学习都是耍流氓,最终还是要走向实战。
二、前后端分离会话问题解决
我再测试的时候发现一个后台的问题,就是我们登录的时候拿到的Cookie没有进行后端的会话存储,导致我们页面请求出现302的问题,前后端的分离问题要考虑会话存储的问题,所以我们现在先解决前后端分离项目中使用shiro的会话问题。要不然页面请求的接口会出现问题。我当时也没考虑页面的问题,只用了postman测了一下。
我这里选择的是redis来存储会话信息 。
1、导入shiro整合redis的jar包
在我们项目的pom.xml中添加如下:
<dependency>
     <groupId>org.crazycake</groupId>
     <artifactId>shiro-redis</artifactId>
     <version>2.4.2.1-RELEASE</version>
</dependency>
2、自定义SessionManager类
我们在项目的shiro包中新建一个MySessionManager.java类,然后这个类继承DefaultWebSessionManager类。
package com.blog.personalblog.shiro;

import org.apache.shiro.web.servlet.ShiroHttpServletRequest;
import org.apache.shiro.web.session.mgt.DefaultWebSessionManager;
import org.apache.shiro.web.util.WebUtils;
import org.springframework.util.StringUtils;

import javax.servlet.ServletRequest;
import javax.servlet.ServletResponse;
import java.io.Serializable;

/**
 * @author: SuperMan
 * @create: 2022-04-14
 **/
public class MySessionManager extends DefaultWebSessionManager {
    private static final String AUTHORIZATION = "Authorization";

    private static final String REFERENCED_SESSION_ID_SOURCE = "Stateless request";

    public MySessionManager() {
        super();
    }

    @Override
    protected Serializable getSessionId(ServletRequest request, ServletResponse response) {
        String id = WebUtils.toHttp(request).getHeader(AUTHORIZATION);
        //如果请求头中有 Authorization 则其值为sessionId
        if (!StringUtils.isEmpty(id)) {
            request.setAttribute(ShiroHttpServletRequest.REFERENCED_SESSION_ID_SOURCE, REFERENCED_SESSION_ID_SOURCE);
            request.setAttribute(ShiroHttpServletRequest.REFERENCED_SESSION_ID, id);
            request.setAttribute(ShiroHttpServletRequest.REFERENCED_SESSION_ID_IS_VALID, Boolean.TRUE);
            return id;
        } else {
            //否则按默认规则从cookie取sessionId
            return super.getSessionId(request, response);
        }
    }
}
这里大家可能会问,这个类是干嘛的,什么是SessionManager?
**SessionManager:**会话管理,即用户登录后就是一次会话,在没有退出之前,它的所有信息都在会话中;会话可以是普通 JavaSE 环境的,也可以是如 Web 环境的,负责管理shiro自己封装的session的生命周期。
为什么shiro要自己封装session?
1.可以为任意应用提供session支持,不依赖于底层容器
2.简单扩容session管理容器,可以实现任何数据源(redis,ehcache)来管理session,而不必担心jvm内存溢出。
还有想学习更多的可以看下我找的这一篇文章:shiro详解

3、ShiroConfig配置文件注入SessionManager
写到这的时候,我们就需要下载一下redis的软件了,有很多不知道redis是干嘛的,接下来先说一下redis,这也是以后企业经常用到的,大家尽可能的多去了解和使用。
3.1、什么是redis?
Redis(Remote Dictionary Server ),即远程字典服务,是一个开源的使用ANSI C语言编写、支持网络、可基于内存亦可持久化的日志型、Key-Value数据库,并提供多种语言的API。
Redis支持主从同步、是一个高性能的key-value数据库。
redis官网地址:https://redis.io/
学习教程:https://www.runoob.com/redis/redis-tutorial.html
3.2、下载(文件版)
打开官网即可看到这个download,直接下载即可。

如果想和我的一样,关注下我的公众号:码上言,然后回复:教程,然后关于这个项目的所有软件和资料都会有。我们下载完之后,把压缩包解压后不需要安装,直接点击文件夹里面的redis-server.exe启动即可。

启动效果如下,出现这种情况就启动成功了。

这个缺点是每次启动项目前都要去启动一下redis服务,有点麻烦,我们可以找到redis的安装包,设置成开机自启即可。
3.3、下载(安装版)
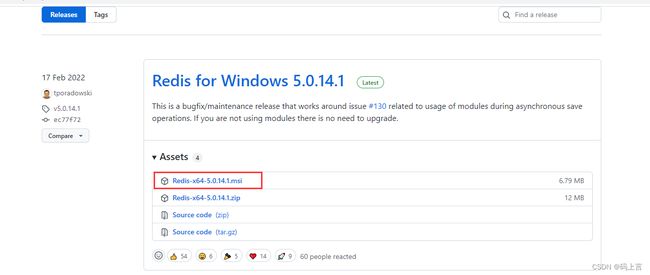
下载地址:https://github.com/tporadowski/redis/releases

下载下来之后,直接安装即可。如果下载不下来就去我公众号里下载,上边有说下载方式。
这里有几个常用的redis配置,大家学习一下。

其他的东西大家可以去菜鸟教程上边去学习,网上资料还是很多的,这个不是我们学习的重点。
3.4、注入SessionManager
(1)首先去配置文件配置redis
打开·application.yml·,然后添加如下代码,注意是spring配置下的,redis的密码我的为空,你可以看你安装时是不是设置了密码,如果是解压的基本上都是空。
  redis:
    host: 127.0.0.1
    port: 6379
    timeout: 300
    password:
  data:
    redis:
      repositories:
        enabled: false

然后我们在就在ShiroConfig类中引入这些配置。这里用到了一个注解@Value
    @Value("${spring.redis.host}")
    private String host;
    @Value("${spring.redis..port}")
    private int port;
    @Value("${spring.redis.timeout}")
    private int timeout;
    @Value("${spring.redis.password}")
    private String password;
(2)自定义sessionManger
    /**
     * 自定义sessionManager,用户的唯一标识,即Token或Authorization的认证
     * @return
     */
    @Bean
    public SessionManager sessionManager() {
        //创建一个上面自定的SessionManager
        MySessionManager mySessionManager = new MySessionManager();
        mySessionManager.setSessionDAO(redisSessionDAO());
        return mySessionManager;
    }
(3)配置shiro redisManager
在这个方法里面,就使用了我们配置的redis的信息,以后需要改动的时候直接改配置文件即可,也是规范化开发。
    /**
     * 配置shiro redisManager,使用的是shiro-redis开源插件
     *
     * @return
     */
    public RedisManager redisManager() {
        RedisManager redisManager = new RedisManager();
        redisManager.setHost(host);
        redisManager.setPort(port);
        // 配置缓存过期时间
        redisManager.setExpire(1800);
        redisManager.setTimeout(timeout);
        redisManager.setPassword(password);
        return redisManager;
    }
(4)cacheManager 缓存
    /**
     * cacheManager 缓存 redis实现
     * @return
     */
    @Bean
    public RedisCacheManager cacheManager() {
        RedisCacheManager redisCacheManager = new RedisCacheManager();
        redisCacheManager.setRedisManager(redisManager());
        return redisCacheManager;
    }
(5)自定义session管理
    /**
     * RedisSessionDAO shiro sessionDao层的实现 通过redis
     * @return
     */
    @Bean
    public RedisSessionDAO redisSessionDAO() {
        RedisSessionDAO redisSessionDAO = new RedisSessionDAO();
        // 自定义session管理 使用redis
        redisSessionDAO.setRedisManager(redisManager());
        return redisSessionDAO;
    }
3.5、SessionManager注入安全管理器
这个方法我们之前已经写过了,只是没有配置redis这个,现在再加入这个。
    @Bean
    public SecurityManager securityManager() {
        DefaultWebSecurityManager securityManager =  new DefaultWebSecurityManager();
        //一定要通过上面的定义来加载自定义realm,否则在自定义realm中无法注入service层
        securityManager.setRealm(myShiroRealm());
        // 自定义session管理 使用redis
        securityManager.setSessionManager(sessionManager());
        // 自定义缓存实现 使用redis
        securityManager.setCacheManager(cacheManager());
        return securityManager;
    }
一切都配置完成之后,我们再修改一下我们之前的配置过滤规则shirFilter这个方法。这里只需要去掉info接口即可。将这个注释掉即可
filterChainDefinitionMap.put("/user/info", "anon");
然后我们再去登录的接口,打开UserController.java,找到info接口,我们这里可以获取到登录的用户了,我们再修改一下。
    /**
     * 登录info信息
     * @return
     */
    @GetMapping("/info")
    public JsonResult<Object> info(){
        String username = (String) SecurityUtils.getSubject().getPrincipal();
        User user = userService.getUserByUserName(username);
        Map<String, Object> ret = new HashMap<>(3);
        ret.put("roles", "[admin]");
        ret.put("name", user.getUserName());
        ret.put("avatar","https://wpimg.wallstcn.com/f778738c-e4f8-4870-b634-56703b4acafe.gif");
        return JsonResult.success(ret);
    }
好啦,到现在我们的改造完了,下面去打开前端项目,运行,进行登录一下。看到登录进来name为admin这个是真实的用户,你可以再换一个用户,看看是否会变。

到这里,后端的问题已经解决,下面我们去写页面。
如果你点击登录控制台出现302错误,请检查一下前端的代码中headers是否正确。

三、计划
在这最后说一下接下来的计划,下面主要是对页面和后台的对接,还有个操作日志没有写,下一篇我先把这个写了,然后再连接页面,估计没有几篇就可以写完了,从去年的10月份写到了现在,中间写写停停,让大家等了那么久,我的技术有限,我把我所学的东西尽可能的回馈给大家,出于学习的心态,可能写的不好,希望大家多理解。移动端的我想了下,先不写,等下一个项目再加上,或者想要学习的可以私聊我加好友,方便沟通。
上一篇:Spring Boot + vue-element 开发个人博客项目实战教程(十六、登录功能实现(上))
下一篇:Spring Boot + vue-element 开发个人博客项目实战教程(十八、操作日志功能实现)