【Web开发】Python实现Web服务器(CentOS下运行Flask)
文章目录
- 1、简介
- 2、安装
-
- 2.1 安装Centos
- 2.2 安装python
- 2.3 安装虚拟环境
- 2.4 修改国内源
- 2.5 安装flask库
- 3、测试
-
- 3.1 flask官方例子
- 结语
1、简介
CentOS 大家应该很熟悉了,英文全称:Community Enterprise Operating System(社区企业操作系统),是 RHEL(红帽企业 Linux) 的免费发行版本,也是目前市面上用得最多的最火的商用 Linux 发行版。

CentOS Stream 是 RHEL(红帽企业 Linux) 搞的一个滚动更新的 Linux 发行版,即没有像 CentOS Linux 6/7/8 这样的大版本了,以后都是滚动的小版本更新,它会优先使用各种新特性和新内核,待稳定之后再发布 RHEL 版本。

CentOS Linux 发行版是一个稳定、可预测、可管理和 源自红帽企业 Linux 源代码的可重现平台 (RHEL)。自 2004 年 3 月起,CentOS Linux 成为社区支持的发行版 来源于红帽免费向公众提供的来源。因此,CentOS Linux的目标是在功能上与RHEL兼容。我们主要更换包装 删除上游供应商品牌和插图。CentOS Linux是免费且可以免费重新分发的。
2、安装
2.1 安装Centos
https://www.centos.org/
Centos是一个主流的Linux操作系统,免费稳定;
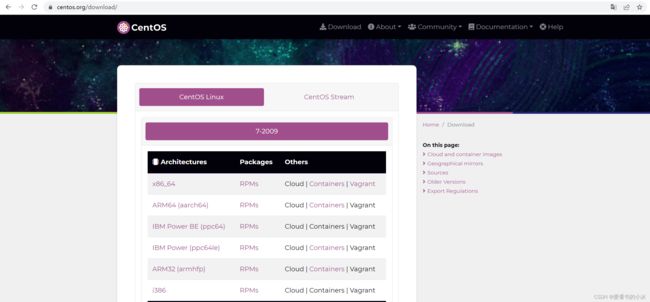
首先我们去Centos官网下载新版本的Centos:

由于是国外线路比较慢,我们一般是建议下载内部版本。
提供有DVD安装版本,完整版以及最低版本;我们为了方便在虚拟机中安装,需要下载DVD版本,
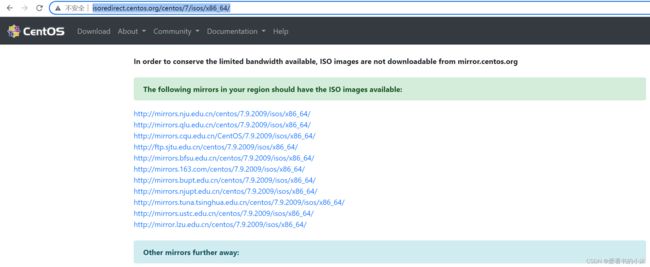
推荐阿里云可以下载:https://http://mirrors.aliyun.com/centos/7/isos/x86_64/下载那个DVD版本即可

http://mirrors.nju.edu.cn/centos/7.9.2009/isos/x86_64/
http://mirrors.qlu.edu.cn/centos/7.9.2009/isos/x86_64/
http://mirrors.cqu.edu.cn/CentOS/7.9.2009/isos/x86_64/
http://ftp.sjtu.edu.cn/centos/7.9.2009/isos/x86_64/
http://mirrors.bfsu.edu.cn/centos/7.9.2009/isos/x86_64/
http://mirrors.163.com/centos/7.9.2009/isos/x86_64/
http://mirrors.bupt.edu.cn/centos/7.9.2009/isos/x86_64/
http://mirrors.njupt.edu.cn/centos/7.9.2009/isos/x86_64/
http://mirrors.tuna.tsinghua.edu.cn/centos/7.9.2009/isos/x86_64/
http://mirrors.ustc.edu.cn/centos/7.9.2009/isos/x86_64/
http://mirror.lzu.edu.cn/centos/7.9.2009/isos/x86_64/
- 可获取系统内核版本
uname -a
- 获取系统版本信息
cat /proc/version
- 获取系统发行版信息
cat /etc/issue
cat /etc/redhat-release
2.2 安装python
Centos7默认自带了Python2.7版本。
# python的当前版本
python -V

# python的位置
whereis python
- python在 /usr/bin目录
cd /usr/bin/
ll python*

python指向的是python2,python2指向的是python2.7,因此我们可以装个python3,然后将python指向python3,然后python2指向python2.7,那么两个版本的python就能共存了。
运行了如上命令以后,就安装了编译python3所用到的相关依赖:
yum install zlib-devel bzip2-devel openssl-devel ncurses-devel sqlite-devel readline-devel tk-devel gcc make
#运行这个命令添加epel扩展源
yum -y install epel-release
yum -y install libffi-devel
#安装pip
yum install python-pip
- 用pip装wget
pip install wget
- 用wget下载python3的源码包
wget http://npm.taobao.org/mirrors/python/3.8.10/Python-3.8.10.tar.xz
- 编译python3源码包
#解压
xz -d Python-3.8.10.tar.xz
tar -xf Python-3.8.10.tar

#进入解压后的目录,依次执行下面命令进行手动编译
cd Python-3.8.10
./configure prefix=/usr/local/python3
make && make install

# 如果出现can't decompress data; zlib not available这个错误,则需要安装相关库
#安装依赖zlib、zlib-devel
yum install zlib zlib
yum install zlib zlib-devel
- 添加软连接
#添加python3的软链接
ln -s /usr/local/python3/bin/python3.8 /usr/bin/python3

#添加 pip3 的软链接
ln -s /usr/local/python3/bin/pip3.8 /usr/bin/pip3
python3 -V
pip3 -V

这里没有链接到python上,是因为yum要用到python2才能执行,所以现在输入python的话还是会进入python2.7,输入python3才会进入python3.8。如果执意想要链接到python的话,就得修改一下yum的配置:
#将原来的链接备份
mv /usr/bin/python /usr/bin/python.bak

#添加python3的软链接
ln -s /usr/local/python3/bin/python3.8 /usr/bin/python

#测试是否安装成功了
python -V
更改yum配置,因为其要用到python2才能执行,否则会导致yum不能正常使用。
vi /usr/bin/yum
把 #! /usr/bin/python 修改为 #! /usr/bin/python2

vi /usr/libexec/urlgrabber-ext-down
把 #! /usr/bin/python 修改为 #! /usr/bin/python2
2.3 安装虚拟环境
python -m venv myvenv
2.4 修改国内源
- 临时使用pip镜像源:
可以在使用pip的时候加参数-i https://pypi.tuna.tsinghua.edu.cn/simple
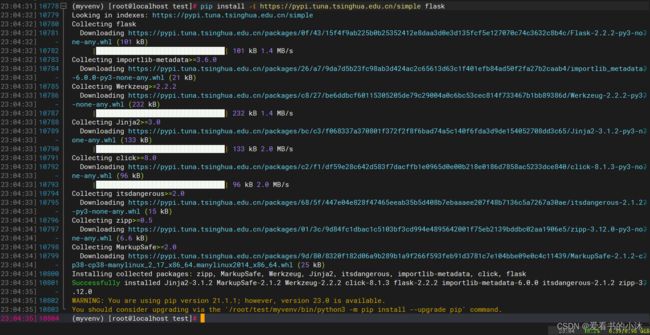
pip install -i https://pypi.tuna.tsinghua.edu.cn/simple flask
- 永久修改pip镜像源:
Linux下,修改 ~/.pip/pip.conf (没有就创建一个文件夹及文件。文件夹要加“.”,表示是隐藏文件夹)
[global]
index-url = https://pypi.tuna.tsinghua.edu.cn/simple
[install]
trusted-host=mirrors.aliyun.com
2.5 安装flask库
pip安装flask库。
pip3 install flask
pip3 install -i https://pypi.tuna.tsinghua.edu.cn/simple flask
pip3 install -i https://pypi.tuna.tsinghua.edu.cn/simple pyecharts
pip3 install -i https://pypi.tuna.tsinghua.edu.cn/simple pyinstaller
3、测试
3.1 flask官方例子
- test.py
from flask import Flask, request, jsonify
app = Flask(__name__)

@app.route('/')
def hello_world():
    return 'Hello World,爱看书的小沐!'

@app.route('/test', methods=['GET', 'POST'])
def train_status():
    if request.method == 'GET':
        return jsonify({'code': 200, 'status': 'false', 'msg': 'hello'})
    else:
        return jsonify({'code': 500, 'msg': '不支持该请求'})

if __name__ == '__main__':
    app.run(host="0.0.0.0", port=8080)
python test.py
CentOS防火墙操作:开启端口、开启、关闭、配置。
- 基本使用
启动: systemctl start firewalld
关闭: systemctl stop firewalld
查看状态: systemctl status firewalld
开机禁用  : systemctl disable firewalld
开机启用  : systemctl enable firewalld
- 配置firewalld-cmd
查看版本: firewall-cmd --version
查看帮助: firewall-cmd --help
显示状态: firewall-cmd --state
查看所有打开的端口: firewall-cmd --zone=public --list-ports
更新防火墙规则: firewall-cmd --reload
查看区域信息:  firewall-cmd --get-active-zones
查看指定接口所属区域: firewall-cmd --get-zone-of-interface=eth0
拒绝所有包:firewall-cmd --panic-on
取消拒绝状态: firewall-cmd --panic-off
查看是否拒绝: firewall-cmd --query-panic
- 开启防火墙端口
# –permanent永久生效,没有此参数重启后失效
firewall-cmd --add-service=http --permanent
sudo firewall-cmd --add-port=2888/tcp --permanent
sudo firewall-cmd --add-port=3888/tcp --permanent
- 重启防火墙
firewall-cmd --reload
- 查看开放端口号
firewall-cmd --list-all
在设置了防火墙之后,浏览器终于可以成功访问flask服务器的页面,如下:
http://192.168.136.129:8080
http://192.168.136.129:8080/test
结语
如果您觉得该方法或代码有一点点用处,可以给作者点个赞,或打赏杯咖啡;╮( ̄▽ ̄)╭
如果您感觉方法或代码不咋地//(ㄒoㄒ)//,就在评论处留言,作者继续改进;o_O???
如果您需要相关功能的代码定制化开发,可以留言私信作者;(✿◡‿◡)
感谢各位大佬童鞋们的支持!( ´ ▽´ )ノ ( ´ ▽´)っ!!!


