smqtt:高性能开源MQTT消息代理Broker
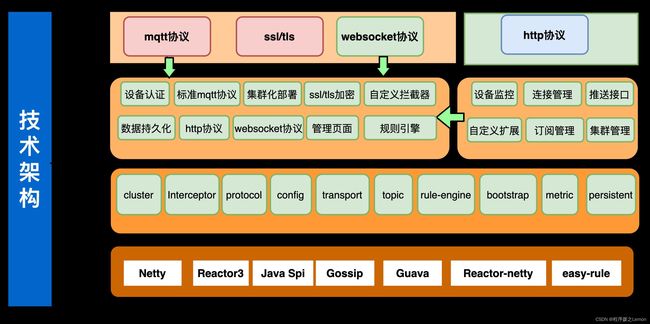
SMQTT基于reactor-netty(spring-webflux底层依赖) 开发,底层采用Reactor3反应堆模型,支持单机部署,支持容器化部署,具备低延迟,高吞吐量,支持百万TCP连接,同时支持多种协议交互,是一款非常优秀的消息中间件!
一:smqtt目前拥有的功能如下:
1:消息质量等级实现(支持qos0,qos1,qos2)
2:topicFilter支持
①topic分级(test/test)
②+支持(单层匹配
③ 支持(多层匹配)
3:会话消息
①默认内存存储
②支持持久化(redis/db)
4:保留消息
①默认内存存储
②支持持久化(redis/db)
5:遗嘱消息
①设备掉线时候触发
6:客户端认证
①支持spi注入外部认证
7:tls加密
①支持tls加密(mqtt端口/http端口)
8:websocket协议支持
①使用mqtt over websocket
9:http协议交互
①支持http接口推送消息
②支持spi扩展http接口
10:SPI接口扩展支持
①消息管理接口(会话消息/保留消息管理)
②通道管理接口 (管理系统的客户端连接)
③认证接口 (用于自定义外部认证)
④ 拦截器 (用户自定义拦截消息)
10:集群支持(gossip协议实现)
12:容器化支持
①默认镜像最新tag: 1ssqq1lxr/smqtt
13:持久化支持(session 保留消息)
14:规则引擎支持
15:支持springboot starter启动
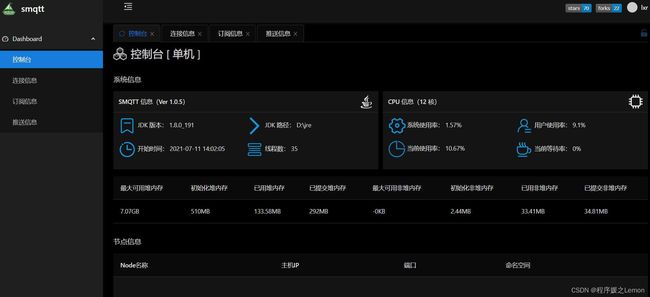
16:管理后台
请参考smqtt文档如何启动管理后台
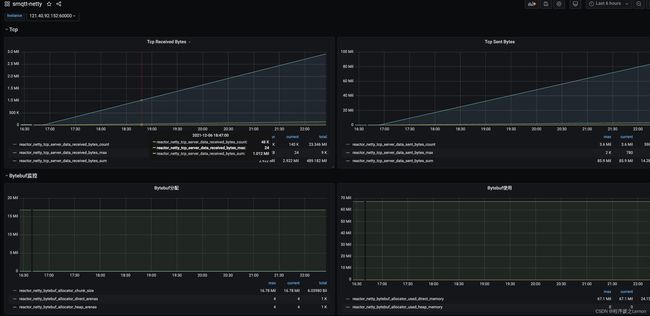
17:grafana监控集成
①支持influxdb
②支持prometheus
18:ACL权限管理
①对设备、资访问授权
19:认证模块
①支持http
②支持匿名
③支持固定密码
④支持sql
二:尝试一下
| 管理 | 说明 | 其他 |
|---|---|---|
| 121.40.92.152:1883 | mqtt端口 | 用户名:smqtt 密码:smqtt |
| 121.40.92.152:18888 | mqtt over websocket | 用户名:smqtt 密码:smqtt |
| http://121.40.92.152:60000/smqtt/admin | 管理后台 | 用户名:smqtt 密码:smqtt |
三:商业化版本
如果遇到接入性能问题,或者需要定制化开发的,我们提供SY版本出售,WX17512575402
四:启动方式
1:main方式启动
<!--smqtt依赖 -->
<dependency>
  <groupId>io.github.quickmsg</groupId>
  <artifactId>smqtt-core</artifactId>
  <version>${Latest version}</version>
</dependency>
<!--集群依赖 -->
<dependency>
   <artifactId>smqtt-registry-scube</artifactId>
   <groupId>io.github.quickmsg</groupId>
   <version>${Latest version}</version>
</dependency>
<!--管理ui依赖 -->
<dependency>
   <artifactId>smqtt-ui</artifactId>
   <groupId>io.github.quickmsg</groupId>
   <version>${Latest version}</version>
</dependency>
2:阻塞式启动服务:
   Bootstrap.builder()
                .rootLevel(Level.INFO)
                .websocketConfig(
                        BootstrapConfig.WebsocketConfig
                                .builder()
                                .enable(false)
                                .path("/mqtt")
                                .port(8888)
                                .build()
                )
                .tcpConfig(
                        BootstrapConfig
                                .TcpConfig
                                .builder()
                                .port(1883)
                                .ssl(SslContext.builder().enable(false).build())
                                .build())
                .httpConfig(
                        BootstrapConfig
                                .HttpConfig
                                .builder()
                                .enable(false)
                                .accessLog(true)
                                .admin(BootstrapConfig.HttpAdmin.builder().enable(true).username("smqtt").password("smqtt").build())
                                .build())
                .clusterConfig(
                        BootstrapConfig.
                                ClusterConfig
                                .builder()
                                .enable(false)
                                .namespace("smqtt")
                                .node("node-1")
                                .port(7773)
                                .url("127.0.0.1:7771,127.0.0.1:7772").
                                build())
                .build()
                .startAwait();
3:非阻塞式启动服务
   Bootstrap.builder()
                .rootLevel(Level.INFO)
                .websocketConfig(
                        BootstrapConfig.WebsocketConfig
                                .builder()
                                .enable(false)
                                .path("/mqtt")
                                .port(8888)
                                .build()
                )
                .tcpConfig(
                        BootstrapConfig
                                .TcpConfig
                                .builder()
                                .port(1883)
                                .ssl(SslContext.builder().enable(false).build())
                                .build())
                .httpConfig(
                        BootstrapConfig
                                .HttpConfig
                                .builder()
                                .enable(false)
                                .accessLog(true)
                                .admin(BootstrapConfig.HttpAdmin.builder().enable(true).username("smqtt").password("smqtt").build())
                                .build())
                .clusterConfig(
                        BootstrapConfig.
                                ClusterConfig
                                .builder()
                                .enable(false)
                                .namespace("smqtt")
                                .node("node-1")
                                .port(7773)
                                .url("127.0.0.1:7771,127.0.0.1:7772").
                                build())
                .build()
                .startAwait();
4:jar方式:
1:下载源码 mvn compile package -Dmaven.test.skip=true -P jar,web
下载源码 mvn compile package -Dmaven.test.skip=true -P jar,web
2:下载源码 mvn compile package -Dmaven.test.skip=true -P jar,web
config.yaml
3:启动服务
java -jar smqtt-bootstrap-1.0.1-SNAPSHOT.jar
5:docker 方式
拉取镜像
拉取docker镜像地址
docker pull 1ssqq1lxr/smqtt:latest
启动镜像默认配置
#启动服务
docker run -it -p 1883:1883 1ssqq1lxr/smqtt
#启动镜像使用自定义配置(同上准备配置文件config.yaml)
#启动服务
docker run -it -v <配置文件路径目录>:/conf -p 1883:1883 -p 1999:1999 1ssqq1lxr/smqtt
6:springboot方式
1:引入依赖
<dependency>
    <groupId>io.github.quickmsg</groupId>
    <artifactId>smqtt-spring-boot-starter</artifactId>
    <version>${Latest version >= 1.0.8}</version>
</dependency>
2:启动类Application上添加注解 @EnableMqttServer
3:配置application.yml文件
properties也支持,但是需要自己转换,没有提供demo文件
config.yaml
4:启动springboot服务服务即可
5:如果引入的是spring-boot-starter-parent的管理包,如果启动报错,则需要添加以下依赖
<dependency>
    <groupId>io.projectreactor</groupId>
    <artifactId>reactor-core</artifactId>
    <version>3.4.9</version>
</dependency>
<dependency>
<groupId>io.projectreactor.netty</groupId>
<artifactId>reactor-netty</artifactId>
<version>1.0.10</version>
</dependency>
五:地址
GitHub项目:  https://github.com/quickmsg/smqtt
Gitee项目:  https://gitee.com/quickmsg/mqtt-cluster

https://www.smqtt.cc/
//wiki
https://wiki.smqtt.cc/


