VisualStudioCode配置TypeScript编程环境
文章目录
-
- 1:下载安装nodejs
- 2:安装TypeScript Compiler
- 3:安装 Tpyings
- 4:配置TypeScript工程
-
- 1,建立项目目录
- 2,初始化NPM
- 3,创建并配置tsconfig.json
- 5:命令行 Hello TypeScript
- 6:VSCode Hello TypeScript
-
- VSCode中如何编译ts文件?
- 7:代码检查
-
- 1,安装ESLint
- 2,创建配置文件.eslintrc.json
- 3,VSCode中集成ESLint检查
- 8:代码调试
-
- 补充
1:下载安装nodejs
https://nodejs.org/en/ 这里下载安装LTS版。
安装好后,win+R打开cmd输入命令path
看nodejs目录是否加入环境变量中

若已加入,输入node -version可以查看当前版本。如上图所示。
2:安装TypeScript Compiler
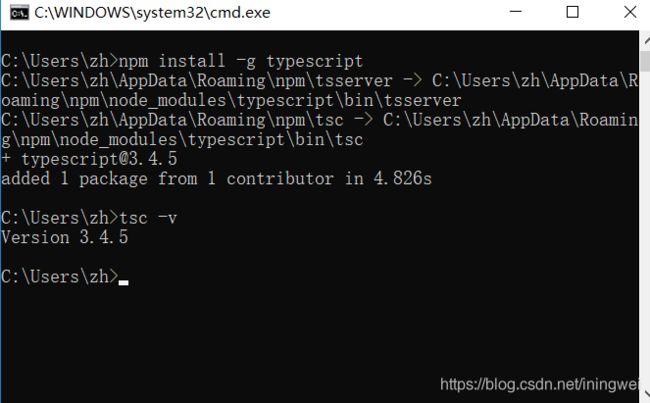
安装好Node.js后,可以直接使用npm工具来安装TypeScript,这个TypeScript的Package其实也是一个Compiler,可以通过这个Complier将typescript编译成javascript。打开命令提示符cmd,进入控制台(或其他终端Terminal),输入指令:
npm install -g typescript

要查看TypeScript Compiler版本,输入tsc -v即可.
要更新TypeScript Compiler,输入npm update -g typescript
3:安装 Tpyings
typings 主要是用来获取.d.ts文件。当typescript使用一个外部JavaScript库时,会需要这个文件,当然好多的编译器都用它来增加智能感知能力。
输入指令:npm install -g typings

4:配置TypeScript工程
1,建立项目目录
假设创建根文件夹Algorithm_TS
再在其内部创建文件夹dist和src
src用来放置ts文件,dist用来放置编译后的js文件
当前目录结构为:
Algorithm_TS
├─dist
└─src
2,初始化NPM
在Algorithm_TS目录下,执行命令
npm init -y
会在目录下生成package.json,内容如下:
{
  "name": "Algorithm_TS",
  "version": "1.0.0",
  "description": "",
  "main": "index.js",
  "scripts": {
    "test": "echo \"Error: no test specified\" && exit 1"
  },
  "keywords": [],
  "author": "",
  "license": "ISC"
}
3,创建并配置tsconfig.json
项目根目录下执行命令
tsc --init
会生成文件tsconfig.json
现在目录结构为:
Algorithm_TS
├─dist
└─src
├─package.json
└─tsconfig.json
取消tsconfig.json中outDir和rootDir的注释,并分别修改值为./dist和./src
"outDir": "./dist",
"rootDir": "./src",
这样设置之后,我们在 ./src 中编码 .ts 文件,.ts 文件编译成 .js 后,输出到 ./dist 中。
5:命令行 Hello TypeScript
在./src目录下创建index.ts,并书写代码:
const hello: string = 'hello, iningwei';
console.log(hello);
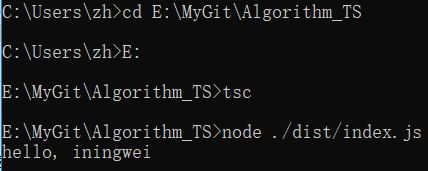
然后在项目根目录\Algorithm_TS下执行cmd命令。
tsc
node ./dist/index.js
tsc 是编译命令,详情查看:https://www.tslang.cn/docs/handbook/typescript-in-5-minutes.html
node ./dist/index.js属于tsc的编译选项,详情查看:https://www.tslang.cn/docs/handbook/compiler-options.html

可见顺利的输出目标字符串。
同时在.dist目录下也顺利生成编译后的index.js文件。
6:VSCode Hello TypeScript
上面使用纯命令行的方式来编译代码,自然效率低下。
下面祭上VisualStudioCode。使用VSCode打开文件夹根目录。然后直接点击debug按钮。
弹出如下提示:

点击上面报错页面提示的Open launch.json按钮,打开launch.json文件
{
    // Use IntelliSense to learn about possible attributes.
    // Hover to view descriptions of existing attributes.
    // For more information, visit: https://go.microsoft.com/fwlink/?linkid=830387
    "version": "0.2.0",
    "configurations": [
        {
            "type": "node",
            "request": "launch",
            "name": "Launch Program",
            "program": "${workspaceFolder}\\index.js",
            "outFiles": [
                "${workspaceFolder}/**/*.js"
            ]
        }
    ]
}
可见program的目录是错误的,我们之前编译生成的js文件是放在dist目录下的。于是修改目录。"program": "${workspaceFolder}\\dist\\index.js"
再点击debug按钮。顺利输出。

VSCode中如何编译ts文件?
上面debug是使用之前cmd中已经生成好的js文件。当把dist目录下的index.js文件删除后,再点击debug按钮。此时由于没有目标js文件,又会报错。

快捷键:ctrl+shift+b。调出tsconfig.json中配置好的编译选项。

执行tsc:build后,就会在dist/目录下生成编译好的.js文件
执行tsc:watch后,则会在有新的代码保存后,都会自动编译为.js文件,不需要手动编译了。
7:代码检查
代码检查主要是用来发现代码错误、统一代码风格。
详情可以查看:https://ts.xcatliu.com/engineering/lint.html
1,安装ESLint
ESLint 可以安装在当前项目中或全局环境下,因为代码检查是项目的重要组成部分,所以我们一般会将它安装在当前项目中。
在项目根目录下运行命令来安装: npm install eslint --save-dev
由于 ESLint 默认使用 Espree 进行语法解析,无法识别 TypeScript 的一些语法,故我们需要安装 typescript-eslint-parser,替代掉默认的解析器,别忘了同时安装 typescript,项目根目录执行命令:npm install typescript typescript-eslint-parser --save-dev
由于 typescript-eslint-parser 对一部分 ESLint 规则支持性不好,故我们需要安装 eslint-plugin-typescript,弥补一些支持性不好的规则。
项目根目录执行命令:npm install eslint-plugin-typescript --save-dev
2,创建配置文件.eslintrc.json
ESLint 需要一个配置文件来决定对哪些规则进行检查,配置文件的名称一般是 .eslintrc.js 或 .eslintrc.json。
当运行 ESLint 的时候检查一个文件的时候,它会首先尝试读取该文件的目录下的配置文件,然后再一级一级往上查找,将所找到的配置合并起来,作为当前被检查文件的配置。
在项目根目录执行命令eslint --init,按需求,选择相应的选项。
type of modules一项选择JavaScript modules
配置文件格式选择json格式
最终会在根目录生成文件.eslintrc.json。在该文件增加一行"parser":"typescript-eslint-parser"替换掉默认的解析器,使之识别 TypeScript 的一些语法,最终文件内容如下面所示:
{
	"parser":"typescript-eslint-parser",
    "env": {
        "browser": true,
        "es6": true
    },
    "extends": "eslint:recommended",
    "globals": {
        "Atomics": "readonly",
        "SharedArrayBuffer": "readonly"
    },
    "parserOptions": {
        "ecmaVersion": 2018,
        "sourceType": "module"
    },
    "rules": {
    }
}
3,VSCode中集成ESLint检查
点击「扩展」按钮,搜索 ESLint,然后安装即可。
VSCode 中的 ESLint 插件默认是不会检查 .ts 后缀的,需要在「File -> Preferences-> Settings」中,搜索eslint.validate,按照提示打开settings.json文件,并添加以下配置:
"eslint.validate": ["typescript" ]
把代码let num: number = 1; if (num == 2) { console.log(num); }复制到./src/index.ts中,会发现console.log弹出错误提示。
打开.eslintrc.json,在rules项中增加"no-console":0,即可过滤掉对console的检查。
至此项目结构为:
Algorithm_TS
└─.vscode
└─launch.json
└─dist
└─index.js
└─node_modules
└─src
└─index.ts
└─.eslintrc.json
└─package.json
└─package-lock.json
└─tsconfig.json
8:代码调试
代码调试借助ts-node
在项目根目录,执行命令:npm install -D ts-node
若我们有时候跳过了上面的第7步,即没有配置eslint,直接设置代码调试的话,那么还需要在根目录执行命令:npm install typescript。这是因为代码调试需要依赖模块typescript,否则的话,调试的时候会报错:internal/modules/cjs/loader.js:584 Error: Cannot find module ‘typescript’。(上述第7步,是安装了该模块的)
修改launch.json文件,添加runtimeArgs和args两项。最终如下:
{
    // Use IntelliSense to learn about possible attributes.
    // Hover to view descriptions of existing attributes.
    // For more information, visit: https://go.microsoft.com/fwlink/?linkid=830387
    "version": "0.2.0",
    "configurations": [
        {
            "type": "node",
            "request": "launch",
            "name": "Launch Program",
            "program": "${workspaceFolder}\\dist\\index.js",
            "outFiles": [
                "${workspaceFolder}/**/*.js"
            ],
            "runtimeArgs": [
                "-r",
                "ts-node/register"   //注册
              ],
            "args": [
                "${workspaceFolder}/src/index.ts"  // 入口文件
              ]
        }
    ]
}
同时还要把tsconfig.json文件中的"sourceMap": true前的注释取消。
再次编译后,会发现dist/目录下生成了index.js.map。于是可以愉快的F9加断点,F5调试了。
补充
默认情况下tsconfig.json文件中"strict": true是开启的,这将会导致执行很严格的代码检查。
比如let a:number=null,会提示错误。虽然代码依旧能够编译并运行。
根据需要可以关闭严格执行代码检查。