微服务API网关--Spring Cloud Gateway
1.什么是API 网关
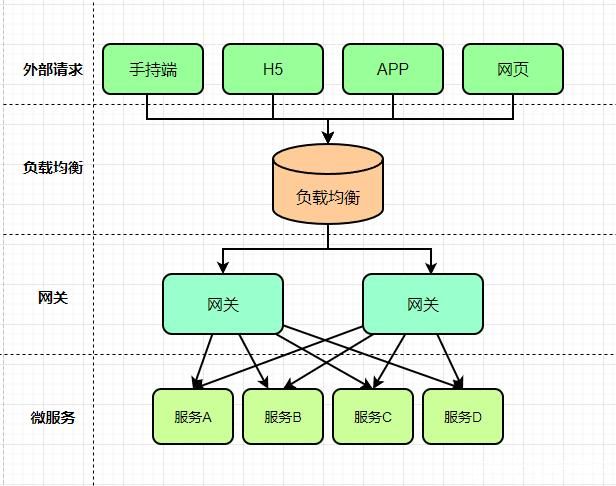
API网关是随着微服务概念兴起的一种架构模式,它是运行于外部请求与内部服务之间的一个流量入口,用于实现对外部请求的协议转换、鉴权、流控、参数校验、监控等通用功能。
1.1 背景
在微服务架构中,通常一个系统会被拆分为多个微服务,面对这么多微服务客户端应该如何去调用呢?如果根据每个微服务的地址发起调用,存在如下问题:
- 客户端多次请求不同的微服务,会增加客户端代码和配置的复杂性,维护成本比价高
- 认证复杂,每个微服务可能存在不同的认证方式,客户端去调用,要去适配不同的认证
- 存在跨域的请求,调用链有一定的相对复杂性(防火墙 / 浏览器不友好的协议)
- 难以重构,随着项目的迭代,可能需要重新划分微服务
为了解决上面的问题,微服务引入了 API网关 的概念,API网关为微服务架构的系统提供简单、有效且统一的API路由管理,作为系统的统一入口,提供内部服务的路由中转,给客户端提供统一的服务,可以实现一些和业务没有耦合的公用逻辑,主要功能包含认证、鉴权、路由转发、安全策略、防刷、流量控制、监控日志等。
1.2 什么是Spring Cloud Gateway
Spring Cloud Gateway 是Spring Cloud官方推出的第二代网关框架,定位于取代 Netflix Zuul。Spring Cloud Gateway 旨在为微服务架构提供一种简单且有效的 API 路由的管理方式,并基于 Filter 的方式提供网关的基本功能,例如说安全认证、监控、限流等等。
Spring Cloud Gateway 是由 WebFlux + Netty + Reactor 实现的响应式的 API 网关。它不能在传统的 servlet 容器中工作,也不能构建成 war 包。
官方文档:https://docs.spring.io/spring-cloud-gateway/docs/current/reference/html/
1.2.1 核心概念
- 路由(route)
路由是网关中最基础的部分,路由信息包括一个ID、一个目的URI、一组断言工厂、一组Filter组成。 - 断言(predicates)
Java8中的断言函数,SpringCloud Gateway中的断言函数类型是Spring5.0框架中的ServerWebExchange。断言函数允许开发者去定义匹配Http request中的任何信息,比如请求头和参数等。如果断言为真,则说明请求的URL和配置的路由匹配。
Java - 过滤器(Filter)
SpringCloud Gateway中的filter分为Gateway FilIer和Global Filter。Filter可以对请求和响应进行处理。
1.2.2 工作原理
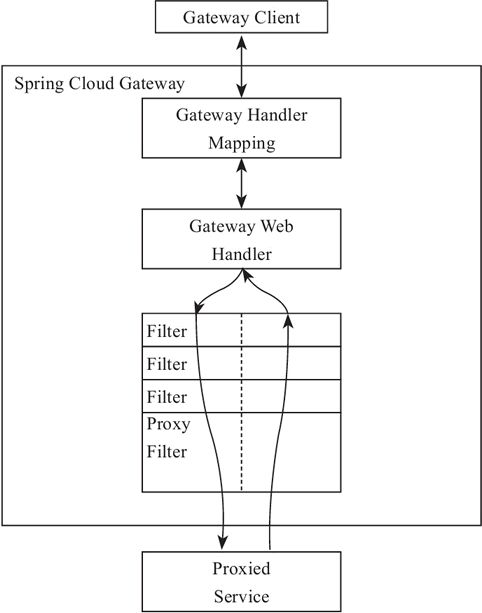
Spring Cloud Gateway 的工作原理跟 Zuul 的差不多,最大的区别就是 Gateway 的 Filter 只有 pre 和 post 两种。
客户端向 Spring Cloud Gateway 发出请求,如果请求与网关程序定义的路由匹配,则该请求就会被发送到网关 Web 处理程序,此时处理程序运行特定的请求过滤器链。
过滤器之间用虚线分开的原因是过滤器可能会在发送代理请求的前后执行逻辑。所有 pre 过滤器逻辑先执行,然后执行代理请求;代理请求完成后,执行 post 过滤器逻辑。
2.Spring Cloud Gateway实战
2.1 微服务接入Spring Cloud Gateway
1) 引入依赖
<!-- gateway网关 -->
<dependency>
    <groupId>org.springframework.cloud</groupId>
    <artifactId>spring-cloud-starter-gateway</artifactId>
</dependency>

<!-- nacos服务注册与发现 -->
<dependency>
    <groupId>com.alibaba.cloud</groupId>
    <artifactId>spring-cloud-starter-alibaba-nacos-discovery</artifactId>
</dependency>
注意:会和spring-webmvc的依赖冲突,需要排除spring-webmvc
2) 编写yml配置文件
spring:
  application:
    name: mall-gateway
  #配置nacos注册中心地址
  cloud:
    nacos:
      discovery:
        server-addr: 127.0.0.1:8848

    gateway:
      #设置路由:路由id、路由到微服务的uri、断言
      routes:
        - id: order_route  #路由ID,全局唯一,建议配置服务名
          uri: lb://mall-order  #lb 整合负载均衡器ribbon,loadbalancer
          predicates:
            - Path=/order/**   # 断言,路径相匹配的进行路由

        - id: user_route   #路由ID,全局唯一,建议配置服务名
          uri: lb://mall-user  #lb 整合负载均衡器ribbon,loadbalancer
          predicates:
            - Path=/user/**   # 断言,路径相匹配的进行路由
3)测试
http://localhost:8888/order/findOrderByUserId/1
2.2 路由断言工厂(Route Predicate Factories)配置
predicates:路由断言,判断请求是否符合要求,符合则转发到路由目的地。application.yml配置文件中写的断言规则只是字符串,这些字符串会被Predicate Factory读取并处理,转变为路由判断的条件。
文档:https://docs.spring.io/spring-cloud-gateway/docs/current/reference/html/#gateway-request-predicates-factories
2.2.1 路径匹配
spring:
  cloud:
    gateway:
      #设置路由:路由id、路由到微服务的uri、断言
      routes:
      - id: order_route  #路由ID,全局唯一
        uri: lb://mall-order  #目标微服务的请求地址和端口
        predicates:
         # 测试:http://localhost:8888/order/findOrderByUserId/1
        - Path=/order/**    # 断言,路径相匹配的进行路由
2.2.2 Header匹配
spring:
  cloud:
    gateway:
      #设置路由:路由id、路由到微服务的uri、断言
      routes:
      - id: order_route  #路由ID,全局唯一
        uri: lb://mall-order  #目标微服务的请求地址和端口
        predicates:
          - Path=/order/**   # 断言,路径相匹配的进行路由
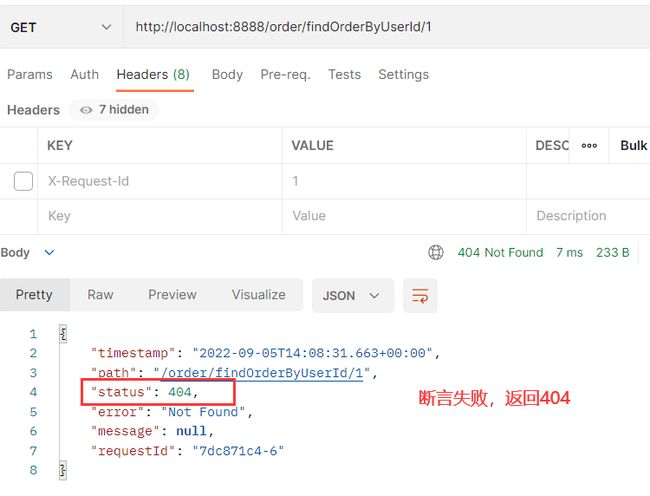
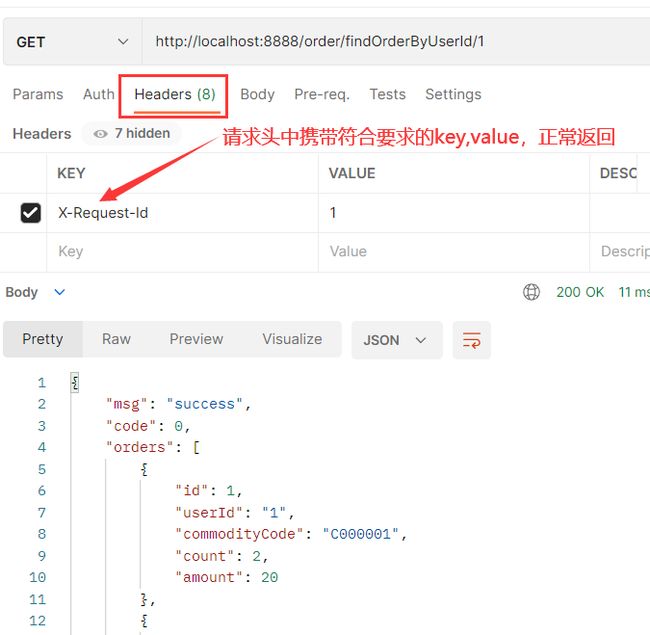
         # Header匹配  请求中带有请求头名为 x-request-id,其值与 \d+ 正则表达式匹配
         - Header=X-Request-Id, \d+
2.3 过滤器工厂( GatewayFilter Factories)配置
GatewayFilter是网关中提供的一种过滤器,可以对进入网关的请求和微服务返回的响应做处理
https://docs.spring.io/spring-cloud-gateway/docs/current/reference/html/#gatewayfilter-factories
2.3.1 添加请求头
需求:给所有进入mall-order的请求添加一个请求头:X-Request-color=red。
只需要修改gateway服务的application.yml文件,添加路由过滤即可:
spring:
  cloud:
    gateway:
      #设置路由:路由id、路由到微服务的uri、断言
      routes:
      - id: order_route  #路由ID,全局唯一
        uri: http://localhost:8020  #目标微服务的请求地址和端口
        #配置过滤器工厂
        filters:
        - AddRequestHeader=X-Request-color, red  #添加请求头
@GetMapping("/testgateway")
public String testGateway(HttpServletRequest request) throws Exception {
    log.info("gateWay获取请求头X-Request-color:"
            +request.getHeader("X-Request-color"));
    return "success";
}
@GetMapping("/testgateway2")
public String testGateway(@RequestHeader("X-Request-color") String color) throws Exception {
    log.info("gateWay获取请求头X-Request-color:"+color);
    return "success";
}
2.3.2 添加请求参数
spring:
  cloud:
    gateway:
      #设置路由:路由id、路由到微服务的uri、断言
      routes:
      - id: order_route  #路由ID,全局唯一
        uri: http://localhost:8020  #目标微服务的请求地址和端口
        #配置过滤器工厂
        filters:
        - AddRequestParameter=color, blue  # 添加请求参数
@GetMapping("/testgateway3")
public String testGateway3(@RequestParam("color") String color) throws Exception {
    log.info("gateWay获取请求参数color:"+color);
    return "success";
}
2.3.3 自定义过滤器工厂
继承AbstractNameValueGatewayFilterFactory且我们的自定义名称必须要以GatewayFilterFactory结尾并交给spring管理。
@Component
@Slf4j
public class CheckAuthGatewayFilterFactory extends AbstractNameValueGatewayFilterFactory {

    @Override
    public GatewayFilter apply(NameValueConfig config) {
        return (exchange, chain) -> {
            log.info("调用CheckAuthGatewayFilterFactory==="
                    + config.getName() + ":" + config.getValue());
            return chain.filter(exchange);
        };
    }
}
配置自定义的过滤器工厂
spring:
  cloud:
    gateway:
      #设置路由:路由id、路由到微服务的uri、断言
      routes:
      - id: order_route  #路由ID,全局唯一
        uri: http://localhost:8020  #目标微服务的请求地址和端口
        #配置过滤器工厂
        filters:
        - CheckAuth=fox,男   #自定义过滤器工厂
测试
2.4 全局过滤器(Global Filters)配置
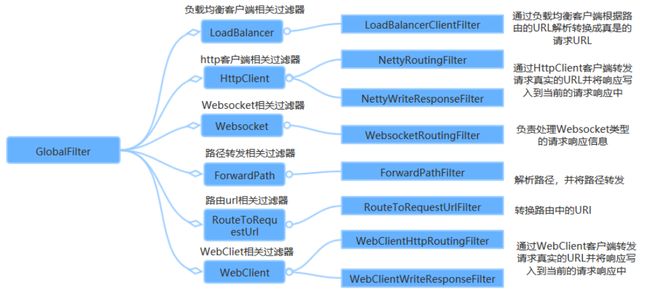
全局过滤器的作用也是处理一切进入网关的请求和微服务响应,与GatewayFilter的作用一样。
- GatewayFilter:网关过滤器,需要通过spring.cloud.routes.filters配置在具体的路由下,只作用在当前特定路由上,也可以通过配置spring.cloud.default-filters让它作用于全局路由上。
- GlobalFilter: 全局过滤器,不需要再配置文件中配置,作用在所有的路由上,最终通过GatewayFilterAdapter包装成GatewayFilterChain能够识别的过滤器。
https://docs.spring.io/spring-cloud-gateway/docs/current/reference/html/#global-filters
2.4.1 LoadBalancerClientFilter
LoadBalancerClientFilter 会查看exchange的属性 ServerWebExchangeUtils.GATEWAY_REQUEST_URL_ATTR 的值(一个URI),如果该值的scheme是 lb,比如:lb://myservice ,它将会使用Spring Cloud的LoadBalancerClient 来将 myservice 解析成实际的host和port,并替换掉ServerWebExchangeUtils.GATEWAY_REQUEST_URL_ATTR 的内容。
其实就是用来整合负载均衡器Ribbon的。
spring:
  cloud:
    gateway:
      routes:
      - id: order_route
        uri: lb://mall-order
        predicates:
        - Path=/order/**
2.4.2 自定义全局过滤器
自定义全局过滤器定义方式是实现GlobalFilter接口。每一个过滤器都必须指定一个int类型的order值,order值越小,过滤器优先级越高,执行顺序越靠前。GlobalFilter通过实现Ordered接口来指定order值。
@Component
@Slf4j
public class CheckAuthFilter implements GlobalFilter, Ordered {
    @Override
    public Mono<Void> filter(ServerWebExchange exchange, GatewayFilterChain chain) {
        //获取token
        String token = exchange.getRequest().getHeaders().getFirst("token");
        if (null == token) {
            log.info("token is null");
            ServerHttpResponse response = exchange.getResponse();
            response.getHeaders().add("Content-Type",
                    "application/json;charset=UTF-8");
            // 401 用户没有访问权限
            response.setStatusCode(HttpStatus.UNAUTHORIZED);
            byte[] bytes = HttpStatus.UNAUTHORIZED.getReasonPhrase().getBytes();
            DataBuffer buffer = response.bufferFactory().wrap(bytes);
            // 请求结束,不继续向下请求
            return response.writeWith(Mono.just(buffer));
        }
        //TODO 校验token进行身份认证
        log.info("校验token");
        return chain.filter(exchange);
    }

    @Override
    public int getOrder() {
        return 2;
    }
}
2.5 Gateway跨域配置(CORS Configuration)
在前端领域中,跨域是指浏览器允许向服务器发送跨域请求,从而克服Ajax只能同源使用的限制。
同源策略(Same Orgin Policy)是一种约定,它是浏览器核心也最基本的安全功能,它会阻止一个域的js脚本和另外一个域的内容进行交互,如果缺少了同源策略,浏览器很容易受到XSS、CSFR等攻击。所谓同源(即在同一个域)就是两个页面具有相同的协议(protocol)、主机(host)和端口号(port)
如何解决gateway跨域问题?
通过yml配置的方式
https://docs.spring.io/spring-cloud-gateway/docs/current/reference/html/#cors-configuration
spring:
  cloud:
    gateway:
    globalcors:
      cors-configurations:
        '[/**]':
          allowedOrigins: "*"
          allowedMethods:
          - GET
          - POST
          - DELETE
          - PUT
          - OPTION
通过java配置的方式
@Configuration
public class CorsConfig {
    @Bean
    public CorsWebFilter corsFilter() {
        CorsConfiguration config = new CorsConfiguration();
        config.addAllowedMethod("*");
        config.addAllowedOrigin("*");
        config.addAllowedHeader("*");

        UrlBasedCorsConfigurationSource source = new UrlBasedCorsConfigurationSource(new PathPatternParser());
        source.registerCorsConfiguration("/**", config);

        return new CorsWebFilter(source);
    }
}
