爬虫实战(一)Python+selenium自动化获取数据存储到Mysql中
行话说得好,“爬虫学得好,牢饭吃到饱!”哈哈博主是因这句话入的坑,不为别的就为邀大家一起铁窗泪(bushi),本人虽小牛一只,但是喜爱捣鼓技术,有兴趣的小伙伴们可以共同探讨,也欢迎各位大佬们的指点,愿共同进步!
从Selenium自动化测试到Mysql数据库
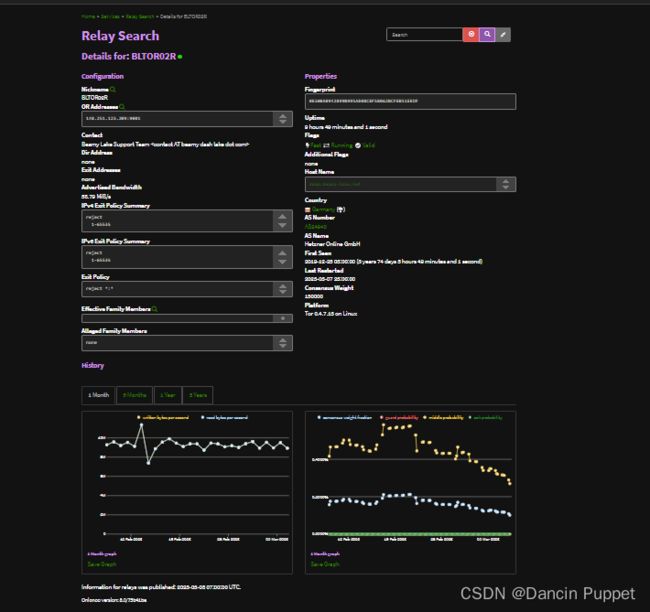
这次计划是爬取外网某网站https://metrics.torproject.org/rs.html#details/0E300A0942899B995AE08CEF58062BCFEB51EEDF页面的内容,页面中除了正常的文本数据外,还包含了数张js加载的历史数据统计图,将爬取的文本数据直接以字符形式插入表中,图片数据需要处理为二进制后存入。素材使用的工具是Pycharm+python3.7(个人相当推荐Pycharm,不用考虑python版本于库版本是否匹配的问题,设置黑色的界面风格很有让人写代码的冲动,而且3月4号刚上线chatgpt插件),武器库呢采用的是反爬利器selenium web自动化测试,使用版本是3.141.0。从python连接数据库使用的是Pymysql1.0.2。数据库选用的是Mariadb,没找到免费Mysql,民间还是开源的Mariadb呼声更高。
Selenium自动化测试
selenium的好处在于对于一般网页的反爬虫手段有着很好的反制策略,例如常见的有请求头反爬虫,这个也是最简单的,如果不给定请求头,对方服务器就不会理你,需要设置的参数有User-Agent、Referer和Cookie。还包括有的网站会使用js接口传递数据。甚至有时你会发现自己的请求语句完全正确但是就是定位到页面元素,那就可能是使用了iframe框架,可以理解为网页嵌套。能够做到这些手段的网站不多,对于数据十分金贵的知网算的上一个,这里挖个小坑后面实战项目会有的。对于selenium还不熟悉的小伙伴,博主推荐Selenium with Python中文翻译文档https://selenium-python-zh.readthedocs.io/en/latest/
- 库文件
from selenium import webdriver
import pymysql as sql
import time
import random
- Webdriver初始化
webdriver要和自己的chrome浏览器版本相对应(使用火狐浏览器也是可以的),不知道下载哪个版本来这里http://chromedriver.storage.googleapis.com/index.html
self.url="https://metrics.torproject.org/rs.html#details/0E300A0942899B995AE08CEF58062BCFEB51EEDF"
self.driver_path=r"D:\python\chromedriver.exe"
#获取数据
self.lable=[]
self.tip=[]
self.content=[]
self.image_f=[]
self.image_s=[]
self.time=[]
- 访问页面
headless赋值为True是开启无头模式测试,初次使用webdriver自动化测试的小伙伴可以去掉这行体验一下
option=webdriver.ChromeOptions()
option.headless=True
option.binary_location=r'D:\Google\Chrome\Application\chrome.exe'
self.driver = webdriver.Chrome(executable_path=self.driver_path,options=option)
self.driver.get(self.url)
time.sleep(10)#这里也可以使用self.driver.implicitly_wait(10)
implicitly_wait(10) 隐性等待的好处是在设定的时间内只要加载完毕就执行下一步,不用像time.sleep那样强行等待10秒钟
- 获取文本数据
# 获取lable
wash=self.driver.find_elements_by_tag_name('h3')
metri.wash_data(wash,0)#wash_data()调用函数对获取到的数据进行清洗
#获取tip
wash=self.driver.find_elements_by_class_name('tip')
wash.pop(0)
metri.wash_data(wash,2)
#获取content
wash=self.driver.find_elements_by_tag_name('dd')
metri.wash_data(wash,1)
metri是使用类class的名称:metri=metrics(),由于网页设计的原因有时开发人员的无规律设计可能导致我们获取的数据与期望存在偏差,小问题清洗一下就好了
- 获取折线图
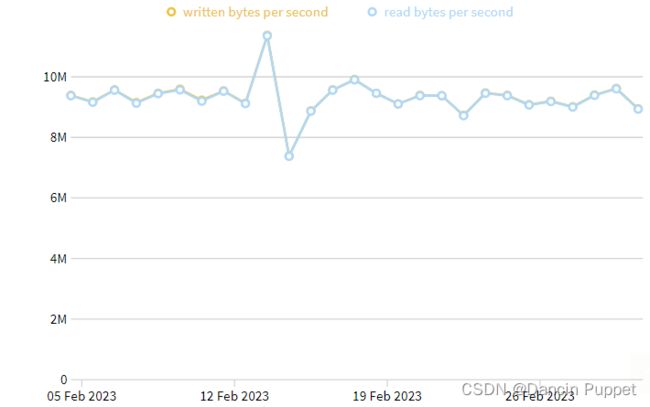
对于这类难获取,获取后难以可视化的情形(如下图),博主非常推荐使用selenium中screenshoot_as_png按元素定位拍照的方法
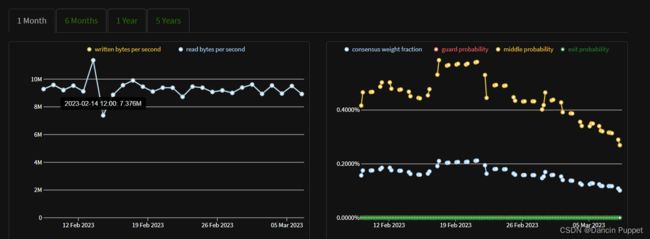
一筹莫展的时候正好发现了screenshoot的功能,可谓是柳暗花明又一村
self.image_f.append(self.driver.find_element_by_xpath('//*[@id="bw_month"]').screenshot_as_png)
self.image_s.append(self.driver.find_element_by_xpath('//*[@id="weights_month"]').screenshot_as_png)
self.time.append(self.driver.find_element_by_id('history-1m-tab').text)
Mysql数据库
Mariadb和Oracle甲骨文旗下的Mysql之间的渊源,感兴趣的小伙伴可以去了解一下,Mariadb由于是开源的软件所以更新迭代的次数要比Mysql多,但是两者的语法和大体功能上是相同的
- 初始化信息
在开始运行前一定要安装配置好mysql,我这里使用的是mariadb附上下载链接https://mariadb.com/downloads/,登录界面长这样

mysql登录信息
    def __init__(self):
        # mysql登录信息
        self.host='127.0.0.1'
        self.user='root'
        self.password='123456'
        self.chartset='utf8'#编码格式注意这里不是utf-8,数据库这里的参数配置没有'-'
        self.database='metrics_db'#数据库名称
- 建立数据库
 def set_sqldb(self,sql):
        db = sql.connect(
            host=self.host,
            user=self.user,
            password=self.password,
            charset=self.chartset,
        )
        cursor=db.cursor()
        try:
            cursor.execute("create database metrics_db character set utf8;")
        except:
            pass
        cursor.close()
        db.close()
- 建立数据表
    #建立mysql数据表
    def set_sqlist(self,sql,list_lable):
        db=sql.connect(
            host=self.host,
            user=self.user,
            password=self.password,
            charset=self.chartset,
            database=self.database
        )
        cursor=db.cursor()
        sql="""drop table if exists `%s`"""%((list_lable))
        cursor.execute(sql)
        if list_lable=='History':
            sql = """
                       create table if not  exists `%s`(id int auto_increment primary key comment'序列号',
                       time VARCHAR(255) not null comment '月份',
                       graph1 longblob comment '图片',
                       graph2 longblob comment '图片');""" % (list_lable)
        else:
            sql="""
                        create table if not  exists `%s`(id int auto_increment primary key comment'序列号',
                        item VARCHAR(255) not null comment '项目名称',
                        value VARCHAR(255) not null comment '内容',
                        notes VARCHAR(255) not null comment '备注');"""%(list_lable)
        cursor.execute(sql)
        cursor.close()
        db.close()
这里博主建表个数是依据爬取页面lable的个数,故在命名时要使用变量建表,格式为代码中sql=“”" “”"三双引号内的部分,这里就不得不吐槽一下python里引号类型是真的多(单引号,双引号,三引号,三双引号)一不留神就用错了
数据库中导入数据
- 插入文本数据
 # 添加文本数据
    def insert_txt_sqldb(self,sql,list_lable,st1,st2):
        db = sql.connect(
            host=self.host,
            user=self.user,
            password=self.password,
            charset=self.chartset,
            database=self.database
        )
        cursor=db.cursor()
        sql = """insert into `%s`(item,value,notes)values ('%s','%s','%s')""" % ((list_lable), st1, st2, 'null')
        try:
            # 执行sql语句
            cursor.execute(sql)
            # 数据库执行sql语句
            db.commit()
        except Exception as res:
            # 发生错误时回滚
            db.rollback()
            print("error %s" % res)

        cursor.close()
        db.close()
- 插入图片数据
 def insert_picture_sqldb(self,sql,list_lable):
        db = sql.connect(
            host=self.host,
            user=self.user,
            password=self.password,
            charset=self.chartset,
            database=self.database
        )
        cursor=db.cursor()
        sql="insert into History(time,graph1,graph2)values(%s,%s,%s);"
        for i in range(len(self.time)):
            try:
                # 执行sql语句
                cursor.execute(sql,[self.time[i],self.image_f[i],self.image_s[i]])
                # 数据库执行sql语句
                db.commit()
            except Exception as res:
                # 发生错误时回滚
                db.rollback()
                print("error %s" % res)

        cursor.close()
        db.close()
相信细心的小伙伴已经发现了,之前在建表的时候sql语句中分了两种格式,如下,graph1列对应的数据是longblob,blob是二进制数据类型,在数据库中有blob,mediumblob以及longblob,区别就在于存储数据的大小,插入指令为sql=“insert into History(time,graph1,graph2)values(%s,%s,%s);”,cursor.execute(sql,[self.time[i],self.image_f[i],self.image_s[i]])同样表明为变量插入时格式也为变量形式
sql = """
           create table if not  exists `%s`(id int auto_increment primary key comment'序列号',
           time VARCHAR(255) not null comment '月份',
           graph1 longblob comment '图片',
           graph2 longblob comment '图片');""" % (list_lable)
结果展示(一)
Configuration标签数据
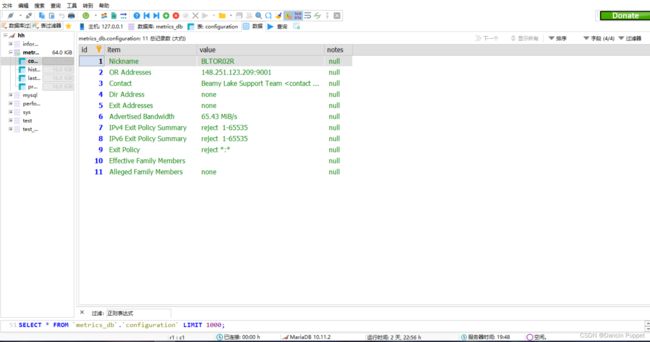
Properties标签数据

History折线图数据
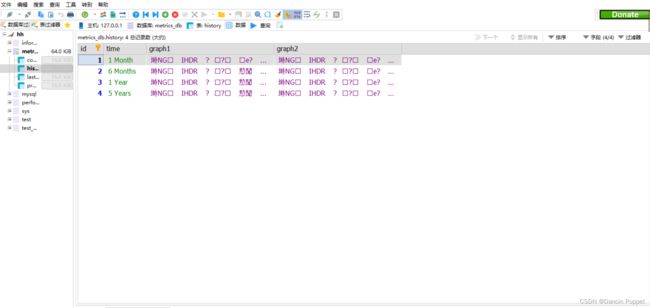
当然二进制形式不方便查看,我们再从Mysql中将数据提取出保存为本地文件
图片本地存储
    def extract_picture(self,sql):
        db = sql.connect(
            host=self.host,
            user=self.user,
            password=self.password,
            charset=self.chartset,
            database=self.database
        )
        cursor = db.cursor()
        cursor.execute('select graph1 from History')
        out_1=cursor.fetchall()
        cursor.execute('select graph2 from History')
        out_2=cursor.fetchall()
        for i in range(4):
            with open('pair'+str(i+1)+'_graph_1.png',mode="wb")as f1:
                f1.write(out_1[i][0])
                f1.close()
            time.sleep(random.uniform(2, 3))
            with open('pair'+str(i+1)+'_graph_2.png',mode="wb")as f2:
                f2.write(out_2[i][0])
                f2.close()
            time.sleep(random.uniform(2, 3))
        cursor.close()
        db.close()
结果展示(二)
History折线图片数据本地保存效果
附上代码
感谢大家的驻足,最后附上代码,有什么问题欢迎评论区留言,下期见!
from selenium import webdriver
import pymysql as sql
import time
import random

class metrics(object):
    # 初始化信息
    def __init__(self):
        # mysql登录信息
        self.host='127.0.0.1'
        self.user='root'
        self.password='123456'
        self.chartset='utf8'
        self.database='metrics_db'
        #webdriver初始化
        self.url="https://metrics.torproject.org/rs.html#details/0E300A0942899B995AE08CEF58062BCFEB51EEDF"
        self.driver_path=r"D:\python\chromedriver.exe"
        #获取数据
        self.lable=[]
        self.tip=[]
        self.content=[]
        self.image_f=[]
        self.image_s=[]
        self.time=[]
    #建立数据库
    def set_sqldb(self,sql):
        db = sql.connect(
            host=self.host,
            user=self.user,
            password=self.password,
            charset=self.chartset,
        )
        cursor=db.cursor()
        try:
            cursor.execute("create database metrics_db character set utf8;")
        except:
            pass
        cursor.close()
        db.close()

    #建立mysql数据表
    def set_sqlist(self,sql,list_lable):
        db=sql.connect(
            host=self.host,
            user=self.user,
            password=self.password,
            charset=self.chartset,
            database=self.database
        )
        cursor=db.cursor()
        sql="""drop table if exists `%s`"""%((list_lable))
        cursor.execute(sql)
        if list_lable=='History':
            sql = """
                       create table if not  exists `%s`(id int auto_increment primary key comment'序列号',
                       time VARCHAR(255) not null comment '月份',
                       graph1 longblob comment '图片',
                       graph2 longblob comment '图片');""" % (list_lable)
        else:
            sql="""
                        create table if not  exists `%s`(id int auto_increment primary key comment'序列号',
                        item VARCHAR(255) not null comment '项目名称',
                        value VARCHAR(255) not null comment '内容',
                        notes VARCHAR(255) not null comment '备注');"""%(list_lable)
        cursor.execute(sql)
        cursor.close()
        db.close()

    # 数据转换清洗
    def wash_data(self,wash,flag):
        if flag==0:
            for i in range(len(wash)):
                self.lable.append(wash[i].text)

        a=0
        if flag==1:
            for i in range(len(wash)):
                if(wash[i].text)=='':
                    a+=1
                    if a==2:
                        continue
                self.content.append(wash[i].text)

        b=0
        if flag==2:
            for i in range(len(wash)):
                if(b==0):
                    self.tip.append(wash[i].text)
                if(b!=0):
                    b-=1
                if wash[i].text=='Flags':
                    b=3
                if wash[i].text=='Advertised Bandwidth':
                    b=1
    # 添加图片数据
    def insert_picture_sqldb(self,sql,list_lable):
        db = sql.connect(
            host=self.host,
            user=self.user,
            password=self.password,
            charset=self.chartset,
            database=self.database
        )
        cursor=db.cursor()
        sql="insert into History(time,graph1,graph2)values(%s,%s,%s);"
        for i in range(len(self.time)):
            try:
                # 执行sql语句
                cursor.execute(sql,[self.time[i],self.image_f[i],self.image_s[i]])
                # 数据库执行sql语句
                db.commit()
            except Exception as res:
                # 发生错误时回滚
                db.rollback()
                print("error %s" % res)

        cursor.close()
        db.close()

    #访问网页
    def website_get(self):
        option=webdriver.ChromeOptions()
        option.headless=True
        option.binary_location=r'D:\Google\Chrome\Application\chrome.exe'
        self.driver = webdriver.Chrome(executable_path=self.driver_path,options=option)
        self.driver.get(self.url)
        time.sleep(10)
        # 获取lable
        wash=self.driver.find_elements_by_tag_name('h3')
        metri.wash_data(wash,0)
        #获取tip
        wash=self.driver.find_elements_by_class_name('tip')
        wash.pop(0)
        metri.wash_data(wash,2)
        #获取content
        wash=self.driver.find_elements_by_tag_name('dd')
        metri.wash_data(wash,1)
        #获取image曲线图
        self.image_f.append(self.driver.find_element_by_xpath('//*[@id="bw_month"]').screenshot_as_png)
        self.image_s.append(self.driver.find_element_by_xpath('//*[@id="weights_month"]').screenshot_as_png)
        self.time.append(self.driver.find_element_by_id('history-1m-tab').text)

        self.driver.find_element_by_id('history-6m-tab').click()
        self.image_f.append(self.driver.find_element_by_xpath('//*[@id="bw_months"]').screenshot_as_png)
        self.image_s.append(self.driver.find_element_by_xpath('//*[@id="weights_months"]').screenshot_as_png)
        self.time.append(self.driver.find_element_by_id('history-6m-tab').text)

        self.driver.find_element_by_id('history-1y-tab').click()
        self.image_f.append(self.driver.find_element_by_xpath('//*[@id="bw_year"]').screenshot_as_png)
        self.image_s.append(self.driver.find_element_by_xpath('//*[@id="weights_year"]').screenshot_as_png)
        self.time.append(self.driver.find_element_by_id('history-1y-tab').text)

        self.driver.find_element_by_id('history-5y-tab').click()
        self.image_f.append(self.driver.find_element_by_xpath('//*[@id="bw_years"]').screenshot_as_png)
        self.image_s.append(self.driver.find_element_by_xpath('//*[@id="weights_years"]').screenshot_as_png)
        self.time.append(self.driver.find_element_by_id('history-5y-tab').text)


    # 添加文本数据
    def insert_txt_sqldb(self,sql,list_lable,st1,st2):
        db = sql.connect(
            host=self.host,
            user=self.user,
            password=self.password,
            charset=self.chartset,
            database=self.database
        )
        cursor=db.cursor()
        sql = """insert into `%s`(item,value,notes)values ('%s','%s','%s')""" % ((list_lable), st1, st2, 'null')
        try:
            # 执行sql语句
            cursor.execute(sql)
            # 数据库执行sql语句
            db.commit()
        except Exception as res:
            # 发生错误时回滚
            db.rollback()
            print("error %s" % res)

        cursor.close()
        db.close()
    # 本地存储图片数据
    def extract_picture(self,sql):
        db = sql.connect(
            host=self.host,
            user=self.user,
            password=self.password,
            charset=self.chartset,
            database=self.database
        )
        cursor = db.cursor()
        cursor.execute('select graph1 from History')
        out_1=cursor.fetchall()
        cursor.execute('select graph2 from History')
        out_2=cursor.fetchall()
        for i in range(4):
            with open('pair'+str(i+1)+'_graph_1.png',mode="wb")as f1:
                f1.write(out_1[i][0])
                f1.close()
            time.sleep(random.uniform(2, 3))
            with open('pair'+str(i+1)+'_graph_2.png',mode="wb")as f2:
                f2.write(out_2[i][0])
                f2.close()
            time.sleep(random.uniform(2, 3))
        cursor.close()
        db.close()
    # 存入txt文件
    def save(self):
        db = sql.connect(
            host=self.host,
            user=self.user,
            password=self.password,
            charset=self.chartset,
            database=self.database
        )
        cursor = db.cursor()
        cursor.execute('select * from Configuration')
        out_put = cursor.fetchall()
        for a in out_put:
            with open('metrics_1.txt','a') as f:
                f.write(str(a)+'\n')
                f.close()
        cursor.execute('select * from Properties')

        out_put2 = cursor.fetchall()
        for a in out_put2:
            with open('metrics_2.txt', 'a') as f:
                f.write(str(a) + '\n')
                f.close()
        cursor.close()
        db.close()

if __name__=="__main__":
    metri=metrics()
    metri.set_sqldb(sql)
    metri.website_get()
    for i in range(len(metri.lable)):
        metri.set_sqlist(sql,metri.lable[i])
    # 表1
    for i in range(11):
        metri.insert_txt_sqldb(sql,metri.lable[0],metri.tip[i],metri.content[i])
    # 表2
    for i in range(11,len(metri.content)):
        metri.insert_txt_sqldb(sql,metri.lable[1],metri.tip[i],metri.content[i])
    # 表3
    metri.insert_picture_sqldb(sql,metri.lable[2])
    #提取sql图片数据并本地保存
    metri.extract_picture(sql)
    #提取所有数据保存到txt文件
    metri.save()
