为了将node.js项目转换为Java,这里对node.js语法做简单记录
文章目录
- 1. require指令来加载和引入模块
- 2. 创建服务器
- 3. 使用node命令执行node.js文件
- 4. npm使用介绍与模块安装
- 5. Node.js回调函数
- 6. EventEmitter类
- 7. Node.js事件循环
- 8. 创建Buffer类
- 9. Node.js模块系统
- 10. Node.js函数
- 11. 函数传递是如何让HTTP服务器工作的
- 12. Node.js 路由
- 13. Node.js 全局对象
- 14. Node.js Web模块
- 15. Node.js 多进程
- 16. Node.js 的 MySQL
1. require指令来加载和引入模块
// const module = require("module-name")
// module-name可以是一个文件路径,也可以是一个模块名称
const module = require("./hello");
// http是从npm包下载过来,后面有解释
const module = require("http");
2. 创建服务器
http.createServer(function(request, response){

	// 发送HTTP头部
	response.writeHead(200,{'Content-Type':'text/plain'});

	// 发送响应数据"Hello World"
	response.end('Hello World\n');
}).listen(8888);
3. 使用node命令执行node.js文件
4. npm使用介绍与模块安装
NPM是随同NodeJS一起安装的包管理工具,我们可以通过npm来安装我们需要的模块
npm 安装 Node.js 模块语法格式如下:
$ npm install express          	# 本地安装
$ npm install express -g   		# 全局安装
$ npm install express			# 本地安装express模块
安装好之后,express 包就放在了工程目录下的 node_modules 目录中,因此在代码中只需要通过 require(‘express’) 的方式就好,无需指定第三方包路径。
var express = require('express');
5. Node.js回调函数
回调函数一般作为函数的最后一个参数出现
function foo2(value, callback1, callback2) { }
【同步代码示例】
创建一个文件 input.txt ,内容如下:
菜鸟教程官网地址:www.runoob.com
创建main.js文件
var fs = require("fs");

var data = fs.readFileSync('input.txt');

console.log(data.toString());
console.log("程序执行结束!");
以上代码执行结果如下:
$ node main.js
菜鸟教程官网地址:www.runoob.com

程序执行结束!
【异步代码示例】
创建一个文件 input.txt ,内容如下:
菜鸟教程官网地址:www.runoob.com
创建main.js文件
var fs = require("fs");

fs.readFile('input.txt', function (err, data) {
    if (err) return console.error(err);
    console.log(data.toString());
});

console.log("程序执行结束!");
以上代码执行结果如下:
$ node main.js
程序执行结束!

菜鸟教程官网地址:www.runoob.com
以上两个实例我们了解了阻塞与非阻塞调用的不同。第一个实例在文件读取完后才执行程序。 第二个实例我们不需要等待文件读取完,这样就可以在读取文件时同时执行接下来的代码,大大提高了程序的性能。
6. EventEmitter类
events 模块只提供了一个对象: events.EventEmitter。EventEmitter 的核心就是事件触发与事件监听器功能的封装。
// 引入 events 模块
var events = require('events');
// 创建 eventEmitter 对象
var eventEmitter = new events.EventEmitter();
7. Node.js事件循环
当web server接收到请求,就把它关闭然后进行处理,然后去服务下一个web请求。当这个请求完成,它被放回处理队列,当到达队列开头,这个结果被返回给用户。这个模型非常高效可扩展性非常强,因为 webserver 一直接受请求而不等待任何读写操作。
8. 创建Buffer类
// 创建一个长度为 10、且用 0 填充的 Buffer。
const buf1 = Buffer.alloc(10);

// 创建一个长度为 10、且用 0x1 填充的 Buffer。
const buf2 = Buffer.alloc(10, 1);

// 创建一个长度为 10、且未初始化的 Buffer。
// 这个方法比调用 Buffer.alloc() 更快,
// 但返回的 Buffer 实例可能包含旧数据,
// 因此需要使用 fill() 或 write() 重写。
const buf3 = Buffer.allocUnsafe(10);

// 创建一个包含 [0x1, 0x2, 0x3] 的 Buffer。
const buf4 = Buffer.from([1, 2, 3]);

// 创建一个包含 UTF-8 字节 [0x74, 0xc3, 0xa9, 0x73, 0x74] 的 Buffer。
const buf5 = Buffer.from('tést');

// 创建一个包含 Latin-1 字节 [0x74, 0xe9, 0x73, 0x74] 的 Buffer。
const buf6 = Buffer.from('tést', 'latin1');
写入缓存区
buf = Buffer.alloc(256);
len = buf.write("www.runoob.com");

// 写入字节数:14
console.log("写入字节数 : "+  len);
读出缓存区
buf = Buffer.alloc(26);
for (var i = 0 ; i < 26 ; i++) {
  buf[i] = i + 97;
}

console.log( buf.toString('ascii'));       // 输出: abcdefghijklmnopqrstuvwxyz
console.log( buf.toString('ascii',0,5));   //使用 'ascii' 编码, 并输出: abcde
console.log( buf.toString('utf8',0,5));    // 使用 'utf8' 编码, 并输出: abcde
console.log( buf.toString(undefined,0,5)); // 使用默认的 'utf8' 编码, 并输出: abcde
9. Node.js模块系统
模块是Node.js 应用程序的基本组成部分,文件和模块是一一对应的。一个 Node.js 文件就是一个模块,这个文件可能是JavaScript 代码、JSON 或者编译过的C/C++ 扩展。
我们就来创建 hello.js 文件,将function通过exports暴露出去
exports.world = function() {
  console.log('Hello World');
}
创建一个 main.js 文件并引入 hello 模块,通过require将模块引入进来
var hello = require('./hello');
hello.world();
10. Node.js函数
在 JavaScript中,一个函数可以作为另一个函数的参数。我们可以先定义一个函数,然后传递,也可以在传递参数的地方直接定义函数。
function say(word) {
  console.log(word);
}

function execute(someFunction, value) {
  someFunction(value);
}

execute(say, "Hello");
11. 函数传递是如何让HTTP服务器工作的
var http = require("http");

http.createServer(function(request, response) {
  response.writeHead(200, {"Content-Type": "text/plain"});
  response.write("Hello World");
  response.end();
}).listen(8888);
12. Node.js 路由
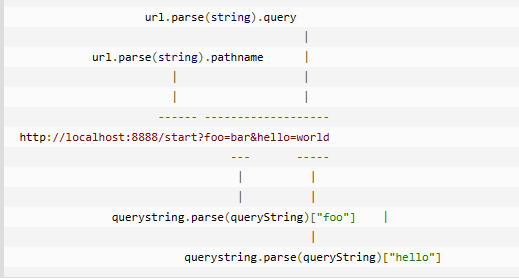
我们要为路由提供请求的 URL 和其他需要的 GET 及 POST 参数,随后路由需要根据这些数据来执行相应的代码。因此,我们需要查看 HTTP 请求,从中提取出请求的 URL 以及 GET/POST 参数。
我们需要的所有数据都会包含在 request 对象中,该对象作为 onRequest() 回调函数的第一个参数传递。但是为了解析这些数据,我们需要额外的 Node.JS 模块,它们分别是 url 和 querystring 模块。

13. Node.js 全局对象
JavaScript 中有一个特殊的对象,称为全局对象(Global Object),它及其所有属性都可以在程序的任何地方访问,即全局变量。
// 输出全局变量 __filename 的值:当前正在执行的脚本的文件名。
console.log( __filename );

// 输出全局变量 __dirname 的值:当前执行脚本所在的目录。
console.log( __dirname );

function printHello(){
   console.log( "Hello, World!");
}
// 只执行一次指定函数:两秒后执行以上函数,
setTimeout(printHello, 2000);
14. Node.js Web模块
【使用Node创建Web服务器】
var http = require('http');
var fs = require('fs');
var url = require('url');


// 创建服务器
http.createServer( function (request, response) {
   // 解析请求,包括文件名
   var pathname = url.parse(request.url).pathname;

   // 输出请求的文件名
   console.log("Request for " + pathname + " received.");

   // 从文件系统中读取请求的文件内容
   fs.readFile(pathname.substr(1), function (err, data) {
      if (err) {
         console.log(err);
         // HTTP 状态码: 404 : NOT FOUND
         // Content Type: text/html
         response.writeHead(404, {'Content-Type': 'text/html'});
      }else{
         // HTTP 状态码: 200 : OK
         // Content Type: text/html
         response.writeHead(200, {'Content-Type': 'text/html'});

         // 响应文件内容
         response.write(data.toString());
      }
      //  发送响应数据
      response.end();
   });
}).listen(8080);

// 控制台会输出以下信息
console.log('Server running at http://127.0.0.1:8080/');
【使用 Node 创建 Web 客户端】
var http = require('http');

// 用于请求的选项
var options = {
   host: 'localhost',
   port: '8080',
   path: '/index.html'
};

// 处理响应的回调函数
var callback = function(response){
   // 不断更新数据
   var body = '';
   response.on('data', function(data) {
      body += data;
   });

   response.on('end', function() {
      // 数据接收完成
      console.log(body);
   });
}
// 向服务端发送请求
var req = http.request(options, callback);
req.end();
15. Node.js 多进程
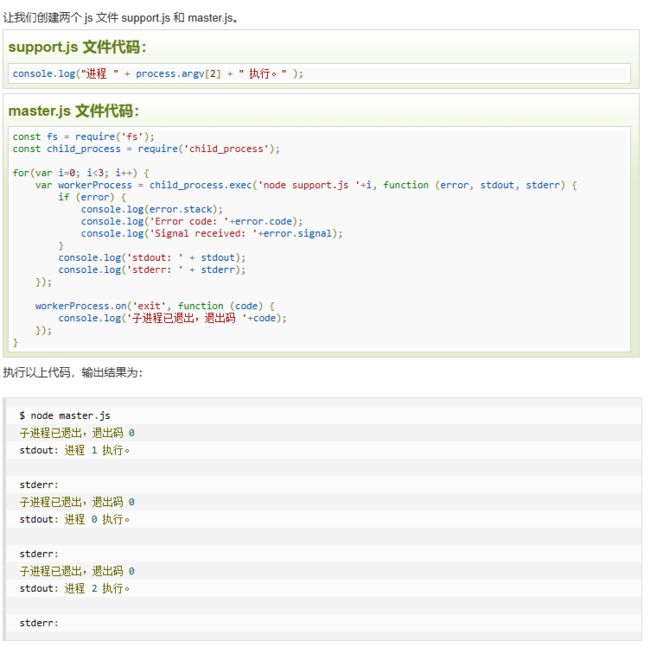
Node 提供了 child_process 模块来创建子进程,方法有:
- exec - child_process.exec 使用子进程执行命令,缓存子进程的输出,并将子进程的输出以回调函数参数的形式返回。
- spawn - child_process.spawn 使用指定的命令行参数创建新进程。
- fork - child_process.fork 是 spawn()的特殊形式,用于在子进程中运行的模块,如 fork(‘./son.js’) 相当于 spawn(‘node’, [‘./son.js’]) 。与spawn方法不同的是,fork会在父进程与子进程之间,建立一个通信管道,用于进程之间的通信。


