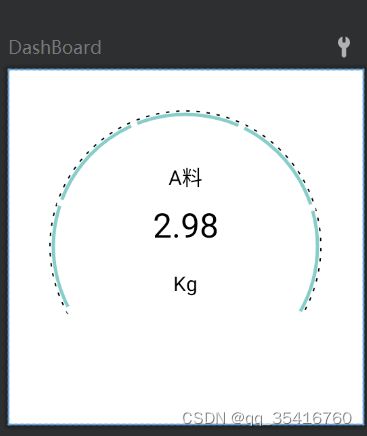
Android自定义View 文字的坐标排版
背景:需定义一个类似刻度的View
思路:
分三部分绘制:
1. 绘制最外侧的弧线,
2.给外侧虚线添加虚线效果
3.绘制旁边的有进度条的View
4.给进度条添加白色刻度
5.文字绘制
本文重点是文字绘制;
声明paint ,在onDraw 函数中 ,canvas.drawText (), 传参 drawText(@NonNull String text, float x, float y, @NonNull Paint paint)
参数详解:
text – The text to be drawn
x – The x-coordinate of the origin of the text being drawn
(x-正在绘制的文本的原点的x坐标 )
y – The y-coordinate of the baseline of the text being drawn
(y-正在绘制的文本的基线的y坐标 )
paint – The paint used for the text (e.g. color, size, style)
根据本项目 x = width/2,y需要确定文本基线的y坐标,由此引申出文本基线问题;

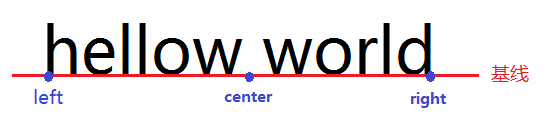
实际绘制时需要需要一个点 ,而这个点有三种对应,left、center、right。
首先将文字居中计算出文字高度从而计算出y
paint.setTextAlign(Paint.Align.CENTER);

fms = paint.getfontMetrics();

//计算文字高度
tHeight = fms.bottom  - fms.top

canvas.drawText("",mWidth / 2 -0f ,mHeight / 2 + tHeight - textHeight,paint)
文本参考:
https://www.jb51.net/article/131779.htm (文字基线计算)
自定义控件之绘图篇( 五):drawText()详解_启舰的博客-CSDN博客_drawtext
Android自定义View : 绘制汽车仪表盘,圆盘_hongwen_yul的博客-CSDN博客_android绘制仪表盘
仪表盘的绘制:
虚线的绘制:
paint .pathEffect 设置路径效果
DashPathEffect函数参数:
第一个参数是数组,且它的长度必须>=2, 数组的数字就是控制虚实虚实虚实... 长度。
第二个参数就是控制第一条线(实线)的偏移量,是向左偏移
/**
     * 虚线
     */
    fun dummyLine(paint:Paint):Paint {
        //虚线效果
        paint.pathEffect = DashPathEffect(floatArrayOf(5f, 10f), 10f)
        return paint
    }
参考:Android DashPathEffect的简单使用(如实线虚线)_梦天2015的博客-CSDN博客_android dashpatheffect
外侧圆弧的绘制:
drawArc(@NonNull RectF oval, float startAngle, float sweepAngle, boolean useCenter,
        @NonNull Paint paint)
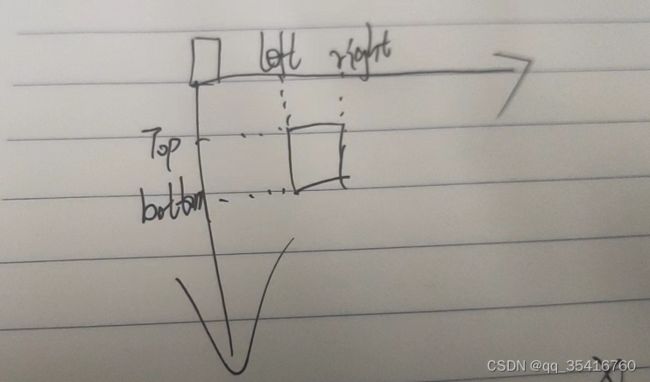
参数1:Rectf 绘制矩形,矩形绘制需要了解
Params:
left – The X coordinate of the left side of the rectangle
top – The Y coordinate of the top of the rectangle
right – The X coordinate of the right side of the rectangle
bottom – The Y coordinate of the bottom of the rectangle
继续回到绘制弧,以下是参数
oval – The bounds of oval used to define the shape and size of the arc
startAngle – Starting angle (in degrees) where the arc begins
sweepAngle – Sweep angle (in degrees) measured clockwise
useCenter – If true, include the center of the oval in the arc, and close it if it is being stroked. This will draw a wedge
paint – The paint used to draw the arc
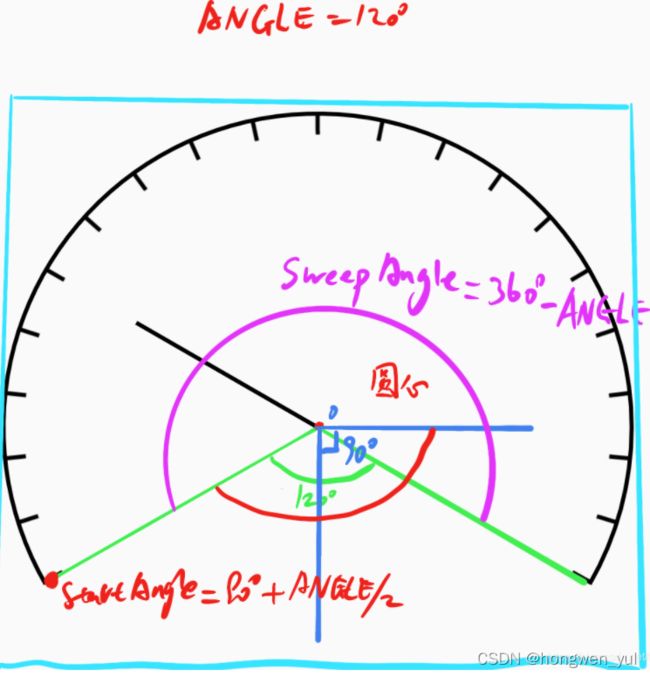
useCenter,当为true 会显示绿线;因需求传入false
刻度
仍旧使用到Paint.setPathEffect (),刻度颗粒化后其实是小的矩形;绘制过程如下:
var dash: Path = Path()
//小矩形
val rf = RectF(0f,0f,10f,15f)
//将矩形以顺时针方式排列放置到path上
dash.addRect(rf,Path.Direction.CW)


//绘制弧形添加到path
val arc = Path()

arc.addArc(RectF(10f,10f,10f,15f),90 + ANGLE / 2, 360 - ANGLE)

//计算总弧形长度
val pathMeasure = PathMeasure(arc, false)

//参数1 刻度本体。
//参数2 间隔距离(弧形长度 - 刻度的厚度  然后平均分num分)。
//参数3 起始第一个距离开头。
//参数4 旋转类型
PathDashPathEffect(dash,
            (pathMeasure.length - Utils.convertDpToPixel(houdu)) / num,
            0f,
            PathDashPathEffect.Style.MORPH
        )


在onDraw 中调用
//画刻度
dashPaint.pathEffect = effect
canvas!!.drawArc(rf,90 + ANGLE / 2, 360 - ANGLE, false, dashPaint)
dashPaint.pathEffect = null
参考:Android自定义View : 绘制汽车仪表盘,圆盘_hongwen_yul的博客-CSDN博客_android绘制仪表盘
完成;
若侵权请告知,谢谢