一文小入门pyQt5 —— 从零到一完成一个Excel文件处理程序
一文小入门pyQt5 —— 从零到一完成一个Excel文件处理程序
-
-
- 一、概述
- 二、项目说明(也可以直接看README.md文件)
-
- 2.1 项目结构
- 2.2 使用
- 2.3 功能介绍
- 2.4 注意点
- 2.5 打包成exe程序
- 2.6 不足
- 三、QtDesigner入门(正式开始!)
-
- 3.1 开始
- 3.2 表格数据渲染及单元格里插入按钮控件
- 3.3 如何给槽函数传参?
- 3.4 如何实现点击按钮打开一个新窗口?
- 3.5 状态栏显示文本信息
- 3.6 关闭主界面时关闭其他所有窗口
- 3.7 添加程序的icon图标
- 3.8 QTableWidget显示正确的日期格式
- 3.9 打开文件选择框
- 3.10 弹出提示框
- 3.11 在QLabel上显示图片
- 四、具体功能实现
-
- 4.1 Excel的查
- 4.2 Excel的增删改
- 4.3 针对文件夹的图像的增删改查
- 五、训练自己的分类网络
-
- 5.1 数据增强
- 5.2 根据Excel信息分类测试集
- 5.3 画AUC曲线
- 六、打包注意点
- 总结
- 代码下载
-
一、概述
前人踩坑,后人少踩!
心疼我可爱的舍友为了这个课设搭环境花了一百多块钱,还只是环境。这个项目是我的一个课设,课设要求做出一款能实现Excel增删改查及对应图像增删改查功能的软件,最后要求打包成exe,因为数据保密的原因,代码里的相关图片及表格都被我删掉了,都是假数据,只留了两张测试图片。 正所谓,做都做了,不能白做。之前从未正经接触过QtDesigner和python,对于python的认知也只是停留在函数,所以在程序的设计模式上有很多不足,包括个人认为整个项目会有点乱,详细都写在README.md里了,有很多人进不去GitHub,因此代码放在了码云上。发现网上没有一篇比较统一的入门贴,这次踩了不少坑,写得辛苦,感觉还是蛮有借鉴意义的,包括分页、加强鲁棒性等等,会以功能点的实现为线写出来给各位入个门。一文可能讲不完,所有开源给大家,具体功能实现去看代码更清晰。若有任何关于优化或错误的建议,请联系我!
二、项目说明(也可以直接看README.md文件)
2.1 项目结构
|-data  数据
    |-dist  Excel文件输出位置
        |-new.xls  用户操作后的新Excel文件
    |-dist_images  存放原始数据图像,用户操作影像读取及输出位置
        |-M0  正常样本图像
        |-M1  异常样本图像
        |-new 新增未分类图像
    |-info.xlsx  示例Excel文件
|-detect  神经网络(*可替换,不可更改,替换时也应更改detail.py文件中的接口)
    |-logs
        |-best.pth  网络权重
    |-model_data
        |-cls_classes.txt  类别
    |-nets  网络主体
    |-utils 工具函数文件夹
    |-classification.py  分类网络类
|-icon 图标文件夹
	|-cat.ico  程序icon图标
|-img  示例图像
|-Clinical_information  临床信息界面文件
|-detail  影像图片文件
|-Image_information Excel  表格影像信息文件
|-information  主界面布局文件
|-new_info  新增患者信息文件
|-main.py  程序入口文件
|-main.spec  打包的中间文件
|-requirements.txt  库版本要求
|-README.md  项目说明
|-.gitignore  git忽略的文件
|-eval_top5.py  画auc曲线,在本项目运行不了,需下载下面博主的代码
|-split_data.py  根据Excel文件里的诊断结果将测试集图片归类为两个文件夹
|-intense_data.py  数据增强扩充数据集

# 训练网络是resnet50
# 参考博主:https://blog.csdn.net/weixin_44791964/article/details/109160814
2.2 使用
安装好合适的环境后,点击运行 main.py 即可。
2.3 功能介绍
-
在使用所有功能前,需先通过“Open Excel”打开Excel文件作为表格数据库,否则会有提示。
-
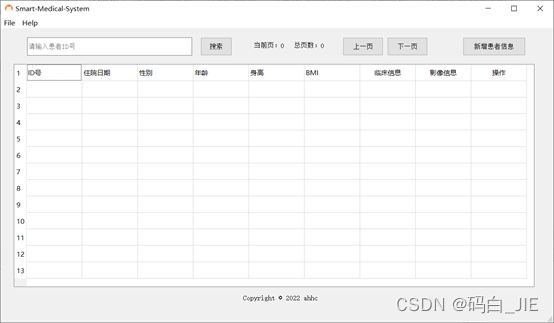
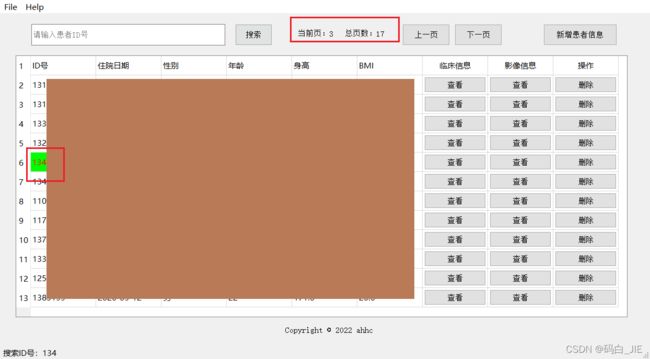
视图渲染:当用户选择完Excel文件时,表格视图会自动渲染,并自动计算当前页和总页数,下方状态栏会显示当前用户操作。
-
当关闭主界面窗口时,其他界面也会跟着关闭。
-
搜索患者:当用户输入ID号的前几位并点击“搜索”按钮时,会自动查找到第一个匹配的患者信息,并自动跳转定位到当前页和当前行。
-
页面切换功能:点击“上一页”跳转至上一页,点击“下一页”跳转至下一页,当在第一页和最后一页分别点击“上一页”和“下一页”的按钮时,会弹出提示框。
-
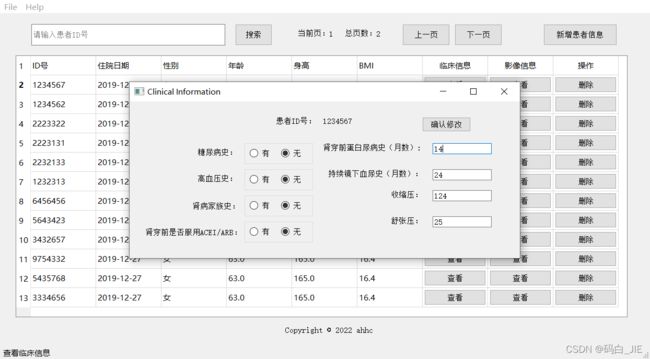
点击“查看”按钮,查看当前行患者的临床信息和影像信息。
-
修改功能:双击单元格,修改内容之后,按Enter键,修改的数据会重新写到dist文件夹下的new.xls文件中,这样不会污染原始数据。对于临床信息和影像信息,在修改完之后点击“确认修改”按钮。
-
删除功能:点击“删除”按钮,修改的数据会重新写到dist文件夹下的new.xls文件中,这样不会污染原始数据。
-
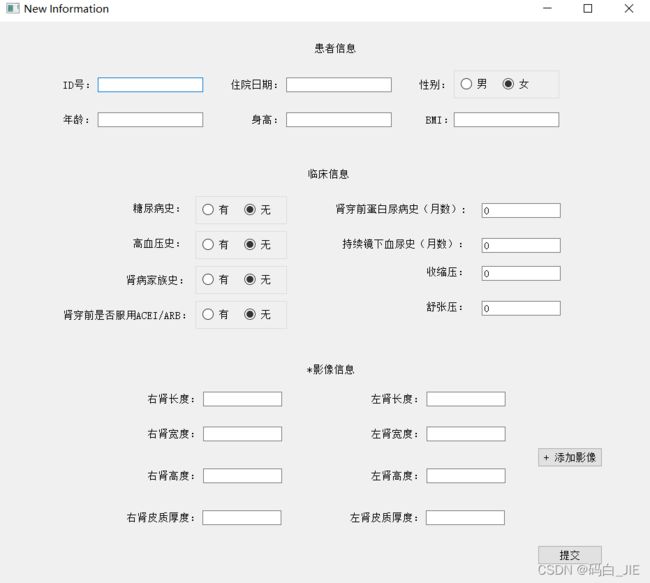
新增患者信息:点击“新增患者信息”按钮,填写完信息后,点击“提交”按钮,同样,添加的信息会写入到new.xls文件中,新增的影像图片会放在images/new文件夹下。当点击“+添加影像”选择完图片后,“影像信息”前的“”会消失。填写信息需要注意格式,比如日期格式为“YYYY-MM-DD”,ID号不可以超过九位。
-
查看患者对应的影像信息:点击“影像信息”列下的“查看”按钮,在弹出的界面中点击“查看影像”按钮。
-
点击7中界面的“添加”、“修改”、“删除”、“AI检测”按钮,实现对图片的增删改及人工智能诊断,诊断结果将显示在下方的输出栏,并将文件夹放在images对应的M0和M1文件夹下。
2.4 注意点
- 任何路径里不要包含中文!ID号只能是数字!
- py文件与ui文件并不完全相同,ui文件只是拿来布局,有些微调部分直接用代码在py文件里修改了,ui并不完全同步。
- 整个应用程序都是基于info.xlsx的数据格式去设计的,并没有很强的裂变能力,如果不是严格按照info.xlsx的行列进行排版的,极大概率运行不出来。
- 影像图片的命名严格按照”ID号-rk“的格式,且ID号不超过九位。
2.5 打包成exe程序
-
安装virtualenv后,在cmd中用命令virtualenv env_name 创建出一个虚拟环境,和anaconda的环境做隔离,减小包的体积。
该项目打包之后有2GB多是因为torch这个包就占了2GB。 -
pycharm打开Terminal,切换到env_name/Scripts路径下,输入activate.bat激活环境。
-
查看requirements.txt,利用pip install安装完所有的包,直至不再报No module的错误。
-
在激活环境下运行下方命令:
pyinstaller main.spec -
在生成的dist文件夹中新建以下文件夹:
|-data  数据
    |-dist
    |-dist_images
        |-M0 以类别名命名的文件夹
        |-M1 以类别名命名的文件夹
        |-new 新增未分类图像(不可随意更改,若更改则需同步更改代码)
2.6 不足
- 在不同的电脑,界面显示会不一样,没有做自适应。
- 表头不应该写死,最好还是写成跟着数据渲染。
- 鲁棒性不太强,比如如果表格里有格式不正确应该给予拦截和提示,不应该无故终止。
- 最好是可以让用户选择数据打开和存储的文件夹,用户体验更好,当初设计模式有问题。
- 修改功能有待优化。
三、QtDesigner入门(正式开始!)
QtDesigner官方文档
3.1 开始
我跳过了环境安装,请配好了QtDesigner和.ui转.py的工具之后再来(不是。
版本: pycharm 2017.3
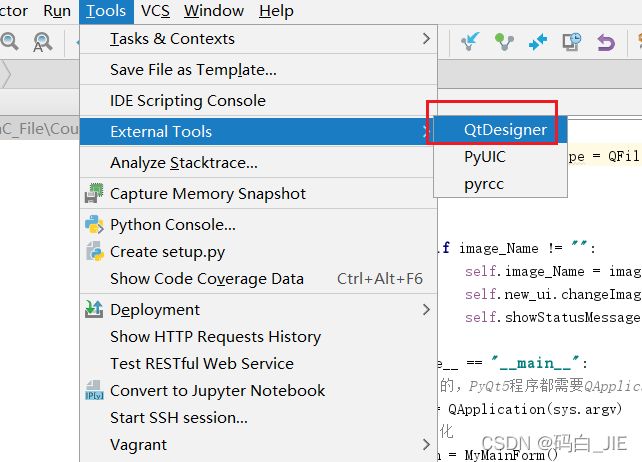
- 点击Tool -> Externals Tools -> QtDesigner运行
- 弹出的窗口中可以打开已有.ui文件,也可以新建.ui文件,这里我们选择MainWindow,然后点击创建。(MainWindow和Widget的区别是,MainWindow有菜单栏和下方的状态栏,不需要的可以选Widget就好。)

- 添加控件
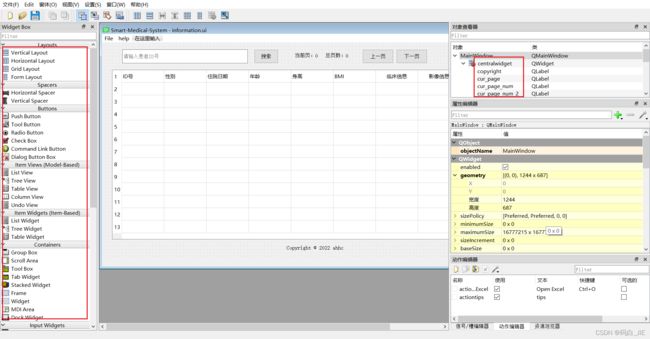
将左侧栏中的控件拖到画布中松开即可添加,注意修改右上角“对象查看器”中的对象名,更有辨识度,不可重名。
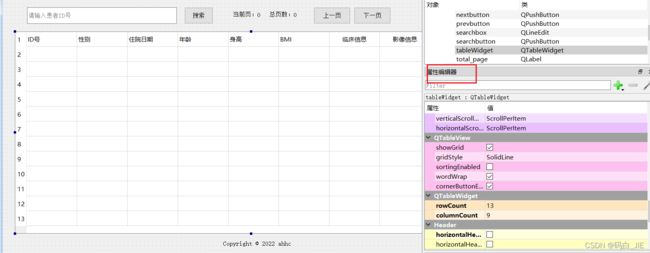
鼠标左键点击选择控件时,右侧“属性编辑器”会显示当前选择控件的属性,罗列了该类及该类的所有父类属性值,我们可以通过属性编辑器进行修改。比如QTableWIDget有rowCount和columnCount的属性可以修改表格的行数和列数。
- 修改主程序窗口的名字

在右侧的属性编辑器中搜索“title”,修改windowTitle的值。
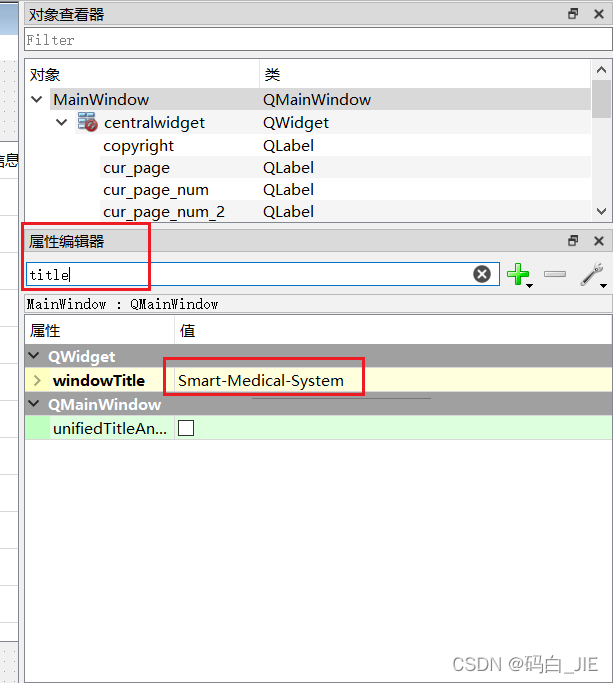
- 信号接槽
a. 点击QtDesigner菜单栏中的“编辑信号/槽”;
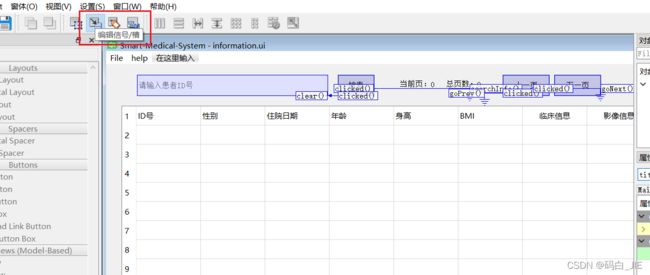
b. 鼠标左键点击控件拉出一条地线,接地则只触发当前控件的信号,与其他控件相连则同时触发多个信号;

c. 在弹出的窗口中,左侧为该控件能触发的信号,右侧为接此信号的槽函数,比如按钮的clicked信号接searchInfo这个槽函数。点击选择完左侧的信号,再点击右侧的槽函数,点击OK即可关联。

若想新建槽函数,点击“编辑”。
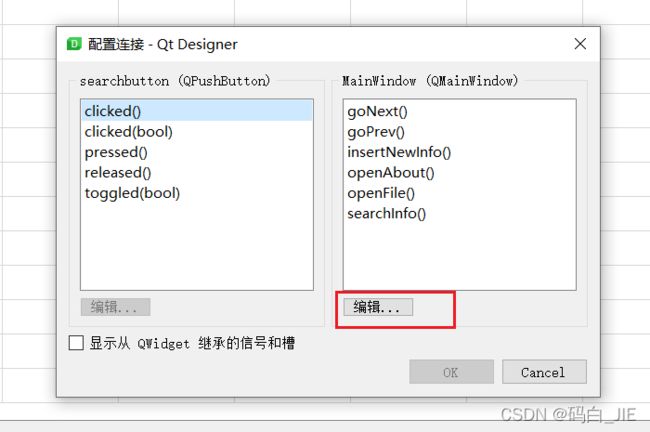
再点击“+”,输入槽函数名即可。
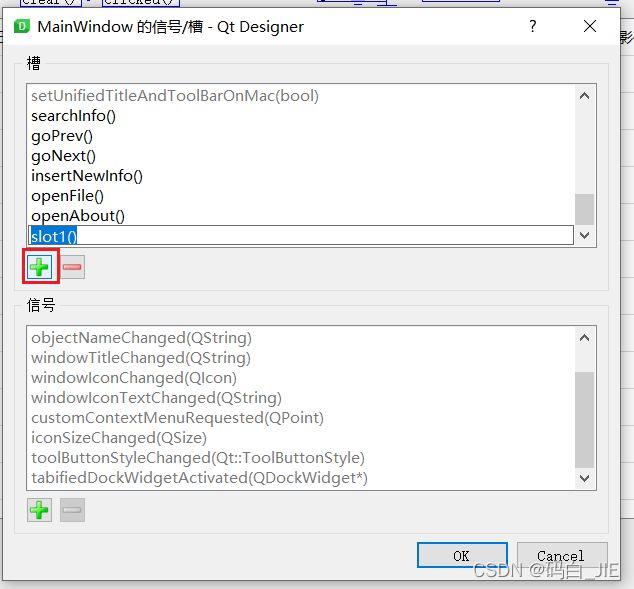
注意: 这里与控件关联的槽函数必须在生成的.py文件中有定义,否则运行时会报错。 - 菜单栏信号接槽
新建菜单:双击“在这里输入”进入编辑模式,输入菜单栏选项卡名后按Enter键则新建完成。

同理,双击选项卡里的“在这里输入”,按Enter键同样可以新建子选项卡。
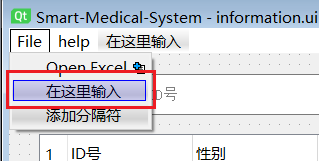
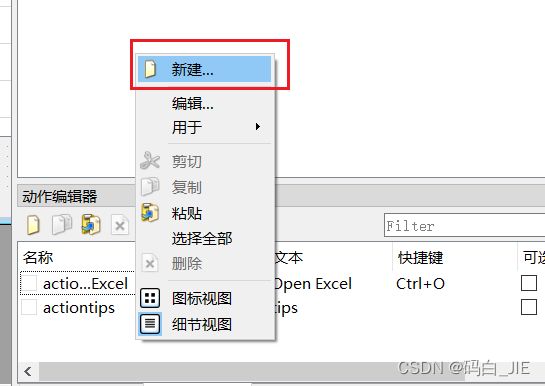
在右下方的“动作编辑器”栏目中选择“动作编辑器”选项卡。

鼠标右键选择“新建”。
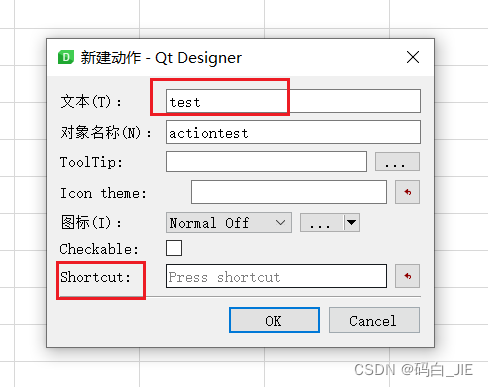
在弹出的窗口中填写选项卡的名称,shortcut的快捷键,点击“OK”。
切换到信号/槽编辑器,点击左上角绿色的“+”,新建。

依次选择发送者为刚刚新建的动作、信号、接收者、槽如下:
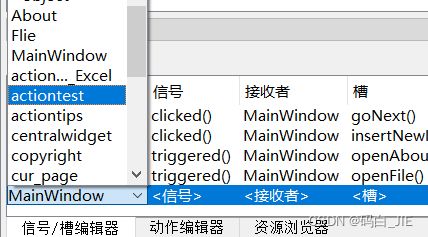
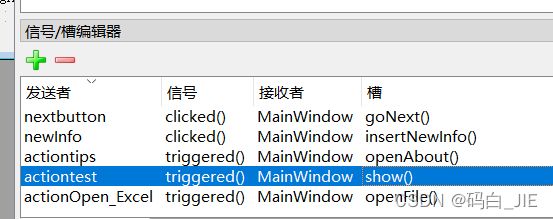
槽函数为自定义,不知道怎么新建槽函数的各位回到5.进行查看。 - 将.ui文件转为同名的.py文件,注意:每次重新生成.py文件都会覆盖原来文件的内容,也就是说,如果你写了新的代码在里面时要特别小心。 此时还不能运行,我们新开一个main.py文件,将下列代码copy进去即可运行。
import sys
from information import Ui_MainWindow  # 由information.ui转来的information.py文件,Ui_MainWindow是information.py里面的类名,这一步根据自己的类名去写。
class MyMainForm(QMainWindow, Ui_MainWindow):
    def __init__(self, parent=None):
        super(MyMainForm, self).__init__(parent)
        self.setupUi(self)
	# 槽函数
	def MethodName(self):
		print("test")
if __name__ == "__main__":
    #固定的,PyQt5程序都需要QApplication对象。sys.argv是命令行参数列表,确保程序可以双击运行
    app = QApplication(sys.argv)
    #初始化
    myWin = MyMainForm()
    #将窗口控件显示在屏幕上
    myWin.show()
    #程序运行,sys.exit方法确保程序完整退出。
    sys.exit(app.exec())

### 如果这一步运行不出来,请检查一下main.py文件里有没有刚刚定义的与控件相关联的槽函数。
小结
到这一步,基本流程已经打通了,可以开始自己的页面布局啦!
3.2开始介绍特殊功能点,比较这是处理Excel文件的程序
3.2 表格数据渲染及单元格里插入按钮控件
当用户打开Excel文件时,将Excel文件里的信息渲染到QTableWidget上。分为三步:用xlrd库去读Excel文件,拿到每一行的信息,按行渲染到QTableWidget上。具体看main.py文件里的readExcel和getOnePage、information.py文件里的generateRow这三个方法。(注意导入相应的包哦!)
# 读Excel文件
    def readExcel(self, fileName):
        workbook = xlrd.open_workbook(fileName)
        # 获得sheet_name
        self.sheet_name = workbook.sheet_names()[0]
        # 根据sheet索引或者名称获取sheet内容
        self.sheet = workbook.sheet_by_index(0)  # 从索引0开始

        # 获得总行数
        self.nrows = self.sheet.nrows
        # 获取总页数
        self.pageCount = math.ceil((self.nrows - 2) / self.pageSize)
        self.setTotalPage(self.pageCount)
        # 获取最后一页的行数
        self.lastPageCount = self.nrows - 2 - self.pageSize * (self.pageCount - 1)

        # 获取第一列的内容
        self.ids = self.sheet.col_values(0)
        for i, v in enumerate(self.ids):
            # 跳过头两个item
            if i > 1:
               self.ids[i] = str(int(v))

    # 逐行生成一页
    def getOnePage(self):
        self.isEidt = False # isEdit是用来作阀的,因为接上了QTableWidget的cellChanged信号,前期我并不想触发,想等用户自己修改时再触发
        self.changePageStatus(self.currentPage + 1)
        for i in range(self.pageSize):
            for j in range(self.infoCols):
                if self.lastPageFlag and i >= self.lastPageCount:
                    val = ''
                else:
                    index = self.currentPage * self.pageSize + i + 2
                    # 拿到value
                    val = self.sheet.cell_value(index, j)
                    if isinstance(val, float):
                        if j == 0:
                            # 去除小数点后面的数字
                            val = int(val)
                            # TableWidget需要字符串格式才能正常显示
                            val = str(val)
                        elif j == 1:
                        	# 做日期格式的转换,显示正确的日期格式
                            data_time = datetime(*xldate_as_tuple(val, 0))
                            val = data_time.strftime('%Y-%m-%d')
                        else:
                            val = str(val)
                # 除去表头
                self.generateRow(i + 1, j, val, self.lastPageCount, self.lastPageFlag, index)
        self.isEidt = True

    # 生成表格的一行
    def generateRow(self, row, col, val, lastPageNum, lastPageFlag, trueRow):
        # print('p', row, col, val)
        item = QtWidgets.QTableWidgetItem(val)
        self.tableWidget.setItem(row, col, item)
        if row <= lastPageNum or lastPageFlag == False:
            # 插入查看临床信息按钮
            self.bedButton = QtWidgets.QPushButton('查看')
            self.bedButton.setStyleSheet('QPushButton{margin:3px};')
            self.bedButton.setObjectName("bedButton" + str(trueRow))
            self.tableWidget.setCellWidget(row, 6, self.bedButton)
            # 插入查看影像信息按钮
            self.imageButton = QtWidgets.QPushButton('查看')
            self.imageButton.setStyleSheet('QPushButton{margin:3px};')
            self.imageButton.setObjectName("imageButton" + str(trueRow))
            self.tableWidget.setCellWidget(row, 7, self.imageButton)
            # 插入删除信息按钮
            self.deleteButton = QtWidgets.QPushButton('删除')
            self.deleteButton.setStyleSheet('QPushButton{margin:3px};')
            self.deleteButton.setObjectName("deleteButton" + str(trueRow))
            self.tableWidget.setCellWidget(row, 8, self.deleteButton)

            # lambda匿名函数用于传参
            self.bedButton.clicked.connect(lambda: self.MainWindow.getBedInfo(trueRow))
            self.imageButton.clicked.connect(lambda: self.MainWindow.getImageInfo(trueRow))
            self.deleteButton.clicked.connect(lambda: self.MainWindow.deleInfo(trueRow))

        else:
            self.tableWidget.removeCellWidget(row, 6)
            self.tableWidget.removeCellWidget(row, 7)
            self.tableWidget.removeCellWidget(row, 8)
3.3 如何给槽函数传参?
传参:利用匿名函数lambda,场景为:当我点击按钮时,打开另一个Widget,此时我需要传入ID号。
# lambda匿名函数用于传参
self.bedButton.clicked.connect(lambda: self.goToNewWidget(user_id))

def goToNewWidget(self, user_id):
	print(user_id)
3.4 如何实现点击按钮打开一个新窗口?
- 安装之前的教程生成一个新窗口的.py文件,如new.py。
- from new import Ui_new导入新的py文件,给相应的按钮接上槽。
- 在槽函数里实现打开功能。
self.bedButton.clicked.connect(self.goToNewWidget())

def goToNewWidget(self):
	self.new_widget = QWidget()
    self.new_ui = Ui_New_Info()
    self.new_ui.setupUi(self.new_widget, self)
    self.new_widget.setWindowTitle('New Information')
    self.new_widget.show()
3.5 状态栏显示文本信息
self.statusbar.showMessage(message)
3.6 关闭主界面时关闭其他所有窗口
重写closeEvent方法,具体看information.py文件里的closeEvent方法。
# --------------information.py------------------
	# 重写关闭方法
    def closeEvent(self, event):
        if self.MainWindow.clinical_widget:
            # print('close')
            self.MainWindow.clinical_widget.close()
        if self.MainWindow.image_widget:
            # print('close')
            self.MainWindow.image_widget.close()
        if self.MainWindow.new_widget:
            # print('close')
            self.MainWindow.new_widget.close()
        if self.MainWindow.detail_widget:
            # print('close')
            self.MainWindow.detail_widget.close()
        event.accept()

### 这里的所有widget都挂载在main.py文件里的QMainWindow对象中,为了在其他函数里拿到QMainWindow里的widget,我把QMainWindow挂载为当前类的属性,即self.MainWindow = MainWindow, 加多一层if判断是为了防止有些窗口没打开,如果这是执行关闭的话,程序会卡顿出错。

# ---------------main.py-------------
    def __init__(self, parent=None):
        super(MyMainForm, self).__init__(parent)
        self.setupUi(self)
        self.setWindowIcon(QIcon('icon\cat.ico'))

        # 四个窗口
        self.clinical_widget = ''
        self.image_widget = ''
        self.new_widget = ''
        self.detail_widget = ''
3.7 添加程序的icon图标
self.setWindowIcon(QIcon('icon\cat.ico')
3.8 QTableWidget显示正确的日期格式
你会发现从Excel表格里读取到的日期是一串数字,需要利用datetime这个库进行转化才能正确显示。
from datetime import datetime
from xlrd import xldate_as_tuple
data_time = datetime(*xldate_as_tuple(val, 0))
                            val = data_time.strftime('%Y-%m-%d')

# 在Excel中写入正确的日期格式
datetime.strptime(self.getTableWidgetItemContent(row, col), '%Y-%m-%d')
3.9 打开文件选择框
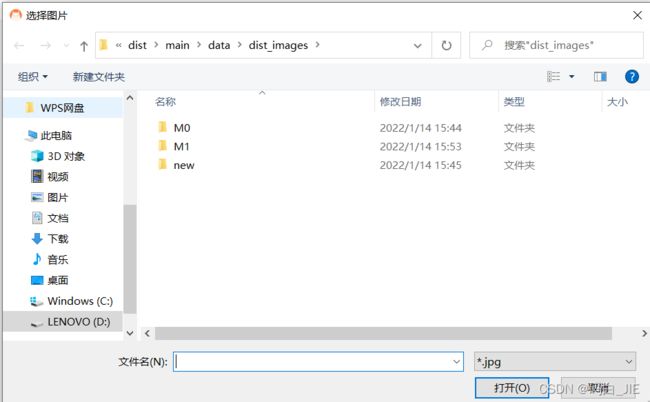
第一个参数为打开文件选择框的窗口父类,第二个参数为弹出的选择框的名称,第三个参数为打开的指定路径(可选),第四个为限制类型(注意:这里的类型限制的“无效”的)。
image_Name, imgType = QFileDialog.getOpenFileName(self,
                                                  "选择图片",
                                                  "",
                                                       "*.jpg;;*.png;;All Files(*)")
3.10 弹出提示框
from PyQt5.QtWidgets import *
 QMessageBox.information(self, "提示", "当前页是最后一页!")
 QMessageBox.warning(self, "警告", "请先打开Excel文件!")
 QMessageBox.error(self, "警告", "请先打开Excel文件!")
 ### 具体的弹出框类型看文档
3.11 在QLabel上显示图片
具体看detail.py文件里的setPixMap方法。
    def setPixMap(self, path):
        # 利用qlabel显示图片,show_image是QLabel的对象名,在3.1开始的添加控件有说明
        png = QtGui.QPixmap(path).scaled(self.show_image.width(),self.show_image.height())
        self.show_image.setPixmap(png) # 这里的setPixmap是QLabel的原生方法
        self.show_image.setScaledContents(True)
四、具体功能实现
4.1 Excel的查
思路:获取到Excel表格中的所有ID号放在list里,因为ID号是按行存储的,所以list的索引就是患者信息在Excel文件里的行数-1(list索引从零开始)。当用户在输入框输入完ID号,点击搜索按钮时,截取掉输入框值前后的空格,利用list的原生方法count和index查看当前患者是否存在,存在则定位至那一页和那一行,不存在则给予相应的提示。用户可以不必输入完整的ID号,会自动返回第一个匹配项。具体看main.py里的searchInfo方法。
    # 搜索患者信息
    def searchInfo(self):
        if self.fileName != '':
            search_id = self.getContent().strip() # 字符串格式
            self.showStatusMessage("搜索ID号:" + search_id)
            # 清除搜索框内容
            self.clearContect()

            # 使用 startswith,返回一个列表
            res = [idx for idx in self.ids if idx.startswith(search_id)]
            if len(res) == 0:
                QMessageBox.information(self, "提示", "没有找到匹配项")
            else:
                # 第一个匹配项,index是Excel表格中的真实行数
                index = self.ids.index(res[0]) - 2
                # 获取匹配项所在页数
                page = math.floor(index / self.pageSize)
                row = (index % self.pageSize) + 1
                self.currentPage = page
                if self.currentPage == (self.pageCount - 1):
                    self.lastPageFlag = True
                self.getOnePage()
                self.isEidt = False
                self.setLineColor(row)
                self.isEidt = True
        else:
            QMessageBox.warning(self, "警告", "请先打开Excel文件!")
4.2 Excel的增删改
思路:很好理解,增删改都可以理解为两步,读取和重新写入,利用xlrd库读取Excel文件,利用xlwt库写入Excel文件。对读取到的信息进行增删改的操作之后,再将操作之后的信息写回去。具体看main.py里的getNewXl方法
# 新建工作本并保存,有row则删除,有row和col则为修改,都没有则为新增, change_val为指定值,未传时为双击表格修改的内容,count为计数器,防止多次弹出提示框
    def getNewXl(self, row = -1, col = -1, change_val = '', count_n = 0):
        try:
            # 新建工作簿
            workbook = xlwt.Workbook(encoding='utf-8')
            # 新建sheet
            sheet_w = workbook.add_sheet(self.sheet_name)

            # 循环
            count = 0
            for x in range(self.sheet.nrows):
                if col == -1:
                    # 删除
                    if x != row:
                        for y in range(self.sheet.ncols):
                            val = self.sheet.cell_value(x, y)
                            if y == 1:
                                dateFormat = xlwt.XFStyle()
                                dateFormat.num_format_str = 'yyyy/mm/dd'
                                sheet_w.write(count, y, val, dateFormat)
                            else:
                                sheet_w.write(count, y, val)
                        count = count + 1
                else:
                    # 修改
                    for y in range(self.sheet.ncols):
                        if x == row and y == col:
                            if change_val == '':
                                val = self.text
                            else:
                                val = change_val
                        else:
                            val = self.sheet.cell_value(x, y)
                        if y == 1:
                            dateFormat = xlwt.XFStyle()
                            dateFormat.num_format_str = 'yyyy/mm/dd'
                            sheet_w.write(x, y, val, dateFormat)
                        else:
                            sheet_w.write(x, y, val)
            if row == -1:
                new_row = self.sheet.nrows
                # 新增
                for i, v in enumerate(self.forms):
                    if i == 1:
                        dateFormat = xlwt.XFStyle()
                        dateFormat.num_format_str = 'yyyy/mm/dd'
                        sheet_w.write(new_row, i, v, dateFormat)
                    else:
                        sheet_w.write(new_row, i, v)

            # 保存工作簿
            path = self.dist_root + self.dist_name
            workbook.save(path)
            # 重新渲染视图
            self.readExcel(path)
            self.getOnePage()
        except:
            if row == -1:
                QMessageBox.warning(self, "错误", "新增失败")
            elif col == -1:
                QMessageBox.warning(self, "错误", "删除失败")
            else:
                if count_n == 0:
                    QMessageBox.warning(self, "错误", "修改失败")
                else:
                    self._count = self._count + 1
                    if self._count == count_n:
                        QMessageBox.warning(self, "错误", "修改失败")
                        self._count = 0
        else:
            if row ==  -1:
                self.showStatusMessage("新增成功")
            elif col == -1:
                self.showStatusMessage("删除成功")
            else:
                self.showStatusMessage("修改成功")
4.3 针对文件夹的图像的增删改查
思路:实现对一个文件夹里的图片的增删改查,查就必须要有数据,因此我们需要利用os库遍历文件夹里的文件获取到每一个文件名,构成一个文件名的list,之后拿用户输入的信息在list里面找,方法和Excel的查一样。增是利用cv2这个库实现的。删是利用os.remove方法。改就是增+删。具体看detail.py文件里的逻辑。
# 获取文件夹图片目录元组
    def getDirectTuple(self):
        self.fileList = []
        for filepath, dirnames, filenames in os.walk(r'data\dist_images'):
            for filename in filenames:
                self.fileList.append(os.path.join(filepath, filename))
        # print(self.fileList)
五、训练自己的分类网络
由于我不会torch这个库,直接拿的大佬的代码自己训练。所使用的网络resnet50,后期只有一天多的时间,没做什么改进,只做了数据增强和数据分类。准确率70%。
参考文章:按着大佬的步骤来没什么问题,显卡不行的关闭多线程(num_worker),减少batch大小(batch_size)。里面的eval_top5.py有点问题,后面我拿eval_top5.py来改画auc曲线。
5.1 数据增强
到手的训练集只有200张,并且样本分布不均匀,两类比例为1:4,最后用旋转、镜像、翻转等方法扩充数据集,使其比例为1120:1120=1:1。具体看intense_data.py文件。这个代码是网上扒的,但是现在找不到出处了,感谢大佬。
# -*- coding: UTF-8 -*-
__author__ = "AhhC"
# -*- coding: utf-8 -*-

import cv2
import numpy as np
import os.path


# 椒盐噪声
def SaltAndPepper(src, percetage):
    SP_NoiseImg = src.copy()
    SP_NoiseNum = int(percetage * src.shape[0] * src.shape[1])
    for i in range(SP_NoiseNum):
        randR = np.random.randint(0, src.shape[0] - 1)
        randG = np.random.randint(0, src.shape[1] - 1)
        randB = np.random.randint(0, 3)
        if np.random.randint(0, 1) == 0:
            SP_NoiseImg[randR, randG, randB] = 0
        else:
            SP_NoiseImg[randR, randG, randB] = 255
    return SP_NoiseImg


# 高斯噪声
def addGaussianNoise(image, percetage):
    G_Noiseimg = image.copy()
    w = image.shape[1]
    h = image.shape[0]
    G_NoiseNum = int(percetage * image.shape[0] * image.shape[1])
    for i in range(G_NoiseNum):
        temp_x = np.random.randint(0, h)
        temp_y = np.random.randint(0, w)
        G_Noiseimg[temp_x][temp_y][np.random.randint(3)] = np.random.randn(1)[0]
    return G_Noiseimg


# 昏暗
def darker(image, percetage=0.9):
    image_copy = image.copy()
    w = image.shape[1]
    h = image.shape[0]
    # get darker
    for xi in range(0, w):
        for xj in range(0, h):
            image_copy[xj, xi, 0] = int(image[xj, xi, 0] * percetage)
            image_copy[xj, xi, 1] = int(image[xj, xi, 1] * percetage)
            image_copy[xj, xi, 2] = int(image[xj, xi, 2] * percetage)
    return image_copy


# 亮度
def brighter(image, percetage=1.5):
    image_copy = image.copy()
    w = image.shape[1]
    h = image.shape[0]
    # get brighter
    for xi in range(0, w):
        for xj in range(0, h):
            image_copy[xj, xi, 0] = np.clip(int(image[xj, xi, 0] * percetage), a_max=255, a_min=0)
            image_copy[xj, xi, 1] = np.clip(int(image[xj, xi, 1] * percetage), a_max=255, a_min=0)
            image_copy[xj, xi, 2] = np.clip(int(image[xj, xi, 2] * percetage), a_max=255, a_min=0)
    return image_copy


# 旋转
def rotate(image, angle, center=None, scale=1.0):
    (h, w) = image.shape[:2]
    # If no rotation center is specified, the center of the image is set as the rotation center
    if center is None:
        center = (w / 2, h / 2)
    m = cv2.getRotationMatrix2D(center, angle, scale)
    rotated = cv2.warpAffine(image, m, (w, h))
    return rotated


# 翻转
def flip(image):
    flipped_image = np.fliplr(image)
    return flipped_image


# 图片文件夹路径
file_dir = r'D:\AhhC_File\CourseDesign\classification-pytorch-main\datasets\train\\new\\M0\\'
# for img_name in os.listdir(file_dir):
#     img_path = file_dir + img_name
#     img = cv2.imread(img_path)
#     # cv2.imshow("1",img)
#     # cv2.waitKey(5000)
#     # 旋转
#     rotated_90 = rotate(img, 90)
#     cv2.imwrite(file_dir + img_name[0:-4] + '_r90.jpg', rotated_90)
#     rotated_180 = rotate(img, 180)
#     cv2.imwrite(file_dir + img_name[0:-4] + '_r180.jpg', rotated_180)

for img_name in os.listdir(file_dir):
    img_path = file_dir + img_name
    img = cv2.imread(img_path)
    # # 镜像
    # flipped_img = flip(img)
    # cv2.imwrite(file_dir + img_name[0:-4] + '_fli.jpg', flipped_img)

    # 增加噪声
    # img_salt = SaltAndPepper(img, 0.3)
    # cv2.imwrite(file_dir + img_name[0:7] + '_salt.jpg', img_salt)
    # img_gauss = addGaussianNoise(img, 0.3)
    # cv2.imwrite(file_dir + img_name[0:-4] + '_noise.jpg', img_gauss)

    # # 变亮、变暗
    # img_darker = darker(img)
    # cv2.imwrite(file_dir + img_name[0:-4] + '_darker.jpg', img_darker)
    # img_brighter = brighter(img)
    # cv2.imwrite(file_dir + img_name[0:-4] + '_brighter.jpg', img_brighter)

    blur = cv2.GaussianBlur(img, (7, 7), 1.5)
    #      cv2.GaussianBlur(图像,卷积核,标准差)
    cv2.imwrite(file_dir + img_name[0:-4] + '_blur.jpg', blur)
5.2 根据Excel信息分类测试集
测试集的图片没有分类文件夹,手工分类成本太高,于是就写了个小脚本来分,是根据诊断结果那一列来分类,具体看split_data.py。如果想多分类啥的,改一下代码就行。
# -*- coding: UTF-8 -*-
__author__ = "AhhC"

import xlrd
import cv2
import os

_path = "C:\\Users\\LENOVO\\Desktop\\classification-pytorch-main\\datasets\\test\\"
ids = []
flags = []

# 读Excel文件
def readExcel(fileName):
    workbook = xlrd.open_workbook(fileName)
    # 获得sheet_name
    sheet_name = workbook.sheet_names()[0]
    # 根据sheet索引或者名称获取sheet内容
    sheet = workbook.sheet_by_index(0)  # 从索引0开始

    # 获取第一列的内容
    global ids
    ids = sheet.col_values(0)
    global flags
    # 获取最后一列的内容
    flags = sheet.col_values(sheet.ncols-1)
    # print(ids,flags)


# 根据不同等级写入不同的文件夹
def split_data(path, fileName, cls):
    img = cv2.imread(path+fileName)
    cv2.imwrite(_path+cls+"\\"+fileName,img)
    os.remove(path+fileName)

fileName = _path + "test_info.xlsx"
readExcel(fileName)
classes = ["M0", "M1"]
for i,v in enumerate(ids):
    # 跳过表头
    if i > 1:
        if isinstance(v, float):
            v = str(int(v))
            for k in range(9 - len(v)):
                v = "0" + v
        imageName = v + "-rk.jpg"
        path = _path + "\\images\\"
        if flags[i] == 1.0:
            cls = "M1"
        else:
            cls = "M0"
        split_data(path, imageName, cls)
5.3 画AUC曲线
输入的y_test是测试样本原来的真实值,为0/1的list列表;y_pred是模型输出的预测值,为 [ [ , ], [ , ] ] 的格式,里面的元素值因为经过softmax,所以在0到1之间。
# 把这个文件放到那位博主大大的项目文件夹里
import numpy as np
import torch
from PIL import Image

from classification import (Classification, cvtColor, letterbox_image,
                            preprocess_input)
from utils.utils import letterbox_image
from sklearn import metrics
import matplotlib.pyplot as plt

y_test= []
y_pred = []

class top5_Classification(Classification):
    def detect_image(self, image):
        #---------------------------------------------------------#
        #   在这里将图像转换成RGB图像,防止灰度图在预测时报错。
        #   代码仅仅支持RGB图像的预测,所有其它类型的图像都会转化成RGB
        #---------------------------------------------------------#
        image       = cvtColor(image)
        #---------------------------------------------------#
        #   对图片进行不失真的resize
        #---------------------------------------------------#
        image_data  = letterbox_image(image, [self.input_shape[1], self.input_shape[0]])
        #---------------------------------------------------------#
        #   归一化+添加上batch_size维度+转置
        #---------------------------------------------------------#
        image_data  = np.transpose(np.expand_dims(preprocess_input(np.array(image_data, np.float32)), 0), (0, 3, 1, 2))

        with torch.no_grad():
            photo   = torch.from_numpy(image_data).type(torch.FloatTensor)
            if self.cuda:
                photo = photo.cuda()
            #---------------------------------------------------#
            #   图片传入网络进行预测
            #---------------------------------------------------#
            preds   = torch.softmax(self.model(photo)[0], dim=-1).cpu().numpy()
        y_pred.append(preds)
        arg_pred = np.argsort(preds)[::-1]
        arg_pred_top5 = arg_pred[:5]
        return arg_pred_top5

def evaluteTop5(classfication, lines):
    correct = 0
    total = len(lines)
    for index, line in enumerate(lines):
        annotation_path = line.split(';')[1].split()[0]
        x = Image.open(annotation_path)
        y = int(line.split(';')[0])

        y_test.append(y)

        pred = classfication.detect_image(x)
        # print(pred[0], y)
        # correct += y in pred
        correct += y == pred[0]
        if index % 100 == 0:
            print("[%d/%d]"%(index,total))
    return correct / total

classfication = top5_Classification()
with open("./cls_test.txt","r") as f:
    lines = f.readlines()
top5 = evaluteTop5(classfication, lines)
print("top-5 accuracy = %.2f%%" % (top5*100))

# 绘制AUC曲线
y_test = np.array(y_test)
y_pred = np.array(y_pred)
# print(y_test)
# print(y_pred)
fpr, tpr, threshold = metrics.roc_curve(np.array(y_test),np.array(y_pred)[:,1])
roc_auc = metrics.auc(fpr, tpr)
plt.figure(figsize=(6,6))
plt.title('Validation ROC')
plt.plot(fpr, tpr, 'b', label = 'Val AUC = %0.3f' % roc_auc)
plt.legend(loc = 'lower right')
plt.plot([0, 1], [0, 1],'r--')
plt.xlim([0, 1])
plt.ylim([0, 1])
plt.ylabel('True Positive Rate')
plt.xlabel('False Positive Rate')
plt.savefig('auc.jpg')
plt.show()
六、打包注意点
针对单个py文件打包成exe网上已经有很多教程了,针对整个项目的却很散。我们利用中间文件.spec来提高成功率。注意: 这里所讲的步骤最后打包出来是一个文件夹,不是单个exe。
步骤
- 打开cmd窗口,输入pip install pyinstaller,命令行输出successfully表示成功。
- pycharm打开Terminal,输入pyi-makespec main.py --> 打包之后会生成一个目录(main.py是你程序的入口文件)。
- 现在文件夹下生成了一个main.spec文件。
- 编辑main.spec文件,找到a = Analysis()
a. 第一个参数,放置需要用到的所有py文件。格式为[‘aaa.py’, ‘bbb.py’, ‘ccc.py’]。注意:同级目录下,直接写文件名。如果不在同一个文件下,要写相对路径,[‘aaa.py’, ‘bbb.py’, ‘director\ccc.py’]。
b. 第四个参数,datas=[]。 如果用到了非py文件需要打包,那么找到datas列表,将非py文件的路径与文件夹名写在元组里。比如,有图片文件的话,可以放在images文件夹中。元组里的第一项为未打包前的文件所在路径,第二项为打包之后文件所在的目录路径。注意:这里要写相对路径,而且第一项和第二项最好相同,当文件夹里没有东西时,该文件夹会被忽略。为了程序的鲁棒性,程序里的路径最好都用相对路径。(懂的懂,不懂就算)
c. 第五个参数,hiddenimports=[]。 如果打包之后出现No module name…可以采用临时解决方案,将缺少的模块放置在这个列表中。hiddenimports=[‘PyQt5.sip’]
d. 添加程序icon。 在exe = EXE中加入 icon=‘icon/cat.ico’ ,要写相对路径!这里是一个图片转.ico文件的网站。
a = Analysis(['main.py', 'Clinical_information.py', 'detail.py', 'Image_information.py', 'information.py', 'new_info.py', 'detect\\classification.py', 'detect\\utils\\utils.py', 'detect\\nets\\__init__.py', 'detect\\nets\\mobilenet.py', 'detect\\nets\\resnet50.py', 'detect\\nets\\vgg16.py', 'detect\\nets\\vit.py'],
             pathex=['D:\\AhhC_File\\CourseDesign\\smodel_mart-medical-system'],
             binaries=[],
             datas=[('detect\\logs','detect\\logs'),('detect\\model_data','detect\\model_data'),('icon','icon')],
             hiddenimports=[],
             hookspath=[],
             runtime_hooks=[],
             excludes=[],
             win_no_prefer_redirects=False,
             win_private_assemblies=False,
             cipher=block_cipher,
             noarchive=False)
pyz = PYZ(a.pure, a.zipped_data,
             cipher=block_cipher)
exe = EXE(pyz,
          a.scripts,
          [],
          exclude_binaries=True,
          name='main',
          debug=False,
          bootloader_ignore_signals=False,
          strip=False,
          upx=True,
          console=True,
          icon='icon/cat.ico')
- 最后运行pyinstaller main.spec,打包成功时会生一个build和dist文件夹
- 参考文章:虽然里面很多不适用了,但是嗯,还是感谢大佬。
- 打包时报栈溢出错误的解决方法
# 在生成的main.spec文件中加入
# -*- mode: python ; coding: utf-8 -*-
import sys
sys.setrecursionlimit(5000)
- 打包之后的文件夹体积太大的解决方法
如果使用anaconda环境,打包之后的体积会异常大,3GB多,这是可以利用2.5打包成exe程序步骤做环境隔离。
总结
每天感慨自己写的什么垃圾代码,一两句话说不完,还是得看代码,虽然我不是正经python人,虽然我只是个前端。写这个程序大概四五天吧,之后就是自己做测试,优化,也让我学到了一些设计模式。真是one day day, write bug。最后还是发现了很多不足,比如打包之后在朋友的电脑上显出出来很丑且不能自适应,还有一些隐藏的bug。想学东西还是得自己动手!
欢迎批评指正。
