SpringBoot项目中使用Swagger3(开发小记)
项目是小团队开发,对于API接口文档有所疏忽,没有编写,只是在代码中加了注释而已,现在即将交付,就苦逼了。。。。
Swagger一款强大的接口文档生成工具,使用起来很便捷,在项目中引入Swagger,可以扫描相关的代码,生成该描述文件。这里要说明一下,我用的是Springfox Swagger,生成的文件是json格式的,有需要其他格式的可以在官网上看看。
我使用的是Swagger3,同样它保持着向下兼容,推荐使用Swagger3,因为SpringBoot项目和Swagger是有版本兼容问题的。就兼容问题,我卡了有一个小时。
接下来讲一下如何使用,以及可能会遇到的问题。
第一步,在pom文件中引入swagger包
在引入之前,你如果引用过其他版本的swagger包,我建议先clean一下,删除不干净会出现报错
  .........
  .........
  .........

            io.springfox
            springfox-boot-starter
            3.0.0
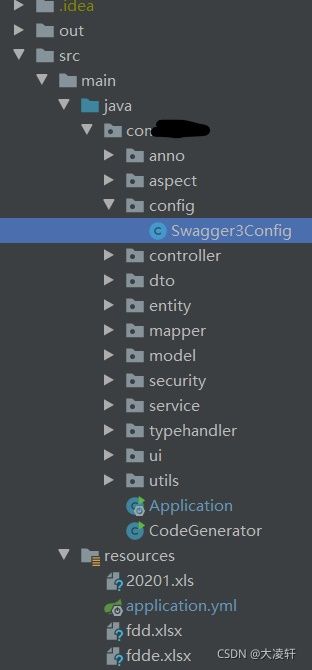
第二步,在目录中创建config文件夹,写一份配置文件Swagger3Config
import io.swagger.annotations.ApiOperation;
import org.springframework.context.annotation.Bean;
import org.springframework.context.annotation.Configuration;
import springfox.documentation.builders.ApiInfoBuilder;
import springfox.documentation.builders.PathSelectors;
import springfox.documentation.builders.RequestHandlerSelectors;
import springfox.documentation.oas.annotations.EnableOpenApi;
import springfox.documentation.service.ApiInfo;
import springfox.documentation.spi.DocumentationType;
import springfox.documentation.spring.web.plugins.Docket;

@Configuration
@EnableOpenApi
public class Swagger3Config {
    @Bean
    public Docket createRestApi(){
        return new Docket(DocumentationType.OAS_30)
                .apiInfo(apiInfo())
                .select()
                .apis(RequestHandlerSelectors.withMethodAnnotation(ApiOperation.class))
                .paths(PathSelectors.any())
                .build();
    }

    private ApiInfo apiInfo(){
        return new ApiInfoBuilder()
                .title("接口文档")
                .description("https://blog.csdn.net/weixin_42078172")
                .version("1.0")
                .build();
    }
}
这里注意一下,.apis(RequestHandlerSelectors.withMethodAnnotation(ApiOperation.class))这一块的作用是为了扫描我的项目中所有带有@Api注解的项目,你也可以写成.apis(RequestHandlerSelectors.basePackage("com.XXX.controller")),这样就可以只扫描你想要扫描的包下面的文件了。
第三步,在我们的启动类Application中加上@EnableOpenApi,让项目启动的时候就去扫描全局。
第四步,就是使用了,使用起来非常的简单
在controller类上方加上@Api(value = “XX接口”)),名字自定义就行。
@Controller
@Api(value = "用户信息接口")
@RequestMapping("/sysUser")
public class SysUserController {
        。。。。。。。。。
}
接口上的使用方式我就说明几个常用的,其他的用法可以百度
//一,简单注释,value中是描述,note可以备注,可加可不加
@ApiOperation(value = "字典列表",note="XXXXX")
    @RequestMapping("list")
    public JsonMessage list(@RequestParam(defaultValue = "1") int pageIndex,
                            @RequestParam(defaultValue = "10") int pageSize) {
        JsonMessage message = new JsonMessage();
        message.setData(dictService.findAll(pageIndex, pageSize));
        return message;
}


//二,对多参数进行解释,后面的paramType可以删除,不会有影响,甚至可以减少不少麻烦
@ApiOperation(value = "字典列表")
@ApiImplicitParams({
		@ApiImplicitParam(name = "pageIndex", value = "开始页", required = true, dataType = "int", paramType = "path"),
		@ApiImplicitParam(name = "pageSize", value = "每页显示数量", required = true, dataType = "int")
		})
 @RequestMapping("list")
    public JsonMessage list(@RequestParam(defaultValue = "1") int pageIndex,
                            @RequestParam(defaultValue = "10") int pageSize) {
        JsonMessage message = new JsonMessage();
        message.setData(dictService.findAll(pageIndex, pageSize));
        return message;
}


//三,对单参数进行解释
@ApiOperation(value = "字典列表")
@ApiImplicitParam(name = "pageIndex", value = "开始页", required = true, dataType = "int")
 @RequestMapping("list")
    public JsonMessage list(@RequestParam(defaultValue = "1") int pageIndex,
                            @RequestParam(defaultValue = "10") int pageSize) {
        JsonMessage message = new JsonMessage();
        message.setData(dictService.findAll(pageIndex, pageSize));
        return message;
}


//四,忽略该方法,亦可以用在controller上,用来忽略controller
@ApiIgnore
@RequestMapping("list")
    public JsonMessage list(@RequestParam(defaultValue = "1") int pageIndex,
                            @RequestParam(defaultValue = "10") int pageSize) {
        JsonMessage message = new JsonMessage();
        message.setData(dictService.findAll(pageIndex, pageSize));
        return message;
}
最后一步,运行
在运行之前,我们需要先检查一下自己的拦截器是否对接口进行拦截!!!这一步非常重要!!!(时间的教训)
为了安全,在没有登录之前我们开发者一般是设置了拦截器的,如果没有放行,直接访问是访问不了Swagger的,会出现404错误!!!
各人的拦截器大家自己去找,我们有两种处理方式:第一种,直接将拦截器注释掉,反正在上线之前也没人用;第二种,我们需要自己配置一下拦截器,让拦截器忽略Swagger所需要的路径:
    @Override
    public void configure(WebSecurity web) throws Exception {
        //super.configure(web);
        web.ignoring().antMatchers(
                "/路径/swagger-ui.html",
                "/路径/swagger-ui/**",
                "/路径/swagger-resources/**",
                "/路径/v2/api-docs",
                "/路径/v3/api-docs",
                "/路径/webjars/**");

    }
至于这个路径两个字填什么,就看你自己的服务器是怎么配置的了,我的是tomcat,如下所示:
运行起来后,在网页种输入 localhost:8080/路径(有就填,没有就不写,一般没有)/swagger-ui/ 或者 localhost:8080/路径/swagger-ui/index.html,之前版本的localhost:8080/路径/swagger-ui.html已经不能用了哦。
最后,附上我的目录结构
_____________________________________________________________________________
对于需要将json格式数据转换为doc文档的童鞋,可以使用这个项目,直接clone部署运行就行:
https://github.com/JMCuixy/swagger2word


