python3+opencv+PyMySQL实现人脸识别
前言
今天带来的是基于Opencv(c++底层编译)的人脸识别,再利用PyMySQL实现对数据的储存。
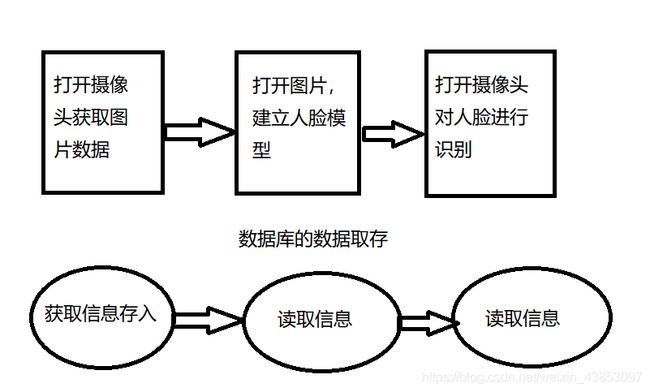
具体步骤是:

使用到的库,模块有
①CV2(Opencv):图像识别,摄像头调用
②os:文件操作
③numpy:NumPy(Numerical Python) 是 Python 语言的一个扩展程序库,支持大量的维度数组与矩阵运算,此外也针对数组运算提供大量的数学函数库
④PIL:Python Imaging Library,Python平台事实上图像处理的标准库
⑤PyMySQL:用户信息存储(可以用 Navicat for MySQL来可视化操作)
当然电脑应该先下载mysql数据库,本次默认的是使用mysql自带的test数据库,具体参数也可自行修改,下载教程百度有,使用可以看我另一篇博文
建议用pip命令时使用清华镜像网站,否则下载可能很慢
pip install [名字] -i https://pypi.tuna.tsinghua.edu.cn/simple
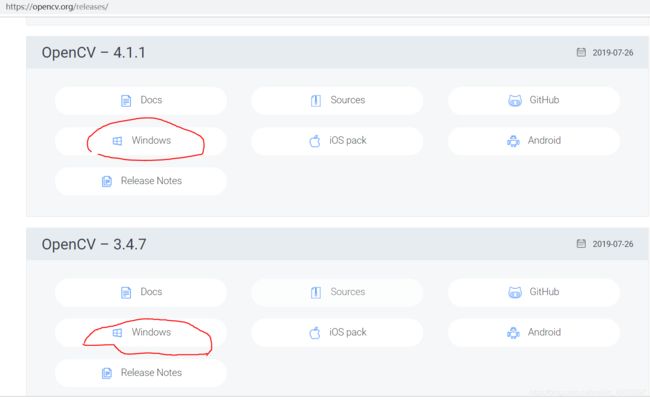
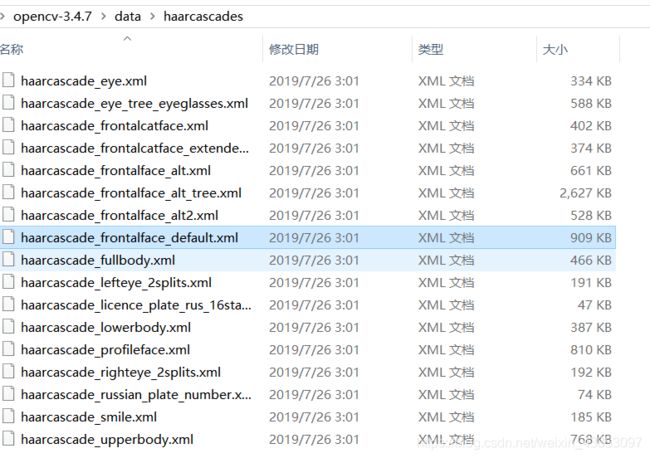
还需要下载Opencv提供的人脸模型特征数据 版本自己选择,还有显示的字体(simsun.ttc文件)应该放到py文件的同个目录 下载网址是下载地址
Opencv官网
下载完后将 ./data/haarcascades/haarcascade_frontalface_default.xml 复制到跟py文件同个目录


首先
首先应该在py文件的目录里面创建一个名为Picture_resources的子文件夹,当然可以修改代码中的生成文件目录
先是对人脸数据的抓取,然后生成一帧一帧的人脸灰度图片储存起来,过程中还应该将用户输入的信息对应储存到MySQL数据库里面
import datetime
import os
import shutil
import time
import cv2 as cv
import numpy as np
import pymysql
'''
@Author:Himit_ZH
@Date: 2020.3.1
'''
#与数据库进行数据连接
def PutDatatoSql(sname,sno):
    flag = 1
    con = pymysql.connect(host='localhost', password='123456', user='root', port=3306,db='facedata')
    # 创建游标对象
    cur = con.cursor()
    # 判断是否存在库
    #判断是否存在表 无则自动创建
    sql1 = r'''
                CREATE TABLE IF NOT EXISTS t_stu (
                id int PRIMARY KEY NOT NULL auto_increment,
                sname VARCHAR(20) NOT NULL,
                sno VARCHAR(14) NOT NULL,
                created_time DATETIME )
                 '''
    cur.execute(sql1)
    # 编写查询数据的sql
    sql2 = 'select * from t_stu where sname=%s and sno=%s'
    try:
        cur.execute(sql2,args=(sname,sno))
        con.commit()
        # 处理结果集
        student = cur.fetchall()
        if student:
            con.close()
            flag = 2
            return flag
    except Exception as e:
        print(e)
        print('查询数据失败')
        flag = 0
        return flag
    # 编写插入数据的sql
    sql3 = 'insert into t_stu(sname,sno,created_time) values(%s,%s,%s)'
    dt = datetime.datetime.now().strftime("%Y-%m-%d %H:%M:%S")
    try:
        # 执行sql
        cur.execute(sql3, (sname,sno,dt))
        # 提交事务
        con.commit()
        print('插入数据成功')
        return flag
    except Exception as e:
        print(e)
        con.rollback()
        print('插入数据失败')
        flag = 0
        return flag
    finally:
        # 关闭连接
        con.close()


if __name__ == '__main__':
    while True:
        face_id = input('请输入学号:')
        face_name = input('请输入姓名:')
        result = PutDatatoSql(face_name, face_id)
        if  result == 1:
            break
        elif result == 2:
            # 可能存在数据库有记录 但是图像资源被删掉了,这种情况重新录入
            if not os.path.exists('./Picture_resources/Stu_' + str(face_id)): #文件夹是否存在
                break
            elif not os.listdir("./Picture_resources/Stu_" + str(face_id)): #文件夹里面是否有文件
                break
            else:
                print('该用户已存在!')
        else:
            print('数据库未能成功连接')
    print('请看向摄像头,3秒后开始采集300张人脸图片(可按ESC强制退出)...')
    count = 0 #统计照片数量
    path = "./Picture_resources/Stu_" + str(face_id) #人脸图片数据的储存路径
    #读取视频
    cap=cv.VideoCapture(0)
    time.sleep(3) #停顿三秒后打开摄像头
    while True:
        flag,frame=cap.read()
        #print('flag:',flag,'frame.shape:',frame.shape)
        if not flag:
            break
        # 将图片灰度
        gray = cv.cvtColor(frame, cv.COLOR_BGR2GRAY)
        # 加载特征数据
        face_detector = cv.CascadeClassifier('haarcascade_frontalface_default.xml')
        faces = face_detector.detectMultiScale(gray, 1.2, 5)
        if not os.path.exists(path):  # 如果没有对应文件夹,自动生成
            os.makedirs(path)
        if len(faces) > 1: #一帧出现两张照片丢弃,原因:有人乱入,也有可能人脸识别出现差错
            continue
        # 框选人脸,for循环保证一个能检测的实时动态视频流
        for x, y, w, h in faces:
            cv.rectangle(frame, (x, y), (x + w, y + h), color=(0, 255, 0), thickness=2)
            count += 1
            cv.imwrite(path+'/'+str(count) + '.png', gray[y:y + h, x:x + w])
            # 显示图片
            cv.imshow('Camera', frame)
        print('已采集成功人脸照片数量为:'+str(count))
        if 27 == cv.waitKey(1) or count>=300: #按ESC可退出 默认采集500张照片
            break
    #关闭资源
    print('采集照片成功,3秒后退出程序...')
    time.sleep(3)
    cv.destroyAllWindows()
    cap.release()
其次
一样要在py文件同目录下创建一个名叫Trainer的文件夹,当然你可以修改代码里面的生成文件路径
然后利用opencv的LBPHFaceRecognizer对人脸创建模型,制作我们自己的人脸识别器,存储为名叫trainer.yml的数据文件,等待人脸识别来调用
补充:LBP是一种特征提取方式,能提取出图像的局部的纹理特征,最开始的LBP算子是在3X3窗口中,取中心像素的像素值为阀值,与其周围八个像素点的像素值比较,若像素点的像素值大于阀值,则此像素点被标记为1,否则标记为0。这样就能得到一个八位二进制的码,转换为十进制即LBP码,于是得到了这个窗口的LBP值,用这个值来反映这个窗口内的纹理信息。
import os
import time

import cv2
import pymysql
from PIL import Image
import numpy as np
'''
@Author:Himit_ZH
@Date: 2020.3.1
'''
def getIdfromSql(sno):
    con = pymysql.connect(host='localhost', database='test', user='root', password='123456', port=3306)
    # 创建游标对象
    cur = con.cursor()
    # 编写查询的sql
    sql = 'select id from t_stu where sno='+sno
    # 执行sql
    try:
        cur.execute(sql)
        # 处理结果集
        student = cur.fetchone()
        id = student[0]
        return id
    except Exception as e:
        print(e)
        print('查询所有数据失败')
    finally:
        con.close()

def getImageAndLabels(path):
    facesSamples=[]
    imageFiles = []
    ids = []
    for root, dirs, files in os.walk(path):
        # root 表示当前正在访问的文件夹路径
        # dirs 表示该文件夹下的子目录名list
        # files 表示该文件夹下的文件list
        # 遍历文件
        for file in files:
            imageFiles.append(os.path.join(root, file))
    #检测人脸
    face_detector = cv2.CascadeClassifier('haarcascade_frontalface_default.xml')
    #遍历列表中的图片
    count = 0
    for imagefile in imageFiles: #获得各文件夹名字
        imagefile=imagefile.replace('\\','/')
        id = int(getIdfromSql(imagefile.split('/')[2].split('_')[1]))

        PIL_img=Image.open(imagefile).convert('L') #打开图片并且转为灰度图片
        #将图像转换为数组
        img_numpy=np.array(PIL_img,'uint8')
        faces = face_detector.detectMultiScale(img_numpy)
        for x,y,w,h in faces:
            facesSamples.append(img_numpy[y:y+h,x:x+w])
            ids.append(id)
    return facesSamples,ids

if __name__ == '__main__':
    #图片路径
    path='./Picture_resources'
    #获取图像数组和id标签数组
    print('开始采集数据...')
    faces,ids=getImageAndLabels(path)
    print('采集数据结束,开始训练数据...')
    #获取训练对象
    recognizer=cv2.face.LBPHFaceRecognizer_create()
    recognizer.train(faces,np.array(ids))
    #保存文件
    recognizer.write('./Trainer/trainer.yml')
    print('训练数据成功!3秒后程序自动关闭...')
    time.sleep(3)
最后
再次打开摄像头对人脸进行识别,此次识别先取出数据库对应id的数据,然后显示在识别框旁边。
import cv2
import pymysql
import numpy
from PIL import Image, ImageFont, ImageDraw
'''
@Author:Himit_ZH
@Date: 2020.3.1
'''
#此函数是为了实现中文显示,opencv自带显示文字的函数的并不能显示中文
def cv2ImgAddText(img, text, left, top, textColor=(0, 255, 0), textSize=20):
    if (isinstance(img, numpy.ndarray)):  #判断是否OpenCV图片类型
        img = Image.fromarray(cv2.cvtColor(img, cv2.COLOR_BGR2RGB))
    draw = ImageDraw.Draw(img)
    fontText = ImageFont.truetype(
        "./simsun.ttc", textSize, encoding="utf-8")
    draw.text((left, top), text, textColor, font=fontText)
    return cv2.cvtColor(numpy.asarray(img), cv2.COLOR_RGB2BGR)
def getDataFromSql():
    names = {}
    # 创建连接
    con = pymysql.connect(host='localhost', database='facedata', user='root', password='123456', port=3306)
    # 创建游标对象
    cur = con.cursor()
    # 编写查询的sql
    sql = 'select * from t_stu'
    # 执行sql
    try:
        cur.execute(sql)
        # 处理结果集
        students = cur.fetchall()
        for student in students:
            id = student[0]
            sname = student[1]
            sno = student[2]
            names[int(id)] = sname
    except Exception as e:
        print(e)
        print('查询所有数据失败')
    finally:
        # 关闭连接
        con.close()
        return names

if __name__ == '__main__':
    recogizer=cv2.face.LBPHFaceRecognizer_create()
    #加载训练数据集文件
    recogizer.read('./Trainer/trainer.yml')
    #加载人脸特征数据
    face_detector = cv2.CascadeClassifier('haarcascade_frontalface_default.xml')
    names = getDataFromSql() #获取数据库对应数据
    cam = cv2.VideoCapture(0) #开启默认摄像头,其他外接摄像头参数可换为1,2....
    minW = 0.1*cam.get(3)
    minH = 0.1*cam.get(4)
    font = cv2.FONT_HERSHEY_SIMPLEX #字体格式
    while True:
        ret, img = cam.read() #读取每一帧图片
        gray = cv2.cvtColor(img, cv2.COLOR_BGR2GRAY) #设置成灰度图片
        faces = face_detector.detectMultiScale(
            gray,
            scaleFactor=1.2,
            minNeighbors=5,
            minSize=(int(minW), int(minH))
        )

        for (x, y, w, h) in faces:
            cv2.rectangle(img, (x, y), (x+w, y+h), (0, 255, 0), 2)
            idnum, confidence = recogizer.predict(gray[y:y+h, x:x+w])
            if confidence < 60:
                idname = names[idnum]
                confidence = "{0}%".format(round(100 - confidence))
            else:
                idname = 'unknown'
                confidence = "{0}%".format(round(100 - confidence))
            #将名字和相似度显示在图片上
            img = cv2ImgAddText(img, idname, x, y-30, (0, 255, 0),30) #显示中文
            #cv2.putText(img, str(idname), (x+5, y-5), font, 1, (0, 0, 255), 2)
            cv2.putText(img, str(confidence), (x+5, y+h-5), font, 1, (0, 0, 255), 2)
        cv2.imshow('Camera', img)
        k = cv2.waitKey(1)
        if k == 27:#按ESC关闭摄像头,退出人脸识别
            break
    cam.release()
    cv2.destroyAllWindows()
最后的最后
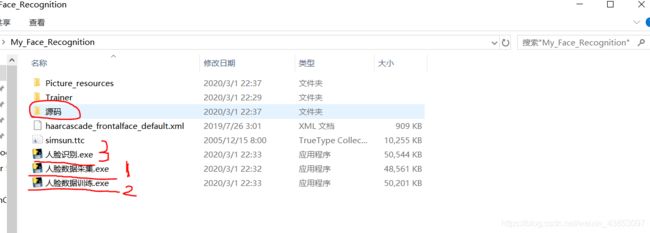
附上已经生成exe文件的压缩包,不过还应该自己下载mysql数据库,将登陆密码设为123456,只要下载后,按顺序打开程序,①录入图片,②训练数据,③进行人脸识别,就能成功。

已经生成exe文件可以没有python环境 但是还是要有mysql数据库!!!
完整压缩包下载