JavaSE-part2
文章目录
- Day07 IO流
-
- 1.IO流
-
- 1.1背景介绍
- 1.2File类
-
- 1.2.1常用方法
- 1.3IO流原理
- 1.4IO流的分类
-
- 1.4.1InputStream 字节输入流
-
- 1.4.1.1FileInputStream
- 1.4.1.2FileOutPutStream
- 1.4.1.3练习
- 1.4.2Reader and Writer
-
- 1.4.2.1FileReader
- 1.4.2.2FileWriter
- 1.4.3节点流和处理流
-
- 1.4.3.1处理流的优点
- 1.4.3.2装饰者模式
- 1.4.4Buffered
-
- 1.4.4.1BufferedReader
- 1.4.4.2BufferedWriter
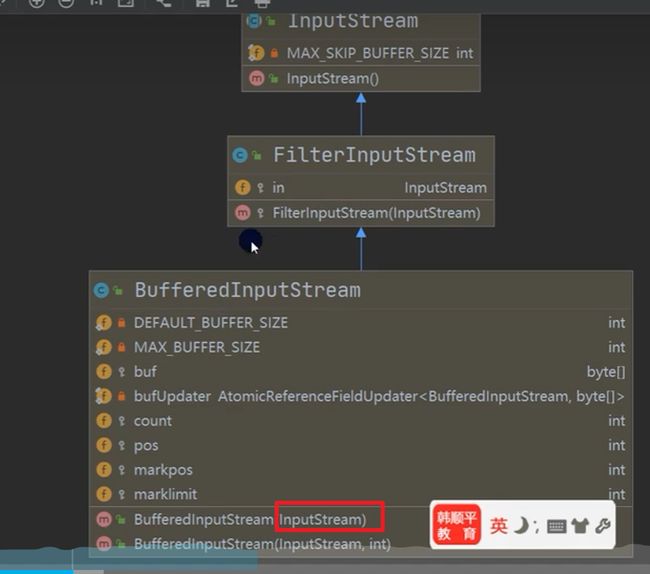
- 1.4.4.3BufferedInputStream
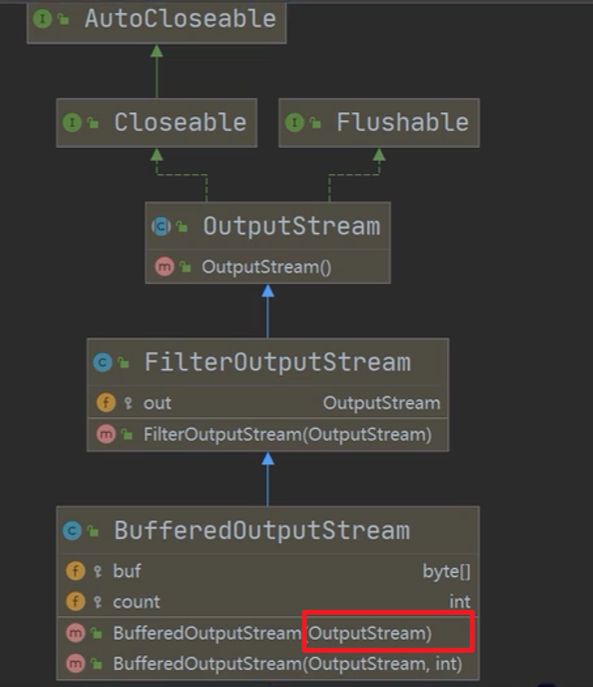
- 1.4.4.4BufferedOutputStream
- 1.4.5Object
-
- 1.4.5.1ObjectInputStream
- 1.4.5.2ObjectOutputStream
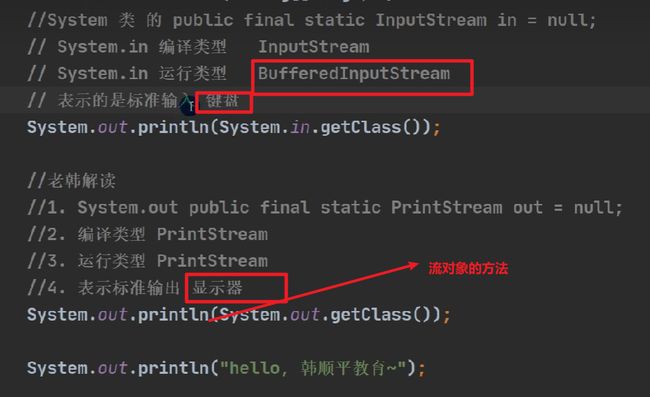
- 1.4.6标准输入输出流(IO流的实例,不属于IO特定的分类)
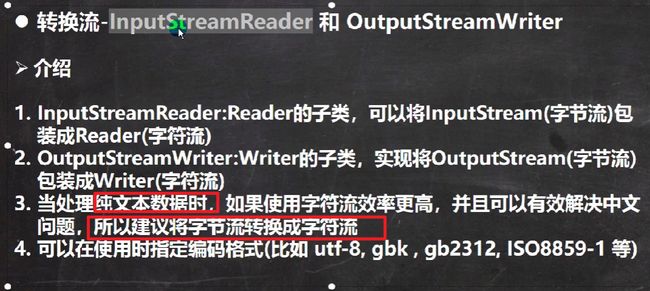
- 1.4.7转换流(适用于处理纯文本文件)
-
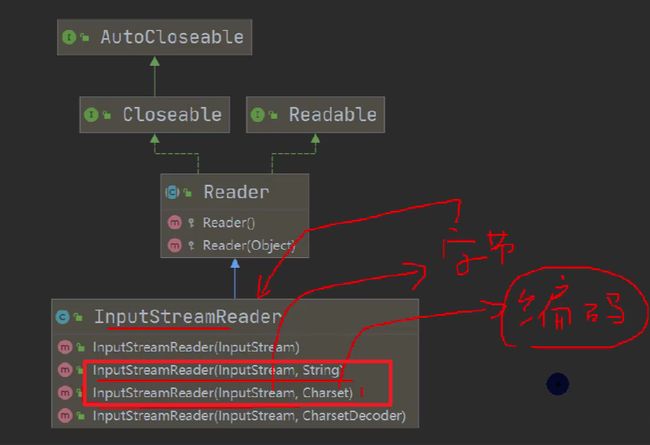
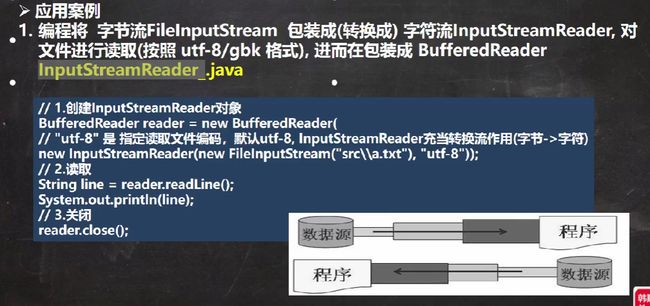
- 1.4.7.1InputStreamReader(解码)
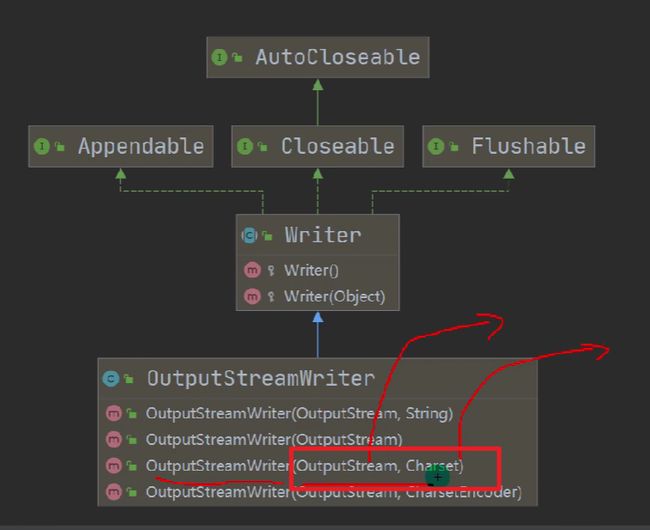
- 1.4.7.2OutputStreamWriter(编码)
- 1.4.8打印流
-
- 1.4.8.1PrintStream
- 1.4.8.2PrintWriter
- 1.4.9Properties
- 1.4.10练习
- 1.4.11总结
- Day08 多线程
-
- 1.多线程
-
- 1.1概念
- 1.2线程的使用
-
-
- 1.2.1多线程机制
- 1.2.2start方法
- 1.2.3实现Runnable接口
- 1.2.4线程方法
-
- 1.3线程生命周期
- 1.4线程的同步:star::star::star:
-
-
- 1.4.1解决方法(Synchronized代码块和方法)
- 1.4.2死锁问题
- 1.4.3Lock锁(线程安全)
-
- 1.5线程通信
- 1.6新增线程创建方法(jdk5.0~)
- Day09 网络编程
-
- 1.网络编程
-
- 1.1基础概念
-
- 1.1.2ip地址
- 1.1.3域名和端口号
- 1.1.4网络协议
- 1.1.5TCP和UDP:star::star::star:
- 1.2InetAddress类
- 1.3Socket
- 1.4TCP编程:star::star::star:
-
- 1.4.1字节流
- 1.4.2字符流
- 1.5UDP网络编程
- 1.6URL编程
- Day10 反射
-
- 1.反射
-
- 1.1反射概念和机制
-
- 1.1.1举例
- 1.1.2理解
-
- 1.1.2.1反射原理图:star::star::star:
- 1.1.2.2反射功能
- 1.2反射相关类
- 1.3反射的优点和缺点
- 1.4class类
-
- 1.4.1class类方法
- 1.4.2获取class类对象的六种方式
- 1.5类加载
-
- 1.5.1类加载时机:star::star::star:
- 1.5.2类加载各个阶段
-
- 1.5.2.1加载阶段
- 1.5.2.2连接
-
- 1.5.2.2.1验证阶段
- 1.5.2.2.2准备
- 1.5.2.2.3解析
- 1.5.2.3初始化
- 1.6通过反射获取类的结构信息
-
- 1.6.1第一组
- 1.6.2第二组(Field)
- 1.6.3第三组(Method)
- 1.6.4第四组(Constructor)
- 1.7运用反射机制进行操作
-
- 1.7.1通过反射创造对象
- 1.7.2通过反射操作属性
- 1.7.3通过反射调用方法
- 1.8动态代理:star::star::star:
-
- 1.8.1实现步骤:star:
-
- 1.8.1-1
- 1.8.2-2
- 1.8.3-3
- 1.8.4-4
- 1.8.5-5.main方法实现
- 1.8.2动态代理与AOP(面向切面编程)
Day07 IO流
1.IO流
1.1背景介绍
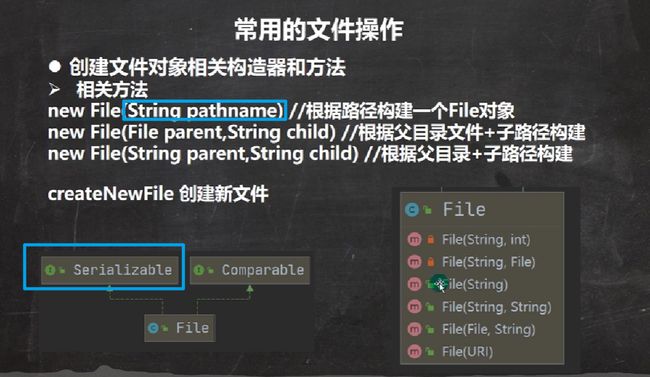
1.2File类
-
创建File类的对象,只是在内存中创建了一个对象,并没有写入到磁盘中,只有调用相应的CreateFile()方法,才能写入到磁盘中
-
文件这个类,按目录构建的时候是一个目录,按目录+文件名构建的时候是一个文件
-
java编程中目录也是一种文件
-
File类对象包括: 文件 + 目录
public class FileCreate {
    public static void main(String[] args) {

    }

    @Test
    //方式一:new File(String pathName)
    public void method1(){
        String path = "text1.txt";
        File file = new File(path);//创建file对象,这时还没创建文件
        try {
            file.createNewFile();
            System.out.println("文件创建成功");
        } catch (IOException e) {
            e.printStackTrace();
        }
    }
    //方式 2 new File(File parent,String child) //根据父目录文件+子路径构建
    @Test
    public void method2(){
        File file = new File("D:\\desktop\\666\\study\\Java\\javaseReverse");
        String name = "text2.txt";
        File file1 = new File(file, name);
        try {
            file1.createNewFile();
            System.out.println("文件创建成功");
        } catch (IOException e) {
            e.printStackTrace();
        }
    }

    //方式 3 new File(String parent,String child) //根据父目录+子路径构建
    @Test
    public void method3(){
        String parentPath = "D:\\desktop\\666\\study\\";
        String childPath  = "Java\\javaseReverse\\text3.txt";
        File file = new File(parentPath, childPath);

        try {
            file.createNewFile();
            System.out.println("文件创建成功");
        } catch (IOException e) {
            e.printStackTrace();
        }
    }
}
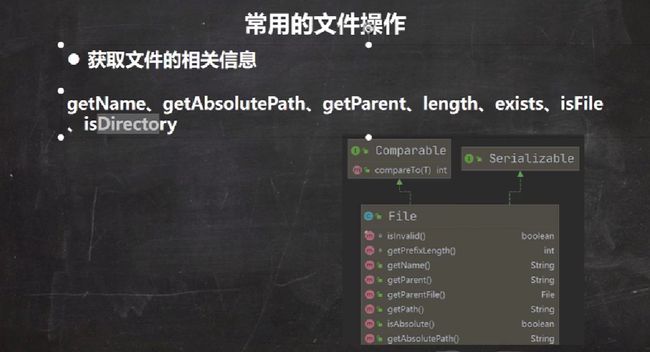
1.2.1常用方法
//获取文件信息
    @Test
    public void test1(){
        //加载文件对象
        File file = new File("text1.txt");

        System.out.println(file.getName());
        //调用相应的方法,得到对应信息
        System.out.println("文件名字=" + file.getName());
        //getName、getAbsolutePath、getParent、length、exists、isFile、isDirectory
        System.out.println("文件绝对路径=" + file.getAbsolutePath());
        System.out.println("文件父级目录=" + file.getParent());//这个文件没有指定父目录,是按相对路径创建的,所以返回null
        System.out.println("文件大小(字节)=" + file.length());
        System.out.println("文件是否存在=" + file.exists());//T
        System.out.println("是不是一个文件=" + file.isFile());//T
        System.out.println("是不是一个目录=" + file.isDirectory());//F
    }
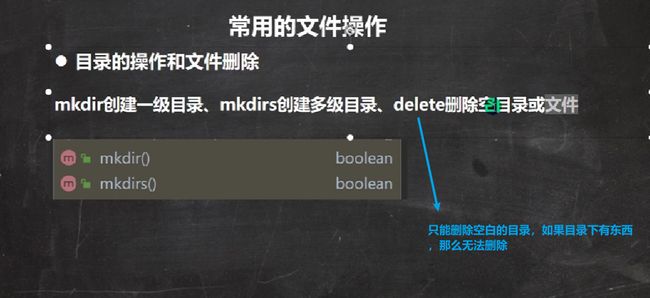
//删除文件操作 file.delete()
    @Test
    public void method1(){
        File file = new File("text3.txt");

        if(file.exists()){
            boolean delete = file.delete();
            if(delete){
                System.out.println("文件删除成功");//T
            }else{
                System.out.println("文件删除不成功");
            }
        }else{
            System.out.println("文件不存在");
        }
    }
//删除目录操作 file.delete()
    //目录也是一种特殊的文件
    @Test
    public void method2(){
        File file = new File("e:\\demo");

        if(file.exists()){
            boolean delete = file.delete();
            if(delete){
                System.out.println("目录删除成功");
            }else{
                System.out.println("目录删除不成功");
            }
        }else{
            System.out.println("目录不存在");//T
        }
    }
	//判断目录是否存在,如果不存在创建该目录
	//mkdirs()针对的是目录文件
    @Test
    public void method3(){
        File file = new File("e:\\demo\\a\\b");

        if(file.exists()){
            System.out.println("该目录已存在");
        }else{
            if(file.mkdirs()){创建多级目录
                System.out.println("该目录创建成功");//T
            }else{
                System.out.println("创建失败");
            }
        }
    }
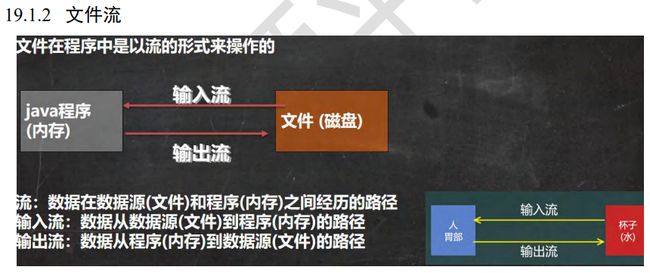
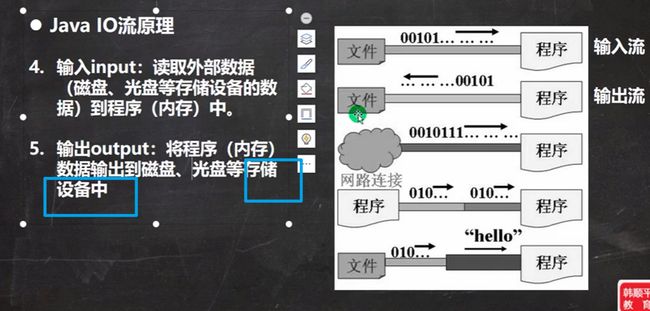
1.3IO流原理
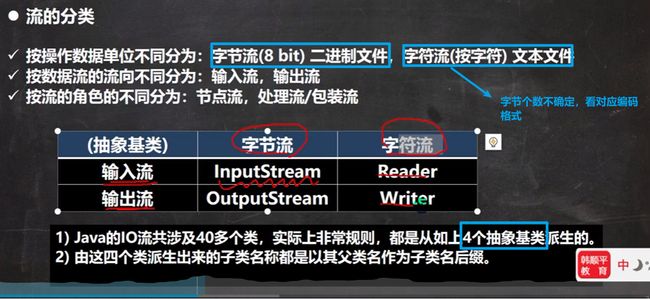
1.4IO流的分类
- 一般用循环读取文件(读取文件注意返回值),然后写入(直接写入就完事了)
1.4.1InputStream 字节输入流
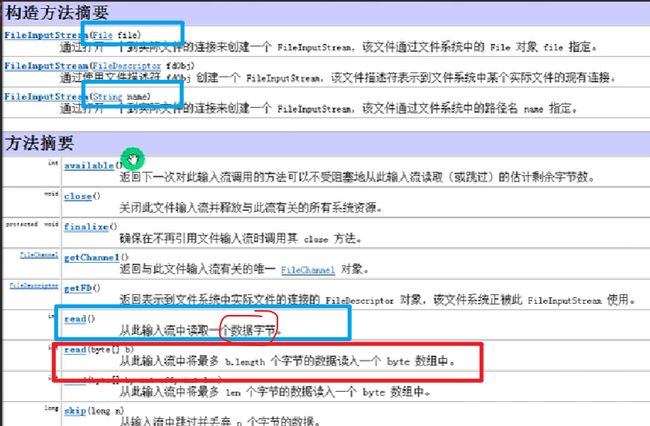
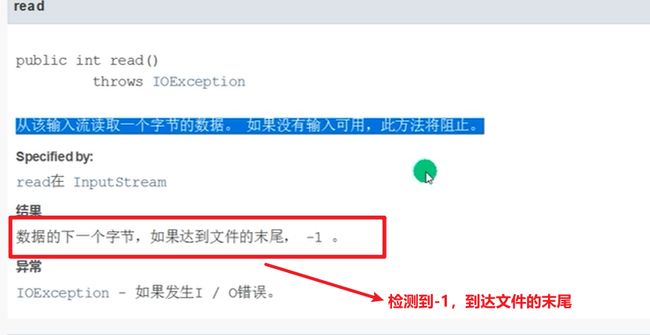
- read:要么一个一个读取,要不创建一个byte数组,多次读取
1.4.1.1FileInputStream
/**
     * 演示读取文件... * 单个字节的读取,效率比较低
     * -> 使用 read(byte[] b)
     */
    @Test
    public void readFile01(){
        String filePath = "text1.txt";
        FileInputStream fis = null;
        try {
            fis = new FileInputStream(filePath);
            int readContext;
            //从该输入流读取一个字节的数据。 如果没有输入可用,此方法将阻止。
            //如果返回-1 , 表示读取完毕
            while((readContext = fis.read()) != -1){
                System.out.println((char) readContext);//中文会乱码
            }
        } catch (IOException e) {
            e.printStackTrace();
        } finally {
            try {
                fis.close();
            } catch (IOException e) {
                e.printStackTrace();
            }
        }


    }
- 每次对流进行操作完,关闭流 的根本原因是,文件描述符不属于jvm管理的,是没有办法通过垃圾回收器回收,因此必须手动关闭
![]()
/**
     *
     * -> 使用 read(byte[] b),一次读取好几个,效率较高
     */
@Test
    public void readFile02() {
        String filePath = "text1.txt";
        FileInputStream fis = null;
        try {
            fis = new FileInputStream(filePath);
            byte[] buff = new byte[5];
            int readLen;
            //从该输入流读取最多 b.length 字节的数据到字节数组。 此方法将阻塞,直到某些输入可用。
            //如果返回-1 , 表示读取完毕
            //如果读取正常, 返回实际读取的字节数
            //如果读取的不够5个字节,那么就返回实际读取的字节数
            while ((readLen = fis.read(buff)) != -1) {
                System.out.println(new String(buff,0,readLen));//用String来讲字节数组转换为字符,这里不能直接用byte[]数组
                                                                    //因为最后如果读取小于五个字符,输出的buff数组前一部分为读取的
                                                                    //部分,其他部分为之前的部分,因此每次buff数组只取实际读取的
                                                                    //一部分
            }
        } catch (IOException e) {
            e.printStackTrace();
        } finally {
            try {
                fis.close();
            } catch (IOException e) {
                e.printStackTrace();
            }
        }
    }
1.4.1.2FileOutPutStream
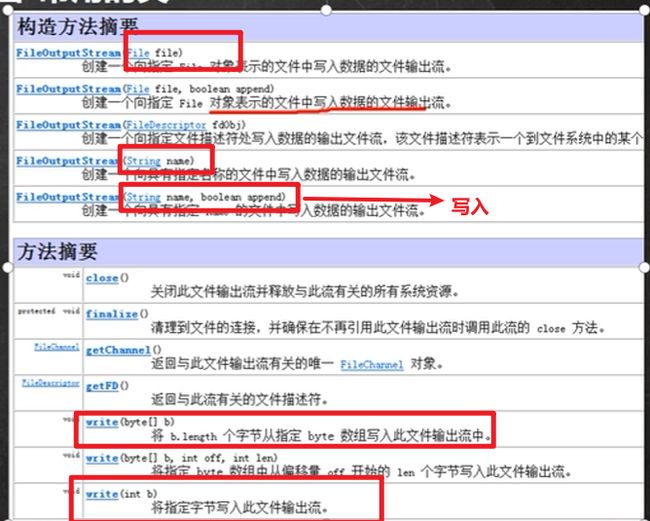
- 特殊的一点是:如果文件不存在,那么会新建一个文件
- 构造器,后面加True是追加的形式
- 写入的时候:是以字节的形式进行写入的,因此要调用String.getbytes()方法转换为字节数组再写入
![]()
 @Test
    public void writeFile() {
        //创建 FileOutputStream 对象
        String filePath = "text3.txt";
        FileOutputStream fileOutputStream = null;
        try {
            //得到 FileOutputStream 对象 对象
            //老师说明
            //1. new FileOutputStream(filePath) 创建方式,当写入内容是,会覆盖原来的内容
            //2. new FileOutputStream(filePath, true) 创建方式,当写入内容是,是追加到文件后面
            fileOutputStream = new FileOutputStream(filePath, true);
            //写入一个字节
            //fileOutputStream.write('H');//
            //写入字符串
            String str = "hsp,world!";
            //str.getBytes() 可以把 字符串-> 字节数组
            //fileOutputStream.write(str.getBytes());
            /*
            write(byte[] b, int off, int len) 将 len 字节从位于偏移量 off 的指定字节数组写入此文件输出流
            */
            fileOutputStream.write(str.getBytes(), 0, 3);
        } catch (IOException e) {
            e.printStackTrace();
        } finally {
            try {
                fileOutputStream.close();
            } catch (IOException e) {
                e.printStackTrace();
            }
        }
    }
1.4.1.3练习
@Test
    public void testCopy(){

        String filePath = "java.jpg";
        FileInputStream fis = null;
        FileOutputStream fos = null;

        try {
            //读取文件
            fis = new FileInputStream(filePath);
            fos = new FileOutputStream("javaCopy.jpg");
            //读取到后,就写入到文件 通过 fileOutputStream
            //即,是一边读,一边写
            byte[] buff = new byte[1024];
            int readLen;
            while((readLen = fis.read(buff)) != -1){
                fos.write(buff,0,readLen);
            }
        } catch (FileNotFoundException e) {
            e.printStackTrace();
        } catch (IOException e) {
            e.printStackTrace();
        } finally {
            try {
                fis.close();
            } catch (IOException e) {
                e.printStackTrace();
            }
            try {
                fos.close();
            } catch (IOException e) {
                e.printStackTrace();
            }
        }
    }
1.4.2Reader and Writer
1.4.2.1FileReader
@Test
    public void storyReader(){

        String filePath = "story.txt";
        FileReader fr = null;

        try {
            fr = new FileReader(filePath);
            char[] readContext = new char[1024];
            int readCount;
            while((readCount = fr.read(readContext)) != -1){
                System.out.print(new String(readContext,0,readCount));这里一定要用String处理
            }


        } catch (FileNotFoundException e) {
            e.printStackTrace();
        } catch (IOException e) {
            e.printStackTrace();
        }finally {
            if(fr != null){
                try {
                    fr.close();
                } catch (IOException e) {
                    e.printStackTrace();
                }
            }
        }


    }
1.4.2.2FileWriter
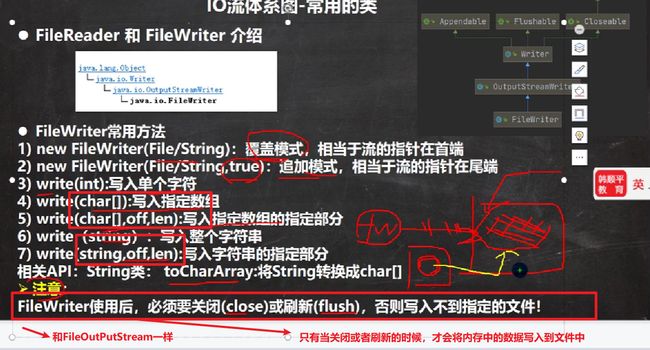
- 在write方法写入完数据之后,一定要flush或者close流,这样才能把数据真正地写入到文件中
public class FileWriter_ {
    public static void main(String[] args) {

    }
    @Test
    public void test(){
        String filePath = "note.txt";
        //创建 FileWriter 对象
        FileWriter fileWriter = null;
        char[] chars = {'a', 'b', 'c'};
        try {
            fileWriter = new FileWriter(filePath);//默认是覆盖写入
            // 3) write(int):写入单个字符
            fileWriter.write('H');
            // 4) write(char[]):写入指定数组
            fileWriter.write(chars);
            // 5) write(char[],off,len):写入指定数组的指定部分
            fileWriter.write("韩顺平教育".toCharArray(), 0, 3);
            // 6) write(string):写入整个字符串
            fileWriter.write(" 你好北京~");
            fileWriter.write("风雨之后,定见彩虹");
            // 7) write(string,off,len):写入字符串的指定部分
            fileWriter.write("上海天津", 0, 2);

        }catch (IOException e){
            e.printStackTrace();
        } finally {
        //对应 FileWriter , 一定要关闭流,或者 flush 才能真正的把数据写入到文件
        //老韩看源码就知道原因. /*
//        看看代码
//        private void writeBytes() throws IOException {
//            this.bb.flip();
//            int var1 = this.bb.limit();
//            int var2 = this.bb.position();
//            assert var2 <= var1;
//            int var3 = var2 <= var1 ? var1 - var2 : 0;
//            if (var3 > 0) {
//                if (this.ch != null) {
//                    assert this.ch.write(this.bb) == var3 : var3;
//                } else {
//                    this.out.write(this.bb.array(), this.bb.arrayOffset() + var2, var3);
//
//                }
//            }
//        }
//        this.bb.clear();
//        }
            try {
            //fileWriter.flush();
            //关闭文件流,等价 flush() + 关闭
            fileWriter.close();
            } catch (IOException e) {
                e.printStackTrace();
            }
        }
    }
}
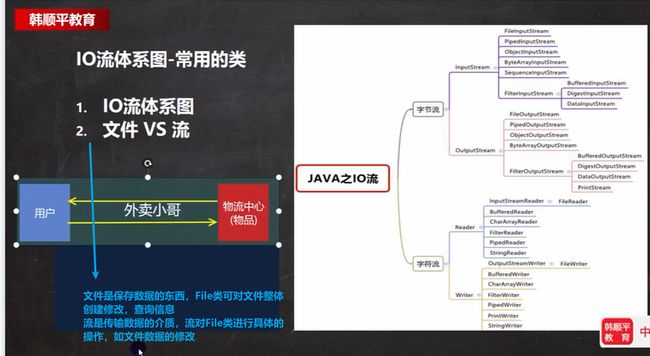
1.4.3节点流和处理流
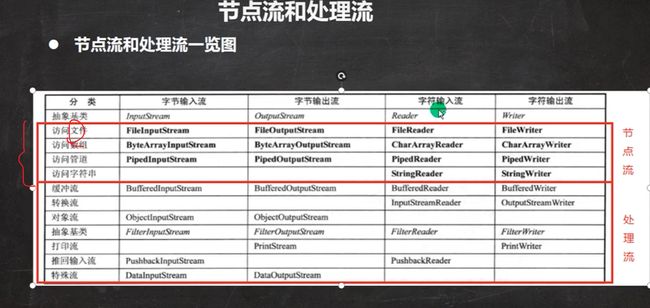
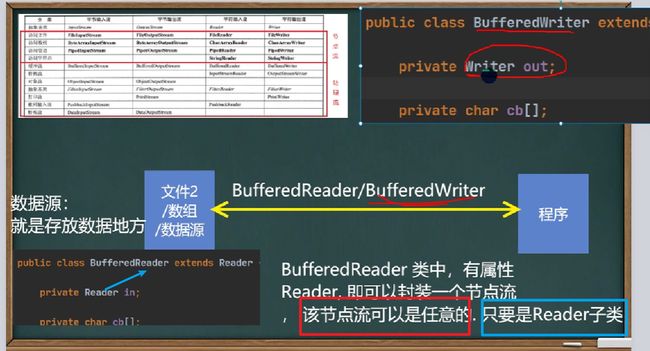
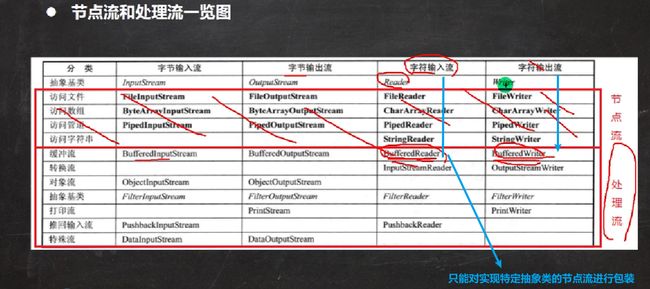
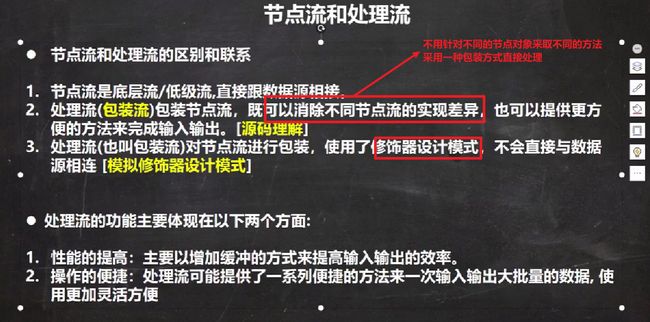
- 之前学过的处理文件的流都是节点流
- 处理流可以套一层节点流,使处理功能更强大
- 区分关键点:如果直接对对象(数据)进行处理,是节点流;有功能名字的流都是处理流
![]()
![]()
1.4.3.1处理流的优点
1.4.3.2装饰者模式
![]()
1.4.4Buffered
1.4.4.1BufferedReader
- 主要方法是跟以前一样还是有read()方法,新增方法readline读取一行,效率更高,读取到文件末尾返回null
public class BufferedReader_ {
    public static void main(String[] args) throws Exception{
        String filePath = "story.txt";
        BufferedReader reader = new BufferedReader(new FileReader(filePath));
        //说明
        //1. bufferedReader.readLine() 是按行读取文件
        //2. 当返回 null 时,表示文件读取完毕
        String line = null;
        while((line = reader.readLine()) != null){
            System.out.println(line);
        }
        //只需关闭外部流即可
        reader.close();
    }
}
1.4.4.2BufferedWriter
- 和以前一样有writer方法,可以按照char[]数组写入,也可以按照String数组写入
public class BufferedWriter_ {
    public static void main(String[] args) throws Exception{
        String filePath = "text2.txt";
        //创建 BufferedWriter
        //说明:
        //1. new FileWriter(filePath, true) 表示以追加的方式写入
        //2. new FileWriter(filePath) , 表示以覆盖的方式写入
        BufferedWriter bufferedWriter = new BufferedWriter(new FileWriter(filePath));
        bufferedWriter.write("hello, 韩顺平教育!");
        bufferedWriter.newLine();//插入一个和系统相关的换行
        bufferedWriter.write("hello2, 韩顺平教育!");
        bufferedWriter.newLine();
        bufferedWriter.write("hello3, 韩顺平教育!");
        bufferedWriter.newLine();
        //说明:关闭外层流即可 , 传入的 new FileWriter(filePath) ,会在底层关闭
        bufferedWriter.close();
    }
}
public class BufferedCopy {
    public static void main(String[] args) throws Exception{

        //1. BufferedReader 和 BufferedWriter 是安装字符操作
        //2. 不要去操作 二进制文件[声音,视频,doc, pdf ], 可能造成文件损坏
        String srcFilePath = "story.txt";
        String destFilePath = "storyCopy.txt";
        BufferedReader reader = new BufferedReader(new FileReader(srcFilePath));
        BufferedWriter writer = new BufferedWriter(new FileWriter(destFilePath));
        String readContext = null;
        //readline读取一行的内容,但是不读取换行符
        while ( (readContext = reader.readLine()) != null){
            writer.write(readContext);
            //插入一个换行符,与系统文件相关
            writer.newLine();
        }

        reader.close();
        writer.close();
    }
}
1.4.4.3BufferedInputStream
1.4.4.4BufferedOutputStream
1.4.5Object
1.4.5.1ObjectInputStream
-
反序列化的时候一定要按照序列化的顺序来,否则会报异常
-
序列化的类和反序列化解析出来的类是同一个类,否则会报异常,因为只有这样解析出来的才能使一个类
-
实际意义是,都是存放一个类对象的文件,便于读取
-
序列化对象时,建议添加serialVersionUID,提高版本兼容性
-
序列化对象默认将里面的对象都序列化,除了static和transient,transient就代表不想序列化
-
序列化类属性必须实现可序列化接口,才能序列化类
public class Dog implements Serializable {
    private String name;
    private int age;
    private String country;
    private String color;
    //序列化版本号,提高版本兼容性
    private static final long serialVersionUID = 1L;

    public Dog(String name, int age, String country, String color) {
        this.name = name;
        this.age = age;
        this.country = country;
        this.color = color;
    }

    @Override
    public String toString() {
        return "Dog{" +
                "name='" + name + '\'' +
                ", age=" + age +
                ", country='" + country + '\'' +
                ", color='" + color + '\'' +
                '}';
    }

    public String getName() {
        return name;
    }

    public void setName(String name) {
        this.name = name;
    }

    public int getAge() {
        return age;
    }

    public void setAge(int age) {
        this.age = age;
    }

    public String getCountry() {
        return country;
    }

    public void setCountry(String country) {
        this.country = country;
    }

    public String getColor() {
        return color;
    }

    public void setColor(String color) {
        this.color = color;
    }
}
public class ObjectInputStream_ {
    public static void main(String[] args) throws Exception{
        String filePath = "data.txt";

        ObjectInputStream ois = new ObjectInputStream(new FileInputStream(filePath));

        //反序列化的时候一定要按照序列化的顺序来
        //否则会报异常
        System.out.println(ois.readInt());
        System.out.println(ois.readBoolean());
        System.out.println(ois.readChar());
        System.out.println(ois.readDouble());
        System.out.println(ois.readUTF());

        //这里有一个重要的细节
        //1.如果我们希望调用Dog的方法,需要向下转型
        //2.需要我们将Dog类的定义,方法到可以引用的位置,这样序列化和反序列化出来的类的和引用的位置一致
        //换句话说,就是序列化的类和反序列化解析出来的类是同一个类
        Object obj = ois.readObject();
        Dog dog = (Dog)obj;
        System.out.println(dog);
        System.out.println(dog.getName());


        ois.close();
    }
}
1.4.5.2ObjectOutputStream
- 序列化后的保存的文本的格式不是纯文本的,是一种
![]()
public class ObjectOutputStream_ {
    public static void main(String[] args) throws Exception{
        //序列化后,保存的文件格式,不是存文本,而是按照他的格式来保存
        String filePath = "data.txt";
        ObjectOutputStream oos = new ObjectOutputStream(new FileOutputStream(filePath));
        //序列化数据到 e:\data.dat
        oos.writeInt(100);// int -> Integer (实现了 Serializable)
        oos.writeBoolean(true);// boolean -> Boolean (实现了 Serializable)
        oos.writeChar('a');// char -> Character (实现了 Serializable)
        oos.writeDouble(9.5);// double -> Double (实现了 Serializable)
        oos.writeUTF("韩顺平教育");//String
        //保存一个 dog 对象
        oos.writeObject(new Dog("旺财", 10, "日本", "白色"));
        oos.close();
        System.out.println("数据保存完毕(序列化形式)");
    }
}
//如果没有实现Serializable,就会报java.io.NotSerializableException异常
//class Dog implements Serializable {
//    private String name;
//    private int age;
//    private String country;
//    private String color;
//
//    public Dog(String name, int age, String country, String color) {
//        this.name = name;
//        this.age = age;
//        this.country = country;
//        this.color = color;
//    }
//}
1.4.6标准输入输出流(IO流的实例,不属于IO特定的分类)
1.4.7转换流(适用于处理纯文本文件)
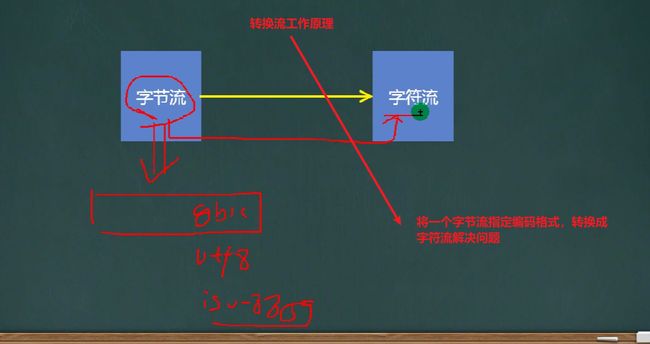
- 解决编码问题
1.4.7.1InputStreamReader(解码)
-
本质上就是将字节流转换为字符流,因为InputStreamReader是Reader的子类,得到一个转换过的字符流(reader)罢了
可以在转换后用BufferedReader进行包装,因为BufferedReader可接收Reader及其子类的对象,处理效率更高
public class InputStreamReader_ {
    public static void main(String[] args) throws Exception{
        String filePath = "text2.txt";

        //解读
        // 1. 把 FileInputStream 转成 InputStreamRea
        //2. 指定解码格式 utf-8
        InputStreamReader isr = new InputStreamReader(new FileInputStream(filePath), "utf-8");
        BufferedReader bufferedReader = new BufferedReader(isr);

        String str = null;
        while((str = bufferedReader.readLine()) != null){
            System.out.println(str);
        }
        //只用关闭最外层流,即BufferedReader即可
        bufferedReader.close();

    }
}
1.4.7.2OutputStreamWriter(编码)
public class OutputStreamWriter_ {
    public static void main(String[] args) throws Exception{

        String filePath = "编码格式gbk.txt";

        FileOutputStream fos = new FileOutputStream(filePath);
        OutputStreamWriter osw = new OutputStreamWriter(fos, "gbk");
        BufferedWriter bufferedWriter = new BufferedWriter(osw);

        bufferedWriter.write("你好,世界");

        bufferedWriter.close();

    }
}
1.4.8打印流
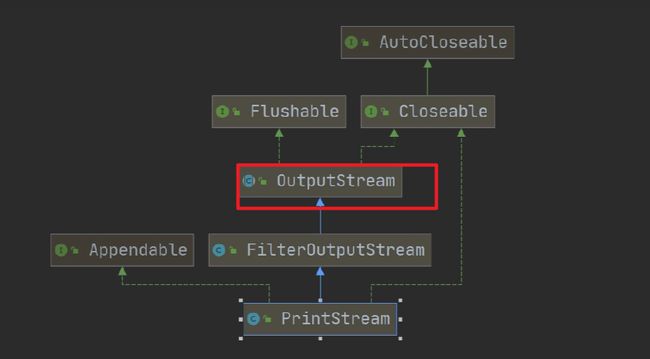
1.4.8.1PrintStream
-
就两个关键点,一个是构造器(指定传入位置的功能),一个是输出方法
-
printStream构造器方法可以直接传入一个文件路径(String或者File),这样可以修改输出的位置
-
这个类的print方法和write方法异曲同工,都是输出信息到指定位置
-
System.SetOut方法可以直接传入一个指定位置的输出流printStream,进行位置的修改
-
System.out的输出流输出到控制台上的,因此要指定输出内容到控制台,可传入System.out
public class PrintStream_ {
    public static void main(String[] args) throws Exception{
        //1.
        PrintStream ps = System.out;
        //在默认情况下PrintStream输出的位置是标准输出,即显示器

        ps.print("hello world");

        //        public void print(String s) {
        //            write(String.valueOf(s));
        //        }
        //因为print底层使用Write方法,所以我们可以直接使用Write进行打印/输出
        ps.write("你好世界".getBytes(StandardCharsets.UTF_8));


        //2.修改打印流的输出位置(设备)
        System.setOut(new PrintStream("print.txt"));
        System.out.print("你好世界");


        ps.close();

    }
}
1.4.8.2PrintWriter
public class PrintWriter_ {
    public static void main(String[] args) throws Exception{
        //输出方式1
//        PrintWriter printWriter = new PrintWriter(System.out);//输出到控制台
        //输出方式二
        PrintWriter printWriter = new PrintWriter(new FileWriter("printWriter.txt"));//输出到文件中

        printWriter.write("你好,世界");


        printWriter.close();//一定要关闭,否则不写入数据
    }
}
1.4.9Properties
1.4.10练习
public class exer1 {
    public static void main(String[] args) throws Exception{
        File file = new File("D:\\desktop\\mytemp");
        if(!file.exists()){
            file.mkdirs();
        }
        File file1 = new File("D:\\desktop\\mytemp\\hello.txt");
        if(file1.exists()){
            System.out.println("该文件已存在!");
        }else{
            file1.createNewFile();
        }
        FileOutputStream fos= new FileOutputStream("D:\\desktop\\mytemp\\hello.txt");
        fos.write("hello wolrd".getBytes(StandardCharsets.UTF_8));
        fos.close();
    }
}
public class exer2 {
    public static void main(String[] args) throws Exception{
        String filePath = "story.txt";
        BufferedReader buffer = new BufferedReader(new InputStreamReader(new FileInputStream(filePath),"utf-8"));
        String context = null;
        int lineCount = 1;
        while((context = buffer.readLine()) != null){
            System.out.println((lineCount++) + context);
        }
        buffer.close();
    }
}
public class Dog implements Serializable {
    private String name;
    private int age;
    private String color;

    public String getName() {
        return name;
    }

    public void setName(String name) {
        this.name = name;
    }

    public int getAge() {
        return age;
    }

    public void setAge(int age) {
        this.age = age;
    }

    public String getColor() {
        return color;
    }

    public void setColor(String color) {
        this.color = color;
    }

    public Dog(String name, int age, String color) {
        this.name = name;
        this.age = age;
        this.color = color;
    }

    public Dog() {
    }

    @Override
    public String toString() {
        return "Dog{" +
                "name='" + name + '\'' +
                ", age=" + age +
                ", color='" + color + '\'' +
                '}';
    }
}

public class exer3 {
    public static void main(String[] args) throws Exception{
        Properties pros = new Properties();
        pros.load(new FileReader("dog.properties"));

        Dog dog = new Dog(pros.getProperty("name"), Integer.parseInt(pros.getProperty("age")), pros.getProperty("color"));
        System.out.println(dog);//Dog{name='tom', age=5, color='red'}

        String filePath = "dog.dat";
        ObjectOutputStream oos = new ObjectOutputStream(new FileOutputStream(filePath));
        oos.writeObject(dog);

        ObjectInputStream ois = new ObjectInputStream(new FileInputStream(filePath));
        Object o = ois.readObject();
        Dog dog1 = (Dog)o;
        System.out.println(dog1.getClass());//class day07.Exer.Dog

        oos.close();
        ois.close();

    }
}
1.4.11总结
-
File类主要是创建一个内存的虚拟的对象,然后对文件/目录进行操作
-
IO流就包括两大类输入流和输出流
-
输入流和输出流又分字节和字符输入输出
-
按照功能分,又分为节点流和处理流,处理流功能更强
-
总之,所有的流都与最初的File流息息相关
Day08 多线程
1.多线程
1.1概念
-
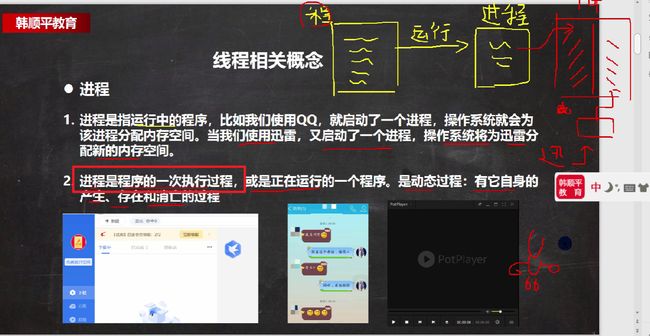
程序是静态的概念,进程是运行的程序
-
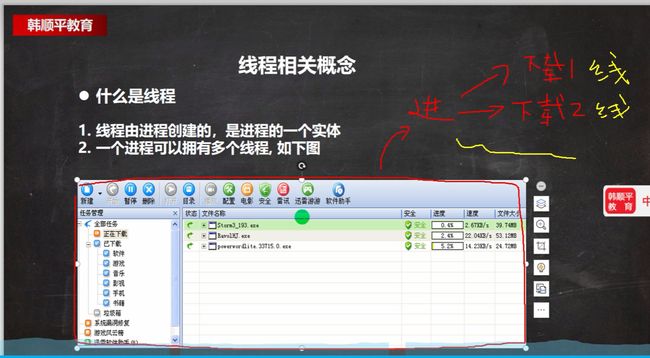
线程由进程创建,一个进程由多个线程组成
-
单线程:同一时间只能运行一个线程;多线程:同一时间可以运行多个线程
-
**并发:**同一时刻,任务交替进行,貌似“同时执行”(人有很多行为都是并发的),单核
**并行:**同一时刻,多个任务同时执行,多核
并发和并行可以同时存在
![]()
![]()
1.2线程的使用
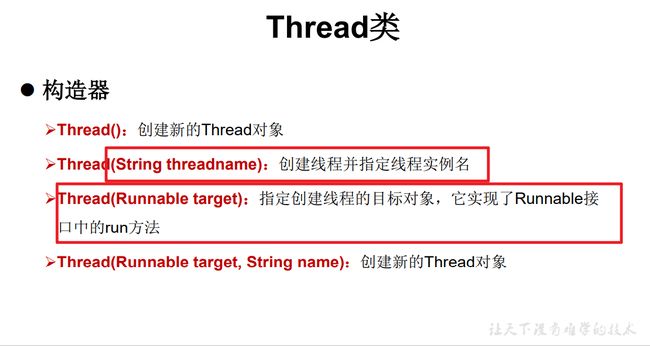
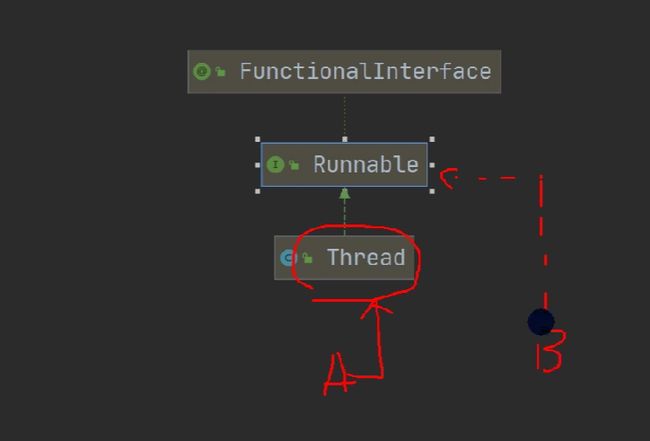
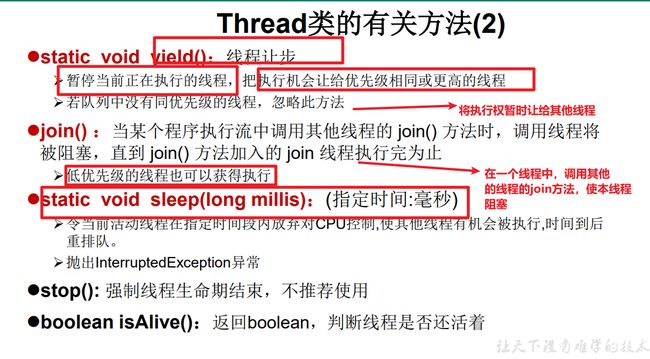
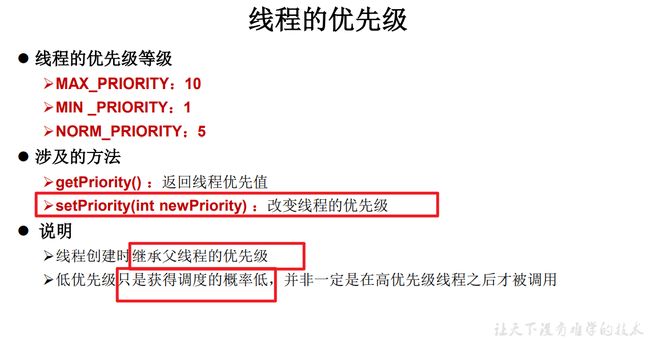
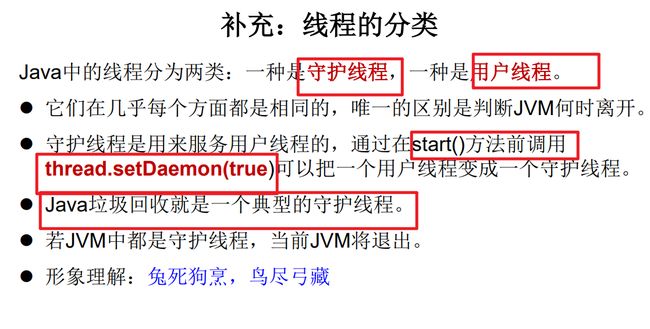
- 线程可以继承Tread类,实现Runnable接口,实现Collable接口,还有线程池四种方式获取
1.2.1多线程机制
-
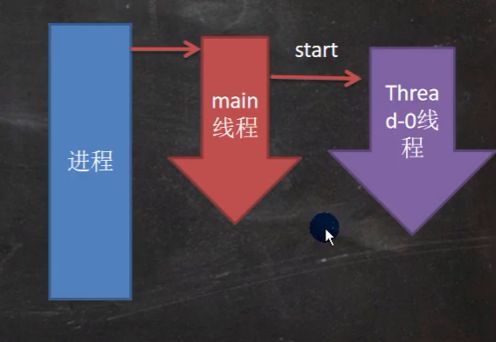
当开启一个进程的时候,main线程同时开启,此时再开一个线程会交替执行。如果是多核,那么可能并行,单核的话,并发
-
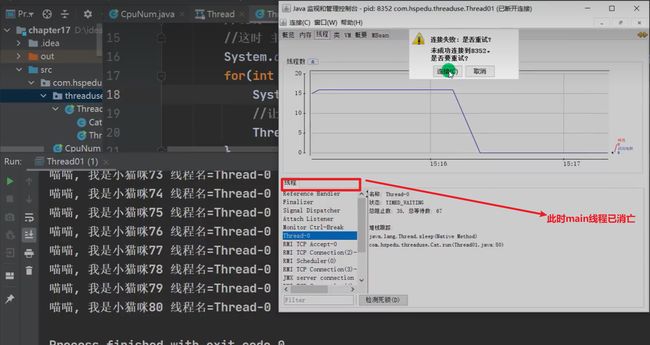
开启一个进程,main线程开启,Thread - 0由main线程开启,main线程结束,子线程不一定结束,当所有的线程结束之后
进程才结束
1.2.2start方法
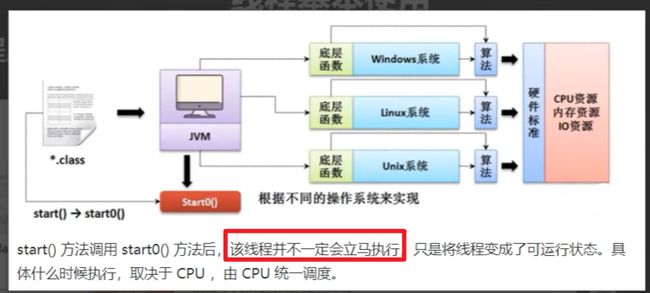
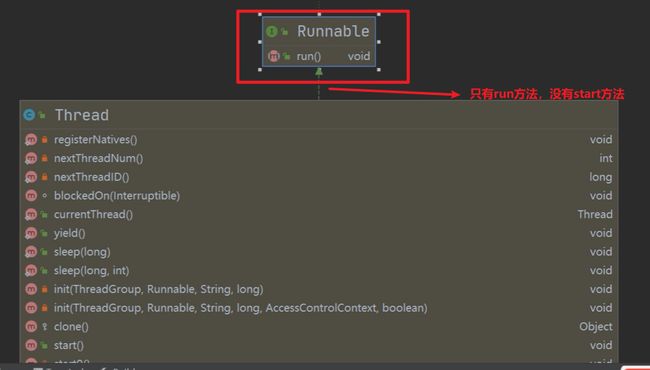
- run方法就是一个普通的方法,start方法才能真正开一个线程
- start方法,调用start0方法开启新线程
1.2.3实现Runnable接口
![]()
1.2.4线程方法
![]()
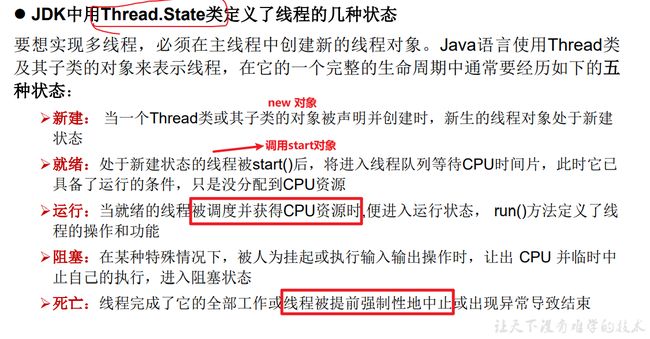
1.3线程生命周期
1.4线程的同步⭐️⭐️⭐️
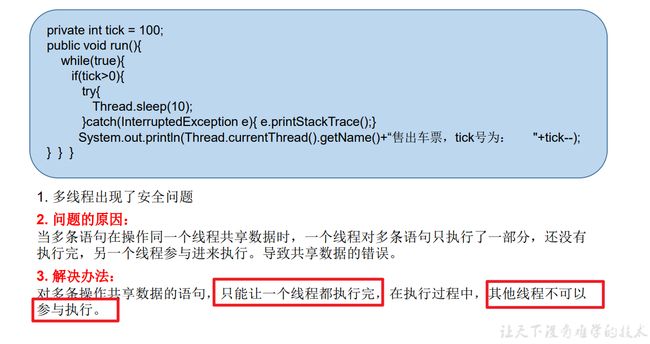
- 出现问题:多个线程对同一份数据进行修改操作的时候
- 设计:将线程要操作共享数据的部分设置为同步代码块
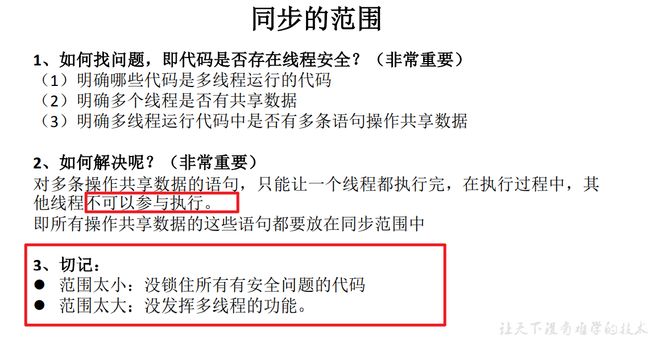
- 总归:在操作共享数据时,只能有一个线程在操作⭐️⭐️⭐️
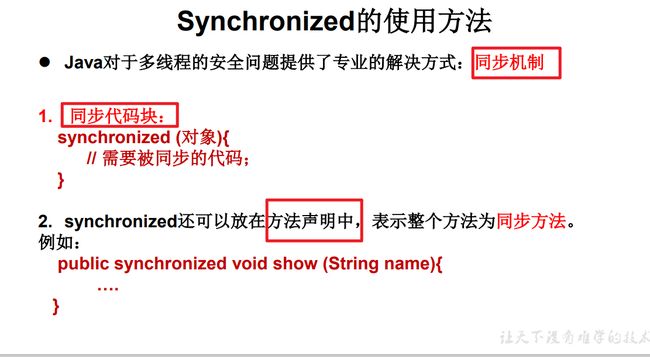
1.4.1解决方法(Synchronized代码块和方法)
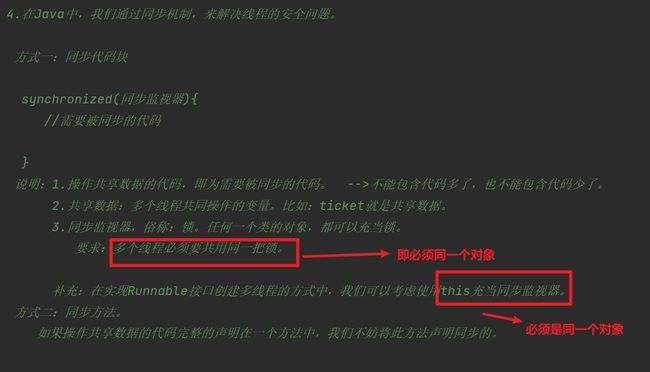
- 锁必须共用一把,即同一个对象
- 锁充当,可以自定义对象,当前对象,类对象(.class)
- 类对象是唯一的,类只会加载一次
- 同步代码一定要是要共享操作的代码,既不能同步多,也不能同步少
- 同步方法适用于一个方法都是对共享的数据进行操作,同步方法默认的是this锁
![]()
/**
 * 使用同步机制将单例模式中的懒汉式改写为线程安全的
 *
 * @author shkstart
 * @create 2019-02-15 下午 2:50
 */
public class BankTest {

}

class Bank{

    private Bank(){}

    private static Bank instance = null;

    public static Bank getInstance(){
        //方式一:效率稍差
//        synchronized (Bank.class) {
//            if(instance == null){
//
//                instance = new Bank();
//            }
//            return instance;
//        }
        //方式二:效率更高
        //双重校验锁
        if(instance == null){

            synchronized (Bank.class) {
                if(instance == null){

                    instance = new Bank();
                }

            }
        }
        return instance;
    }
}
1.4.2死锁问题
![]()
/**
 * 演示线程的死锁问题
 *
 * 1.死锁的理解:不同的线程分别占用对方需要的同步资源不放弃,
 * 都在等待对方放弃自己需要的同步资源,就形成了线程的死锁
 *
 * 2.说明:
 * 1)出现死锁后,不会出现异常,不会出现提示,只是所有的线程都处于阻塞状态,无法继续
 * 2)我们使用同步时,要避免出现死锁。
 *
 * @author shkstart
 * @create 2019-02-15 下午 3:20
 */
public class ThreadTest {

    public static void main(String[] args) {

        StringBuffer s1 = new StringBuffer();
        StringBuffer s2 = new StringBuffer();


        new Thread(){
            @Override
            public void run() {

                synchronized (s1){

                    s1.append("a");
                    s2.append("1");

                    try {
                        Thread.sleep(100);
                    } catch (InterruptedException e) {
                        e.printStackTrace();
                    }


                    synchronized (s2){
                        s1.append("b");
                        s2.append("2");

                        System.out.println(s1);
                        System.out.println(s2);
                    }


                }

            }
        }.start();


        new Thread(new Runnable() {
            @Override
            public void run() {
                synchronized (s2){

                    s1.append("c");
                    s2.append("3");

                    try {
                        Thread.sleep(100);
                    } catch (InterruptedException e) {
                        e.printStackTrace();
                    }

                    synchronized (s1){
                        s1.append("d");
                        s2.append("4");

                        System.out.println(s1);
                        System.out.println(s2);
                    }


                }


            }
        }).start();


    }
}
1.4.3Lock锁(线程安全)
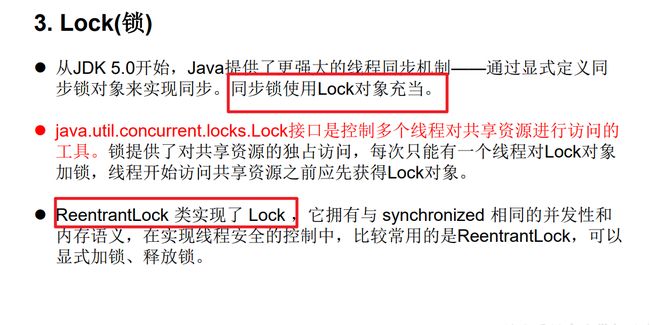
- 构造器有参数fair,参数fair为true为公平的,先进先出,比如三个线程轮流强,不会一个线程多次抢到
- 对象方法lock()为锁住,unlock()为释放锁
![]()
class Window implements Runnable{

    private int ticket = 100;
    //1.实例化ReentrantLock
    //参数fair为true为公平的,先进先出,比如三个线程轮流强,不会一个线程多次抢到
    private ReentrantLock lock = new ReentrantLock();

    @Override
    public void run() {
        while(true){
            try{

                //2.调用锁定方法lock()
                lock.lock();

                if(ticket > 0){

                    try {
                        Thread.sleep(100);
                    } catch (InterruptedException e) {
                        e.printStackTrace();
                    }

                    System.out.println(Thread.currentThread().getName() + ":售票,票号为:" + ticket);
                    ticket--;
                }else{
                    break;
                }
            }finally {
                //3.调用解锁方法:unlock()
                lock.unlock();
            }

        }
    }
}

public class LockTest {
    public static void main(String[] args) {
        Window w = new Window();

        Thread t1 = new Thread(w);
        Thread t2 = new Thread(w);
        Thread t3 = new Thread(w);

        t1.setName("窗口1");
        t2.setName("窗口2");
        t3.setName("窗口3");

        t1.start();
        t2.start();
        t3.start();
    }
}
1.5线程通信
-
线程通信一定要在同步代码块中
-
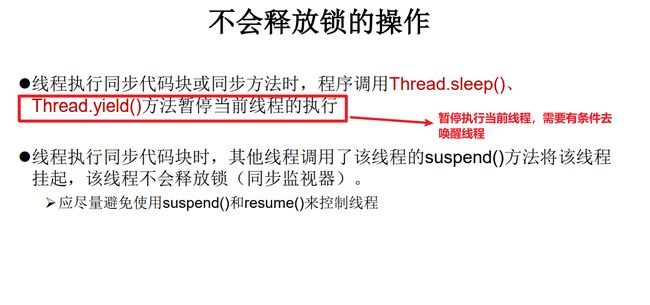
sleep不会释放锁,wait会释放锁,并且阻塞
-
wait():一旦执行此方法,当前线程就进入阻塞状态,并释放同步监视器。
-
notify():一旦执行此方法,就会唤醒被wait的一个线程。如果有多个线程被wait,就唤醒优先级高的那个。
-
notifyAll():一旦执行此方法,就会唤醒所有被wait的线程。
-
三个通信方法的调用,必须是同步代码块或同步方法中的锁,是同一把锁才行
-
阻塞状态:就是当前线程不再执行
![]()
/**
 * 线程通信的应用:经典例题:生产者/消费者问题
 *
 * 生产者(Productor)将产品交给店员(Clerk),而消费者(Customer)从店员处取走产品,
 * 店员一次只能持有固定数量的产品(比如:20),如果生产者试图生产更多的产品,店员
 * 会叫生产者停一下,如果店中有空位放产品了再通知生产者继续生产;如果店中没有产品
 * 了,店员会告诉消费者等一下,如果店中有产品了再通知消费者来取走产品。
 *
 * 分析:
 * 1. 是否是多线程问题?是,生产者线程,消费者线程
 * 2. 是否有共享数据?是,店员(或产品)
 * 3. 如何解决线程的安全问题?同步机制,有三种方法
 * 4. 是否涉及线程的通信?是
 *
 * @author shkstart
 * @create 2019-02-15 下午 4:48
 */
class Clerk{

    private int productCount = 0;
    //生产产品
    public synchronized void produceProduct() {

        if(productCount < 20){
            productCount++;
            System.out.println(Thread.currentThread().getName() + ":开始生产第" + productCount + "个产品");

            notify();

        }else{
            //等待
            try {
                wait();
            } catch (InterruptedException e) {
                e.printStackTrace();
            }
        }

    }
    //消费产品
    public synchronized void consumeProduct() {
        if(productCount > 0){
            System.out.println(Thread.currentThread().getName() + ":开始消费第" + productCount + "个产品");
            productCount--;

            notify();
        }else{
            //等待
            try {
                wait();
            } catch (InterruptedException e) {
                e.printStackTrace();
            }
        }

    }
}

class Producer extends Thread{//生产者

    private Clerk clerk;

    public Producer(Clerk clerk) {
        this.clerk = clerk;
    }

    @Override
    public void run() {
        System.out.println(getName() + ":开始生产产品.....");

        while(true){

            try {
                Thread.sleep(10);
            } catch (InterruptedException e) {
                e.printStackTrace();
            }

            clerk.produceProduct();
        }

    }
}

class Consumer extends Thread{//消费者
    private Clerk clerk;

    public Consumer(Clerk clerk) {
        this.clerk = clerk;
    }

    @Override
    public void run() {
        System.out.println(getName() + ":开始消费产品.....");

        while(true){

            try {
                Thread.sleep(20);
            } catch (InterruptedException e) {
                e.printStackTrace();
            }

            clerk.consumeProduct();
        }
    }
}

public class ProductTest {

    public static void main(String[] args) {
        Clerk clerk = new Clerk();

        Producer p1 = new Producer(clerk);
        p1.setName("生产者1");

        Consumer c1 = new Consumer(clerk);
        c1.setName("消费者1");
        Consumer c2 = new Consumer(clerk);
        c2.setName("消费者2");

        p1.start();
        c1.start();
        c2.start();

    }
}
1.6新增线程创建方法(jdk5.0~)
-
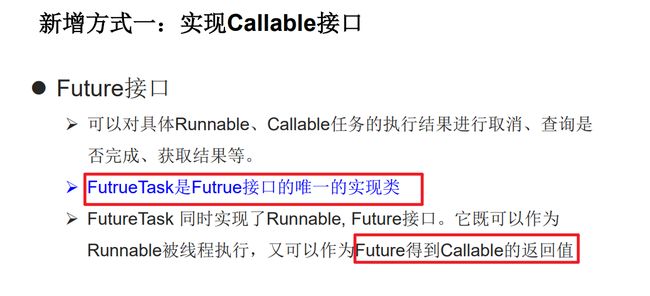
方式一步骤:
//1.创建一个实现Callable的实现类
//2.实现call方法,将此线程需要执行的操作声明在call()中
//3.创建Callable接口实现类的对象
//4.将此Callable接口实现类的对象作为传递到FutureTask构造器中,创建FutureTask的对象
//5.将FutureTask的对象作为参数传递到Thread类的构造器中,创建Thread对象,并调用start()
//6.需要获取返回值,用FutureTask的对象的get方法,不需要返回值,实现call方法返回null
![]()
![]()
-
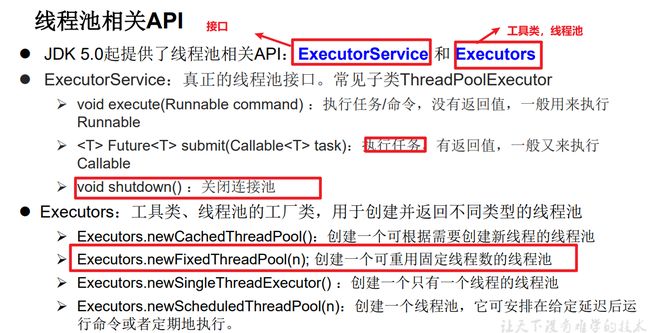
方式二步骤:
//1.提供指定线程数量的线程池
//2.执行指定的线程的操作。需要提供实现Runnable接口或Callable接口实现类的对象
//3.3.关闭连接池
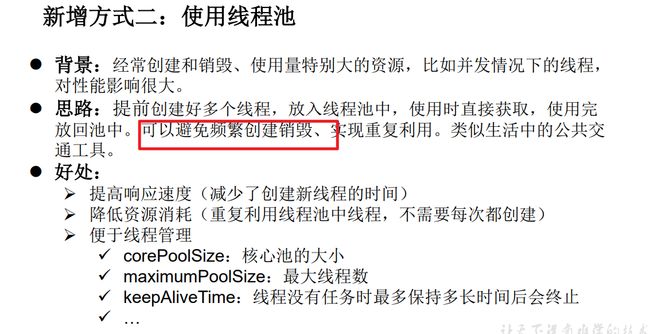
import java.util.concurrent.ExecutorService;
import java.util.concurrent.Executors;
import java.util.concurrent.ThreadPoolExecutor;

/**
 * 创建线程的方式四:使用线程池
 *
 * 好处:
 * 1.提高响应速度(减少了创建新线程的时间)
 * 2.降低资源消耗(重复利用线程池中线程,不需要每次都创建)
 * 3.便于线程管理
 *      corePoolSize:核心池的大小
 *      maximumPoolSize:最大线程数
 *      keepAliveTime:线程没有任务时最多保持多长时间后会终止
 *
 *
 * 面试题:创建多线程有几种方式?四种!
 * @author shkstart
 * @create 2019-02-15 下午 6:30
 */

class NumberThread implements Runnable{

    @Override
    public void run() {
        for(int i = 0;i <= 100;i++){
            if(i % 2 == 0){
                System.out.println(Thread.currentThread().getName() + ": " + i);
            }
        }
    }
}

class NumberThread1 implements Runnable{

    @Override
    public void run() {
        for(int i = 0;i <= 100;i++){
            if(i % 2 != 0){
                System.out.println(Thread.currentThread().getName() + ": " + i);
            }
        }
    }
}

public class ThreadPool {

    public static void main(String[] args) {
        //1. 提供指定线程数量的线程池
        ExecutorService service = Executors.newFixedThreadPool(10);
        ThreadPoolExecutor service1 = (ThreadPoolExecutor) service;
        //设置线程池的属性
//        System.out.println(service.getClass());
//        service1.setCorePoolSize(15);
//        service1.setKeepAliveTime();


        //2.执行指定的线程的操作。需要提供实现Runnable接口或Callable接口实现类的对象
        service.execute(new NumberThread());//适合适用于Runnable
        service.execute(new NumberThread1());//适合适用于Runnable

//        service.submit(Callable callable);//适合使用于Callable
        //3.关闭连接池
        service.shutdown();
    }

}
Day09 网络编程
1.网络编程
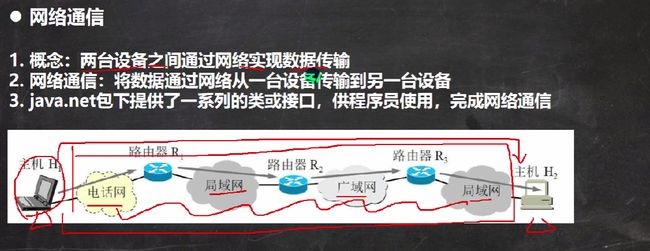
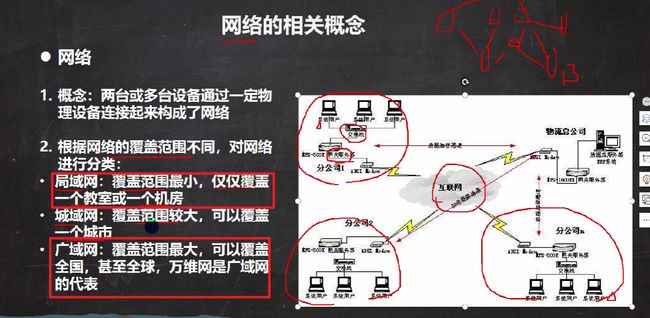
1.1基础概念
![]()
1.1.2ip地址
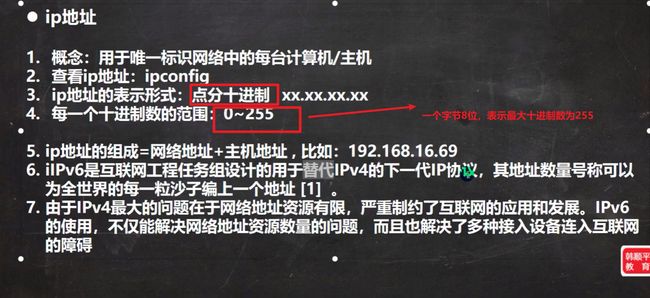
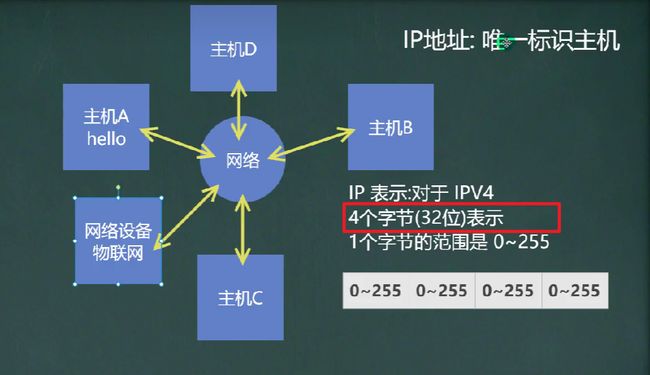
- ipv4是由4个字节进行表示,一共32位,用十进制表示
- ipv6是由16个字节进行表示,一共128位,一般用十六进制表示
- ipv4地址分类
![]()
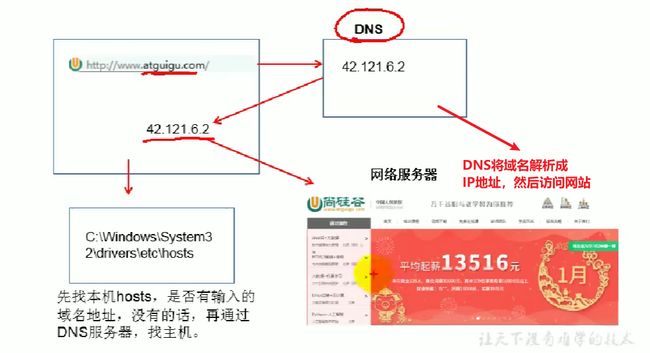
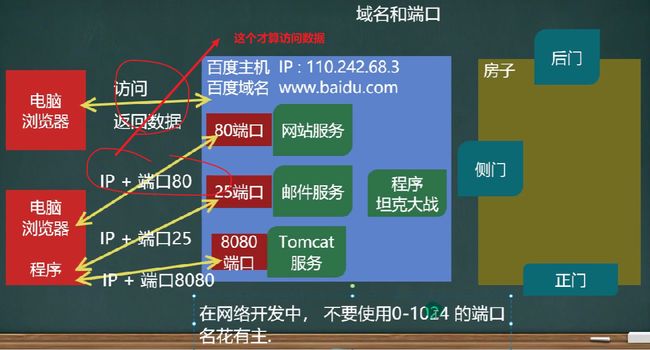
1.1.3域名和端口号
![]()
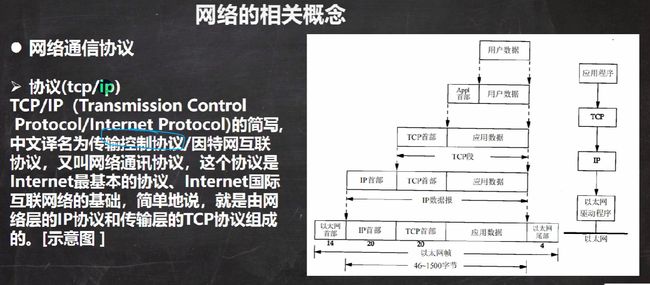
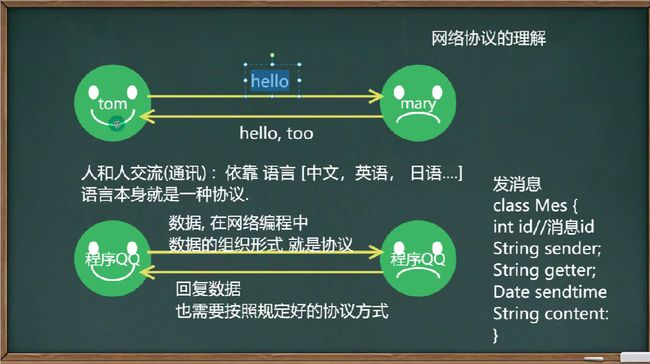
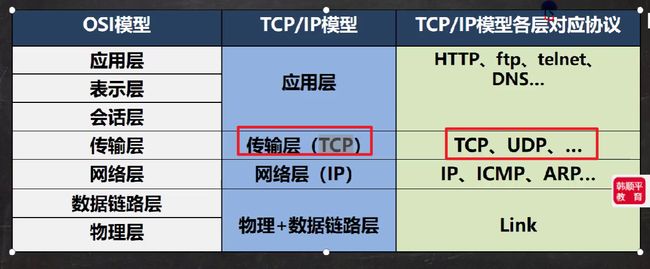
1.1.4网络协议
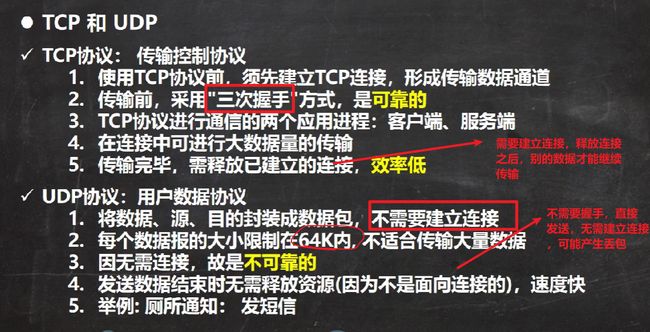
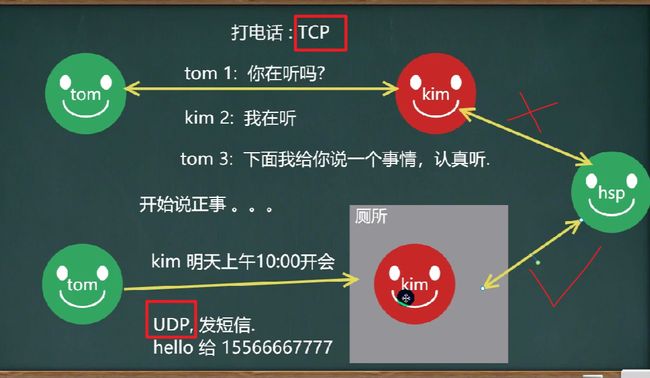
1.1.5TCP和UDP⭐️⭐️⭐️
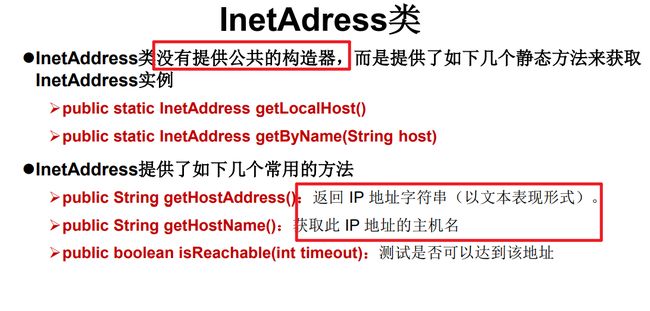
1.2InetAddress类
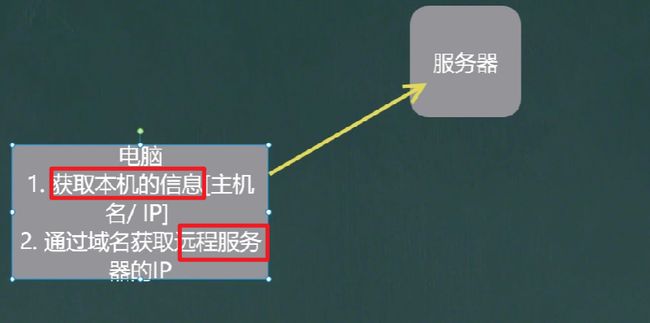
-
InetAddress表示IP,和File类获取形式很像
-
InetAddress两个关键属性 主机名 / IP地址
-
方法一类是获取主机对象
一类是输出主机名字和地址
1.3Socket
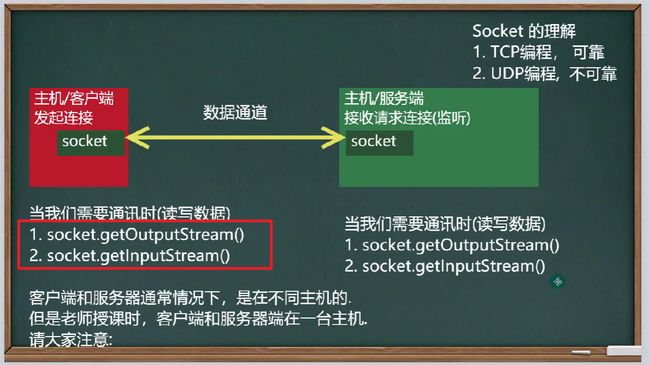
-
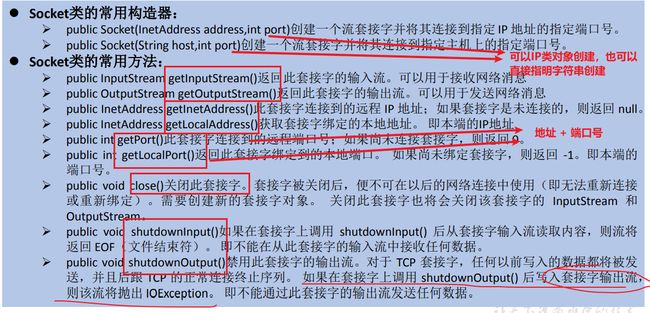
Socket相当于数据两端的插头
-
端口号与IP地址的组合得出一个网络套接字:Socket
-
TCP和UDP编程都要用到socket
-
socket用完要及时关闭,否则连接数过多会浪费资源
-
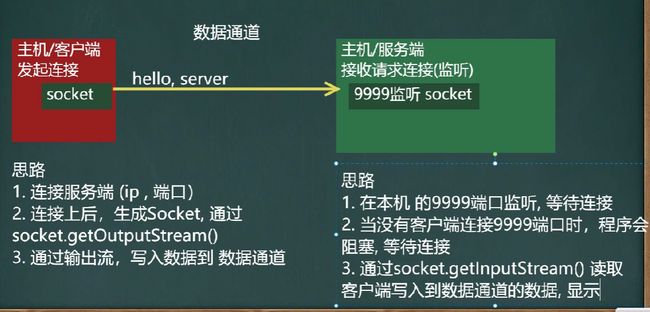
客户端和服务端各有一个socket对象
![]()
![]()
1.4TCP编程⭐️⭐️⭐️
1.4.1字节流
-
每次发送完数据后,应该有一个结束标记
-
read是个阻塞式方法,没有读到结束符就不会停止,客户端write方法没有设置停止符号,所以会堵塞。
在IO中,以文件形式传输会自动加停止符
在网络编程中,socket中outputStream会将数据输出到Socket管道中,不会自动加停止符,所以会堵塞
public class SocketTCP01Client {
    public static void main(String[] args) throws Exception{

        //思路
        //1. 连接服务端 (ip , 端口)
        //解读: 连接本机的 9999 端口, 如果连接成功,返回 Socket 对象
        Socket socket = new Socket(InetAddress.getLocalHost(), 9999);
        System.out.println("客户端发起连接");

        //2. 连接上后,生成 Socket, 通过 socket.getOutputStream()
        OutputStream os = socket.getOutputStream();
        //3. 通过输出流,写入数据到 数据通道
        os.write("hello server".getBytes(StandardCharsets.UTF_8));
        //4. 关闭流对象和 socket,
        os.close();
        socket.close();
    }
}


public class SocketTCP01Server {
    public static void main(String[] args) throws Exception{

        //思路 一定要注意这里new的ServerSocket对象,用来建立多个socket连接
        //1. 在本机 的 9999 端口监听, 等待连接
        // 细节: 要求在本机没有其它服务在监听 9999
        // 细节:这个 ServerSocket 可以通过 accept() 返回多个 Socket[多个]
        ServerSocket serverSocket = new ServerSocket(9999);
        System.out.println("服务器端等待连接.....");

        //2. 当没有客户端连接 9999 端口时,程序会 阻塞, 等待连接
        // 如果有客户端连接,则会返回 Socket 对象,程序继续
        Socket socket = serverSocket.accept();

        //3. 通过 socket.getInputStream() 读取客户端写入到数据通道的数据, 显示
        InputStream is = socket.getInputStream();
        byte[] buf = new byte[1024];
        int length;
        while((length = is.read(buf)) != -1){
            System.out.println(new String(buf,0,length));
        }

        //5.关闭流和 socket
        is.close();
        socket.close();
        serverSocket.close();
    }
}
public class SocketTCP02Server {
    public static void main(String[] args) throws Exception{

        //思路 一定要注意这里new的ServerSocket对象,用来建立多个socket连接
        //1. 在本机 的 9999 端口监听, 等待连接
        // 细节: 要求在本机没有其它服务在监听 9999
        // 细节:这个 ServerSocket 可以通过 accept() 返回多个 Socket[多个]
        ServerSocket serverSocket = new ServerSocket(9999);
        System.out.println("服务器端等待连接.....");

        //2. 当没有客户端连接 9999 端口时,程序会 阻塞, 等待连接
        // 如果有客户端连接,则会返回 Socket 对象,程序继续
        Socket socket = serverSocket.accept();

        //3. 通过 socket.getInputStream() 读取客户端写入到数据通道的数据, 显示
        InputStream is = socket.getInputStream();
        byte[] buf = new byte[1024];
        int length;
        while((length = is.read(buf)) != -1){
            System.out.println(new String(buf,0,length));
        }


        //4.向服务端写入数据
        OutputStream os = socket.getOutputStream();
        os.write("hello client".getBytes(StandardCharsets.UTF_8));

        //5. 设置结束标记
        socket.shutdownOutput();

        //6.关闭流和 socket
        is.close();
        os.close();
        socket.close();
        serverSocket.close();
    }
}

public class SocketTCP02Client {
    public static void main(String[] args) throws Exception{

        //思路
        //1. 连接服务端 (ip , 端口)
        //解读: 连接本机的 9999 端口, 如果连接成功,返回 Socket 对象
        Socket socket = new Socket(InetAddress.getLocalHost(), 9999);
        System.out.println("客户端发起连接");

        //2. 连接上后,生成 Socket, 通过 socket.getOutputStream()
        OutputStream os = socket.getOutputStream();
        //3. 通过输出流,写入数据到 数据通道
        os.write("hello server".getBytes(StandardCharsets.UTF_8));

        socket.shutdownOutput();

        //4.获取从服务器端得到的数据
        InputStream is = socket.getInputStream();
        byte[] buff = new byte[1024];
        int length = 0;
        while((length = is.read(buff)) != -1){
            System.out.println(new String(buff,0,length));
        }


        //5. 关闭流对象和 socket,
        is.close();
        os.close();
        socket.close();
    }
}
1.4.2字符流
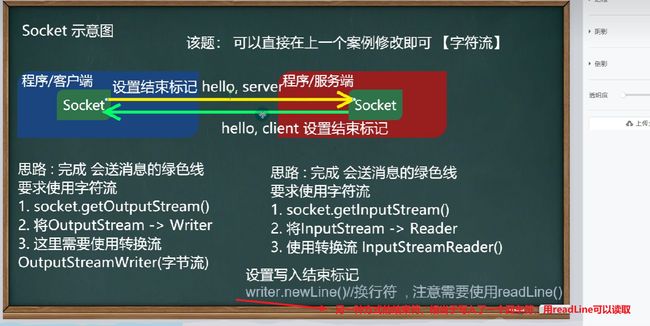
- 如果使用字符流,一定要刷新,否则不会写入数据通道⭐️因为输入输出字符流,只有在关闭的时候才会写入数据
- 如果用BufferedWriter有一个newline插入一个换行符作为结束符,相应的读取要用BufferedReader的readline方法读取
public class SocketTCP03Server {
    public static void main(String[] args) throws Exception{

        //思路 一定要注意这里new的ServerSocket对象,用来建立多个socket连接
        //1. 在本机 的 9999 端口监听, 等待连接
        // 细节: 要求在本机没有其它服务在监听 9999
        // 细节:这个 ServerSocket 可以通过 accept() 返回多个 Socket[多个]
        ServerSocket serverSocket = new ServerSocket(9999);
        System.out.println("服务器端等待连接.....");

        //2. 当没有客户端连接 9999 端口时,程序会 阻塞, 等待连接
        // 如果有客户端连接,则会返回 Socket 对象,程序继续
        Socket socket = serverSocket.accept();

        //3. 通过 socket.getInputStream() 读取客户端写入到数据通道的数据, 显示
        BufferedReader bf = new BufferedReader(new InputStreamReader(socket.getInputStream(), "utf-8"));
        String line = null;
        //下面这种写法是不对的,因为只插入了一个换行符
//        while((line = bf.readLine()) != null){
//            System.out.println(line);
//        }
        String s = bf.readLine();
        System.out.println(s);

        //4.向客户端写入数据
        BufferedWriter br = new BufferedWriter(new OutputStreamWriter(socket.getOutputStream(), "utf-8"));
        br.write("hello client 字符流");
        br.newLine();//插入换行结束符
        br.flush();一定要刷新


        //6.关闭流和 socket
        bf.close();
        br.close();
        socket.close();
        serverSocket.close();
    }
}

@SuppressWarnings("all")
public class SocketTCP03Client {
    public static void main(String[] args) throws Exception{

        //思路
        //1. 连接服务端 (ip , 端口)
        //解读: 连接本机的 9999 端口, 如果连接成功,返回 Socket 对象
        Socket socket = new Socket(InetAddress.getLocalHost(), 9999);
        System.out.println("客户端发起连接");

        //2. 连接上后,生成 Socket, 通过 socket.getOutputStream()
        OutputStream os = socket.getOutputStream();
        //3. 通过输出流,写入数据到 数据通道
        OutputStreamWriter osw = new OutputStreamWriter(os, "UTF-8");
        BufferedWriter bW = new BufferedWriter(osw);
        bW.write("hello server 字符流");
        bW.newLine();//插入换行符,此时要求对方要用readline()读取
        bW.flush();//一定要刷新,否则不会进通道

//        socket.shutdownOutput();

        //4.获取从服务器端得到的数据
        BufferedReader bf = new BufferedReader(new InputStreamReader(socket.getInputStream(), "utf-8"));
        String line = null;
        //这样不行
//        while((line = bf.readLine()) != null){
//            System.out.println(line);
//        }
        String s = bf.readLine();
        System.out.println(s);

        //5. 关闭流对象和 socket,
        bW.close();
        bf.close();
        socket.close();
    }
}
1.5UDP网络编程
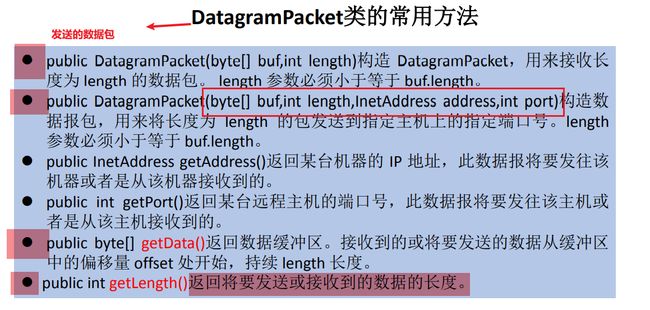
- UDP先启动哪个端没有问题,只管发送数据就行
- TCP必须先启动服务端,因为如果先启动客户端,客户端就去握手,发现无法握手就抛出异常
![]()
![]()
![]()
/**
 * UDPd协议的网络编程
 * @author shkstart
 * @create 2019 下午 4:34
 */
public class UDPTest {

    //发送端
    @Test
    public void sender() throws IOException {

        //这个是空参数的,send方法发送数据包
        //有参数的是接收端,指定在哪个接口接收
        DatagramSocket socket = new DatagramSocket();


        String str = "我是UDP方式发送的导弹";
        byte[] data = str.getBytes();
        InetAddress inet = InetAddress.getLocalHost();
        //数据包要指定内容,也要指定发送的位置
        DatagramPacket packet = new DatagramPacket(data,0,data.length,inet,9090);

        //
        socket.send(packet);

        socket.close();

    }
    //接收端
    @Test
    public void receiver() throws IOException {

        DatagramSocket socket = new DatagramSocket(9090);

        byte[] buffer = new byte[100];
        DatagramPacket packet = new DatagramPacket(buffer,0,buffer.length);

        socket.receive(packet);

        //packet.getLength()是看写进去几个字节的数据
        System.out.println(new String(packet.getData(),0,packet.getLength()));

        socket.close();
    }
}
1.6URL编程
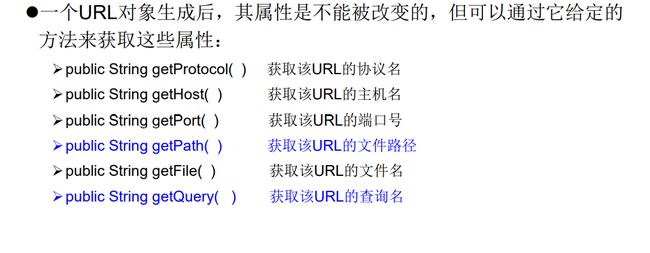
[外链图片转存失败,源站可能有防盗链机制,建议将图片保存下来直接上传(img-fzaKOFHI-1681997063947)(https://weifengqin-image.oss-cn-nanjing.aliyuncs.com/img/202304181615299.png)]
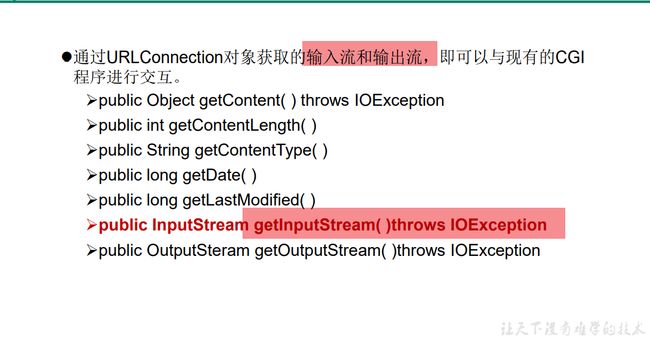
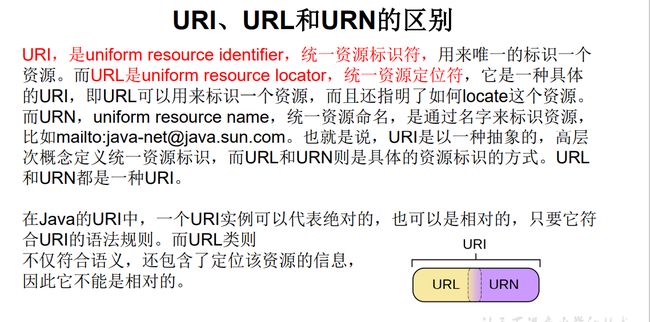
![]()
public class URLTest1 {

    public static void main(String[] args) {

        HttpURLConnection urlConnection = null;
        InputStream is = null;
        FileOutputStream fos = null;
        try {
            //1.获取URL类对象
            URL url = new URL("http://localhost:8080/examples/beauty.jpg");

            //2.创建相应的连接对象
            urlConnection = (HttpURLConnection) url.openConnection();

            //进行连接
            urlConnection.connect();

            //获取数据
            is = urlConnection.getInputStream();
            fos = new FileOutputStream("day10\\beauty3.jpg");

            byte[] buffer = new byte[1024];
            int len;
            while((len = is.read(buffer)) != -1){
                fos.write(buffer,0,len);
            }

            System.out.println("下载完成");
        } catch (IOException e) {
            e.printStackTrace();
        } finally {
            //关闭资源
            if(is != null){
                try {
                    is.close();
                } catch (IOException e) {
                    e.printStackTrace();
                }
            }
            if(fos != null){
                try {
                    fos.close();
                } catch (IOException e) {
                    e.printStackTrace();
                }
            }
            if(urlConnection != null){
                urlConnection.disconnect();
            }
        }
    }
}
![]()
Day10 反射
1.反射
1.1反射概念和机制
1.1.1举例
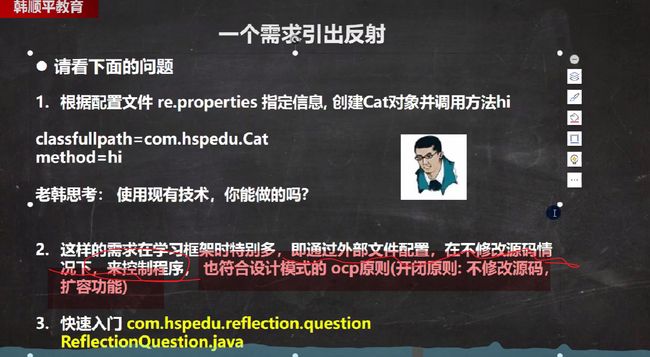
1.1.2理解
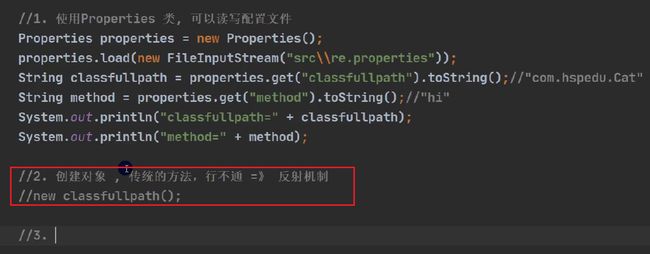
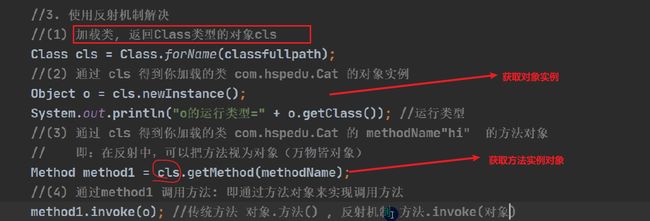
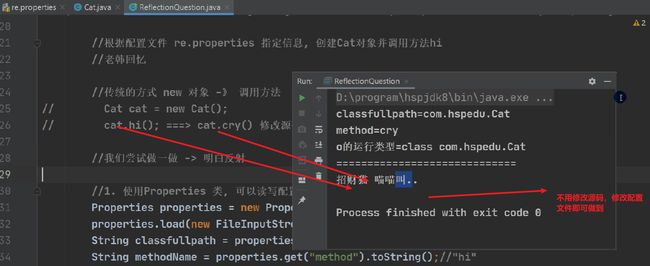
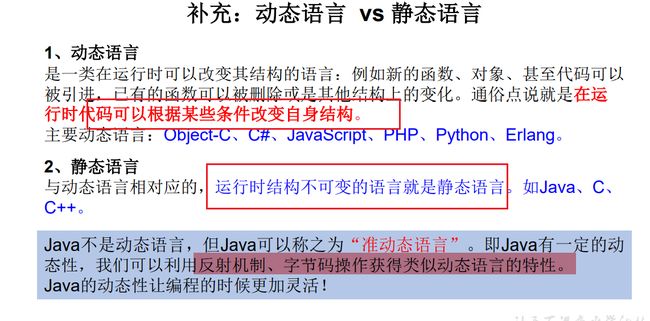
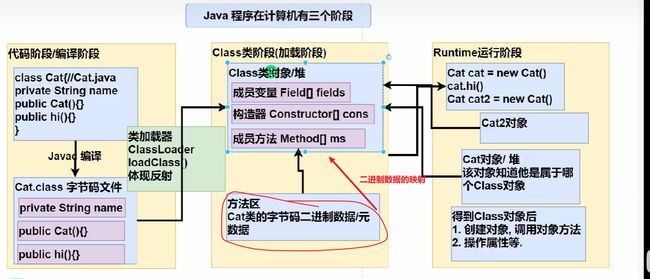
- 虚拟机加载完类之后,会在堆中自动创建一个类对象(只有一个),这个类对象包含了类所有的信息
1.1.2.1反射原理图⭐️⭐️⭐️
![]()
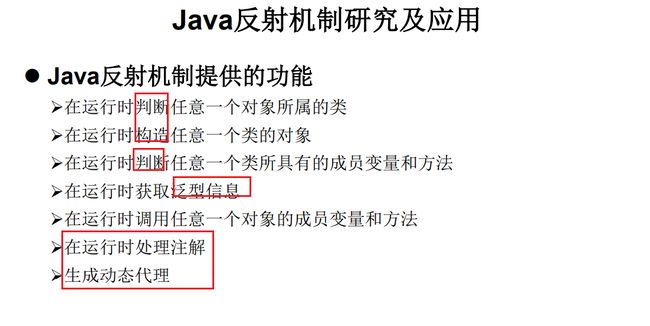
1.1.2.2反射功能
1.2反射相关类
- 类、构造器、属性、方法
![]()
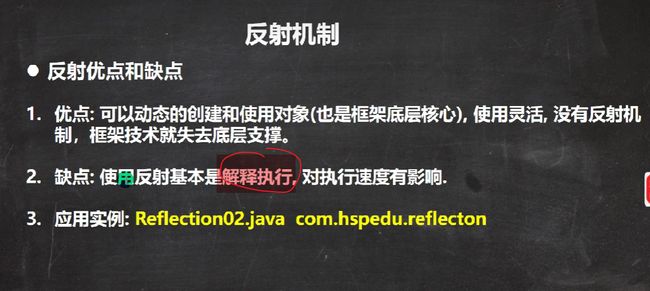
1.3反射的优点和缺点
![]()
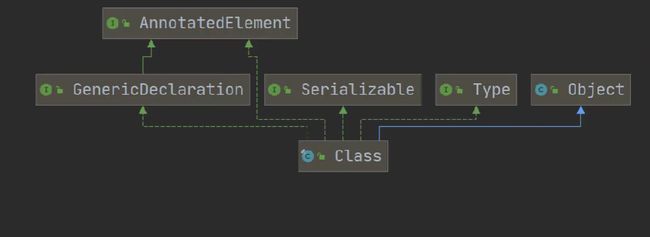
1.4class类
1.4.1class类方法
- 在输入类的加载路径时,路径是"包名.包名.类型"的格式
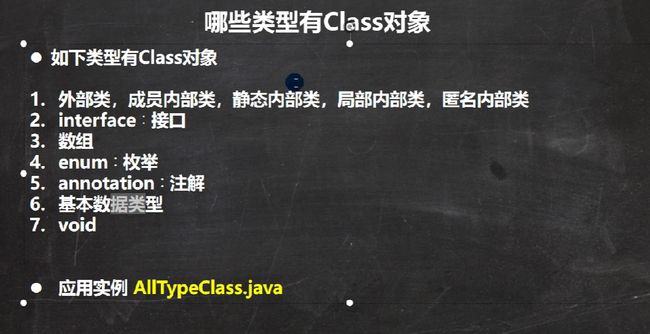
1.4.2获取class类对象的六种方式
public class getClass_ {
    public static void main(String[] args) throws Exception{
        //1.Class.forName()方法获取类
        //适用于读取配置文件
        String filePath = "day10.reflection.Car";
        Class<?> cls1 = Class.forName(filePath);
        System.out.println(cls1);

        //2.类名.class
        //适用于参数传递,如获取构造类的时,指定参数
        Class<Car> cls2 = Car.class;
        System.out.println(cls2);

        //3.对象.getClass()
        //适用于有对象实例时
        Car car = new Car();
        Class<? extends Car> cls3 = car.getClass();
        System.out.println(cls3);

        //4.通过类加载器来获取类的Class对象
        //一个类的类加载器是特殊的,加载一个特定的类
        //(1)得到类的加载器
        ClassLoader classLoader = car.getClass().getClassLoader();
        //(2)通过类加载器加载Class对象
        Class<?> cls4 = classLoader.loadClass("day10.reflection.Car");
        System.out.println(cls4);

        System.out.println(cls1.hashCode());//25126016
        System.out.println(cls2.hashCode());//25126016
        System.out.println(cls3.hashCode());//25126016
        System.out.println(cls4.hashCode());//25126016

        //5.基本数据类型获取Class类对象
        Class<Integer> cls5 = int.class;
        System.out.println(cls5);//int

        //6.基本数据类型的包装类通过.TYPE获取Class对象
        Class<Integer> type = Integer.TYPE;
        System.out.println(type);//int

        System.out.println(cls5 == type);//true int.class和Integer.TYPE得到的是一样的类型

    }
}
public class AllTypeClass {
    public static void main(String[] args) {
        Class<String> cls1 = String.class;//外部类
        Class<Serializable> cls2 = Serializable.class;//接口
        Class<Integer[]> cls3 = Integer[].class;//数组
        Class<float[][]> cls4 = float[][].class;//二维数组
        Class<Deprecated> cls5 = Deprecated.class;//注解

        Class<Thread.State> cls6 = Thread.State.class;//枚举
        Class<Long> cls7 = long.class;//基本数据类型
        Class<Void> cls8 = void.class;//void 数据类型
        Class<Class> cls9 = Class.class;//
        System.out.println(cls1);
        System.out.println(cls2);
        System.out.println(cls3);
        System.out.println(cls4);
        System.out.println(cls5);
        System.out.println(cls6);
        System.out.println(cls7);
        System.out.println(cls8);
        System.out.println(cls9);
    }
}
1.5类加载
1.5.1类加载时机⭐️⭐️⭐️
-
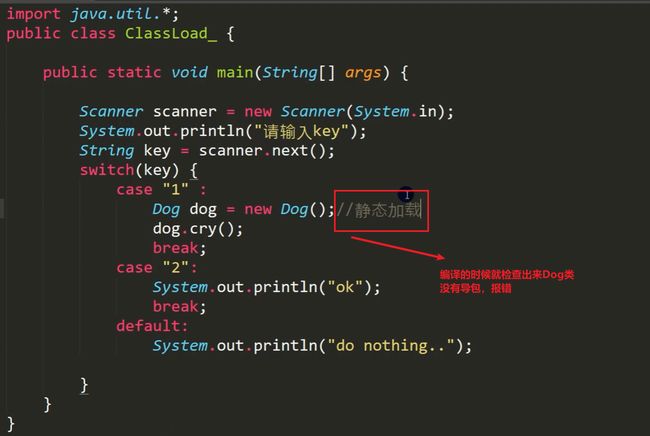
静态加载和动态加载:⭐️⭐️⭐️
静态加载:直接new对象的方式属于静态加载,即编译的时候会把new的对象的类进行加载
静态加载直接在编译的时候就已经把类信息存在方法区中,这样运行时省去加载类再创建对象的时间,运行更快
动态加载(延迟加载):反射就属于动态加载,如Class.forName(),这里只有在运行的时候才执行类加载机制,所以这时候类出问题能通过编译。
![]()
![]()
1.5.2类加载各个阶段
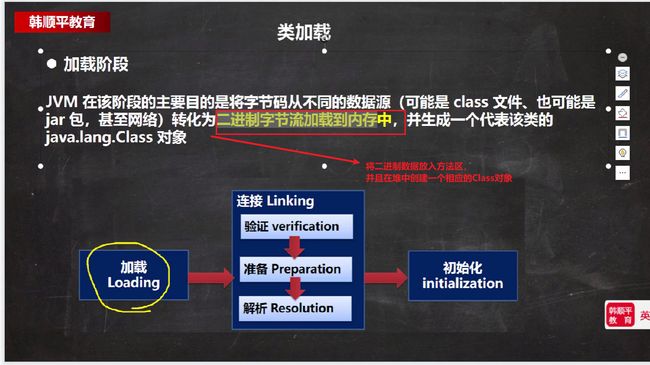
1.5.2.1加载阶段
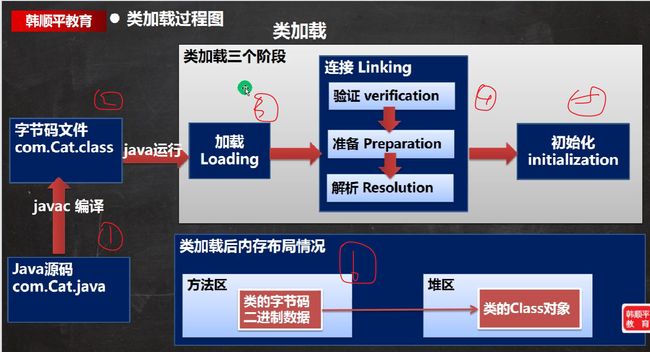
- 将二进制数据放入方法区,并且在堆中创建一个相应的Class对象
1.5.2.2连接
1.5.2.2.1验证阶段
![]()
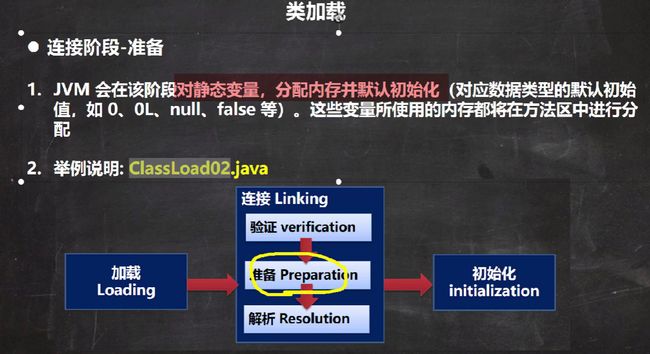
1.5.2.2.2准备
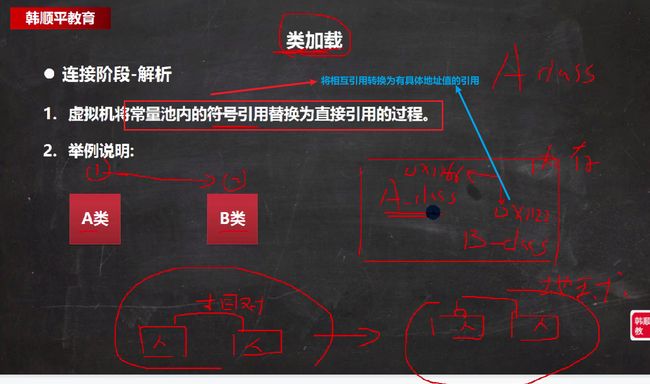
1.5.2.2.3解析
1.5.2.3初始化
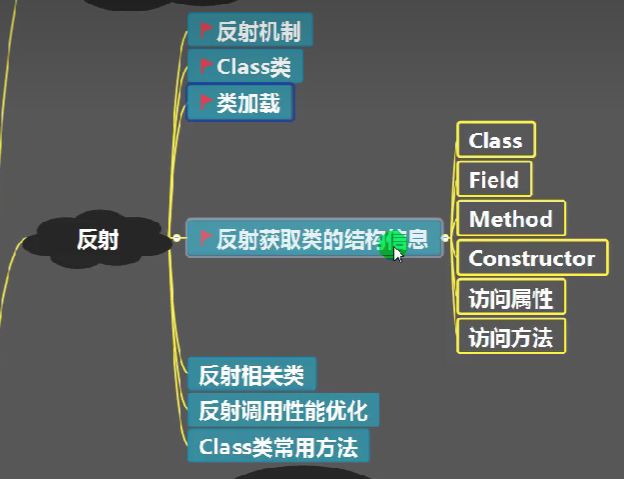
1.6通过反射获取类的结构信息
1.6.1第一组
-
第一组API需要注意的是:
非Declared方法,能获取子类和子类继承父类所有的public方法,不能获取protected和private,但是构造器只能获取本类的public构造器
Declared方法,能获取本类的所有方法
1.6.2第二组(Field)
- getModifiers()以int方式返回操作符
- getType返回当前属性所属真正类的Class对象,比如name属于String,该field调用此方法就返回String.class
- 这里getName()返回的是Field对象,getType返回的是Field实际对应的对象
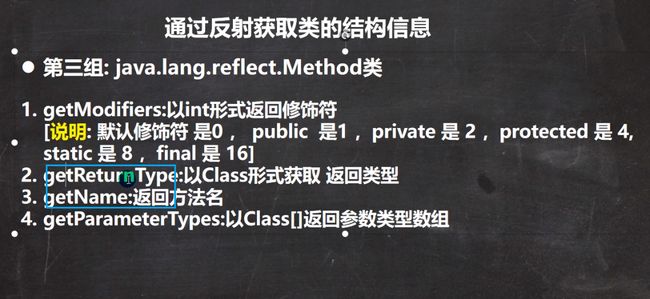
1.6.3第三组(Method)
- 这里无非是方法参数名字,返回值名字
1.6.4第四组(Constructor)
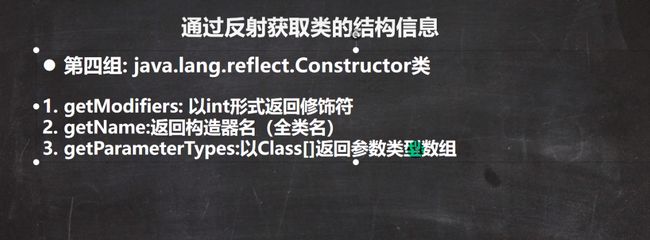
@Test
    public void api_02() throws ClassNotFoundException, NoSuchMethodException {
    //得到 Class 对象
        Class<?> personCls = Class.forName("com.hspedu.reflection.Person");
    //getDeclaredFields:获取本类中所有属性
    //规定 说明: 默认修饰符 是 0 , public 是 1 ,private 是 2 ,protected 是 4 , static 是 8 ,final 是 16
        Field[] declaredFields = personCls.getDeclaredFields();
        for (Field declaredField : declaredFields) {
            System.out.println("本类中所有属性=" + declaredField.getName()
                            + " 该属性的修饰符值=" + declaredField.getModifiers()
                            + " 该属性的类型=" + declaredField.getType());
        }
    //getDeclaredMethods:获取本类中所有方法
        Method[] declaredMethods = personCls.getDeclaredMethods();
        for (Method declaredMethod : declaredMethods) {
            System.out.println("本类中所有方法=" + declaredMethod.getName()
                    + " 该方法的访问修饰符值=" + declaredMethod.getModifiers()
                    + " 该方法返回类型" + declaredMethod.getReturnType());
    //输出当前这个方法的形参数组情况
            Class<?>[] parameterTypes = declaredMethod.getParameterTypes();
            for (Class<?> parameterType : parameterTypes) {
                System.out.println("该方法的形参类型=" + parameterType);
            }
        }
    //getDeclaredConstructors:获取本类中所有构造器
        Constructor<?>[] declaredConstructors = personCls.getDeclaredConstructors();
        for (Constructor<?> declaredConstructor : declaredConstructors) {
            System.out.println("====================");
            System.out.println("本类中所有构造器=" + declaredConstructor.getName());//这里老师只是输出名
            Class<?>[] parameterTypes = declaredConstructor.getParameterTypes();
            for (Class<?> parameterType : parameterTypes) {
                System.out.println("该构造器的形参类型=" + parameterType);
            }
        }
    }
1.7运用反射机制进行操作
1.7.1通过反射创造对象
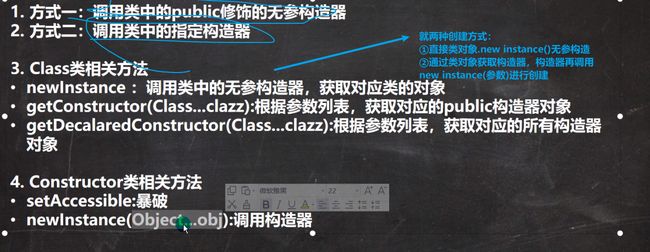
-
之前是创造一个类对象,这里是通过类对象创造一个真正地对象实例
-
就两种创建方式:
①直接类对象.new instance()无参构造
②通过类对象获取构造器,构造器再调用new instance(参数)进行创建,有参构造
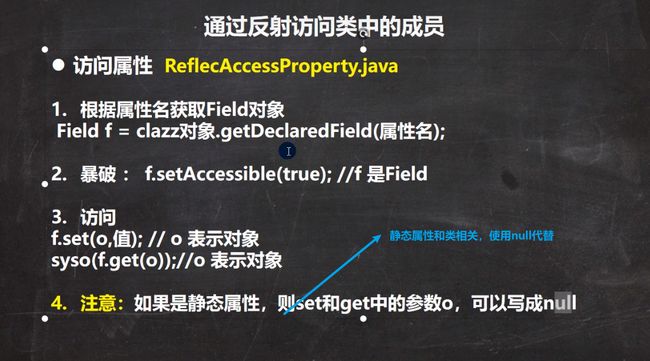
1.7.2通过反射操作属性
-
再通过Field对象访问特定实例对象的静态属性时,方法对象形参部分设置为null即可
传入对象也可以,因为静态类的成员变量属于所有类对象
![]()
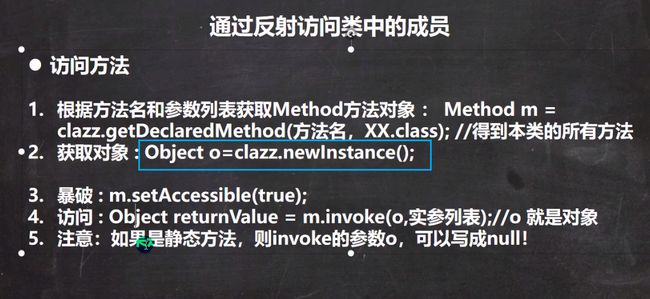
1.7.3通过反射调用方法
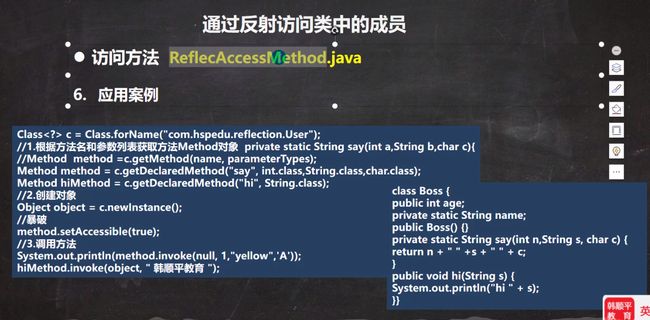
- invoke要返回的对象是Object
1.8动态代理⭐️⭐️⭐️
![]()
![]()
1.8.1实现步骤⭐️
-
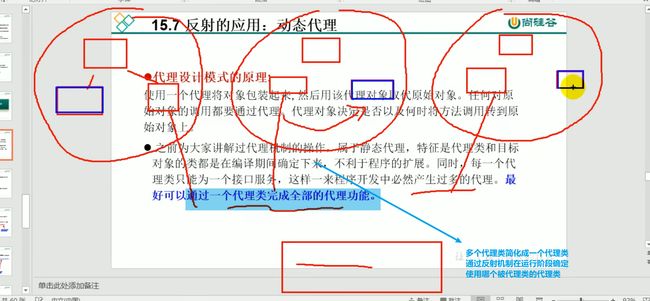
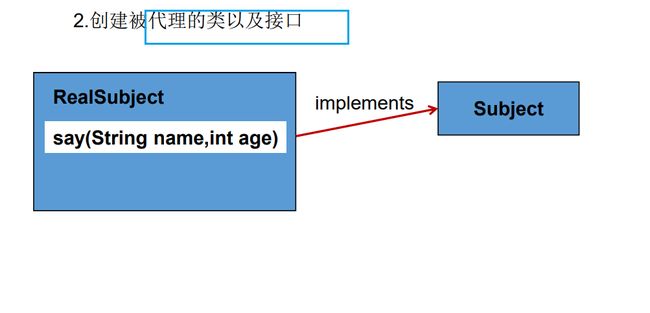
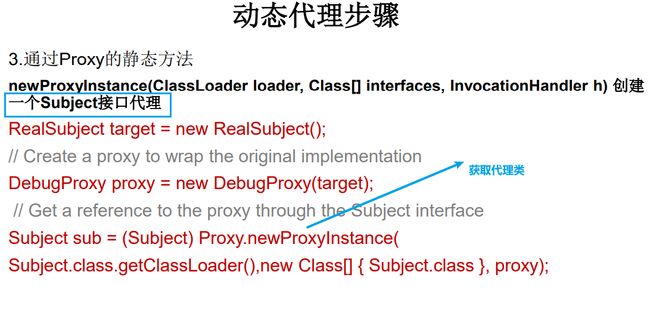
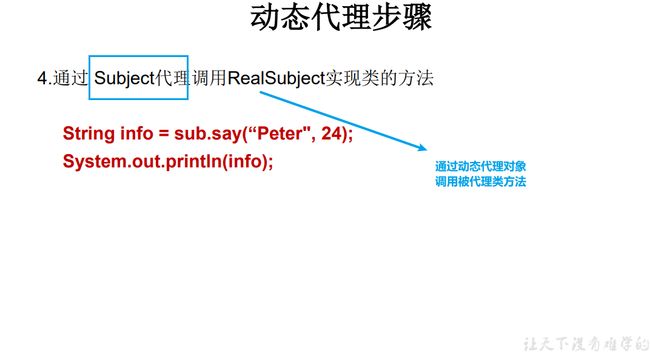
这里的代理类并不是一个implement各个接口的类,而是根据被代理类加载器和被代理类实现接口,动态代理的类
通过Proxy的静态方法,获取一个代理其他类的实际的代理对象
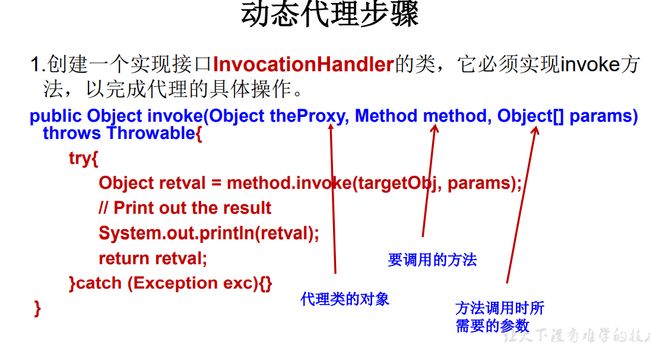
InvocationHandler实现类只是实现代理类要实现的方法
-
InvocationHandler实现类,其实是
-
动态代理其实就是创建动态代理工厂的过程:
- 创建一个类工厂,提供相应的生成代理类的静态方法,该静态方法中调用Proxy.newProxyInstance(被代理类加载器,被代理类实现接口,方法实现操作类实例);
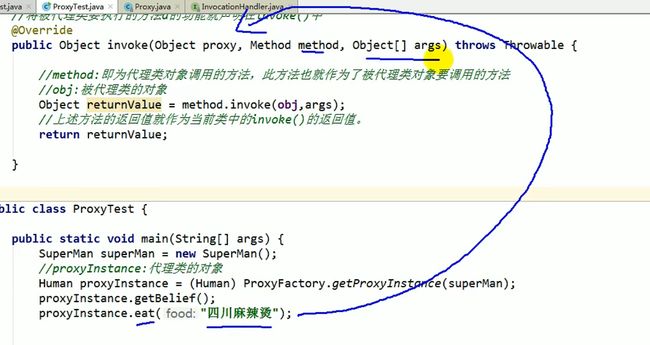
- 创建一个InvocationHandler实现类,重写invoke方法,该方法用来表示代理类完成的动作+调用被代理类相应方法
1.8.1-1
1.8.2-2
1.8.3-3
1.8.4-4
1.8.5-5.main方法实现
public class MyProxyTest {
    public static void main(String[] args) {
        ClothFactory NikeProxy = (ClothFactory) MyProxyFactory.getInstance(new NikeClothFactory());
        NikeProxy.produceCloth();
//        代理类进行一些工作
//        Nike工厂生产一批运动服
        Human SuperManProxy = (Human) MyProxyFactory.getInstance(new SuperMan());
        System.out.println(SuperManProxy.getBelief());
//        代理类进行一些工作
//        I believe I can fly!

    }
}
//1.
class MyProxyFactory{
    public static Object getInstance(Object obj){

        MyHandler handler = new MyHandler(obj);
        return Proxy.newProxyInstance(obj.getClass().getClassLoader(),obj.getClass().getInterfaces(),handler);
    }
}
//2.
class MyHandler implements InvocationHandler {
    private Object obj;
    public MyHandler(Object obj){
        this.obj = obj;
    }

    @Override
    public Object invoke(Object proxy, Method method, Object[] args) throws Throwable {
        System.out.println("代理类进行一些工作");
        Object returnValue = method.invoke(obj, args);


        return returnValue;//这一定返回被代理类方法返回值
    }
}


interface ClothFactory{

    void produceCloth();

}
//被代理类
class NikeClothFactory implements ClothFactory{

    @Override
    public void produceCloth() {
        System.out.println("Nike工厂生产一批运动服");
    }
}

interface Human{

    String getBelief();

    void eat(String food);

}
//被代理类
class SuperMan implements Human{


    @Override
    public String getBelief() {
        return "I believe I can fly!";
    }

    @Override
    public void eat(String food) {
        System.out.println("我喜欢吃" + food);
    }
}
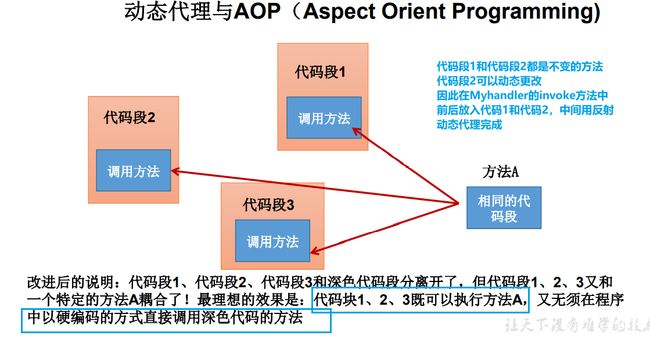
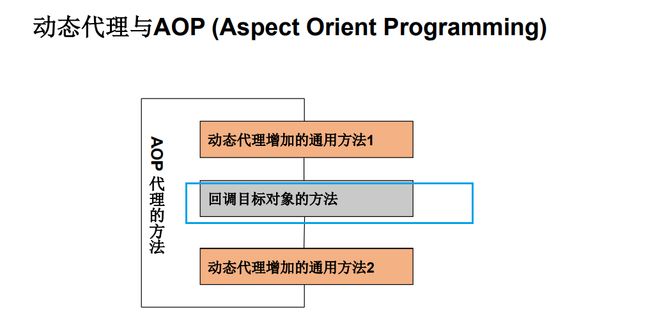
1.8.2动态代理与AOP(面向切面编程)
interface Human{

    String getBelief();

    void eat(String food);

}

//被代理类
class SuperMan implements Human{


    @Override
    public String getBelief() {
        return "I believe I can fly!";
    }

    @Override
    public void eat(String food) {
        System.out.println("我喜欢吃" + food);
    }
}

class HumanUtil{

    public void method1(){
        System.out.println("====================通用方法一====================");

    }

    public void method2(){
        System.out.println("====================通用方法二====================");
    }

}

/*
要想实现动态代理,需要解决的问题?
问题一:如何根据加载到内存中的被代理类,动态的创建一个代理类及其对象。
问题二:当通过代理类的对象调用方法a时,如何动态的去调用被代理类中的同名方法a。


 */

class ProxyFactory{
    //调用此方法,返回一个代理类的对象。解决问题一
    public static Object getProxyInstance(Object obj){//obj:被代理类的对象
        MyInvocationHandler handler = new MyInvocationHandler();

        handler.bind(obj);

        return Proxy.newProxyInstance(obj.getClass().getClassLoader(),obj.getClass().getInterfaces(),handler);
    }

}

class MyInvocationHandler implements InvocationHandler{

    private Object obj;//需要使用被代理类的对象进行赋值

    public void bind(Object obj){
        this.obj = obj;
    }

    //当我们通过代理类的对象,调用方法a时,就会自动的调用如下的方法:invoke()
    //将被代理类要执行的方法a的功能就声明在invoke()中
    @Override
    public Object invoke(Object proxy, Method method, Object[] args) throws Throwable {

        HumanUtil util = new HumanUtil();
        util.method1();

        //method:即为代理类对象调用的方法,此方法也就作为了被代理类对象要调用的方法
        //obj:被代理类的对象
        Object returnValue = method.invoke(obj,args);

        util.method2();

        //上述方法的返回值就作为当前类中的invoke()的返回值。
        return returnValue;

    }
}

public class ProxyTest {

    public static void main(String[] args) {
        SuperMan superMan = new SuperMan();
        //proxyInstance:代理类的对象
        Human proxyInstance = (Human) ProxyFactory.getProxyInstance(superMan);
        //当通过代理类对象调用方法时,会自动的调用被代理类中同名的方法
        String belief = proxyInstance.getBelief();
        System.out.println(belief);
        proxyInstance.eat("四川麻辣烫");

        System.out.println("*****************************");

        NikeClothFactory nikeClothFactory = new NikeClothFactory();

        ClothFactory proxyClothFactory = (ClothFactory) ProxyFactory.getProxyInstance(nikeClothFactory);

        proxyClothFactory.produceCloth();

    }
}
