SpringCloudAlibaba
简介
背景
由于Spring Cloud Netflix已经进入了维护模式。

地址
SpringCloudAlibaba官网
GitHub官网
中文地址
功能
Nacos
一个更易于构建云原生应用的动态服务发现、配置管理和服务管理平台。
Nacos前四个字母分别是Naming和Configuration的前两个字母,最后一个s是Service。
注册中心+配置中心组合=Eureka+Config+Bus
- 替代Eureka做注册中心
- 替代Config做配置中心
| 服务注册与发现框架 | CAP模型 | 控制台模型 | 社区活跃度 |
|---|---|---|---|
| Eureka | AP | 支持 | 低(2.x版本闭源头) |
| Zookeeper | CP | 不支持 | 中 |
| Consul | CP | 支持 | 高 |
| Nacos | AP | 支持 | 高 |
安装
下载
下载地址
nacos需要依赖jdk1.8及以上版本和maven。
解压
tar -zxvf nacos-server-1.4.4.tar.gz
启动
cd nacos/bin
sh startup.sh -m standalone
验证
访问:http://ip:8848/nacos/
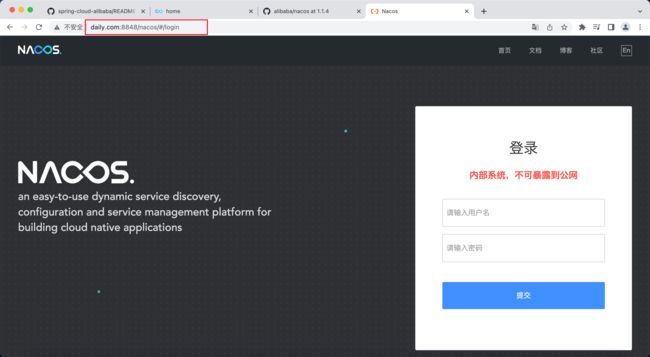
账号密码均为nacos
登录页面

至此Nacos下载安装成功。
服务注册中心
官方文档
官方文档
Nacos服务提供者注册
新建Module
cloudalibaba-provider-payment9001�
pom
<artifactId>cloudalibaba-provider-payment9001artifactId>

    <properties>
        <maven.compiler.source>8maven.compiler.source>
        <maven.compiler.target>8maven.compiler.target>
    properties>

    <dependencies>

        <dependency>
            <groupId>org.springframework.bootgroupId>
            <artifactId>spring-boot-starter-webartifactId>
        dependency>
        <dependency>
            <groupId>org.springframework.bootgroupId>
            <artifactId>spring-boot-starter-actuatorartifactId>
        dependency>

        <dependency>
            <groupId>com.alibaba.cloudgroupId>
            <artifactId>spring-cloud-starter-alibaba-nacos-discoveryartifactId>
        dependency>
        <dependency>
            <groupId>org.springframework.bootgroupId>
            <artifactId>spring-boot-devtoolsartifactId>
            <scope>runtimescope>
            <optional>trueoptional>
        dependency>
        <dependency>
            <groupId>org.projectlombokgroupId>
            <artifactId>lombokartifactId>
            <optional>trueoptional>
        dependency>
        <dependency>
            <groupId>org.springframework.bootgroupId>
            <artifactId>spring-boot-starter-testartifactId>
            <scope>testscope>
        dependency>
    dependencies>
application.yml
server:
  port: 9001

spring:
  application:
    name: nacos-payment-provider
  cloud:
    nacos:
      discovery:
        server-addr: 172.16.124.100:8848 #配置nacos地址

management:
  endpoints:
    web:
      exposure:
        include: '*'
官网提供:
server.port=8081
spring.application.name=nacos-producer
spring.cloud.nacos.discovery.server-addr=127.0.0.1:8848
management.endpoints.web.exposure.include=*
启动类
import org.springframework.boot.SpringApplication;
import org.springframework.boot.autoconfigure.SpringBootApplication;
import org.springframework.cloud.client.discovery.EnableDiscoveryClient;

/**
 * 主启动类
 *
 * @author zhangzengxiu
 * @date 2023/1/8
 */
@EnableDiscoveryClient
@SpringBootApplication
public class PaymentApp9001 {
    public static void main(String[] args) {
        SpringApplication.run(PaymentApp9001.class, args);
    }
}
启动类需要添加注解:@EnableDiscoveryClient
Controller
import org.springframework.beans.factory.annotation.Value;
import org.springframework.web.bind.annotation.GetMapping;
import org.springframework.web.bind.annotation.PathVariable;
import org.springframework.web.bind.annotation.RequestMapping;
import org.springframework.web.bind.annotation.RestController;

/**
 * @author zhangzengxiu
 * @date 2023/1/8
 */
@RestController
@RequestMapping("/payment")
public class PaymentController {

    @Value("${server.port}")
    private String port;

    @GetMapping("/nacos/{id}")
    public String getPayment(@PathVariable("id") Integer id) {
        return "nacos registry,serverport=" + port + ",id=" + id;
    }
}
启动测试
只需要启动一个微服务即可。

此时,服务已经注册进8848中了。
表明8848及微服务提供者都已ok。
访问:http://localhost:9001/payment/nacos/1
![]()
搭建9002同9001,模拟负载均衡。
启动9001和9002:
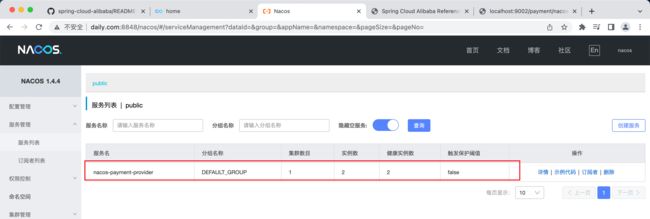
详情:

Nacos服务消费者注册与负载均衡
新建Module
cloudalibaba-consumer-nacos-order83�
pom
<artifactId>cloudalibaba-consumer-nacos-order83artifactId>

    <properties>
        <maven.compiler.source>8maven.compiler.source>
        <maven.compiler.target>8maven.compiler.target>
    properties>

    <dependencies>

        <dependency>
            <groupId>org.springframework.bootgroupId>
            <artifactId>spring-boot-starter-webartifactId>
        dependency>
        <dependency>
            <groupId>org.springframework.bootgroupId>
            <artifactId>spring-boot-starter-actuatorartifactId>
        dependency>

        <dependency>
            <groupId>com.alibaba.cloudgroupId>
            <artifactId>spring-cloud-starter-alibaba-nacos-discoveryartifactId>
        dependency>
        <dependency>
            <groupId>org.springframework.bootgroupId>
            <artifactId>spring-boot-devtoolsartifactId>
            <scope>runtimescope>
            <optional>trueoptional>
        dependency>
        <dependency>
            <groupId>org.projectlombokgroupId>
            <artifactId>lombokartifactId>
            <optional>trueoptional>
        dependency>
        <dependency>
            <groupId>org.springframework.bootgroupId>
            <artifactId>spring-boot-starter-testartifactId>
            <scope>testscope>
        dependency>
        <dependency>
            <groupId>com.test.springcloudgroupId>
            <artifactId>cloud-api-commonsartifactId>
            <version>1.0-SNAPSHOTversion>
        dependency>
    dependencies>
application.yml
server:
  port: 83

spring:
  application:
    name: nacos-order-consumer
  cloud:
    nacos:
      discovery:
        server-addr: 172.16.124.100:8848 #nacos地址

#微服务将要去访问的微服务名
service-url:
  nacos-user-service: http://nacos-payment-provider
启动类
import org.springframework.boot.SpringApplication;
import org.springframework.boot.autoconfigure.SpringBootApplication;
import org.springframework.cloud.client.discovery.EnableDiscoveryClient;

/**
 * @author zhangzengxiu
 * @date 2023/1/10
 */
@EnableDiscoveryClient
@SpringBootApplication
public class OrderApp83 {
    public static void main(String[] args) {
        SpringApplication.run(OrderApp83.class, args);
    }
}
配置类
import org.springframework.cloud.client.loadbalancer.LoadBalanced;
import org.springframework.context.annotation.Bean;
import org.springframework.context.annotation.Configuration;
import org.springframework.web.client.RestTemplate;

/**
 * @author zhangzengxiu
 * @date 2023/1/10
 */
@Configuration
public class ContextConfig {

    @Bean
    @LoadBalanced
    public RestTemplate getRestTemplate() {
        return new RestTemplate();
    }

}
Controller
import org.springframework.beans.factory.annotation.Autowired;
import org.springframework.beans.factory.annotation.Value;
import org.springframework.web.bind.annotation.GetMapping;
import org.springframework.web.bind.annotation.PathVariable;
import org.springframework.web.bind.annotation.RestController;
import org.springframework.web.client.RestTemplate;

/**
 * @author zhangzengxiu
 * @date 2023/1/10
 */
@RestController
public class OrderController {

    @Autowired
    private RestTemplate restTemplate;

    @Value("${service-url.nacos-user-service}")
    private String serviceUrl;

    @GetMapping("/consumer/payment/nacos/{id}")
    public String getPaymentInfo(@PathVariable("id") String id) {
        return restTemplate.getForObject(serviceUrl + "/payment/nacos/" + id, String.class);
    }
}
注意点:
服务名有不同的写法:
![]()
弊端:服务名耦合在了代码中。
可以采用配置的形式:

松耦合,实现配置与业务代码分离。
启动测试
启动9001、9002、83
Nacos控制台:

访问:http://localhost:83/consumer/payment/nacos/1
报错:

原因:是因为少了@LoadBalanced�注解,不加这个注解的话,多个微服务不知道去找哪个服务,会报错。
ContextConfig�:

重启测试访问即可。


负载均衡
Nacos自带负载均衡的原因:
nacos天生集成了ribbon:

服务注册中心对比
Nacos全景图
Nacos服务发现实例模型
Nacos与其他注册中心特性对比
![]()
Nacos支持AP与CP之间的切换。
- C:所有节点在同一时间看到的数据是一致的;
- A:所有的请求都会收到响应
切换场景AP CP
AP
如果不需要存储服务级别的信息且服务实例是通过nacos-client注册,并且能够保持心跳上报,那么选择AP模式。当前主流的SpringCloud和Dubbo服务,都适用于AP模式,AP模式是为了服务的可能而减弱一致性,因为AP模式下只支持注册临时实例。
CP
如果需要在服务级别编辑或者存储配置信息,那么必须是CP。K8S服务和DNS服务则适用于CP模式。
CP模式下则支持注册持久化实例,此时则是以Raft协议为集群进行运行模式,该模式下注册实例化之前必须先注册服务,如果服务不存在,则会返回错误。
切换方式
curl -X PUT "NACOS_SERVER:8848/nacos/v1/ns/operator/switches?entry=serverMode&value=CP"
服务配置中心
Nacos替代SpringCloudConfig做配置中心。之前的服务配置,是通过github&Config结合Bus做自动刷新和动态更新。
我们现在可以通过Nacos去抓取相应的配置信息。我们之前需要在GitHub上配置,现在我们可以直接通过Nacos配置。
![]()
基础配置
新建Module
cloudalibaba-config-nacos-client3377
pom
<artifactId>cloudalibaba-config-client3377artifactId>

    <properties>
        <maven.compiler.source>8maven.compiler.source>
        <maven.compiler.target>8maven.compiler.target>
    properties>

    <dependencies>

        <dependency>
            <groupId>org.springframework.bootgroupId>
            <artifactId>spring-boot-starter-webartifactId>
        dependency>
        <dependency>
            <groupId>org.springframework.bootgroupId>
            <artifactId>spring-boot-starter-actuatorartifactId>
        dependency>

        <dependency>
            <groupId>com.alibaba.cloudgroupId>
            <artifactId>spring-cloud-starter-alibaba-nacos-discoveryartifactId>
        dependency>

        <dependency>
            <groupId>com.alibaba.cloudgroupId>
            <artifactId>spring-cloud-starter-alibaba-nacos-configartifactId>
        dependency>
        <dependency>
            <groupId>org.springframework.bootgroupId>
            <artifactId>spring-boot-devtoolsartifactId>
            <scope>runtimescope>
            <optional>trueoptional>
        dependency>
        <dependency>
            <groupId>org.projectlombokgroupId>
            <artifactId>lombokartifactId>
            <optional>trueoptional>
        dependency>
        <dependency>
            <groupId>org.springframework.bootgroupId>
            <artifactId>spring-boot-starter-testartifactId>
            <scope>testscope>
        dependency>
    dependencies>
yaml配置文件(两个)
Nacos为与SpringCloudConfig无缝迁移。
Nacos同Spring-Cloud-Config一样,在项目初始化时,要保证先从配置中心进行配置拉取,拉取配置之后,才能保证项目正常启动。
SpringBoot中配置文件的加载存在顺序,bootstrap优先与application加载。
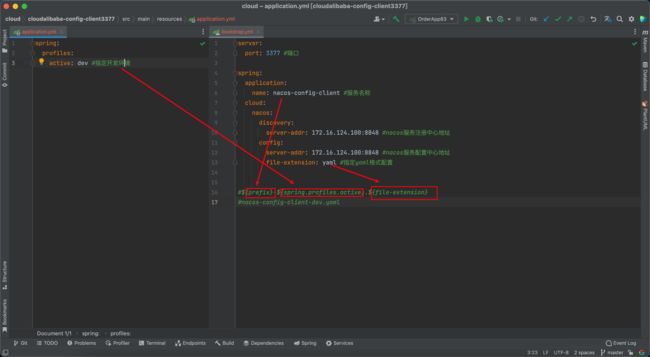
bootstrap.yml
server:
  port: 3377 #端口

spring:
  application:
    name: nacos-config-client #服务名称
  cloud:
    nacos:
      discovery:
        server-addr: 172.16.124.100:8848 #nacos服务注册中心地址
      config:
        server-addr: 172.16.124.100:8848 #nacos服务配置中心地址
        file-extension: yaml #指定yaml格式配置
file-extension� 就相当于是之前GitHub上的配置文件。
application.yml
spring:
  profiles:
    active: dev #指定开发环境
指定了要去Nacos上要去拉取什么环境的配置文件
主启动类
import org.springframework.boot.SpringApplication;
import org.springframework.boot.autoconfigure.SpringBootApplication;
import org.springframework.cloud.client.discovery.EnableDiscoveryClient;

/**
 * @author zhangzengxiu
 * @date 2023/1/15
 */
@EnableDiscoveryClient
@SpringBootApplication
public class ConfigClient3377 {
    public static void main(String[] args) {
        SpringApplication.run(ConfigClient3377.class, args);
    }
}
Controller
import org.springframework.beans.factory.annotation.Value;
import org.springframework.cloud.context.config.annotation.RefreshScope;
import org.springframework.web.bind.annotation.GetMapping;
import org.springframework.web.bind.annotation.RestController;

/**
 * @author zhangzengxiu
 * @date 2023/1/15
 */
@RestController
@RefreshScope //支持nacos动态刷新
public class ConfigController {

    @Value("${config.info}")
    private String configInfo;

    @GetMapping("/config/info")
    public String getConfigInfo() {
        return configInfo;
    }

}
注意点:
configInfo是会去读取config.info这样的配置,再结合spring.profiles. active指定的环境去读取不同的配置文件。
@RefreshScope 通过SpringCloud原生注解实现nacos配置动态刷新。
一个Nacos解决了SpringCloudConfig+Bus所有问题。
配置信息
Nacos中的dataid的组成格式及与SpringBoot配置文件中的匹配规则。
配置规则
在 Nacos Spring Cloud 中,dataId 的完整格式如下:
${prefix}-${spring.profiles.active}.${file-extension}
- prefix 默认为 spring.application.name 的值,也可以通过配置项 spring.cloud.nacos.config.prefix来配置。
- spring.profiles.active 即为当前环境对应的 profile,详情可以参考 Spring Boot文档。 注意:当 spring.profiles.active 为空时,对应的连接符 - 也将不存在,dataId 的拼接格式变成 p r e f i x . {prefix}. prefix.{file-extension}
- file-exetension 为配置内容的数据格式,可以通过配置项 spring.cloud.nacos.config.file-extension 来配置。目前只支持 properties 和 yaml 类型。
通过 Spring Cloud 原生注解 @RefreshScope 实现配置自动更新:
官网地址 
根据官网指定的规则,再结合bootstrap配置文件,可得出最终结果:
#${prefix}-${spring.profiles.active}.${file-extension}
#nacos-config-client-dev.yaml
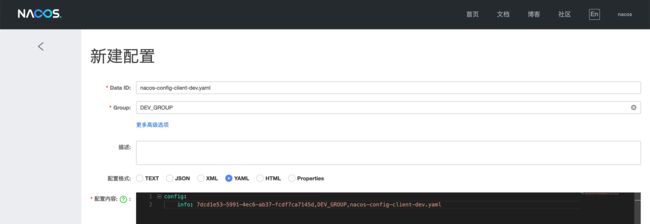
新建配置
启动测试
访问:http://localhost:3377/config/info
![]()
动态刷新测试
修改Nacos配置中心的值,然后再次访问测试:

![]()
访问测试发现,最新值已经刷新,无需重启服务,无需额外操作,相对于SpringCloudConfig配置相当方便。

分类配置
当前存在的问题:
1、实际开发过程中,通常一个系统会准备
dev开发环境
test测试环境
prod生产环境
如果保证指定环境启动时,服务能正确读取到Nacos上相应环境的配置文件呢?
2、一个大型分布式微服务系统会有很多微服务子项目,每个微服务项目又会有相应的开发环境、测试环境、预发环境、正式环境,那如何对这些微服务配置进行管理呢?
图形化管理界面
配置管理
命名空间
原理
类似于Java中的包名+类名的格式,最外层的nameSpace用于区别部署环境,GroupId和DataId逻辑上用来区分两个不同的目标对象。

我们微服务最终是要以集群的形式进行部署
默认:
Namespace=public Group=DEFAULT_GROUP Cluster默认是DEFAULT
Nacos默认的命名空间是public, Namespace主要用来实现隔离。
比方说我们现在有三个环境:开发、测试、生产环境,我们就可以创建三个Namespace,不同的Namespace之间是隔离的。(Namespace主要用来实现隔离,区分部署环境)
Group默认是DEFAULT_ GROUP, Group可以把不同的微服务划分到同一个分组里面去
Service就是微服务;
一个Service可以包含多个Cluster (集群), Nacos默认Cluster是DEFAULT, Cluster是对指定微服务的一个虚拟划分。
比方说为了容灾,将Service微服务分别部署在了杭州机房和广州机房,
这时就可以给杭州机房的Service微服务起一个集群名称(HZ)
给广州机房的Service微服务起一个集群名称(GZ),还可以尽量让同一个机房的微服务互相调用,以提升性能
最后是Instance,就是微服务的实例。
DataId方案
- 指定spring.profile.active和配置文件的DataID来使不同环境下读物不同的配置
- 默认空间+默认分组+新建dev+test两个DataID
- 通过sping.profile.active属性就能进行多环境配置文件的读取
新建配置
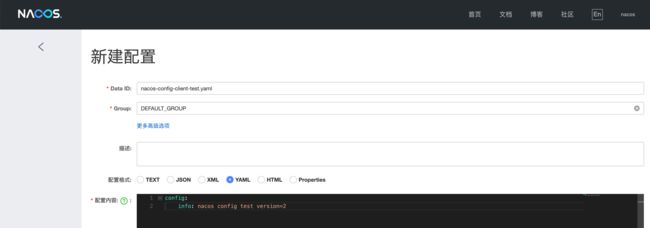

如果配置错误,微服务启动时,会报错:

我们可以创建多个不同环境的配置文件,然后通过VM参数来指定不同环境的配置文件


-Dspring.profiles.active=dev
解释:
dev表示读取dev环境的配置文件,读取文件名为application-dev.properties
测试访问:http://localhost:3377/config/info

切换test环境的配置文件,修改VM参数为:
-Dspring.profiles.active=test
访问测试:

此时已经读取到了另外一个配置。无缝对接,灵活切换。
Group方案
当前我们的Group都是默认的Group。

新建配置时,指定Group,而不采用默认的Group。
新建配置,指定分组


![]()

此时,相同DataId,不同的Group分组。
我们需要在config下增加一条group的配置即可,可配置为PROD_GROUP或者SIT_GROUP

VM参数:指定为预发环境

启动测试访问:

结果为PROD分组下的prod这个DataId。
修改分组配置为SIT_GROUP,重启访问测试
![]()
结果为SIT分组下的prod这个DataId。
Namespace方案
系统出厂自带的pulic保留空间,无法删除。
新建两个命名空间:dev和test
新建命名空间
![]()

配置列表会多出现两个刚配置好的命名空间

命名空间—>分组---->DataId
按照域名配置填写
在命名空间下创建,不同Group分组,不同的配置。


新增配置,指定不同分组



重启测试,指定VM为dev
-Dspring.profiles.active=dev
集群和持久化配置
Nacos在生产环境时,必须使用集群配置,推荐使用Linux环境。
如果Nacos宕机了,重启后,可能会存在部分数据丢失的情况,个别情况下我们需要保证数据持久化。
Nacos推荐使用MySQL数据库。
集群配置
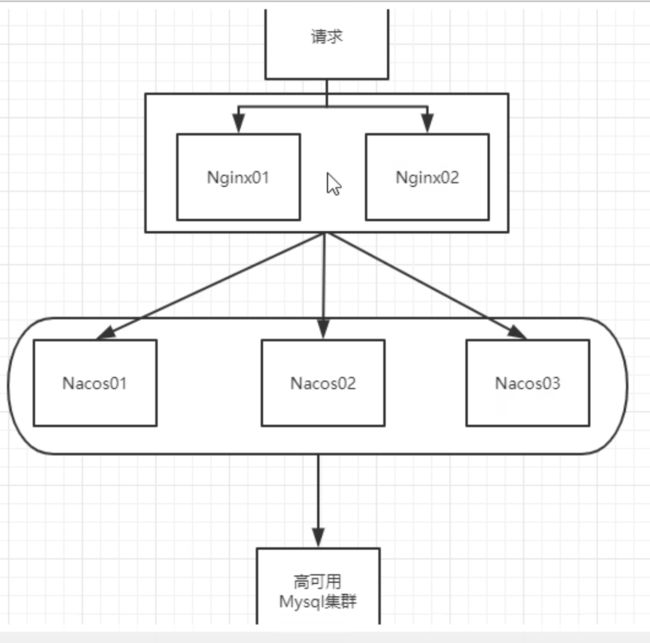
集群部署架构图
Nginx相当于虚拟映射IP
默认情况下,Nacos使用嵌入式数据库实现数据存储,每个Nacos有自己的数据存储。所以,如果启动多个默认配置下的Nacos节点,数据存储是存在一致性问题的,为解决该问题,Nacos采用了集中式存储的方式支持集群化部署,目前只支持MySQL存储,这样就会只有一份数据源,数据安全得到保障。
Nacos至少需要3个,才能构成集群。

部署模式
- 单机模式:用于测试和单机试用
- 集群模式:用于生产环境,确保高可用
- 多集群模式:用于多数据中心场景
单机模式支持MySQL
官网地址
在0.7版本之前,单机模式Nacos使用嵌入式数据库实现数据存储,不方便观察数据存储的基本情况。
0.7版本增加了支持MySQL数据源能力,具体操作步骤:
- 安装MySQL数据库,版本要求:5.6.5+
- 初始化MySQL数据库,数据库初始化问价,nacos-mysql.sql
- 修改conf/application.properties文件,增加支持MySQL数据源配置(目前只支持MySQL),添加MySQL数据源的URL、用户名、密码。
spring.datasource.platform=mysql

db.num=1
db.url.0=jdbc:mysql://11.162.196.16:3306/nacos_devtest?characterEncoding=utf8&connectTimeout=1000&socketTimeout=3000&autoReconnect=true
db.user=nacos_devtest
db.password=youdontknow
再以单机模式启动nacos,nacos所有写嵌入式数据库的数据都写到了mysql
持久化配置
Nacos自带的数据库是derby。

我们需要将数据库从derby切换为MySQL。
derby切换为MySQL
1、到nacos下conf目录下找到sql脚本
找到sql脚本,复制脚本中的内容去数据库中粘贴运行即可。
nacos-mysql.sql文件内容:
/*
 * Copyright 1999-2018 Alibaba Group Holding Ltd.
 *
 * Licensed under the Apache License, Version 2.0 (the "License");
 * you may not use this file except in compliance with the License.
 * You may obtain a copy of the License at
 *
 *      http://www.apache.org/licenses/LICENSE-2.0
 *
 * Unless required by applicable law or agreed to in writing, software
 * distributed under the License is distributed on an "AS IS" BASIS,
 * WITHOUT WARRANTIES OR CONDITIONS OF ANY KIND, either express or implied.
 * See the License for the specific language governing permissions and
 * limitations under the License.
 */

/******************************************/
/*   数据库全名 = nacos_config   */
/*   表名称 = config_info   */
/******************************************/
CREATE TABLE `config_info` (
  `id` bigint(20) NOT NULL AUTO_INCREMENT COMMENT 'id',
  `data_id` varchar(255) NOT NULL COMMENT 'data_id',
  `group_id` varchar(255) DEFAULT NULL,
  `content` longtext NOT NULL COMMENT 'content',
  `md5` varchar(32) DEFAULT NULL COMMENT 'md5',
  `gmt_create` datetime NOT NULL DEFAULT CURRENT_TIMESTAMP COMMENT '创建时间',
  `gmt_modified` datetime NOT NULL DEFAULT CURRENT_TIMESTAMP COMMENT '修改时间',
  `src_user` text COMMENT 'source user',
  `src_ip` varchar(50) DEFAULT NULL COMMENT 'source ip',
  `app_name` varchar(128) DEFAULT NULL,
  `tenant_id` varchar(128) DEFAULT '' COMMENT '租户字段',
  `c_desc` varchar(256) DEFAULT NULL,
  `c_use` varchar(64) DEFAULT NULL,
  `effect` varchar(64) DEFAULT NULL,
  `type` varchar(64) DEFAULT NULL,
  `c_schema` text,
  PRIMARY KEY (`id`),
  UNIQUE KEY `uk_configinfo_datagrouptenant` (`data_id`,`group_id`,`tenant_id`)
) ENGINE=InnoDB DEFAULT CHARSET=utf8 COLLATE=utf8_bin COMMENT='config_info';

/******************************************/
/*   数据库全名 = nacos_config   */
/*   表名称 = config_info_aggr   */
/******************************************/
CREATE TABLE `config_info_aggr` (
  `id` bigint(20) NOT NULL AUTO_INCREMENT COMMENT 'id',
  `data_id` varchar(255) NOT NULL COMMENT 'data_id',
  `group_id` varchar(255) NOT NULL COMMENT 'group_id',
  `datum_id` varchar(255) NOT NULL COMMENT 'datum_id',
  `content` longtext NOT NULL COMMENT '内容',
  `gmt_modified` datetime NOT NULL COMMENT '修改时间',
  `app_name` varchar(128) DEFAULT NULL,
  `tenant_id` varchar(128) DEFAULT '' COMMENT '租户字段',
  PRIMARY KEY (`id`),
  UNIQUE KEY `uk_configinfoaggr_datagrouptenantdatum` (`data_id`,`group_id`,`tenant_id`,`datum_id`)
) ENGINE=InnoDB DEFAULT CHARSET=utf8 COLLATE=utf8_bin COMMENT='增加租户字段';


/******************************************/
/*   数据库全名 = nacos_config   */
/*   表名称 = config_info_beta   */
/******************************************/
CREATE TABLE `config_info_beta` (
  `id` bigint(20) NOT NULL AUTO_INCREMENT COMMENT 'id',
  `data_id` varchar(255) NOT NULL COMMENT 'data_id',
  `group_id` varchar(128) NOT NULL COMMENT 'group_id',
  `app_name` varchar(128) DEFAULT NULL COMMENT 'app_name',
  `content` longtext NOT NULL COMMENT 'content',
  `beta_ips` varchar(1024) DEFAULT NULL COMMENT 'betaIps',
  `md5` varchar(32) DEFAULT NULL COMMENT 'md5',
  `gmt_create` datetime NOT NULL DEFAULT CURRENT_TIMESTAMP COMMENT '创建时间',
  `gmt_modified` datetime NOT NULL DEFAULT CURRENT_TIMESTAMP COMMENT '修改时间',
  `src_user` text COMMENT 'source user',
  `src_ip` varchar(50) DEFAULT NULL COMMENT 'source ip',
  `tenant_id` varchar(128) DEFAULT '' COMMENT '租户字段',
  PRIMARY KEY (`id`),
  UNIQUE KEY `uk_configinfobeta_datagrouptenant` (`data_id`,`group_id`,`tenant_id`)
) ENGINE=InnoDB DEFAULT CHARSET=utf8 COLLATE=utf8_bin COMMENT='config_info_beta';

/******************************************/
/*   数据库全名 = nacos_config   */
/*   表名称 = config_info_tag   */
/******************************************/
CREATE TABLE `config_info_tag` (
  `id` bigint(20) NOT NULL AUTO_INCREMENT COMMENT 'id',
  `data_id` varchar(255) NOT NULL COMMENT 'data_id',
  `group_id` varchar(128) NOT NULL COMMENT 'group_id',
  `tenant_id` varchar(128) DEFAULT '' COMMENT 'tenant_id',
  `tag_id` varchar(128) NOT NULL COMMENT 'tag_id',
  `app_name` varchar(128) DEFAULT NULL COMMENT 'app_name',
  `content` longtext NOT NULL COMMENT 'content',
  `md5` varchar(32) DEFAULT NULL COMMENT 'md5',
  `gmt_create` datetime NOT NULL DEFAULT CURRENT_TIMESTAMP COMMENT '创建时间',
  `gmt_modified` datetime NOT NULL DEFAULT CURRENT_TIMESTAMP COMMENT '修改时间',
  `src_user` text COMMENT 'source user',
  `src_ip` varchar(50) DEFAULT NULL COMMENT 'source ip',
  PRIMARY KEY (`id`),
  UNIQUE KEY `uk_configinfotag_datagrouptenanttag` (`data_id`,`group_id`,`tenant_id`,`tag_id`)
) ENGINE=InnoDB DEFAULT CHARSET=utf8 COLLATE=utf8_bin COMMENT='config_info_tag';

/******************************************/
/*   数据库全名 = nacos_config   */
/*   表名称 = config_tags_relation   */
/******************************************/
CREATE TABLE `config_tags_relation` (
  `id` bigint(20) NOT NULL COMMENT 'id',
  `tag_name` varchar(128) NOT NULL COMMENT 'tag_name',
  `tag_type` varchar(64) DEFAULT NULL COMMENT 'tag_type',
  `data_id` varchar(255) NOT NULL COMMENT 'data_id',
  `group_id` varchar(128) NOT NULL COMMENT 'group_id',
  `tenant_id` varchar(128) DEFAULT '' COMMENT 'tenant_id',
  `nid` bigint(20) NOT NULL AUTO_INCREMENT,
  PRIMARY KEY (`nid`),
  UNIQUE KEY `uk_configtagrelation_configidtag` (`id`,`tag_name`,`tag_type`),
  KEY `idx_tenant_id` (`tenant_id`)
) ENGINE=InnoDB DEFAULT CHARSET=utf8 COLLATE=utf8_bin COMMENT='config_tag_relation';

/******************************************/
/*   数据库全名 = nacos_config   */
/*   表名称 = group_capacity   */
/******************************************/
CREATE TABLE `group_capacity` (
  `id` bigint(20) unsigned NOT NULL AUTO_INCREMENT COMMENT '主键ID',
  `group_id` varchar(128) NOT NULL DEFAULT '' COMMENT 'Group ID,空字符表示整个集群',
  `quota` int(10) unsigned NOT NULL DEFAULT '0' COMMENT '配额,0表示使用默认值',
  `usage` int(10) unsigned NOT NULL DEFAULT '0' COMMENT '使用量',
  `max_size` int(10) unsigned NOT NULL DEFAULT '0' COMMENT '单个配置大小上限,单位为字节,0表示使用默认值',
  `max_aggr_count` int(10) unsigned NOT NULL DEFAULT '0' COMMENT '聚合子配置最大个数,,0表示使用默认值',
  `max_aggr_size` int(10) unsigned NOT NULL DEFAULT '0' COMMENT '单个聚合数据的子配置大小上限,单位为字节,0表示使用默认值',
  `max_history_count` int(10) unsigned NOT NULL DEFAULT '0' COMMENT '最大变更历史数量',
  `gmt_create` datetime NOT NULL DEFAULT CURRENT_TIMESTAMP COMMENT '创建时间',
  `gmt_modified` datetime NOT NULL DEFAULT CURRENT_TIMESTAMP COMMENT '修改时间',
  PRIMARY KEY (`id`),
  UNIQUE KEY `uk_group_id` (`group_id`)
) ENGINE=InnoDB DEFAULT CHARSET=utf8 COLLATE=utf8_bin COMMENT='集群、各Group容量信息表';

/******************************************/
/*   数据库全名 = nacos_config   */
/*   表名称 = his_config_info   */
/******************************************/
CREATE TABLE `his_config_info` (
  `id` bigint(64) unsigned NOT NULL,
  `nid` bigint(20) unsigned NOT NULL AUTO_INCREMENT,
  `data_id` varchar(255) NOT NULL,
  `group_id` varchar(128) NOT NULL,
  `app_name` varchar(128) DEFAULT NULL COMMENT 'app_name',
  `content` longtext NOT NULL,
  `md5` varchar(32) DEFAULT NULL,
  `gmt_create` datetime NOT NULL DEFAULT CURRENT_TIMESTAMP,
  `gmt_modified` datetime NOT NULL DEFAULT CURRENT_TIMESTAMP,
  `src_user` text,
  `src_ip` varchar(50) DEFAULT NULL,
  `op_type` char(10) DEFAULT NULL,
  `tenant_id` varchar(128) DEFAULT '' COMMENT '租户字段',
  PRIMARY KEY (`nid`),
  KEY `idx_gmt_create` (`gmt_create`),
  KEY `idx_gmt_modified` (`gmt_modified`),
  KEY `idx_did` (`data_id`)
) ENGINE=InnoDB DEFAULT CHARSET=utf8 COLLATE=utf8_bin COMMENT='多租户改造';


/******************************************/
/*   数据库全名 = nacos_config   */
/*   表名称 = tenant_capacity   */
/******************************************/
CREATE TABLE `tenant_capacity` (
  `id` bigint(20) unsigned NOT NULL AUTO_INCREMENT COMMENT '主键ID',
  `tenant_id` varchar(128) NOT NULL DEFAULT '' COMMENT 'Tenant ID',
  `quota` int(10) unsigned NOT NULL DEFAULT '0' COMMENT '配额,0表示使用默认值',
  `usage` int(10) unsigned NOT NULL DEFAULT '0' COMMENT '使用量',
  `max_size` int(10) unsigned NOT NULL DEFAULT '0' COMMENT '单个配置大小上限,单位为字节,0表示使用默认值',
  `max_aggr_count` int(10) unsigned NOT NULL DEFAULT '0' COMMENT '聚合子配置最大个数',
  `max_aggr_size` int(10) unsigned NOT NULL DEFAULT '0' COMMENT '单个聚合数据的子配置大小上限,单位为字节,0表示使用默认值',
  `max_history_count` int(10) unsigned NOT NULL DEFAULT '0' COMMENT '最大变更历史数量',
  `gmt_create` datetime NOT NULL DEFAULT CURRENT_TIMESTAMP COMMENT '创建时间',
  `gmt_modified` datetime NOT NULL DEFAULT CURRENT_TIMESTAMP COMMENT '修改时间',
  PRIMARY KEY (`id`),
  UNIQUE KEY `uk_tenant_id` (`tenant_id`)
) ENGINE=InnoDB DEFAULT CHARSET=utf8 COLLATE=utf8_bin COMMENT='租户容量信息表';


CREATE TABLE `tenant_info` (
  `id` bigint(20) NOT NULL AUTO_INCREMENT COMMENT 'id',
  `kp` varchar(128) NOT NULL COMMENT 'kp',
  `tenant_id` varchar(128) default '' COMMENT 'tenant_id',
  `tenant_name` varchar(128) default '' COMMENT 'tenant_name',
  `tenant_desc` varchar(256) DEFAULT NULL COMMENT 'tenant_desc',
  `create_source` varchar(32) DEFAULT NULL COMMENT 'create_source',
  `gmt_create` bigint(20) NOT NULL COMMENT '创建时间',
  `gmt_modified` bigint(20) NOT NULL COMMENT '修改时间',
  PRIMARY KEY (`id`),
  UNIQUE KEY `uk_tenant_info_kptenantid` (`kp`,`tenant_id`),
  KEY `idx_tenant_id` (`tenant_id`)
) ENGINE=InnoDB DEFAULT CHARSET=utf8 COLLATE=utf8_bin COMMENT='tenant_info';

CREATE TABLE `users` (
	`username` varchar(50) NOT NULL PRIMARY KEY,
	`password` varchar(500) NOT NULL,
	`enabled` boolean NOT NULL
);

CREATE TABLE `roles` (
	`username` varchar(50) NOT NULL,
	`role` varchar(50) NOT NULL,
	UNIQUE INDEX `idx_user_role` (`username` ASC, `role` ASC) USING BTREE
);

CREATE TABLE `permissions` (
    `role` varchar(50) NOT NULL,
    `resource` varchar(255) NOT NULL,
    `action` varchar(8) NOT NULL,
    UNIQUE INDEX `uk_role_permission` (`role`,`resource`,`action`) USING BTREE
);

INSERT INTO users (username, password, enabled) VALUES ('nacos', '$2a$10$EuWPZHzz32dJN7jexM34MOeYirDdFAZm2kuWj7VEOJhhZkDrxfvUu', TRUE);

INSERT INTO roles (username, role) VALUES ('nacos', 'ROLE_ADMIN');
改文件缺少创建库语句:
CREATE DATABASE nacos_config;
粘贴脚本内容,到数据库中执行即可。
执行结果:

后续数据将会从自带的apache的derby切换为MySQL。
2、到nacos\conf下的application.properties配置文件下,粘贴我们的数据库的配置信息
该信息由官网提供:
spring.datasource.platform=mysql

db.num=1
db.url.0=jdbc:mysql://11.162.196.16:3306/nacos_devtest?characterEncoding=utf8&connectTimeout=1000&socketTimeout=3000&autoReconnect=true
db.user=nacos_devtest
db.password=youdontknow
注意:这个是Nacos官方提供的配置,我们需要将配置信息,改为我们自己的数据库配置信息。
Nacos官方提供的数据库名称与配置文件中默认的数据库名称不一致!!!
修改后的application.properties文件
spring.datasource.platform=mysql

db.num=1
db.url.0=jdbc:mysql://172.16.138.100:3306/nacos_config?characterEncoding=utf8&connectTimeout=1000&socketTimeout=3000&autoReconnect=true
db.user=root
db.password=19960327xiu
![]()
注意:
1、数据库IP、库名、账号、密码都要换成自己的。
2、时区问题!
重启Nacos!!!
sh shutdown.sh
sh startup.sh -m standalone
测试访问:
![]()
nacos无法访问:大概率是配置信息写错了,比如IP。

新增配置,查看数据库数据

数据库中数据:

已经新建成功。
至此,数据库切换完成!
发现数据时间差问题,修改MySQL的URL信息。
建议修改:在原本数据库URL配置之后,添加
&serverTimezone=Asia/Shanghai
使用其他方式,可能仍然存在其他时区问题(亲测无效),如:
&serverTimezone=UTC
&serverTimezone=GMT%2B8
Nacos+MySQL生产环境配置
预备环境准备
请确保是在环境中安装使用:
- 64 bit OS Linux/Unix/Mac,推荐使用Linux系统。
- 64 bit JDK 1.8+;下载.配置。
- Maven 3.2.x+;下载.配置。
- 3个或3个以上Nacos节点才能构成集群。
集群配置步骤
Linux服务器MySQL数据库配置
application.properties配置
上述两步骤同上!
Linux服务器上Nacos的集群配置cluster.conf
梳理3台不同的端口号作为区分,需要将这3个端口归为一组作为集群。
先备份cluster.conf留存cluster.conf.example(Nacos默认提供)
cd nacos/conf
cp cluster.conf.example cluster.conf
编辑cluster.conf文件,添加集群的IP:端口
172.16.138.100:3333
172.16.138.100:4444
172.16.138.100:5555
注意:
一定不能写127.0.0.1,必须要写以下命令能够识别的IP地址。
hostname -i
编辑Nacos的启动脚本startup.sh,使它能接受不同的启动端口
修改该脚本,是为了方便启动Nacos时,启动多台Nacos,并以端口号作为区分,传递不同的端口号启动不同的Nacos。
当前我们只有一台虚拟机,如果要启动3台Nacos,需要以端口来进行区分,但是我们启动时需要如何来区分启动的Nacos,默认执行startup.sh,无法区分是哪台Nacos,所以,我们需要修改该脚本文件。
先备份原来默认的startup.sh脚本文件:
cd nacos/bin
cp startup.sh startup.sh.bak
原文件startup.sh:
#!/bin/bash

# Copyright 1999-2018 Alibaba Group Holding Ltd.
# Licensed under the Apache License, Version 2.0 (the "License");
# you may not use this file except in compliance with the License.
# You may obtain a copy of the License at

#      http://www.apache.org/licenses/LICENSE-2.0
#
# Unless required by applicable law or agreed to in writing, software
# distributed under the License is distributed on an "AS IS" BASIS,
# WITHOUT WARRANTIES OR CONDITIONS OF ANY KIND, either express or implied.
# See the License for the specific language governing permissions and
# limitations under the License.

cygwin=false
darwin=false
os400=false
case "`uname`" in
CYGWIN*) cygwin=true;;
Darwin*) darwin=true;;
OS400*) os400=true;;
esac
error_exit ()
{
    echo "ERROR: $1 !!"
    exit 1
}
[ ! -e "$JAVA_HOME/bin/java" ] && JAVA_HOME=$HOME/jdk/java
[ ! -e "$JAVA_HOME/bin/java" ] && JAVA_HOME=/usr/java
[ ! -e "$JAVA_HOME/bin/java" ] && JAVA_HOME=/opt/taobao/java
[ ! -e "$JAVA_HOME/bin/java" ] && unset JAVA_HOME

if [ -z "$JAVA_HOME" ]; then
  if $darwin; then

    if [ -x '/usr/libexec/java_home' ] ; then
      export JAVA_HOME=`/usr/libexec/java_home`

    elif [ -d "/System/Library/Frameworks/JavaVM.framework/Versions/CurrentJDK/Home" ]; then
      export JAVA_HOME="/System/Library/Frameworks/JavaVM.framework/Versions/CurrentJDK/Home"
    fi
  else
    JAVA_PATH=`dirname $(readlink -f $(which javac))`
    if [ "x$JAVA_PATH" != "x" ]; then
      export JAVA_HOME=`dirname $JAVA_PATH 2>/dev/null`
    fi
  fi
  if [ -z "$JAVA_HOME" ]; then
        error_exit "Please set the JAVA_HOME variable in your environment, We need java(x64)! jdk8 or later is better!"
  fi
fi

export SERVER="nacos-server"
export MODE="cluster"
export FUNCTION_MODE="all"
export MEMBER_LIST=""
export EMBEDDED_STORAGE=""
while getopts ":m:f:s:c:p:" opt
do
    case $opt in
        m)
            MODE=$OPTARG;;
        f)
            FUNCTION_MODE=$OPTARG;;
        s)
            SERVER=$OPTARG;;
        c)
            MEMBER_LIST=$OPTARG;;
        p)
            EMBEDDED_STORAGE=$OPTARG;;
        ?)
        echo "Unknown parameter"
        exit 1;;
    esac
done

export JAVA_HOME
export JAVA="$JAVA_HOME/bin/java"
export BASE_DIR=`cd $(dirname $0)/..; pwd`
export CUSTOM_SEARCH_LOCATIONS=file:${BASE_DIR}/conf/

#===========================================================================================
# JVM Configuration
#===========================================================================================
if [[ "${MODE}" == "standalone" ]]; then
    JAVA_OPT="${JAVA_OPT} -Xms512m -Xmx512m -Xmn256m"
    JAVA_OPT="${JAVA_OPT} -Dnacos.standalone=true"
else
    if [[ "${EMBEDDED_STORAGE}" == "embedded" ]]; then
        JAVA_OPT="${JAVA_OPT} -DembeddedStorage=true"
    fi
    JAVA_OPT="${JAVA_OPT} -server -Xms2g -Xmx2g -Xmn1g -XX:MetaspaceSize=128m -XX:MaxMetaspaceSize=320m"
    JAVA_OPT="${JAVA_OPT} -XX:-OmitStackTraceInFastThrow -XX:+HeapDumpOnOutOfMemoryError -XX:HeapDumpPath=${BASE_DIR}/logs/java_heapdump.hprof"
    JAVA_OPT="${JAVA_OPT} -XX:-UseLargePages"

fi

if [[ "${FUNCTION_MODE}" == "config" ]]; then
    JAVA_OPT="${JAVA_OPT} -Dnacos.functionMode=config"
elif [[ "${FUNCTION_MODE}" == "naming" ]]; then
    JAVA_OPT="${JAVA_OPT} -Dnacos.functionMode=naming"
fi

JAVA_OPT="${JAVA_OPT} -Dnacos.member.list=${MEMBER_LIST}"

JAVA_MAJOR_VERSION=$($JAVA -version 2>&1 | sed -E -n 's/.* version "([0-9]*).*$/\1/p')
if [[ "$JAVA_MAJOR_VERSION" -ge "9" ]] ; then
  JAVA_OPT="${JAVA_OPT} -Xlog:gc*:file=${BASE_DIR}/logs/nacos_gc.log:time,tags:filecount=10,filesize=102400"
else
  JAVA_OPT="${JAVA_OPT} -Djava.ext.dirs=${JAVA_HOME}/jre/lib/ext:${JAVA_HOME}/lib/ext"
  JAVA_OPT="${JAVA_OPT} -Xloggc:${BASE_DIR}/logs/nacos_gc.log -verbose:gc -XX:+PrintGCDetails -XX:+PrintGCDateStamps -XX:+PrintGCTimeStamps -XX:+UseGCLogFileRotation -XX:NumberOfGCLogFiles=10 -XX:GCLogFileSize=100M"
fi

JAVA_OPT="${JAVA_OPT} -Dloader.path=${BASE_DIR}/plugins/health,${BASE_DIR}/plugins/cmdb"
JAVA_OPT="${JAVA_OPT} -Dnacos.home=${BASE_DIR}"
JAVA_OPT="${JAVA_OPT} -jar ${BASE_DIR}/target/${SERVER}.jar"
JAVA_OPT="${JAVA_OPT} ${JAVA_OPT_EXT}"
JAVA_OPT="${JAVA_OPT} --spring.config.additional-location=${CUSTOM_SEARCH_LOCATIONS}"
JAVA_OPT="${JAVA_OPT} --logging.config=${BASE_DIR}/conf/nacos-logback.xml"
JAVA_OPT="${JAVA_OPT} --server.max-http-header-size=524288"

if [ ! -d "${BASE_DIR}/logs" ]; then
  mkdir ${BASE_DIR}/logs
fi

echo "$JAVA ${JAVA_OPT}"

if [[ "${MODE}" == "standalone" ]]; then
    echo "nacos is starting with standalone"
else
    echo "nacos is starting with cluster"
fi

# check the start.out log output file
if [ ! -f "${BASE_DIR}/logs/start.out" ]; then
  touch "${BASE_DIR}/logs/start.out"
fi
# start
echo "$JAVA ${JAVA_OPT}" > ${BASE_DIR}/logs/start.out 2>&1 &
nohup $JAVA ${JAVA_OPT} nacos.nacos >> ${BASE_DIR}/logs/start.out 2>&1 &
echo "nacos is starting,you can check the ${BASE_DIR}/logs/start.out"
我们启动Nacos时,传入的端口号一定要是cluster.conf配置文件中配置的,否则会对应不上。
修改start.sh脚本文件:
start.sh脚本已经自带了传入端口的参数p:

修改前:
![]()
修改后:

启动Nacos:
sh startup.sh -p 3333
sh startup.sh -p 4444
sh startup.sh -p 5555
Nginx的配置,作为负载均衡器
Nginx作为做前端的入口程序,我们需要修改nginx配置,做负载均衡
查看当前nginx
cd /root/development/nginx/nginx-1.12.2/conf
cp nginx.conf nginx.conf.bak
注意:
server 127.0.0.1:3333; 后面的分号不要忘记,否则启动会报错。
启动nginx,同时指定刚刚配置的conf文件
./nginx -c /root/development/nginx/nginx-1.12.2/conf/nginx.conf
Nginx+3Nacos+MySQL
当前我们有1台nginx+3台Nacos+1台MySQL
- 启动Nacos(3台Nacos启动方式一样,以端口作为区分)
sh startup.sh -p 3333
启动成功:

稍等片刻后再查看启动情况,因为Nacos启动也需要时间
ps -ef |grep nacos|grep -v grep |wc -l
![]()
3台Nacos已经全部启动成功。
- 启动nginx
./nginx -c /root/development/nginx/nginx-1.12.2/conf/nginx.conf
查看启动情况
ps -ef |grep nginx
测试访问
http://172.16.138.100:1111/nacos
![]()
虚拟机内存飙高,重新关机,分配内存,分配到4GB


重启所有服务。仍然报一样的错。
查看Nacos的日志文件,发现启动报错:
第一个Nacos可以正常启动 ,启动第二个时,就会报错:
Caused by: org.springframework.beans.BeanInstantiationException: Failed to instantiate [com.alibaba.nacos.naming.consistency.persistent.PersistentConsistencyServiceDelegateImpl]: Constructor threw exception; nested exception is com.alibaba.nacos.core.distributed.raft.exception.JRaftException: java.io.IOException: Failed to bind
        at org.springframework.beans.BeanUtils.instantiateClass(BeanUtils.java:224)
        at org.springframework.beans.factory.support.SimpleInstantiationStrategy.instantiate(SimpleInstantiationStrategy.java:117)
        at org.springframework.beans.factory.support.ConstructorResolver.instantiate(ConstructorResolver.java:311)
        ... 127 common frames omitted
Caused by: com.alibaba.nacos.core.distributed.raft.exception.JRaftException: java.io.IOException: Failed to bind
        at com.alibaba.nacos.core.distributed.raft.JRaftServer.start(JRaftServer.java:225)
        at com.alibaba.nacos.core.distributed.raft.JRaftProtocol.init(JRaftProtocol.java:122)
        at com.alibaba.nacos.core.distributed.raft.JRaftProtocol.init(JRaftProtocol.java:92)
        at com.alibaba.nacos.core.distributed.ProtocolManager.lambda$initCPProtocol$3(ProtocolManager.java:127)
        at com.alibaba.nacos.sys.utils.ApplicationUtils.getBeanIfExist(ApplicationUtils.java:146)
        at com.alibaba.nacos.core.distributed.ProtocolManager.initCPProtocol(ProtocolManager.java:123)
        at com.alibaba.nacos.core.distributed.ProtocolManager.getCpProtocol(ProtocolManager.java:85)
        at com.alibaba.nacos.naming.consistency.persistent.impl.PersistentServiceProcessor.(PersistentServiceProcessor.java:64)
        at com.alibaba.nacos.naming.consistency.persistent.PersistentConsistencyServiceDelegateImpl.createNewPersistentServiceProcessor(PersistentConsistencyServiceDelegateImpl.java:106)
        at com.alibaba.nacos.naming.consistency.persistent.PersistentConsistencyServiceDelegateImpl.(PersistentConsistencyServiceDelegateImpl.java:54)
        at sun.reflect.NativeConstructorAccessorImpl.newInstance0(Native Method)
        at sun.reflect.NativeConstructorAccessorImpl.newInstance(NativeConstructorAccessorImpl.java:62)
        at sun.reflect.DelegatingConstructorAccessorImpl.newInstance(DelegatingConstructorAccessorImpl.java:45)
        at java.lang.reflect.Constructor.newInstance(Constructor.java:423)
        at org.springframework.beans.BeanUtils.instantiateClass(BeanUtils.java:211)
        ... 129 common frames omitted
Caused by: java.io.IOException: Failed to bind
        at io.grpc.netty.shaded.io.grpc.netty.NettyServer.start(NettyServer.java:252)
        at io.grpc.internal.ServerImpl.start(ServerImpl.java:184)
        at io.grpc.internal.ServerImpl.start(ServerImpl.java:90)
        at com.alipay.sofa.jraft.rpc.impl.GrpcServer.init(GrpcServer.java:108)
        at com.alipay.sofa.jraft.rpc.impl.GrpcServer.init(GrpcServer.java:61)
        at com.alibaba.nacos.core.distributed.raft.JRaftServer.start(JRaftServer.java:214)
        ... 143 common frames omitted
Caused by: java.net.BindException: 地址已在使用
        at sun.nio.ch.Net.bind0(Native Method)
        at sun.nio.ch.Net.bind(Net.java:438)
        at sun.nio.ch.Net.bind(Net.java:430)
        at sun.nio.ch.ServerSocketChannelImpl.bind(ServerSocketChannelImpl.java:225)
        at io.grpc.netty.shaded.io.netty.channel.socket.nio.NioServerSocketChannel.doBind(NioServerSocketChannel.java:134)
        at io.grpc.netty.shaded.io.netty.channel.AbstractChannel$AbstractUnsafe.bind(AbstractChannel.java:550)
        at io.grpc.netty.shaded.io.netty.channel.DefaultChannelPipeline$HeadContext.bind(DefaultChannelPipeline.java:1334)
        at io.grpc.netty.shaded.io.netty.channel.AbstractChannelHandlerContext.invokeBind(AbstractChannelHandlerContext.java:504)
        at io.grpc.netty.shaded.io.netty.channel.AbstractChannelHandlerContext.bind(AbstractChannelHandlerContext.java:489)
        at io.grpc.netty.shaded.io.netty.channel.DefaultChannelPipeline.bind(DefaultChannelPipeline.java:973)
        at io.grpc.netty.shaded.io.netty.channel.AbstractChannel.bind(AbstractChannel.java:248)
        at io.grpc.netty.shaded.io.netty.bootstrap.AbstractBootstrap$2.run(AbstractBootstrap.java:348)
        at io.grpc.netty.shaded.io.netty.util.concurrent.AbstractEventExecutor.safeExecute(AbstractEventExecutor.java:164)
        at io.grpc.netty.shaded.io.netty.util.concurrent.SingleThreadEventExecutor.runAllTasks(SingleThreadEventExecutor.java:472)
        at io.grpc.netty.shaded.io.netty.channel.nio.NioEventLoop.run(NioEventLoop.java:500)
        at io.grpc.netty.shaded.io.netty.util.concurrent.SingleThreadEventExecutor$4.run(SingleThreadEventExecutor.java:989)
        at io.grpc.netty.shaded.io.netty.util.internal.ThreadExecutorMap$2.run(ThreadExecutorMap.java:74)
        at io.grpc.netty.shaded.io.netty.util.concurrent.FastThreadLocalRunnable.run(FastThreadLocalRunnable.java:30)
        at java.lang.Thread.run(Thread.java:750)
日志显示是因为绑定失败,tomcat端口冲突了。
换种方式,将Nacos复制3份,修改端口号启动:
#使用内置数据源
sh startup.sh -p embedded

#使用外置数据源
sh startup.sh

将其中的Nacos的application.properties进行端口修改:
修改示例:

启动3台Nacos和nginx,测试访问:
http://172.16.138.100:1111/nacos/#/login

账号密码都是:nacos。此时是访问的nginx转发过来的服务。

坑:通过指定端口号进行登陆Nacos,账号密码均为:nacos,可以正常登录,但是通nginx转发后,账号就会错误。
http://172.16.138.100:3333/nacos/#/login
http://172.16.138.100:4444/nacos/#/login
http://172.16.138.100:5555/nacos/#/login

测试:
登陆MySQL,查看数据

我们在任意一台Nacos上测试,添加数据:

查看数据库数据:


查看节点列表:

说明数据是可以同步的,表明集群没问题。
SpringBootCloud微服务配置:
![]()
示意图:
![]()
Sentinel
简介
官网:https://github.com/alibaba/sentinel
中文版:https://github.com/alibaba/sentinel/wiki/%E4%BB%8B%E7%BB%8D
对比Hystrix
| Hystrix | Sentinel |
|---|---|
| 需要手动搭建监控平台 | 单独组件 |
| 无web页面配置、流量控制、速率、熔断、降级 | 支持页面配置 |
Sentinel本质相当于是Hystrix的阿里版本。

Sentinel主要特性:

Sentinel开源生态:

Sentinel分为两个部分:
- 核心库(Java客户端)不依赖任何框架/库,能够运行于所有Java运行时环境,同时对Dubbo/SpringCloud等框架也有较好的支持。
- 控制台(Dashboard)基于SpringBoot开发,打包后可以直接运行,不需要额外的Tomcat等应用容器。
下载安装
测试启动
java -jar sentinel-dashboard-1.7.1.jar
后台启动命令:
nohup java -jar ~/develop/sentinel-dashboard-1.7.1.jar &
登录Sentinel
初始化工程
- 启动Nacos
- 新建Model
- 启动Sentinel
- 启动微服务
- 查看控制台
新建Module
新建Module:cloudalibaba-sentinel-service8401
pom
<artifactId>cloudalibaba-sentinel-service8401artifactId>

    <properties>
        <maven.compiler.source>8maven.compiler.source>
        <maven.compiler.target>8maven.compiler.target>
    properties>

    <dependencies>

        <dependency>
            <groupId>com.alibaba.cloudgroupId>
            <artifactId>spring-cloud-starter-alibaba-nacos-discoveryartifactId>
        dependency>
        <dependency>
            <groupId>com.alibaba.cspgroupId>
            <artifactId>sentinel-datasource-nacosartifactId>
        dependency>

        <dependency>
            <groupId>com.alibaba.cloudgroupId>
            <artifactId>spring-cloud-starter-alibaba-sentinelartifactId>
        dependency>

        <dependency>
            <groupId>org.springframework.cloudgroupId>
            <artifactId>spring-cloud-starter-openfeignartifactId>
        dependency>

        <dependency>
            <groupId>org.springframework.bootgroupId>
            <artifactId>spring-boot-starter-webartifactId>
        dependency>
        <dependency>
            <groupId>org.springframework.bootgroupId>
            <artifactId>spring-boot-starter-actuatorartifactId>
        dependency>
        <dependency>
            <groupId>org.springframework.bootgroupId>
            <artifactId>spring-boot-devtoolsartifactId>
            <scope>runtimescope>
            <optional>trueoptional>
        dependency>
        <dependency>
            <groupId>org.projectlombokgroupId>
            <artifactId>lombokartifactId>
            <optional>trueoptional>
        dependency>
        <dependency>
            <groupId>org.springframework.bootgroupId>
            <artifactId>spring-boot-starter-testartifactId>
            <scope>testscope>
        dependency>
        <dependency>
            <groupId>com.test.springcloudgroupId>
            <artifactId>cloud-api-commonsartifactId>
            <version>1.0-SNAPSHOTversion>
        dependency>
    dependencies>
application.yml
server:
  port: 8401

spring:
  application:
    name: cloudalibaba-sentinel-service
  cloud:
    nacos:
      discovery:
        server-addr: 172.16.138.100:8848 #Nacos注册中心地址
    sentinel:
      transport:
        dashboard: 172.16.138.100:8080 #用来监控服务的地址
        port: 8719 #默认8719端口,假如被占用,就会从8719开始依次+1扫描,直至找到未被占用的端口

management:
  endpoints:
    web:
      exposure:
        include: '*'
启动类
import org.springframework.boot.SpringApplication;
import org.springframework.boot.autoconfigure.SpringBootApplication;
import org.springframework.cloud.client.discovery.EnableDiscoveryClient;

/**
 * @author zhangzengxiu
 * @date 2023/2/7
 */
@EnableDiscoveryClient
@SpringBootApplication
public class SentinelApp8401 {
    public static void main(String[] args) {
        SpringApplication.run(SentinelApp8401.class, args);
    }
}
Controller
import org.springframework.web.bind.annotation.GetMapping;
import org.springframework.web.bind.annotation.RestController;

/**
 * @author zhangzengxiu
 * @date 2023/2/7
 */
@RestController
public class FlowLimitController {

    @GetMapping("/testA")
    public String testA() {
        return "---testA---";
    }

    @GetMapping("/testB")
    public String testB() {
        return "---testB---";
    }

}
查看控制台
Nacos控制台
Sentinel控制台
一片空白,是因为Sentinel采用的是懒加载,需要先访问一次该微服务,再次查看。

访问http://localhost:8401/testA

再次查看Sentinel控制台:

结论:Sentinel正在监控该微服务。
访问微服务后,理应有监控数据显示,可是仍然没有任何数据,
解决方式:将Sentinel和微服务部署到同一台机器上。


流控规则
基本介绍
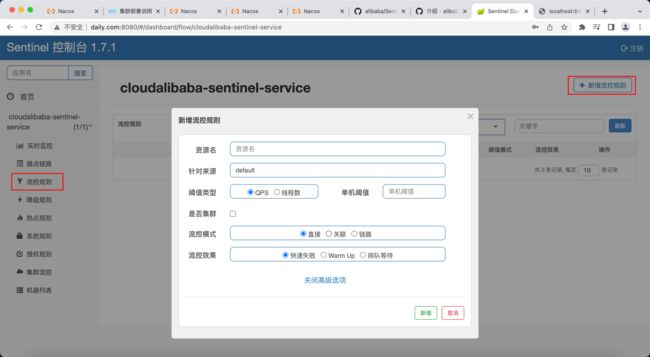
- 资源名:唯一名称,默认请求路径
- 针对来源:Sentinel可以针对调用者进行限流,填写微服务名,默认default(不区分来源)
- 阈值类型/单机阈值:
- QPS(每秒钟的请求数量):当调用该api的QPS达到阈值的时候,进行限流
- 线程数:当调用该ap的线程数达到阈值的时候,进行限流
- 是否集群:不需要集群
- 流控模式:
- 直接:api达到限流条件时,直接限流
- 关联:当关联的资源达到阈值时,就限流自己
- 链路:只记录指定链路上的流量(指定资源从入口资源进来的流量,如果达到阈值,就进行限流)【api级别的针对来源】
- 流控效果:
- 快速失败:直接失败,拋异常
- Warm Up:根据codeFactor (令加载因子,默认3)的值,从阈值/codeFactor,经过预热长,才达到设置的QPS阈值
- 排队等待:匀速排队,让请求以匀速的速度通过,阈值类型必须设置为QPS,否则无效
控制台
直接
QPS+直接+快速失败
添加流控规则:
 该配置表示:1秒钟内超过1次就会触发限流,报默认错误。
再次访问:QPS超过1就会被限流,且快速失败,报默认错误。
![]()
恢复后:

线程数+直接
线程数:当调用API的线程数达到阈值的时候进行限流。
QPSVS线程数流控:
QPS相当于是直接将请求拒绝掉,限制访问。
线程数是请求这个接口,但是这个接口处理不过来了。
    @GetMapping("/testA")
    public String testA() {
        try {
            //模拟业务处理所耗费时间
            Thread.sleep(800);
        } catch (InterruptedException e) {
            e.printStackTrace();
        }
        return "---testA---";
    }
关联
当关联的资源达到阈值,就限流自己。
比如A关联B,但是B资源达到阈值了,那么A就限流。
比如在分布式的链路调用当中,支付接口被限流,那么就限流下订单的接口。
设置效果:testB的QPS阈值超过1,就限流testA的接口

使用postman模拟并发密集访问testB

当testB被限流,testA也限流:


流控效果
直接快速失败(默认流控处理)

源码:com.alibaba.csp.sentinel.slots.block.flow.controller.DefaultController
Warm UP(预热/冷启动)
公式:阈值除以coldFactor(默认值为3),经过预热时常后,才会达到阈值。
默认coldFactor为3,即请求QPS从(threshold/3)开始,经过多少预热时长才逐渐升至设定的QPS。
长期处于低水位,当流量突然增加,直接把系统拉升到高水位可能瞬间把系统压垮。
通过冷启动,让通过的流量缓慢增加,在一定时间内逐渐增加到阈值上限,给冷系统一个预热的时间,避免冷系统被压垮。

源码:com.alibaba.csp.sentinel.slots.block.flow.controller.WarmUpController

配置:模拟预热5秒,峰值承受10QPS。刚开始单机阈值为10/冷启动因子(默认3)=3。

说明:
- 刚开始的阈值为10/3=3QPS
- 经过5秒预热后,达到阈值QPS
场景
秒杀系统在开启的瞬间,会有很多流量上来,很多把系统打死,预热方式就是为了保护系统,可以慢慢把流量放进来。
排队等待
匀速排队,让请求以均匀的速度通过,阈值类型必须设置成QPS,否则无效。
设置含义:/testA每秒1次请求,超过的话就排队等待,等待的超时时间为20000ms

源码:com.alibaba.csp.sentinel.slots.block.flow.controller.RateLimiterController
修改后台接口:添加日志打印
    @GetMapping("/testB")
    public String testB() {
        String thread = Thread.currentThread().getName() + "\t" + "testB";
        log.info("{}", thread);
        return "---testB---";
    }
熔断降级
基本介绍
降级策略实战
RT
平均响应时间:当一秒内持续进入5个请求,对应时刻的平均响应时间(秒级)均超过阈值(count,以ms为单位),那么在接下来的时间窗口,(DegradeRule中的timeWindow,以s为单位)之内,对这个方法的调用都会自动熔断,抛出(DegradeException)。注意Sentinel默认统计的RT上限时4900ms,超过此阈值的都会算作4900ms,若需要变更此上限可以通过启动配置项, -dDcsp.sentinel.statistic.max.rt=xxx 配置
总结:
- 平均响应时间超过阈值 并且 在时间窗口内通过的请求>=5 ,两个条件同时满足后触发降级
- 窗口期过后关闭断路器
- RT最大4900
示意图:
![]()
代码
    @GetMapping("/testD")
    public String testD() {
        try {
            Thread.sleep(1000);
        } catch (InterruptedException e) {
            e.printStackTrace();
        }
        return "---testD---RT";
    }
配置

配置说明:
RT:200ms内就要处理完成
时间窗口:如果RT时间内没有处理完成,接下来的时间窗口1s内就要服务降级。
jmeter压测
线程组:


访问接口:被降级

上述配置:
永远1秒钟发10个线程(大于5个了)请求接口,我们希望200ms内完成本次任务。
如果超过200ms还没处理完,在未来1s的时间窗口内,断路器打开,微服务不可用。
后续停止jmeter,停止大访问了,微服务又可以对外提供服务。
- 线程组1秒钟发10个请求,所以,满足1秒钟大于5个线程;
- 要求200ms内处理完成,当前请求需要1s内处理完成,也满足要求;
异常比例
异常比例:当资源的每秒请求量>=5,并且每秒异常总数占通过量的比值超过阈值(DegradeRule中的count)之后,资源进入降级状态,即在接下来的时间窗口(DegradeRule中的timeWindow,以s为单位)之内,对这个方法的调用都会自动地返回。异常比率的阈值范围时[0.0,1.0],代表0%-100%

示例图: 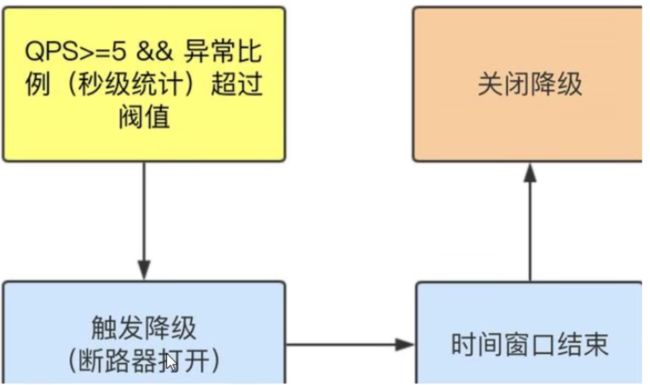
需要满足的条件:
- QPS>=5
- 秒级异常比例超过设定的阈值
同时满足以上条件时,会触发降级,当时间窗口期结束后,才会关闭降级。
代码
    /**
     * 测试Sentinel服务降级:异常比例
     *
     * @return
     */
    @GetMapping("/testE")
    public String testE() {
        int i = 1 / 0;
        return "---testD---异常比例";
    }
配置
解释:
1秒钟内进入>=5个请求
异常比例超过20%
这两个条件同时满足,在1秒的时间窗口内服务降级
jmeter压测
异常数
异常数:当资源近1分钟的异常数目超过阈值之后会进行熔断。注意由于统计时间窗口是分钟级别的,若
timeWindow小于60s,则结束熔断状态后仍可能再进入熔断状态。
时间窗口一定要大于等于60秒
![]()
代码
    /**
     * 测试Sentinel服务降级:异常数
     *
     * @return
     */
    @GetMapping("/testF")
    public String testF() {
        int i = 1 / 0;
        return "---testD---异常数";
    }
配置
![]()
测试
访问:http://localhost:8401/testF
一分钟内超过5次异常,会服务降级

热点key限流
基本介绍
兜底方法
兜底分为系统默认和用户自定义的
- 之前case出问题,sentinel默认提示:Blocked by Sentinel(flowing limiting)
- 异常类:com.alibaba.csp.sentinel.slots.block.BlockException
- Hystrix可以自定义兜底,@HystrixCommand,Sentinel的是@SentinelResource
代码
    /**
     * 测试热点key限流
     *
     * @param p1
     * @param p2
     * @return
     */
    @GetMapping("/testHotKey")
    @SentinelResource(value = "testHotKey", blockHandler = "handler")
    public String testHotKey(@RequestParam(value = "p1", required = false) String p1,
                             @RequestParam(value = "p1", required = false) String p2) {
        return "===testHotKey===";
    }


    /**
     * 兜底方法
     *
     * @param p1
     * @param p2
     * @param blockException
     * @return
     */
    public String handler(String p1, String p2, BlockException blockException) {
        return "===被限流了===";
    }
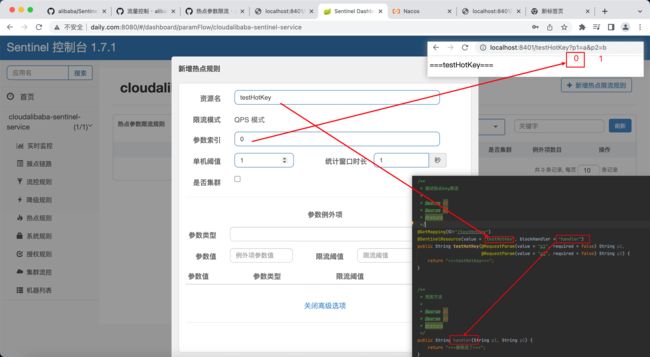
访问:http://localhost:8401/testHotKey?p1=a&p2=b

说明:
参数p1相当于是0索引
参数p2相当于是1索引
配置
说明:
资源名是注解中配置的值。
测试
一定要添加参数BlockException
public String handler(String p1, String p2, BlockException blockException) {
    //参数要有BlockException,否则会报错误页面
}
没加这个参数,会走错误页面:

重新访问:http://localhost:8401/testHotKey?p1=a
走到了我们自定义的兜底。
![]()
测试场景1:
方法testHotKey里的第一个参数QPS只要超过每秒1次,执行降级
@SentinelResource(value = "testHotKey", blockHandler = "handler")
测试场景2:
方法testHotKey里的第一个参数QPS只要超过每秒1次,执行降级
@SentinelResource(value = "testHotKey")
没有服务降级的兜底方法此时会将错误页面抛给用户,对用户并不友好,不建议使用:

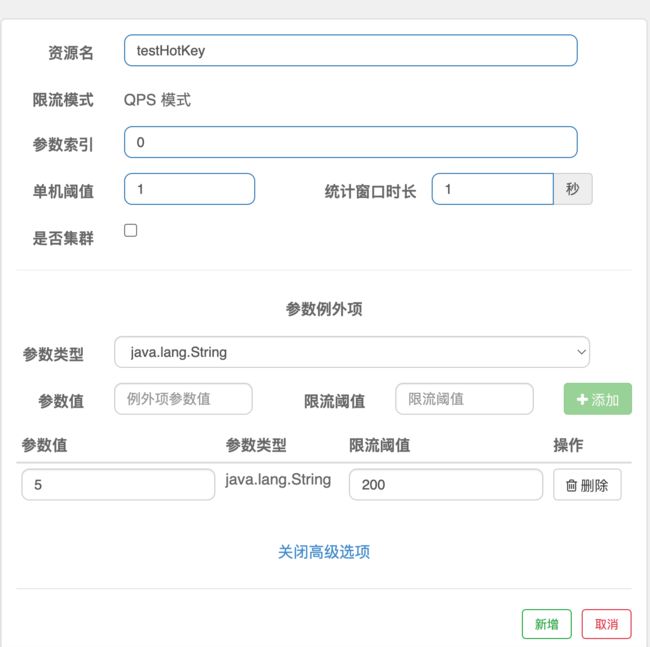
参数例外项
特例
当我们配置了热点key限流规则,但是有时,我们希望针对某些个特殊的值时,不会被限流或者阈值可以达到更高,做特殊处理
配置
解释:
0号索引,平时只要QPS达到1,就会被限流
当值为5时,单独处理,QPS可以达到200
测试
- 当参数不是我们配置的值时,触发限流规则会被限流
![]()
- 当参数是我们配置的例外项时,会单独处理
细节
- @SentinelResource处理的是Sentinel控制台配置的违规情况,有兜底方法处理
- 程序运行报错,是java运行时报错的,@SentinelResource不做处理,仍然是异常程序
系统规则
Sentinel 系统自适应过载保护从整体维度对应用入口流量进行控制,结合应用的 Load、CPU 使用率、总体平均 RT、入口 QPS 和并发线程数等几个维度的监控指标,通过自适应的流控策略,让系统的入口流量和系统的负载达到一个平衡,让系统尽可能跑在最大吞吐量的同时保证系统整体的稳定性。
系统规则支持以下的模式:
- Load 自适应(仅对 Linux/Unix-like 机器生效):系统的 load1 作为启发指标,进行自适应系统保护。当系统 load1 超过设定的启发值,且系统当前的并发线程数超过估算的系统容量时才会触发系统保护(BBR 阶段)。系统容量由系统的 maxQps * minRt 估算得出。设定参考值一般是 CPU cores * 2.5。
- CPU usage(1.5.0+ 版本):当系统 CPU 使用率超过阈值即触发系统保护(取值范围 0.0-1.0),比较灵敏。
- 平均 RT:当单台机器上所有入口流量的平均 RT 达到阈值即触发系统保护,单位是毫秒。
- 并发线程数:当单台机器上所有入口流量的并发线程数达到阈值即触发系统保护。
- 入口 QPS:当单台机器上所有入口流量的 QPS 达到阈值即触发系统保护。
说明:
之前我们都是针对单个接口或者单个请求去做限流处理
现在我们针对整个应用去做处理
![]()
配置
以QPS为例

测试访问:
![]()

相当于是总入口,当应用触发限流,整个应用所有功能都无法对外提供服务了。
@SentinelResource配置
按资源名称限流+后续处理
代码
    /**
     * 测试按资源名限流
     *
     * @return
     */
    @GetMapping("/byResource")
    @SentinelResource(value = "byResource", blockHandler = "handler")
    public CommonResult testByResource() {
        return new CommonResult(200, "testByResource", new Payment(2023L, "serial001"));
    }

    /**
     * 兜底
     *
     * @param blockException
     * @return
     */
    public CommonResult handler(BlockException blockException) {
        return new CommonResult(500, blockException.getClass().getCanonicalName() + "\t 服务不可用");
    }
配置

访问测试:http://localhost:8401/byResource
正常:

未被限流规则:走兜底

如果关闭了服务,再次查看Sentinel控制台:
![]()
之前配置的流控规则消失。
按照URL地址限流+后续处理
代码
    /**
     * 测试按资源名限流
     * 未配置兜底
     *
     * @return
     */
    @GetMapping("/byUrl")
    @SentinelResource(value = "byUrl")
    public CommonResult testByUrl() {
        return new CommonResult(200, "byUrl", new Payment(2023L, "serial002"));
    }
配置
测试
测试访问:http://localhost:8401/byUrl
正常访问:
![]()
触发流控规则:走默认的限流结果

当前兜底方案存在问题
- 系统默认的无法体现我们的业务
- 当前兜底方案鱼业务代码耦合
- 如果针对每个方法都写一个兜底,代码冗余、膨胀
- 全局统一异常没有体现
客户自定义限流处理逻辑
体现客户自定义处理逻辑且与业务代码解藕
创建自定义限流处理逻辑类
import com.alibaba.csp.sentinel.slots.block.BlockException;
import com.test.springcloud.result.CommonResult;

/**
 * 客户自定义兜底
 *
 * @author zhangzengxiu
 * @date 2023/2/18
 */
public class CustomerBlockHandler {

    public static CommonResult handlerException(BlockException blockException) {
        return new CommonResult(500, "自定义global exception----1");
    }

    public static CommonResult handlerException2(BlockException blockException) {
        return new CommonResult(500, "自定义global exception----2");
    }
}
controller
    /**
     * 测试客户自定义兜底方案
     * blockHandlerClass:指定的是哪个类做处理
     * blockHandler:指类中的具体处理方法
     *
     * @return
     */
    @GetMapping("/customerBlockHandler")
    @SentinelResource(value = "customerBlockHandler", blockHandlerClass = CustomerBlockHandler.class, blockHandler = "handlerException")
    public CommonResult testCustomerBlockHandler() {
        return new CommonResult(200, "按照客户自定义", new Payment(2023L, "serial003"));
    }
配置
![]()
测试
访问:http://localhost:8401/customerBlockHandler
正常:

详解:

其他属性说明
Sentinel流控规则配置,支持通过控制台界面去配置,也支持通过编码来实现。拓建使用控制台界面配置
官网示例Demo:
![]()
注解方式埋点不支持private方法
Sentinel核心API:
- SphU定义资源
- Tracer定义统计
- ContextUtil定义了上下文
服务熔断
Sentinel整合ribbon+openFeign+fallback
Ribbon系列
新建模块9003和9004(二者基本相同)
cloudalibaba-provider-payment9003
pom
    <parent>
        <artifactId>cloudartifactId>
        <groupId>com.test.springcloudgroupId>
        <version>1.0-SNAPSHOTversion>
    parent>
    <modelVersion>4.0.0modelVersion>

    <artifactId>cloudalibaba-provider-payment9003artifactId>

    <properties>
        <maven.compiler.source>8maven.compiler.source>
        <maven.compiler.target>8maven.compiler.target>
    properties>

    <dependencies>

        <dependency>
            <groupId>org.springframework.bootgroupId>
            <artifactId>spring-boot-starter-webartifactId>
        dependency>
        <dependency>
            <groupId>org.springframework.bootgroupId>
            <artifactId>spring-boot-starter-actuatorartifactId>
        dependency>

        <dependency>
            <groupId>com.alibaba.cloudgroupId>
            <artifactId>spring-cloud-starter-alibaba-nacos-discoveryartifactId>
        dependency>
        <dependency>
            <groupId>org.springframework.bootgroupId>
            <artifactId>spring-boot-devtoolsartifactId>
            <scope>runtimescope>
            <optional>trueoptional>
        dependency>
        <dependency>
            <groupId>org.projectlombokgroupId>
            <artifactId>lombokartifactId>
            <optional>trueoptional>
        dependency>
        <dependency>
            <groupId>org.springframework.bootgroupId>
            <artifactId>spring-boot-starter-testartifactId>
            <scope>testscope>
        dependency>
        <dependency>
            <groupId>com.test.springcloudgroupId>
            <artifactId>cloud-api-commonsartifactId>
            <version>1.0-SNAPSHOTversion>
        dependency>
    dependencies>
application.yml
server:
  port: 9003

spring:
  application:
    name: nacos-payment-provider
  cloud:
    nacos:
      discovery:
        server-addr: 172.16.138.100:8848 #配置nacos地址

management:
  endpoints:
    web:
      exposure:
        include: '*'
主启动类
import org.springframework.boot.SpringApplication;
import org.springframework.boot.autoconfigure.SpringBootApplication;
import org.springframework.cloud.client.discovery.EnableDiscoveryClient;

/**
 * @author zhangzengxiu
 * @date 2023/2/18
 */
@EnableDiscoveryClient
@SpringBootApplication
public class PaymentApp9003 {
    public static void main(String[] args) {
        SpringApplication.run(PaymentApp9003.class, args);
    }
}
controller
import com.test.springcloud.entities.Payment;
import com.test.springcloud.result.CommonResult;
import org.springframework.beans.factory.annotation.Value;
import org.springframework.web.bind.annotation.GetMapping;
import org.springframework.web.bind.annotation.PathVariable;
import org.springframework.web.bind.annotation.RestController;

import java.util.HashMap;
import java.util.Map;

/**
 * @author zhangzengxiu
 * @date 2023/2/18
 */
@RestController
public class PaymentController {

    @Value("${server.port}")
    private String serverPort;

    /**
     * 模拟数据库数据查询
     */
    public static final Map<Long, Payment> map = new HashMap<>();

    static {
        map.put(1L, new Payment(1L, "001"));
        map.put(2L, new Payment(2L, "002"));
        map.put(3L, new Payment(3L, "003"));
    }

    @GetMapping("/payment/{id}")
    public CommonResult<Payment> getPayment(@PathVariable("id") Long id) {
        Payment payment = map.get(id);
        return new CommonResult<Payment>(200, "getPayment,serverPort=" + serverPort, payment);
    }
}
测试
测试访问:http://localhost:9003/payment/1
![]()
测试访问:http://localhost:9004/payment/1
![]()
新建模块84
cloudalibaba-consumer-nacos-order84�
pom
    <parent>
        <artifactId>cloudartifactId>
        <groupId>com.test.springcloudgroupId>
        <version>1.0-SNAPSHOTversion>
    parent>
    <modelVersion>4.0.0modelVersion>

    <artifactId>cloudalibaba-consumer-nacos-order84artifactId>

    <properties>
        <maven.compiler.source>8maven.compiler.source>
        <maven.compiler.target>8maven.compiler.target>
    properties>

    <dependencies>

        <dependency>
            <groupId>org.springframework.bootgroupId>
            <artifactId>spring-boot-starter-webartifactId>
        dependency>
        <dependency>
            <groupId>org.springframework.bootgroupId>
            <artifactId>spring-boot-starter-actuatorartifactId>
        dependency>

        <dependency>
            <groupId>com.alibaba.cloudgroupId>
            <artifactId>spring-cloud-starter-alibaba-nacos-discoveryartifactId>
        dependency>
        <dependency>
            <groupId>org.springframework.bootgroupId>
            <artifactId>spring-boot-devtoolsartifactId>
            <scope>runtimescope>
            <optional>trueoptional>
        dependency>
        <dependency>
            <groupId>org.projectlombokgroupId>
            <artifactId>lombokartifactId>
            <optional>trueoptional>
        dependency>
        <dependency>
            <groupId>org.springframework.bootgroupId>
            <artifactId>spring-boot-starter-testartifactId>
            <scope>testscope>
        dependency>
        <dependency>
            <groupId>com.test.springcloudgroupId>
            <artifactId>cloud-api-commonsartifactId>
            <version>1.0-SNAPSHOTversion>
        dependency>

        <dependency>
            <groupId>com.alibaba.cloudgroupId>
            <artifactId>spring-cloud-starter-alibaba-sentinelartifactId>
        dependency>
    dependencies>
application.yml
server:
  port: 84

spring:
  application:
    name: nacos-order-consumer
  cloud:
    nacos:
      discovery:
        server-addr: 172.16.138.100:8848 #nacos地址
    sentinel:
      transport:
        dashboard: 172.16.138.100:8080 #用来监控服务的地址
        port: 8719 #默认8719端口,假如被占用,就会从8719开始依次+1扫描,直至找到未被占用的端口

#微服务将要去访问的微服务名
service-url:
  nacos-user-service: http://nacos-payment-provider
主启动类
import org.springframework.boot.SpringApplication;
import org.springframework.boot.autoconfigure.SpringBootApplication;
import org.springframework.cloud.client.discovery.EnableDiscoveryClient;

/**
 * @author zhangzengxiu
 * @date 2023/2/18
 */
@EnableDiscoveryClient
@SpringBootApplication
public class ConsumerOrderApp84 {
    public static void main(String[] args) {
        SpringApplication.run(ConsumerOrderApp84.class, args);
    }
}
配置类
/**
 * @author zhangzengxiu
 * @date 2023/2/18
 */
@Configuration
public class SpringApplicationConfig {

    @Bean
    @LoadBalanced
    public RestTemplate getRestTemplate() {
        return new RestTemplate();
    }
}
controller
@RestController
public class CircleBrakerController {

    @Value("${service-url.nacos-user-service}")
    private String serviceUrl;

    @Autowired
    private RestTemplate restTemplate;

    @GetMapping("/consumer/fallback/{id}")
    @SentinelResource(value = "fallback")
    public CommonResult<Payment> getPayment(@PathVariable("id") Long id) {
        CommonResult commonResult = restTemplate.getForObject(serviceUrl + "/payment/" + id, CommonResult.class, id);
        if (id == 4) {
            //模拟程序异常
            throw new IllegalArgumentException("非法参数异常");
        } else if (Objects.equals(commonResult.getData(), null)) {
            throw new RuntimeException("无数据");
        }
        return commonResult;
    }
}
注意:
fallback主要负责Java代码运行时异常
blockHandler负责配置违规
访问测试:http://localhost:84/consumer/fallback/1
成功访问,且实现负载均衡算法。

![]()
此时的Sentinel控制台

无任何熔断配置
    @GetMapping("/consumer/fallback/{id}")
    @SentinelResource(value = "fallback")
    public CommonResult<Payment> getPayment(@PathVariable("id") Long id) {
        CommonResult commonResult = restTemplate.getForObject(serviceUrl + "/payment/" + id, CommonResult.class, id);
        if (id == 4) {
            //模拟程序异常
            throw new IllegalArgumentException("非法参数异常");
        } else if (Objects.equals(commonResult.getData(), null)) {
            throw new RuntimeException("无数据");
        }
        return commonResult;
    }
请求异常数据:http://localhost:84/consumer/fallback/4
此时会将错误页面直接抛给用户,对用户不友好:

错误2:http://localhost:84/consumer/fallback/5
![]()
只配置fallback
    @GetMapping("/consumer/fallback/{id}")
    @SentinelResource(value = "fallback", fallback = "fallbackHandler")//fallback负责Java运行时异常
    public CommonResult<Payment> getPayment(@PathVariable("id") Long id) {
        CommonResult commonResult = restTemplate.getForObject(serviceUrl + "/payment/" + id, CommonResult.class, id);
        if (id == 4) {
            //模拟程序异常
            throw new IllegalArgumentException("非法参数异常");
        } else if (Objects.equals(commonResult.getData(), null)) {
            throw new RuntimeException("无数据异常");
        }
        return commonResult;
    }

    /**
     * 兜底方法
     *
     * @param id
     * @param throwable
     * @return
     */
    public CommonResult<Payment> fallbackHandler(Long id, Throwable throwable) {
        Payment payment = new Payment(id, null);
        return new CommonResult<>(500, "fallback 兜底" + throwable.getMessage(), payment);
    }
测试访问:
正常访问:http://localhost:84/consumer/fallback/1

异常访问:http://localhost:84/consumer/fallback/4
![]()
异常访问:http://localhost:84/consumer/fallback/5

fallback可以管Java运行时异常
只配置blockHandler�
blockHandler�只负责控制台的违规配置
controller
    @GetMapping("/consumer/fallback/{id}")
    @SentinelResource(value = "fallback", blockHandler = "blockHandlerFallback")//负责控制台违规
    public CommonResult<Payment> getPayment(@PathVariable("id") Long id) {
        CommonResult commonResult = restTemplate.getForObject(serviceUrl + "/payment/" + id, CommonResult.class, id);
        if (id == 4) {
            //模拟程序异常
            throw new IllegalArgumentException("非法参数异常");
        } else if (Objects.equals(commonResult.getData(), null)) {
            throw new RuntimeException("无数据异常");
        }
        return commonResult;
    }


    /**
     * 兜底方法:用来处理控制台违规异常
     *
     * @param id
     * @param blockException
     * @return
     */
    public CommonResult<Payment> blockHandlerFallback(Long id, BlockException blockException) {
        Payment payment = new Payment(id, null);
        return new CommonResult<>(444, "fallback 限流", payment);
    }
Sentinel控制台配置:

正常访问:http://localhost:84/consumer/fallback/1

异常访问:http://localhost:84/consumer/fallback/4
运行时异常会将错误页面抛给用户,对用户不友好。blockHandler�只能处理控制台的流控规则违规

触发Sentinel控制台流控规则:
![]()
配置blockHandler�+fallback
controller
    @GetMapping("/consumer/fallback/{id}")
    @SentinelResource(value = "fallback", blockHandler = "blockHandlerFallback", fallback = "fallbackHandler", exceptionsToIgnore = {IllegalArgumentException.class})
    public CommonResult<Payment> getPayment(@PathVariable("id") Long id) {
        CommonResult commonResult = restTemplate.getForObject(serviceUrl + "/payment/" + id, CommonResult.class, id);
        if (id == 4) {
            //模拟程序异常
            throw new IllegalArgumentException("非法参数异常");
        } else if (Objects.equals(commonResult.getData(), null)) {
            throw new NullPointerException("无数据异常");
        }
        return commonResult;
    }


    /**
     * 兜底方法:用来处理控制台违规异常
     * blockHandler
     *
     * @param id
     * @param blockException
     * @return
     */
    public CommonResult<Payment> blockHandlerFallback(Long id, BlockException blockException) {
        Payment payment = new Payment(id, null);
        return new CommonResult<>(444, "fallback 限流", payment);
    }

    /**
     * 兜底方法:处理程序运行异常
     * fallback
     *
     * @param id
     * @param throwable
     * @return
     */
    public CommonResult<Payment> fallbackHandler(Long id, Throwable throwable) {
        Payment payment = new Payment(id, null);
        return new CommonResult<>(500, "fallback 兜底" + throwable.getMessage(), payment);
    }
正常访问:http://localhost:84/consumer/fallback/1

配置流控规则:

限流:
正常访问:http://localhost:84/consumer/fallback/1
触发限流:

异常访问:http://localhost:84/consumer/fallback/4

触发限流规则:还是走限流blockHandler

如果blockHandler和fallback都配置,则被限流降级而抛出BlockException时只会进入blockHandler处理逻辑
exceptionsToIgnore
忽略属性,我们可以指定特定的异常不走fallback兜底方法
@SentinelResource(value = "fallback", blockHandler = "blockHandlerFallback", fallback = "fallbackHandler", exceptionsToIgnore = {IllegalArgumentException.class})
此时再触发我们指定的异常时,就不再有兜底fallback,经过测试blockHandler和fallback均是如此

![]()
Feign系列
微服务之间的调用类似于Dubbo的RPC
要么通过Ribbon要么通过Feign,Feign一般用在消费侧
修改84模块
pom
        <dependency>
            <groupId>org.springframework.cloudgroupId>
            <artifactId>spring-cloud-starter-openfeignartifactId>
        dependency>
application.yml
#激活Sentinel对Feign的支持
feign:
  sentinel:
    enabled: true
主启动
激活Feign
@EnableFeignClients
@EnableDiscoveryClient
@SpringBootApplication
public class ConsumerOrderApp84 {
    public static void main(String[] args) {
        SpringApplication.run(ConsumerOrderApp84.class, args);
    }
}
Feign接口
避免与主业务逻辑代码耦合
import com.test.springcloud.entities.Payment;
import com.test.springcloud.result.CommonResult;
import org.springframework.cloud.openfeign.FeignClient;
import org.springframework.web.bind.annotation.GetMapping;
import org.springframework.web.bind.annotation.PathVariable;

/**
 * @author zhangzengxiu
 * @date 2023/2/18
 */
@FeignClient(value = "nacos-payment-provider", fallback = PaymentFallbackService.class)
public interface PaymentService {

    @GetMapping("/payment/{id}")
    public CommonResult<Payment> getPayment(@PathVariable("id") Long id);

}
兜底类
import com.test.springcloud.entities.Payment;
import com.test.springcloud.feign.PaymentService;
import com.test.springcloud.result.CommonResult;
import org.springframework.stereotype.Component;

/**
 * @author zhangzengxiu
 * @date 2023/2/18
 */
@Component
public class PaymentFallbackService implements PaymentService {
    @Override
    public CommonResult<Payment> getPayment(Long id) {
        return new CommonResult<>(444, "fallback---PaymentFallbackService", new Payment(id, "error001"));
    }
}
controller
    @Autowired
    private PaymentService paymentService;

    @GetMapping("/consumer/payment/{id}")
    public CommonResult<Payment> getPayment2(@PathVariable("id") Long id) {
        return paymentService.getPayment(id);
    }
正常访问:

手动停止9003、9004微服务:
再次访问:走限流

规则持久化
当前存在的问题,当重启微服务或者关闭微服务后,Sentinel之前的配置全部消失不见。
生产环境需要将配置规则进行持久化
- 将配置保存进Nacos,也可以保存 进数据库,也可以保存到Redis等,只要是持久化媒介即可
- 只要刷新某个rest地址,Sentinel控制台的流控规则就能看到,只要Nacos的配置不删除,针对8401上Sentinel的流控规则持续有效
未配置前

Sentinel控制台

配置流控规则
![]()
触发限流规则

重启应用,配置丢失

持久化实现步骤
修改8401微服务
pom
需要有的坐标
        <dependency>
            <groupId>com.alibaba.cspgroupId>
            <artifactId>sentinel-datasource-nacosartifactId>
        dependency>
yaml
添加Nacos数据源配置
server:
  port: 8401

spring:
  application:
    name: cloudalibaba-sentinel-service
  cloud:
    nacos:
      discovery:
        server-addr: 172.16.138.100:8848 #Nacos注册中心地址
    sentinel:
      transport:
        dashboard: 172.16.138.100:8080 #用来监控服务的地址
        port: 8719 #默认8719端口,假如被占用,就会从8719开始依次+1扫描,直至找到未被占用的端口
      datasource: #添加Nacos的数据源配置
        ds1:
          nacos:
            server-addr: 172.16.138.100:8848
            dataId: ${spring.application.name}
            groupId: DEFAULT_GROUP
            data_type: json
            rule_type: flow

management:
  endpoints:
    web:
      exposure:
        include: '*'
添加Nacos业务规则配置
配置内容
[
  {
  "resource":"/testB",
  "limitApp":"default",
  "grade":1,
  "count":1,
  "strategy":0,
  "controlBehavior":0,
  "clusterMode":false
	}
]
属性解释:
| 属性 | 含义 |
|---|---|
| resource | 资源名 |
| limitApp | 来源应用 |
| grade | 阈值类型,0:线程数,1:QPS |
| count | 单机阈值 |
| strategy | 流控模式,0:直接,1:关联,2:链路 |
| controlBehavior | 流控效果,0:快速失败,1:关联Warm Up,2:排队等待 |
| clusterMode | 是否集群 |
启动8401
查看Sentinel控制台:
![]()
踩坑:
Nacos中的配置内容,最外层是中括号不是花括号

流控规则测试访问:

重启8402微服务,再次查看Sentinel:
需要再去调用几次:


