尚融宝21-整合springcloud
目录
一、整合注册中心nacos
二、整合openFeign
(一)准备工作
(二)导入依赖
(三)接口的远程调用
(四)配置超时控制和日志打印
三、整合Sentinel
四、整合gateway服务网关
一、整合注册中心nacos
使用nacos1.4.1,下载地址:Releases · alibaba/nacos · GitHub
详细可以看这篇文章:SpringCloud AlibabaNacos服务注册和配置中心
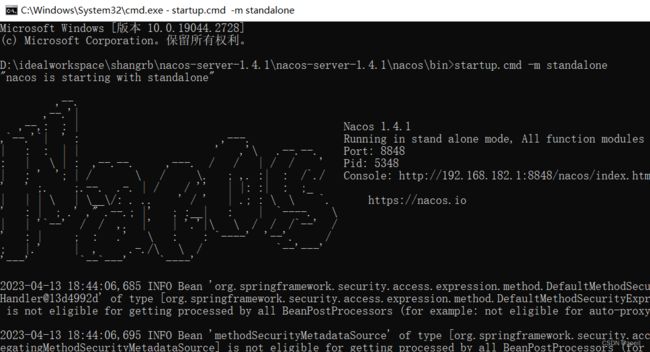
进入nacos目录下的bin目录,通过cmd窗口输入startup.cmd -m standalone启动nacos
通过8848端口访问nacos,账号密码都为nacos
http://localhost:8848/nacos/
在service-base模块中配置Nacos客户端依赖
    com.alibaba.cloud
    spring-cloud-starter-alibaba-nacos-discovery
给每一个微服务配置nacos发现的配置
#spring:
  cloud:
    nacos:
      discovery:
        server-addr: localhost:8848 # nacos服务地址
可以看到三个服务都注册进来了
二、整合openFeign
在用户注册时,原本我们的流程是用户填写信息,获取验证码,点击登录后再判断是否注册过,这样子即浪费用户时间又浪费短信次数,应该在点击获取验证码的时候就对手机号进行判断,即在service-ssm获取验证码的方法中调用service-core的userInfo对象查询数据库是否该手机已经有注册用户。像这样一个微服务调用另外一个微服务的情况,我们就可以整合openFeign进行服务接口的调用
(一)准备工作
首先在userInfoController中添加校验手机号是否注册的方法
@ApiOperation("校验手机号是否注册")
@GetMapping("/checkMobile/{mobile}")
public boolean checkMobile(@PathVariable String mobile){
    return userInfoService.checkMobile(mobile);
}
userService
boolean checkMobile(String mobile);userServiceImpl
@Override
public boolean checkMobile(String mobile) {
    QueryWrapper queryWrapper = new QueryWrapper<>();
    queryWrapper.eq("mobile", mobile);
    Integer count = baseMapper.selectCount(queryWrapper);
    return count > 0;
}
(二)导入依赖
引入openFeign,在service-base的pom.xml中导入依赖
    org.springframework.cloud
    spring-cloud-starter-openfeign
在service-sms启动类上添加注解@EnableFeignClients
(三)接口的远程调用
service-sms中添加远程调用的client接口,调用生产者的方法
@FeignClient(value = "service-core")
public interface CoreUserInfoClient {
    // 注意这里的路径要写全
    @GetMapping("/api/core/userInfo/checkMobile/{mobile}")
    boolean checkMobile(@PathVariable String mobile);
}
在ApiSmsController引入client
@Resource
private CoreUserInfoClient coreUserInfoClient;
在获取验证码方法中调用远程方法校验手机号是否存在
//手机号是否注册
boolean result = coreUserInfoClient.checkMobile(mobile);
System.out.println("result = " + result);
Assert.isTrue(result == false, ResponseEnum.MOBILE_EXIST_ERROR);

//生成验证码
.....
(四)配置超时控制和日志打印
openfeign默认的连接超时时间为1秒,测试时很可能会出现远程调用超时错误。
可以在配置文件中添加如下配置:
feign:
  client:
    config:
      default:
        connectTimeout: 10000 #连接超时配置
        readTimeout: 600000 #执行超时配置
OpenFeign提供了日志打印功能,我们可以通过配置来调整日志级别,从而了解OpenFeign中Http请求的细节。即对OpenFeign远程接口调用的情况进行监控和日志输出。
日志级别
- NONE:默认级别,不显示日志
- BASIC:仅记录请求方法、URL、响应状态及执行时间
- HEADERS:除了BASIC中定义的信息之外,还有请求和响应头信息
- FULL:除了HEADERS中定义的信息之外,还有请求和响应正文及元数据信息
配置日志bean
在service-base中创建配置文件
@Configuration
public class OpenFeignConfig {

    @Bean
    Logger.Level feignLoggerLevel(){
        return Logger.Level.FULL;
    }
}
开启日志
sms的application.yml中指定监控的接口,以及日志级别
logging:
  level:
    com.atguigu.srb.sms.client.CoreUserInfoClient: DEBUG #以什么级别监控哪个接口
修改logback日志级别
修改日志的level为DEBUG
查看日志输出
HTTP 是一种无状态协议,客户端向服务器发送一个 TCP 请求,服务端响应完毕后断开连接。
如果客户端向服务器发送多个请求,每个请求都要建立各自独立的连接以传输数据。
HTTP 有一个 KeepAlive 模式,它告诉 webserver 在处理完一个请求后保持这个 TCP 连接的打开状态。
若接收到来自客户端的其它请求,服务端会利用这个未被关闭的连接,而不需要再建立一个连接。
KeepAlive 在一段时间内保持打开状态,它们会在这段时间内占用资源。占用过多就会影响性能。
timeout 来指定 KeepAlive 的超时时间(timeout)。指定每个 TCP 连接最多可以保持多长时间。
三、整合Sentinel
当sms服务调用core服务,如果core服务出现问题无法响应,此时会造成sms的忙等,如果有别的服务也在这条链路上,那么整条链路都会崩坏。所以我们需要对调用做兜底
service-base引入sentinel的依赖
    com.alibaba.cloud
    spring-cloud-starter-alibaba-sentinel
在service-sms的yml配置文件中开启Feign对Sentinel的支持
#开启Feign对Sentinel的支持
#feign:
  sentinel:
    enabled: true
创建容错类,即兜底方案,fallback:当无法校验手机号是否已注册时,直接发送短信
@Service
@Slf4j
public class CoreUserInfoClientRollback implements CoreUserInfoClient {


    /*
     * 当接口中的原本的服务出现问题没法响应时,调用当前方法,即为服务降级
     * 也相当于一种兜底方案,需要在接口上FeignClient的fallback注册
     */
    @Override
    public boolean checkMobile(String mobile) {

        return false;
    }
}
为OpenFeign远程调用接口添加fallback属性值没指定容错类
@FeignClient(value = "service-core", fallback = CoreUserInfoClientFallback.class)
public interface CoreUserInfoClient {
此时重新启动service-sms服务并停止service-core服务,发送验证码可以发现短信发送成功,而且redis中也有验证码,说明走了兜底方案
四、整合gateway服务网关
我们使用gateway代替nginx
(一)添加依赖
        org.springframework.cloud
        spring-cloud-starter-gateway


        com.alibaba.cloud
        spring-cloud-starter-alibaba-nacos-discovery
(二)配置application
server:
  port: 80 # 服务端口

spring:
  profiles:
    active: dev # 环境设置
  application:
    name: service-gateway # 服务名
  cloud:
    nacos:
      discovery:
        server-addr: localhost:8848 # nacos服务地址
    gateway:
      discovery:
        locator:
          enabled: true # gateway可以发现nacos中的微服务,并自动生成转发路由
(三)logback-spring.xml
    atguiguSrb


            ${CONSOLE_LOG_PATTERN}
            ${ENCODING}


        ${log.path}/log.log
        true

            ${FILE_LOG_PATTERN}
            ${ENCODING}


        ${log.path}/log-rolling.log

            ${FILE_LOG_PATTERN}
            ${ENCODING}


            ${log.path}/info/log-rolling-%d{yyyy-MM-dd}.%i.log

            15


                1KB
(四)启动类
@SpringBootApplication
@EnableDiscoveryClient
public class ServiceGatewayApplication {

    public static void main(String[] args) {
        SpringApplication.run(ServiceGatewayApplication.class, args);
    }
}
(五)配置路由
#spring:
# cloud:
#   gateway:
      routes:
      - id: service-core
        uri: lb://service-core
        predicates:
        - Path=/*/core/**
      - id: service-sms
        uri: lb://service-sms
        predicates:
        - Path=/*/sms/**
      - id: service-oss
        uri: lb://service-oss
        predicates:
        - Path=/*/oss/**
(六)跨域配置
使用nginx的时候,对于跨域问题我们的方案是在类上加上@CrossOrigin注解,使用gateway后原本的方案就不行了,需要使用以下配置类解决
package com.atguigu.srb.gateway.config;

@Configuration
public class CorsConfig {
    @Bean
    public CorsWebFilter corsFilter() {
        CorsConfiguration config = new CorsConfiguration();
        config.setAllowCredentials(true); //是否允许携带cookie
        config.addAllowedOrigin("*"); //可接受的域,是一个具体域名或者*(代表任意域名)
        config.addAllowedHeader("*"); //允许携带的头
        config.addAllowedMethod("*"); //允许访问的方式

        UrlBasedCorsConfigurationSource source = new UrlBasedCorsConfigurationSource();
        source.registerCorsConfiguration("/**", config);

        return new CorsWebFilter(source);
    }
}


