一个Java项目的学习
1. java命令行的启动
首先是gradle build
其次是:java -Dabc.appid=1234 -classpath "a.jar:b.jar" com.ctrip.oss.MainClass 1>"d:\test\logs\log.txt" 2>"d:\test\errors\errors.txt"
其中:
-D后面的是运行时的配置参数,可以在代码中通过 System.getProperty('abc.appid')的方式获得
-classpath是编译完成后生成的*.jar文件路径
com.ctrip.oss.MainClass是程序运行开始的主类
1>如果代码中存在sl4j 这个参数后面的路径文件将用来存放log log文件,包括info, warn, error 信息
2>如果代码中存在任何未经捕获的异常,log信息会写到errors.txt文件中
如何配置sl4j的环境。 以下依赖是必须的
compile 'org.slf4j:slf4j-api:1.7.5'
代码中使用logger:
Logger logger = LoggerFactory.getLogger(this.getClass());
2. Logback 的使用,logback用来记录本地log
logback是用来配置Log写在什么地方的,这里将Log写在本地:
首先需要引用logback的dependency:
 compile 'ch.qos.logback:logback-core:1.1.1'

        compile 'ch.qos.logback:logback-classic:1.1.1'

        compile 'ch.qos.logback:logback-access:1.1.1'
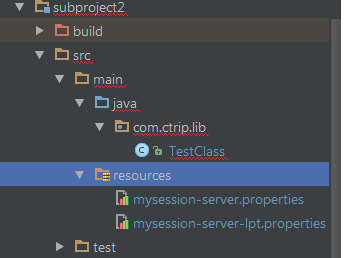
其次在resources目录下配置logback.xml.

<?xml version="1.0" encoding="UTF-8"?>

<configuration>

    <property name="LOG_DIR" value="session-service/logs"/>

    <property name="LOG_FILE_NAME" value="session-server.log"/>

    <!-- Output to File and Rotate if it's necessary -->

    <appender name="ROLLING" class="ch.qos.logback.core.rolling.RollingFileAppender">

        <file>${LOG_DIR}/${LOG_FILE_NAME}</file>

        <rollingPolicy class="ch.qos.logback.core.rolling.TimeBasedRollingPolicy">

            <!-- rollover daily -->

            <fileNamePattern>${LOG_DIR}/${LOG_FILE_NAME}.%d{yyyy-MM-dd}.%i</fileNamePattern>

            <timeBasedFileNamingAndTriggeringPolicy

                    class="ch.qos.logback.core.rolling.SizeAndTimeBasedFNATP">

                <!-- or whenever the file size reaches 100MB -->

                <maxFileSize>100MB</maxFileSize>

                <maxHistory>10</maxHistory>

            </timeBasedFileNamingAndTriggeringPolicy>

        </rollingPolicy>

        <encoder>

            <pattern>%date [%-5thread] %-5level [%-10logger] %-10msg%n</pattern>

        </encoder>

        <filter class="com.ctriposs.session.util.LogLevelFilter">

            <level>WARN</level>

        </filter>

    </appender>


    <root level="INFO">

        <appender-ref ref="ROLLING"/>

    </root>

</configuration>
最后在代码中加载这个xml 并且配置运行时环境变量

 1      LoggerContext lc = (LoggerContext)LoggerFactory.getILoggerFactory();

 2

 3         JoranConfigurator joranConfigurator=new JoranConfigurator();

 4         joranConfigurator.setContext(lc);

 5         lc.reset();

 6

 7         // Get the configuration xml file

 8         String configurationFilePath=appName+"-logback.xml";

 9         InputStream stream = logConfigurator.class.getResourceAsStream(configurationFilePath);

10

11         // Configure the log context with the stream loaded

12         try {

13             joranConfigurator.doConfigure(stream);

14         } catch (JoranException e) {

15             e.printStackTrace();

16         }
通过以上配置:在此配置之前的log会写在>1 和>2两个命令行参数所指定的log地址,但是当使用了log back之后的logger将使用最新的log地址
注意:
XML中配置的log地址是可以动态配置的,即通过在java命令的配置参数中使用 -DXX的形式
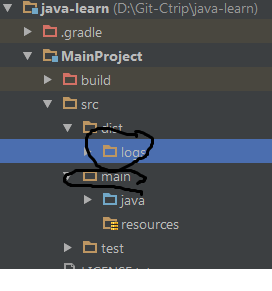
log所在的路径即/opt/test/session-service/logs, 这里/opt/test/session-service为classpath的根,logs文件夹应该提前在工程中与main相同的路径下新建好

2. Configuration的配置和使用。
上面提到了使用在启动命令中使用 -Dxxx 的方式传递配置参数,也可以使用一些开源的属性配置器来做
添加引用:
compile 'com.netflix.archaius:archaius-core:0.6.0'

使用代码:
// 首先设置全局变量,这两个变量
System.setProperty("archaius.deployment.applicationId", "mysession-server");
System.setProperty("archaius.deployment.environment", "lpt");
//获取以上设置
String appId = ConfigurationManager.getDeploymentContext().getApplicationId();
String environmentName = ConfigurationManager.getDeploymentContext().getDeploymentEnvironment();
//加载properties文件
ConfigurationManager.loadCascadedPropertiesFromResources(appId);
String settingName=ConfigurationManager.getConfigInstance().getString("setting1");
String settingName2=ConfigurationManager.getConfigInstance().getString("setting2");

3。由于要加在到classpath中的jar包随着工程的复杂而增加,所以手动的拼写所有的依赖包变得不现实,使用sh脚本语言将大大简化我们的工作
sourcelocation='/opt/test/MainProject-1.0/'
loglocation='/opt/test/MainProject-1.0/logs'
java -classpath $(echo /opt/test/MainProject-1.0/lib/* | tr ' ' ':') com.ctrip.test.mainClass 1>$loglocation/log.txt 2>$loglocation/error.txt
4. Handler 的添加。
在项目开发过程中往往要将内部的一些部分作为API对外公开,在.NET中是通过配置handler进行的。Java中可以通过一些服务器组件来实现,比如jetty,前半部分是Jetty的后半部分是序列化器的
compile 'org.eclipse.jetty:jetty-server:8.1.0.RC5'
compile 'org.eclipse.jetty:jetty-servlet:8.1.0.RC5'
compile 'org.eclipse.jetty:jetty-servlets:8.1.0.RC4'

compile 'com.fasterxml.jackson.core:jackson-core:2.3.3'
compile 'com.fasterxml.jackson.core:jackson-databind:2.3.3'
compile 'com.fasterxml.jackson.core:jackson-annotations:2.3.3'

新写一个Server类作为注册Handler的容器

public class ServerBoard {

    private int _port;

    private Server server;

    private volatile boolean running=false;

    public ServerBoard(int p)

    {

        _port=p;

        server=new Server(_port);


        ServletContextHandler servletContextHandler = new ServletContextHandler();

        servletContextHandler.setContextPath("/");

        servletContextHandler.addServlet(ServeletA.class,"/api/env");

        server.setHandler(servletContextHandler);

    }


    public void Start(){

        try {

            if(!running) {

                server.start();

                running=true;

            }

        } catch (Exception e) {

            e.printStackTrace();

        }

    }

    public void Stop(){

        try {

            if(running) {

                server.stop();

                running=false;

            }

        } catch (Exception e) {

            e.printStackTrace();

        }

    }

}
至于Servlet则很简单的

public class ServeletA extends HttpServlet {


    private ObjectMapper objectMapper = new ObjectMapper();


    @Override

    protected void doGet(HttpServletRequest req, HttpServletResponse resp) throws ServletException, IOException {


        Map<String, String> map = new TreeMap<String, String>(System.getenv());

        String systemEnvironmentStr = objectMapper.writeValueAsString(map);


        resp.addHeader("Access-Control-Allow-Origin", "*");

        resp.addHeader("Access-Control-Allow-Headers", "Content-Type, Accept");

        resp.setContentType("application/json");


        PrintWriter printWriter = resp.getWriter();

        try {

            printWriter.write(systemEnvironmentStr);

            resp.setStatus(org.eclipse.jetty.server.Response.SC_OK);

        }

        finally {

            if(printWriter!=null) {

                printWriter.close();

            }

        }

    }

}
5。Thrift的使用:
关于Thrift的使用这里有一篇参考文档

http://blog.csdn.net/m13321169565/article/details/7835957
http://www.javabloger.com/article/thrift-java-code-example.html
第一步 引入Dependency-
compile 'org.apache.thrift:libthrift:0.9.1'
第二步:下载Windows的Thrift.exe用于根根据IDL生成不同语言的支持代码(YOUR CODE)
下载地址http://labs.renren.com/apache-mirror//incubator/thrift/0.5.0-incubating/thrift-0.5.0.exe
第三部:根据业务逻辑书写IDL文件

/*Include the another thrift file, like using*/

include "common.thrift"

namespace csharp a.b.c // The namespace used for csharp generated class file

namespace java a.b.d // java


// Struct type

struct StructType{

    1: string stringProperty,

    2: i32 intProperty,

    3: i64 intProperty,

    4: double doubleProperty,

    5: list<string> orderedListProperty,

    6: set<string> unorderedListProperty,

    7: map<string,string> k-vProperty,

    8: common.typeInCommonThrift referenceProperty

}

// Enumeration type

enum EnumType{

    1: A,

    2: B,

    3: C

}

// Service interface, methods should not have implementations

service ServiceOperation{

/**Service method comments**/

    structType MethodName(1:paramType param1, 2:paramType parma2),


    // Other methods

}
第四部:运行命令 以生成java的IDL-
thrift-0.9.1.exe -gen java a.thrift
将生成的java代码直接拖到你的工程里对应的package下面。
第五步:使用上面生成的代码:
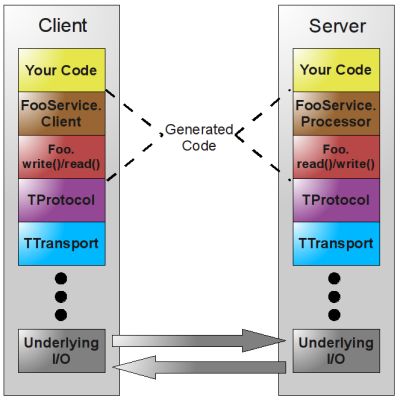
代码主要部分在上面的IDL中的Service声明部分,上面的Service部分生成的Java或者C# 的样式大概是这样的

// 类名ServiceOperation - IDL中由Service声明的类

public class ServiceOperation {

public interface Iface {

// 方法名和IDL中的Service 块中的方法名相同

  public GetBookResponseType GetBooks(GetBookRequestType getReqeust) throws org.apache.thrift.TException;


    public SetBookResponseType SetBook(SetBookRequestType setBookRequest) throws org.apache.thrift.TException;

}


// Client是用在客户端的类

  public static class Client extends org.apache.thrift.TServiceClient implements Iface {

}

// Processor用在服务端的类

public static class Processor<I extends Iface> extends org.apache.thrift.TBaseProcessor<I> implements org.apache.thrift.TProcessor

{

}


}
第六部:在Server端定义Thrift Server所需要的component 主要是Protocol 和Transport代码如下
public class ThriftServer {

    private BookRepository bookRepository;

    private int port;

    private TServer server;

    private ServiceOperation.Processor processor;

    private ThreadPoolExecutor executor;

    private TNonblockingServerTransport transport;


    public ThriftServer(int _port) throws TTransportException {


        port=_port;


        bookRepository = new BookRepositoryImpl();

        processor = new ServiceOperation.Processor<BookRepository>(bookRepository);


        transport = new TNonblockingServerSocket(port, 2000);


        executor = new ThreadPoolExecutor(100, 200, 1000, TimeUnit.MILLISECONDS, new SynchronousQueue<Runnable>()) {

            @Override

            public void execute(Runnable command) {

                super.execute(command);

            }

        };


        THsHaServer.Args args = new THsHaServer.Args(transport);

        args.maxReadBufferBytes = 1024 * 1024 * 8;

        server = new THsHaServer(args.executorService(executor).processor(processor));

    }


    public void start(){

        server.serve();

    }

}
public interface BookRepository extends ServiceOperation.Iface{
}
public class BookRepositoryImpl implements BookRepository {
    @Override
    public GetBookResponseType GetBooks(GetBookRequestType getReqeust) throws TException {
        return null;
    }

    @Override
    public SetBookResponseType SetBook(SetBookRequestType setBookRequest) throws TException {
        SetBookResponseType setBookResponseType=new SetBookResponseType();
        setBookResponseType.status= BookOperationStatus.NotFound;
        return setBookResponseType;
    }
}
这样就会在Server端开启一个端口监听来自客户端的请求
最后一部:在客户端比如是C# 的Console程序。 定义Client的组件

    static void Main(string[] args)

        {

            TSocket socket = new TSocket("10.2.5.63", 7896, 10 * 1000);


            TFramedTransport transport = new TFramedTransport(socket);


            transport.Open();


            TBinaryProtocol protocol = new TBinaryProtocol(transport);


            Ctrip.Test.Client.Service.ServiceOperation.Client client = new Service.ServiceOperation.Client(protocol);

            SetBookResponseType response = client.SetBook(new Service.SetBookRequestType()

            {

                Books = new CTripOSS.Thrift.Collections.THashSet<Service.Book>() {

                 new Book(){ BookId=1, BookTitle="Test Book", BookPrice=100, BookState=BookStatusEnumerate.IN}

                }

            });


            Console.WriteLine(response.Status);

        }
