- 深入解析Java跨平台原理
KBkongbaiKB
java开发语言
一、操作系统屏障的本质挑战源代码编译方式直接编译为机器码Windows的可执行文件.exeLinux的可执行文件.elfmacOS的可执行文件.machJava独特的中间格式字节码文件.classJVM虚拟机1.1传统语言的平台困局语言类型编译方式执行依赖跨平台能力C/C++直接生成机器码特定操作系统❌不可直接移植Python解释型执行Python解释器✅但性能较低Java字节码中间件JVM虚拟机
- Linux Kernel入门到精通系列讲解(RV-Kernel 篇) 5.3 从零移植 busybox,基于RISC-V
嵌入式内核源码
Linuxkernel从入门到精通linuxrisc-vrootfsqemukernel嵌入式芯片
1.概述上一章节我们已经成功启动了Ubuntu,但是由于Ubuntu占用系统空间过大,所以我转向占用较小的busybox,预计就占用30M左右。2.源码下载下载地址3.编译busybox在上一章节中,我们就提到了kernel在启动时会去初始化rootfs,具体为下列四个脚本,如果我们不去写这四个脚本会是什么样呢?如下图,它会不断重复打印log。接下来我们就先去编译busybox。[
- CentOS下安装ElasticSearch(日志分析)
墨痕诉清风
安全建设elasticsearch大数据日志分析
准备目录搞一个自己喜欢的目录mkdir/usr/local/app切换到该目录cd/usr/local/app下载wgethttps://artifacts.elastic.co/downloads/elasticsearch/elasticsearch-7.9.2-linux-x86_64.tar.gz选择其他版本点击进入官网
- stressapptest交叉编译(ARM64)
单车少年ing
arm64linux
一、代码下载:https://github.com/stressapptest/stressapptest二、编译:cdstressapptest#注意:XXX是你的目标主机。也就是你交叉编译工具链gnu前缀。比如你的交叉编译工具链是:aarch64-linux-gnu-gcc,那XXX就是aarch64-linux-gnuCC="xxx/aarch64-unknown-linux-gnu-gcc
- linux zk服务 关闭_linux – 如何在Ubuntu上停止ZooKeeper?
童广
linuxzk服务关闭
我按照建议here在ubuntu14.04上安装了zookeeperd:不幸的是,这个过程在某种程度上是不可停止的.我甚至试过杀了-9user@node1:/opt/zookeeper-3.4.6$ps-ef|grepzookeeperzookeep+40081801:07?00:00:00/usr/bin/java-cp/etc/zookeeper/conf:/usr/share/java/jl
- Linux 常用命令 - tail 【显示文件最后几行内容】
WKJay_
Linux常用命令linux运维服务器
简介tail这个命令源自英文单词“尾巴”,它的主要功能是显示文件的最后几行内容。通过使用tail,用户可以查看文件的最新添加内容,特别是对于监控日志文件来说非常有用。tail命令默认显示文件的最后10行,但这可以通过参数调整。使用方式tail[参数]...[文件]...常用选项-c,--bytes=[+]NUM:输出每个文件的最后NUM个字节的数据;或者使用-c+NUM来输出从文件NUM个字节开始
- Linux运维技术之Linux云计算架构
极客事纪
Linux《Linux一学就会》程序员linux运维服务器
我以下图为基础,说明Linux的架构(architecture)。最内层是硬件,最外层是用户常用的应用,比如说firefox浏览器,evolution查看邮件,一个计算流体模型等等。硬件是物质基础,而应用提供服务。但在两者之间,还要经过一番周折。还记得Linux启动。Linux首先启动内核(kernel),内核是一段计算机程序,这个程序直接管理管理硬件,包括CPU、内存空间、硬盘接口、网络接口等等
- 高可用Keepalived在Linux中的应用
「已注销」
linux运维服务器高可用集群keepalivedcentos
目录一、高可用1.高可用介绍(1)普通理解(2)专业理解2.高可用目的3.高可用实现1.介绍2.特点三、Keepalived1.介绍2.Keepalived核心组件(1)VRRPstack(2)NetLink接口(3)IPVSWrapper(4)checkers(5)systemcall(6)SMTP(7)watchDog3.控制组件4.内存管理四、Keepalived核心概念1.虚拟路由器2.m
- keepalived应用
小卓笔记
服务器linux数据库
Keepalived是一个基于VRRP(虚拟路由冗余协议)实现的高可用解决方案,常用于构建高可用性的服务器集群,特别是在负载均衡场景中,可确保服务的不间断运行。以下为你详细介绍它:0主要功能高可用性:借助VRRP协议,Keepalived能在多台服务器间自动切换,当主服务器出现故障时,备用服务器可迅速接替工作,保障服务的持续可用。负载均衡:Keepalived可与LVS(Linux虚拟服务器)集成
- Debian:apt-get命令汇总
apt-get命令是DebianLinux发行版中的APT软件包管理工具。所有基于Debian的发行(常见的10个基于Debian的Linux发行版)都使用这个包管理系统。deb包可以把一个应用的文件包在一起,大体就如同Windows上的安装文件。语法apt-get[OPTION]PACKAGE选项apt-getinstall#安装新包apt-getremove#卸载已安装的包(保留配置文件)ap
- Linux使用cpulimit对CPU使用率进行限制
云服务器linux运维cpu
介绍cpulimit是一款可以对CPU使用率进行限制的软件,既可限制单个特定程序,也可以对整个CPU使用率进行限制,安装使用都很方便,需要的朋友可以试试。源安装(推荐)Centos:yuminstallcpulimitDebian/Ubuntu:apt-getinstall-ycpulimit编译安装cd/tmpwget'https://www.02405.com/wp-content/uploa
- 【操作系统之对换技术详解】
武帝为此
操作系统服务器网络
文章目录一、前言二、对换技术的原理1.什么是对换(Swapping)?2.为什么需要对换?三、对换的工作过程1️⃣内存不足,触发对换2️⃣将内存中的数据写入磁盘3️⃣释放内存4️⃣数据交换回内存四、对换与分页的区别五、对换的优缺点✅优点:❌缺点:六、现代操作系统中的对换✅1️⃣LinuxSwap分区✅2️⃣Windows虚拟内存七、总结一、前言在操作系统中,对换(Swapping)是一种将内存与磁
- Linux 查看 CPU 使用情况
linux运维
在Linux系统中,查看CPU使用情况是性能分析和故障排查的重要环节。查看CPU使用情况,使用top命令或者htop命令来查看。top命令是Linux的一个快速动态进程监视器,可以实时显示特定系统监视器核心指标,示例如下:1.top命令toptop-19:30:10up 2:33, 1user, loadaverage:0.44,0.47,0.45Tasks:183total, 1runn
- 30岁了,零基础想转行网安从头开始现实吗?
白帽子凯哥哥
tcp/ip安全web安全学习网络
这篇文章没有什么套路。就是一套自学理论和方向,具体的需要配合网络黑白去学习。毕竟是有网络才会有黑白!有自学也有培训!1.打死也不要相信什么分分钟钟教你成为大黑阔的,各种包教包会的教程,就算打不死也不要去购买那些所谓的盗号软件之类的东西。2,我之前让你们在没有目的的时候学习linux,在学习LINUX的同时你第一个遇到的问题就是命令。作为一个黑客入门着来说你必须要懂什么是命令化系统,什么是图形化系统
- lvs
wzyzzu
linux
目录LVS项目理论项目介绍体系结构IP负载均衡负载调度安装配置简介组件背景硬件/网络的要求路由的必要条件节点内部连接的必要条件安装软件配置例子简单实例LVSLVS是章文嵩博士发起和领导的优秀的集群解决方案,许多商业的集群产品,比如RedHat的Piranha,TurboLinux公司的TurboCluster等,都是基于LVS的核心代码的。在现实的应用中,LVS得到了大量的部署,请参考http:/
- linux常用基础命令_最新版
脚大江山稳
linux运维服务器
常用命令查看当前目录下个各个文件大小查看当前系统储存使用情况查看当前路径删除当前目录下所有包含".log"的文件linux开机启动jar更改自动配置文件后操作关闭自启动linux静默启动java服务查询端口被占用查看软件版本重启关机开机启动取别名清空当前行创建文件touch创建文件夹查找文件/文件名/大小查找查看文件内容cat/more删除文件或文件夹管道符|过滤grep命令echo命令输出内容重
- 优麒麟Ubuntu Kylin 20.04 Pro SP1 上线
Linux_华仔
技术干货ubuntukylin网络
优麒麟团队正式宣布UbuntuKylin20.04ProSP1上线。此版本默认搭载Linux5.11内核,新增显示器显示模式的记忆支持、鼠标拖拽支持等功能,优化网络插件、登录程序和定时关机等系统组件,修复了用户手册程序崩溃、软件商店暂停键刷新不及时、蓝牙传输空文件失败等严重问题,累计200+桌面环境和应用软件方面的已知问题得到解决,从而全面提升系统稳定性和安全性,为用户提供更加高效便捷的使用体验,
- 优麒麟 20.04 LTS Pro 发布 | 以初心,铸匠心
优麒麟
优麒麟UKUI操作系统
优麒麟20.04LTSPro发布|附详细更新列表北京时间2021年4月22日,优麒麟团队很高兴地宣布优麒麟(UbuntuKylin)开源操作系统20.04LTSPro版本正式发布。优麒麟20.04Pro是基于20.04长期支持版本的更新,官方将提供5年的技术支持。优麒麟20.04Pro版本默认搭载最新Linux5.10LTS内核,新增自主研发的麒麟音乐、麒麟录音、麒麟摄像头、麒麟桌面安装程序、麒麟
- Windows空间和Linux空间的最大的区别是什么?
网硕互联的小客服
服务器运维linuxphp网络
Windows空间和Linux空间是网站托管和应用部署中常用的两种服务器环境,它们之间存在多方面的显著差异。以下是Windows空间和Linux空间的主要区别:###一、操作系统***Windows空间**:使用WindowsServer操作系统,如WindowsServer2016、2019等。这些系统提供图形用户界面(GUI),便于用户操作和管理。***Linux空间**:使用Linux操作系
- Kali Linux 渗透测试环境配置(Metasploit + Burp Suite)
李游Leo
环境配置linux运维服务器
一、KaliLinux系统准备首先,确保你已经成功安装了KaliLinux系统。可以从官方网站下载镜像文件,并通过U盘引导安装等常规方式完成系统部署。建议使用最新稳定版本,以获取最新的软件包支持和安全更新。安装完成后,登录系统,打开终端。由于许多操作需要管理员权限,在终端输入“sudosu”切换到root用户,后续操作若无特殊说明,均在root权限下进行。二、Metasploit配置1.KaliL
- linux命令touch意思,Linux touch命令的用法
tegrodikk
linux命令touch意思
touch命令不仅可以创建文件(空文件或多个文件),还可以修改文件的时间参数。在Linux系统中,每个文件有3个时间参数,分别是文件的访问时间、数据的修改时间以及状态的修改时间,它们的含义分别为:访问时间(atime):如果文件的内容被读取,紧接着访问时间就会自动更新。数据修改时间(mtime):当文件的数据发生改变时,该文件的数据修改时间就会随着做出改变。状态修改时间(ctime):当文件的状态
- 关于Linux系统下如何配置双网口绑定
1079986725
linux运维服务器
在Linux系统中,配置双网口绑定(也称为网卡绑定或链路聚合)可以提高网络带宽、冗余和负载均衡。以下是配置双网口绑定的详细步骤:1.确认网卡信息首先,确认系统中已安装并识别的网卡设备。可以使用以下命令查看网卡信息:bashiplinkshow或bashifconfig-a记录下需要绑定的网卡名称(如`eth0`和`eth1`)。2.安装必要的工具确保系统已安装`ifenslave`工具,用于绑定网
- 使用Python来执行Shell脚本
代码编织匠人
linux运维服务器python
使用Python来执行Shell脚本Shell脚本可以在Linux系统下用于自动化执行一些命令或者程序,而Python可以很好地与Shell脚本进行交互,可以方便地通过Python脚本来执行Shell脚本。以下是一个简单的Shell脚本示例:#!/bin/bashecho"HelloWorld"该脚本会输出"HelloWorld"。我们可以使用Python的subprocess库来执行该脚本:im
- Linux命令touch和mkdir的区别
Easy_Lee_willpower
软件测试linux服务器
mkdir文件夹c文件夹d文件夹e:创建文件夹/目录c、d、e,创建的目录是并列关系filec可以查看文件夹c的属性,此时显示directory,表示c是一个文件夹mkdir文件夹x/文件夹y,创建嵌套目录x/ytouch文件名a文件名b。。。:创建一个或多个文件filea可以查看文档a的属性,此时显示empty,表示a是空白文件文件和目录的区别:目录可以嵌套,文件不能嵌套文件(例子:一个exce
- Linux中部署DeepSeek R1
Java探索者 °
linux服务器语言模型
一、首先了解DeepSeek-R1模型规格B则是指“billion”的意思,也就是十亿,表示这个模型有多少亿个参数。DeepSeek-R1本地部署硬件需求表模型规模GPU需求CPU需求内存需求存储需求备注1.5B-GTX16504GB(可选)四核i5/Ryzen3000+16GBDDR450GBSSD需4-bit量化,CPU推理延迟约10-30秒/回答,适合基础文本生成7BRTX306012GB或
- ORA-12541: TNS:no listener
夜光小兔纸
运维数据库Oracle运维oracle数据库
问题描述:使用PL/SQLDeveloper连接数据库时出现ORA-12541错误。1.查询监听状态[oracle@localhostadmin]$lsnrctlstatusLSNRCTLforLinux:Version19.0.0.0.0-Productionon15-MAR-202510:47:57Copyright(c)1991,2021,Oracle.Allrightsreserved.C
- Linux系统下Conda安装状态检查与环境管理指南
2401_85812053
linux
在Linux系统上管理和使用Conda环境是科学计算和数据分析工作中的常见需求。Conda是一个开源的包管理系统和环境管理系统,广泛用于安装多种编程语言的软件包和库。本文将详细介绍如何在Linux上检查Conda是否已经安装,以及如何管理Conda环境。1.Conda简介Conda是一个跨平台的软件包管理系统,它不仅能够管理Python包,还能管理R、Ruby、Lua、Scala等其他语言的包。C
- ubuntu双网卡连接不同网络
周陽讀書
个人经验可供分享Ubuntuubuntu网络服务器
在ubuntu系统中插入ubs无线网卡构成双网卡设备,设想一个连外网一个连局域网。原本以为装上ubs网卡驱动即可,双网卡连接后发现不能上网,遂研究之。0前言接上一篇文章CF-955AX无线网卡LINUX驱动安装问题及解决我以为装好驱动就能实现双网卡上网,结果发现在ubuntu下还需要配置,网络是薄弱项,多亏学习交流群网友指点。1网卡信息查询参考连接:1.查看网卡信息:ifconfig命令及详细介绍
- Linux_Ubuntu20.04中ens33没有ip
ginger_mr
Linux
今天换了一个工位(公司网络也是同一个),但是打开电脑虚拟机Ubtuntu连接不上网络,windows上的配置已经检查了一遍发现没什么问题,在Ubtun上发现ens33这个网卡根本没有分配ip。ginger@ubuntu:~$ifconfig-aens33:flags=4098mtu1500ether00:0c:29:ef:77:09txqueuelen1000(以太网)RXpackets0byte
- linux makefile tutorial
oushaojun2
linuxmakefile
一个makefile的教程,几个小时就能看完,对makefile有个总体加细节的系统了解,非常不错:LearnMakefilesWiththetastiestexamples中文翻译版:起步-Makefile教程(gavinliu6.github.io)gcc官网手册(用于查找语法细节):GNUmakemakefile总体跟shell有八成是类似的,不一样的只是几个判断语句和内部函数,以前老是掌握
- java工厂模式
3213213333332132
java抽象工厂
工厂模式有
1、工厂方法
2、抽象工厂方法。
下面我的实现是抽象工厂方法,
给所有具体的产品类定一个通用的接口。
package 工厂模式;
/**
* 航天飞行接口
*
* @Description
* @author FuJianyong
* 2015-7-14下午02:42:05
*/
public interface SpaceF
- nginx频率限制+python测试
ronin47
nginx 频率 python
部分内容参考:http://www.abc3210.com/2013/web_04/82.shtml
首先说一下遇到这个问题是因为网站被攻击,阿里云报警,想到要限制一下访问频率,而不是限制ip(限制ip的方案稍后给出)。nginx连接资源被吃空返回状态码是502,添加本方案限制后返回599,与正常状态码区别开。步骤如下:
- java线程和线程池的使用
dyy_gusi
ThreadPoolthreadRunnabletimer
java线程和线程池
一、创建多线程的方式
java多线程很常见,如何使用多线程,如何创建线程,java中有两种方式,第一种是让自己的类实现Runnable接口,第二种是让自己的类继承Thread类。其实Thread类自己也是实现了Runnable接口。具体使用实例如下:
1、通过实现Runnable接口方式 1 2
- Linux
171815164
linux
ubuntu kernel
http://kernel.ubuntu.com/~kernel-ppa/mainline/v4.1.2-unstable/
安卓sdk代理
mirrors.neusoft.edu.cn 80
输入法和jdk
sudo apt-get install fcitx
su
- Tomcat JDBC Connection Pool
g21121
Connection
Tomcat7 抛弃了以往的DBCP 采用了新的Tomcat Jdbc Pool 作为数据库连接组件,事实上DBCP已经被Hibernate 所抛弃,因为他存在很多问题,诸如:更新缓慢,bug较多,编译问题,代码复杂等等。
Tomcat Jdbc P
- 敲代码的一点想法
永夜-极光
java随笔感想
入门学习java编程已经半年了,一路敲代码下来,现在也才1w+行代码量,也就菜鸟水准吧,但是在整个学习过程中,我一直在想,为什么很多培训老师,网上的文章都是要我们背一些代码?比如学习Arraylist的时候,教师就让我们先参考源代码写一遍,然
- jvm指令集
程序员是怎么炼成的
jvm 指令集
转自:http://blog.csdn.net/hudashi/article/details/7062675#comments
将值推送至栈顶时 const ldc push load指令
const系列
该系列命令主要负责把简单的数值类型送到栈顶。(从常量池或者局部变量push到栈顶时均使用)
0x02 &nbs
- Oracle字符集的查看查询和Oracle字符集的设置修改
aijuans
oracle
本文主要讨论以下几个部分:如何查看查询oracle字符集、 修改设置字符集以及常见的oracle utf8字符集和oracle exp 字符集问题。
一、什么是Oracle字符集
Oracle字符集是一个字节数据的解释的符号集合,有大小之分,有相互的包容关系。ORACLE 支持国家语言的体系结构允许你使用本地化语言来存储,处理,检索数据。它使数据库工具,错误消息,排序次序,日期,时间,货
- png在Ie6下透明度处理方法
antonyup_2006
css浏览器FirebugIE
由于之前到深圳现场支撑上线,当时为了解决个控件下载,我机器上的IE8老报个错,不得以把ie8卸载掉,换个Ie6,问题解决了,今天出差回来,用ie6登入另一个正在开发的系统,遇到了Png图片的问题,当然升级到ie8(ie8自带的开发人员工具调试前端页面JS之类的还是比较方便的,和FireBug一样,呵呵),这个问题就解决了,但稍微做了下这个问题的处理。
我们知道PNG是图像文件存储格式,查询资
- 表查询常用命令高级查询方法(二)
百合不是茶
oracle分页查询分组查询联合查询
----------------------------------------------------分组查询 group by having --平均工资和最高工资 select avg(sal)平均工资,max(sal) from emp ; --每个部门的平均工资和最高工资
- uploadify3.1版本参数使用详解
bijian1013
JavaScriptuploadify3.1
使用:
绑定的界面元素<input id='gallery'type='file'/>$("#gallery").uploadify({设置参数,参数如下});
设置的属性:
id: jQuery(this).attr('id'),//绑定的input的ID
langFile: 'http://ww
- 精通Oracle10编程SQL(17)使用ORACLE系统包
bijian1013
oracle数据库plsql
/*
*使用ORACLE系统包
*/
--1.DBMS_OUTPUT
--ENABLE:用于激活过程PUT,PUT_LINE,NEW_LINE,GET_LINE和GET_LINES的调用
--语法:DBMS_OUTPUT.enable(buffer_size in integer default 20000);
--DISABLE:用于禁止对过程PUT,PUT_LINE,NEW
- 【JVM一】JVM垃圾回收日志
bit1129
垃圾回收
将JVM垃圾回收的日志记录下来,对于分析垃圾回收的运行状态,进而调整内存分配(年轻代,老年代,永久代的内存分配)等是很有意义的。JVM与垃圾回收日志相关的参数包括:
-XX:+PrintGC
-XX:+PrintGCDetails
-XX:+PrintGCTimeStamps
-XX:+PrintGCDateStamps
-Xloggc
-XX:+PrintGC
通
- Toast使用
白糖_
toast
Android中的Toast是一种简易的消息提示框,toast提示框不能被用户点击,toast会根据用户设置的显示时间后自动消失。
创建Toast
两个方法创建Toast
makeText(Context context, int resId, int duration)
参数:context是toast显示在
- angular.identity
boyitech
AngularJSAngularJS API
angular.identiy 描述: 返回它第一参数的函数. 此函数多用于函数是编程. 使用方法: angular.identity(value); 参数详解: Param Type Details value
*
to be returned. 返回值: 传入的value 实例代码:
<!DOCTYPE HTML>
- java-两整数相除,求循环节
bylijinnan
java
import java.util.ArrayList;
import java.util.List;
public class CircleDigitsInDivision {
/**
* 题目:求循环节,若整除则返回NULL,否则返回char*指向循环节。先写思路。函数原型:char*get_circle_digits(unsigned k,unsigned j)
- Java 日期 周 年
Chen.H
javaC++cC#
/**
* java日期操作(月末、周末等的日期操作)
*
* @author
*
*/
public class DateUtil {
/** */
/**
* 取得某天相加(减)後的那一天
*
* @param date
* @param num
*
- [高考与专业]欢迎广大高中毕业生加入自动控制与计算机应用专业
comsci
计算机
不知道现在的高校还设置这个宽口径专业没有,自动控制与计算机应用专业,我就是这个专业毕业的,这个专业的课程非常多,既要学习自动控制方面的课程,也要学习计算机专业的课程,对数学也要求比较高.....如果有这个专业,欢迎大家报考...毕业出来之后,就业的途径非常广.....
以后
- 分层查询(Hierarchical Queries)
daizj
oracle递归查询层次查询
Hierarchical Queries
If a table contains hierarchical data, then you can select rows in a hierarchical order using the hierarchical query clause:
hierarchical_query_clause::=
start with condi
- 数据迁移
daysinsun
数据迁移
最近公司在重构一个医疗系统,原来的系统是两个.Net系统,现需要重构到java中。数据库分别为SQL Server和Mysql,现需要将数据库统一为Hana数据库,发现了几个问题,但最后通过努力都解决了。
1、原本通过Hana的数据迁移工具把数据是可以迁移过去的,在MySQl里面的字段为TEXT类型的到Hana里面就存储不了了,最后不得不更改为clob。
2、在数据插入的时候有些字段特别长
- C语言学习二进制的表示示例
dcj3sjt126com
cbasic
进制的表示示例
# include <stdio.h>
int main(void)
{
int i = 0x32C;
printf("i = %d\n", i);
/*
printf的用法
%d表示以十进制输出
%x或%X表示以十六进制的输出
%o表示以八进制输出
*/
return 0;
}
- NsTimer 和 UITableViewCell 之间的控制
dcj3sjt126com
ios
情况是这样的:
一个UITableView, 每个Cell的内容是我自定义的 viewA viewA上面有很多的动画, 我需要添加NSTimer来做动画, 由于TableView的复用机制, 我添加的动画会不断开启, 没有停止, 动画会执行越来越多.
解决办法:
在配置cell的时候开始动画, 然后在cell结束显示的时候停止动画
查找cell结束显示的代理
- MySql中case when then 的使用
fanxiaolong
casewhenthenend
select "主键", "项目编号", "项目名称","项目创建时间", "项目状态","部门名称","创建人"
union
(select
pp.id as "主键",
pp.project_number as &
- Ehcache(01)——简介、基本操作
234390216
cacheehcache简介CacheManagercrud
Ehcache简介
目录
1 CacheManager
1.1 构造方法构建
1.2 静态方法构建
2 Cache
2.1&
- 最容易懂的javascript闭包学习入门
jackyrong
JavaScript
http://www.ruanyifeng.com/blog/2009/08/learning_javascript_closures.html
闭包(closure)是Javascript语言的一个难点,也是它的特色,很多高级应用都要依靠闭包实现。
下面就是我的学习笔记,对于Javascript初学者应该是很有用的。
一、变量的作用域
要理解闭包,首先必须理解Javascript特殊
- 提升网站转化率的四步优化方案
php教程分享
数据结构PHP数据挖掘Google活动
网站开发完成后,我们在进行网站优化最关键的问题就是如何提高整体的转化率,这也是营销策略里最最重要的方面之一,并且也是网站综合运营实例的结果。文中分享了四大优化策略:调查、研究、优化、评估,这四大策略可以很好地帮助用户设计出高效的优化方案。
PHP开发的网站优化一个网站最关键和棘手的是,如何提高整体的转化率,这是任何营销策略里最重要的方面之一,而提升网站转化率是网站综合运营实力的结果。今天,我就分
- web开发里什么是HTML5的WebSocket?
naruto1990
Webhtml5浏览器socket
当前火起来的HTML5语言里面,很多学者们都还没有完全了解这语言的效果情况,我最喜欢的Web开发技术就是正迅速变得流行的 WebSocket API。WebSocket 提供了一个受欢迎的技术,以替代我们过去几年一直在用的Ajax技术。这个新的API提供了一个方法,从客户端使用简单的语法有效地推动消息到服务器。让我们看一看6个HTML5教程介绍里 的 WebSocket API:它可用于客户端、服
- Socket初步编程——简单实现群聊
Everyday都不同
socket网络编程初步认识
初次接触到socket网络编程,也参考了网络上众前辈的文章。尝试自己也写了一下,记录下过程吧:
服务端:(接收客户端消息并把它们打印出来)
public class SocketServer {
private List<Socket> socketList = new ArrayList<Socket>();
public s
- 面试:Hashtable与HashMap的区别(结合线程)
toknowme
昨天去了某钱公司面试,面试过程中被问道
Hashtable与HashMap的区别?当时就是回答了一点,Hashtable是线程安全的,HashMap是线程不安全的,说白了,就是Hashtable是的同步的,HashMap不是同步的,需要额外的处理一下。
今天就动手写了一个例子,直接看代码吧
package com.learn.lesson001;
import java
- MVC设计模式的总结
xp9802
设计模式mvc框架IOC
随着Web应用的商业逻辑包含逐渐复杂的公式分析计算、决策支持等,使客户机越
来越不堪重负,因此将系统的商业分离出来。单独形成一部分,这样三层结构产生了。
其中‘层’是逻辑上的划分。
三层体系结构是将整个系统划分为如图2.1所示的结构[3]
(1)表现层(Presentation layer):包含表示代码、用户交互GUI、数据验证。
该层用于向客户端用户提供GUI交互,它允许用户
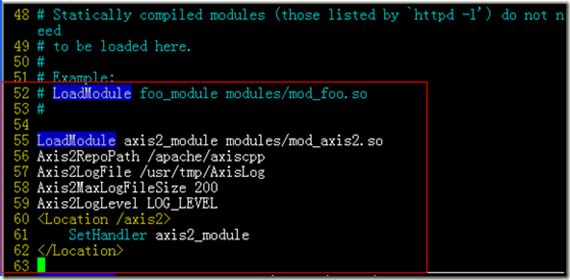
![clip_image001[4] Axis2 Linux 下安装步骤说明_第1张图片](http://img.e-com-net.com/image/product/cd86f88d592e4981914f67cd4e470d1e.jpg)
![clip_image002[4] Axis2 Linux 下安装步骤说明_第2张图片](http://img.e-com-net.com/image/product/2aeb7c19fdb84fb0b6412fd052edc602.jpg)


![clip_image003[4] Axis2 Linux 下安装步骤说明_第5张图片](http://img.e-com-net.com/image/product/013b860719574b45bbd801b4aca04d95.jpg)