CRDT
在多人协作领域除了上一篇所介绍的OT算法,还有后起之秀CRDT (conflict-free replicated data type) 无冲突复制数据类型:是一种可以协调网络上多个副本达到一致性的算法。
CRDT又分为两种实现:基于状态的CmRDT和基于操作的CvRDT;但是在实际应用的时候,基于状态的CmRDT的一般实用价值比较低(数据传输体积更大),所以Yjs也是基于操作的CvRDT的一个实现。
CRDT VS OT
| OT | CRDT |
|---|---|
| OT 依赖中心化服务器完成协作 | CRDT 算法可以通过 P2P 的方式完成数据的同步 |
| 为保证一致性,OT 的算法设计时的复杂度更高 | 为保证一致性,CRDT 算法设计更简单 |
| OT 的设计更容易保留用户意图 | 设计一个保留用户意图的 CRDT 算法更困难 |
| OT 不影响文档体积 | CRDT 文档比原文档数据更大 |
因为CRDT对于OT算法来说,解决冲突算法是固定的,完全绕过过OT算法中的最难的地方transfrom方法的设计(transform的复杂度会随着operation类型增多快速增长,而且保证正确性也需要付出更多的时间和精力)。
Lamport Clock
在Yjs实现里面每个字符都是有一个唯一的id(clientId, clock),而里面的clock就是Lamport Clock。
因为在分布式里面,所有的节点的时钟是很难保持精确统一的,想通过赋予一个时间戳给事件,然后对比事件的时间戳还原出各个节点的事件顺序几乎无法实现,所以Lamport Timestamp就被提出来,它通过节点之间交换信息,并使用logic clock而不是true lock来解决事件顺序问题。
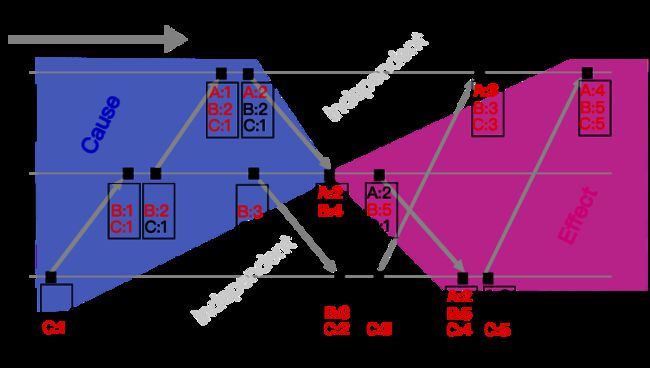
例如上图A,B,C初始的clock都是0,当C1发生时就把本地clock+1,并广播给其他节点,当其他节点A,B接收到C的的广播的信息时就使用max(本地的clock, 接收的clock)尝试更新本地的clock,这样可以理解为A,B之后的事件是预见了C所发生事件才发生的,所以后面发生事件的clock都会比接收到的clock大。
但是并不意味所有clock比较大的事件就一定在比较小的事件后面发生:在图里面B3的clock就比A2小,但是A2的事件实际并不是在B3后面发生的(可能是同时,也可能在它之前),所以Lamport Clock存在一定的局限性,并不能完全可以从clock的大小就能推出所有事件间的顺序,只能获得部分有序的事件序列。
Vector Clock
Vector Clock是在Lamport Clock基础上扩展而来。Vector Clock要求每个一个节点都有自己独立的clock,当有本地事件发生时候只更新自己节点的clock+1;而在广播消息时要把节点整个Vector Clock传出去,当接收到消息时需要遍历接收的Vector Clock上所有节点,并使用max(节点的clock,接收的节点clock)来更新。
定义Va,Vb为事件A和B的Vector Clock,再定义Vb >= Va为Vb包含每个节点clock都大于等于Va上每个节点clock;那么就有Vb >= Va意味事件B会在A的后面发生,因为这样说明B的事件发生的时候,是明确看到A的时间轴上的事件。
如上图,大部分Vector Clock都能继续找到对应的>=关系,但是在同样的A2和B3位置上,是不存在A2 >= B3 也不存在 B3 >= A2的关系的,这样就说明这里可能存在并发的事件,无法确定准确的顺序,这也是符合预期的,并不会发生Lamport Clock那样的问题。
Yjs分析
数据结构
Yjs提供丰富的数据结构YArray, YMap, YText等,而且数据结构间还可以组合一起,这样可以利用这些组成更加复杂的数据结构非常方便容易融入不同应用场景中。
首先介绍核心结构Item。
Item
作为Yjs最核心的结构,支撑其他所有结构的实现,所以如果能够把这个结构吃透,基本其他结构也是很容易理解。
Item属性如下:
type Item = {
    // 由[clientId, clock]组成,CRDT算法要求每个字符都分配一个id,而Yjs为了节省空间,会把相同clientId且连续的字符串合并成一个Item
    // 所以Item的id也就是第一个字符的id,而通过clock+字符串长度得到Item最后一个字符的id
    id: ID,
    left: Item | null,
    origin: ID | null,
    right: Item | null,
    ID: rightOrigin,
    parent: AbstractType|ID|null,
    parentSub: string | null,
    content: AbstractContent,
    keep: boolean, // 用于redo/undo场景,避免Item过早回收
    info: number, // 状态标记位
}
origin和rightOrigin指向的是Item插入时位置前后的字符的ID,主要是用在解决冲突的时候用来维持原始用户操作意图;left,right是Item的经过解决冲突后实际前后节点,所以Item是双向链表的结构,而且left,right在不会参与序列化传输的,只有origin,rightOrigin和content会被序列化传输过去;parent指向父节点(YText),parentSub当父节点内容是YMap时,parentSub就是key;而父节点内容是其他的时候就是为null了。content就是Item实际承载的内容可以是ContentString,ContentJSON,ContentDoc,ContentType等等。
integrate方法

integrate方法是Item的核心方法,主要是通过待插入Item的origin和rightOrigin,然后在Item链表里面寻找适合的位置进行插入。
首先正如前面所说的,因为left,right属性是不跟在一起传输的;所以接收到外部操作的时就是使用getMissing方法,在本地Item链表上去寻找origin 和 rightOrigin,作为初始的left和right,如果找不到origin或rightOrigin的Item意味着仍然有其他用户依赖的操作还没有接收,放到等待队列里面,等接收到必须的操作才进入解决冲突。
接着再看integrate方法,这个时候我们需要解决origin和rightOrigin之间存在的节点冲突。
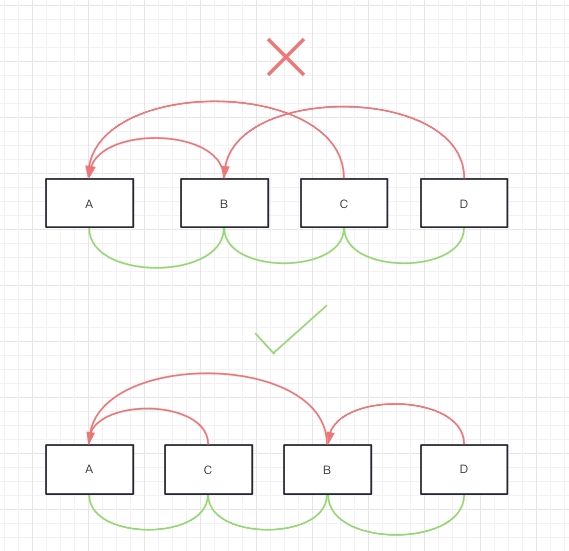
而Yjs使用的是自己一套解决冲突的方法,核心规则就是:
- orgin之间的连线不能相交;
- 满足规则1后,clientId小的节点排在左边;

红色连线都是节点的origin指向,当两根红线交叉的时候其实已经说明用户意图已经被破坏了;因为C的意图是紧跟A的后面,D的意图是紧跟B的后面,而B意图是紧跟A后面,适当调整一下C的位置可以最大满足用户初始意图;虽然说B的意图最终没有被满足,但是多人协作中解决冲突只能尽可能达到最优,很多时候没有完美的解法。
而integrate方法实际处理情况还会多一些:
integrate (transaction, offset) {
    if (this.parent) {
      if ((!this.left && (!this.right || this.right.left !== null)) || (this.left && this.left.right !== this.right)) {
        let left = this.left
        let o
        if (left !== null) {
          o = left.right
        } else if (this.parentSub !== null) {
          o = (this.parent)._map.get(this.parentSub) || null
          while (o !== null && o.left !== null) {
            o = o.left
          }
        } else {
          o = (this.parent)._start
        }

        const conflictingItems = new Set()

        const itemsBeforeOrigin = new Set()
        // Let c in conflictingItems, b in itemsBeforeOrigin
        // ***{origin}bbbb{this}{c,b}{c,b}{o}***
        // Note that conflictingItems is a subset of itemsBeforeOrigin
        while (o !== null && o !== this.right) {
          itemsBeforeOrigin.add(o)
          conflictingItems.add(o)
          if (compareIDs(this.origin, o.origin)) {
            // 场景1
            if (o.id.client < this.id.client) {
              left = o
              conflictingItems.clear()
            } else if (compareIDs(this.rightOrigin, o.rightOrigin) {
              break
            }
          // 场景3
          } else if (o.origin !== null && itemsBeforeOrigin.has(getItem(transaction.doc.store, o.origin))) {
            if (!conflictingItems.has(getItem(transaction.doc.store, o.origin))) {
              left = o
              conflictingItems.clear()
            }
          } else {
            // 场景2
            break
          }
          o = o.right
        }
        this.left = left
      }
      if (this.left !== null) {
        const right = this.left.right
        this.right = right
        this.left.right = this
      } else {
        let r
        if (this.parentSub !== null) {
          r = (this.parent)._map.get(this.parentSub) || null
          while (r !== null && r.left !== null) {
            r = r.left
          }
        } else {
          r = (this.parent)._start;
            (this.parent)._start = this
        }
        this.right = r
      }
      if (this.right !== null) {
        this.right.left = this
      } else if (this.parentSub !== null) {
        (this.parent)._map.set(this.parentSub, this)
        if (this.left !== null) {
          this.left.delete(transaction)
        }
      }
      // adjust length of parent
      if (this.parentSub === null && this.countable && !this.deleted) {
       (this.parent)._length += this.length
      }
      addStruct(transaction.doc.store, this)
      this.content.integrate(transaction, this)
      // add parent to transaction.changed
      addChangedTypeToTransaction(transaction, (this.parent), this.parentSub)
      if (((this.parent)._item !== null && /** @type {AbstractType} */ (this.parent)._item.deleted) || (this.parentSub !== null && this.right !== null)) {
        this.delete(transaction)
      }
    } else {
      // 如果没有parent,使用GC结构integrate
      new GC(this.id, this.length).integrate(transaction, 0)
    }
}
如果单看代码感觉容易一头雾水,列一下场景会容易理解一些:
- 场景1:冲突的节点Origin都相同

比较简单,E只跟{B, C}有冲突,而且他们之间的Origin连线也不会相交(因为他们的Origin都是同一个),所以只需要对比他们的clientId就可以找到适当的位置 - 场景2:冲突节点Origin不一样,导致Origin连线相交

这个时候E跟C有冲突但是C的Origin跟E的Origin不一样,E是不能跟在C后面因为这样E的连线就会相交,所以E只能放在C前面 - 场景3: 冲突的节点Origin不相同,但是Origin也是指向之前的跳过的冲突节点

E跟B互相冲突,但是B因为clientId比较小所以应该排在E的左边,所以conflictingItems.clear()会先清除跳过的冲突节点;接着遍历到{C,D}
的时候会发现他们的Origin指向的是之前跳过的B节点,所以也让他们一起跳过,最后发现D后面的位置是合适的。
到此核心部分已经解释完成,这个时候新的节点也找到自己对应的left和right。
delete方法
Yjs的删除操作采用的是很多CRDT算法所采用的墓碑方式:即不做任何实际删除操作,只是仅仅做一个标记,这也是很多人对CRDT担忧的意味着随着操作增加空间占用也会越来越大,性能也会越来越低。
delete (transaction) {
    if (!this.deleted) {
      const parent = /** @type {AbstractType} */ (this.parent)
      // adjust the length of parent
      if (this.countable && this.parentSub === null) {
        parent._length -= this.length
      }
      this.markDeleted()
      addToDeleteSet(transaction.deleteSet, this.id.client, this.id.clock, this.length)
      addChangedTypeToTransaction(transaction, parent, this.parentSub)
      this.content.delete(transaction)
    }
  }
export const addToDeleteSet = (ds, client, clock, length) => {
map.setIfUndefined(ds.clients, client, () => /** @type {Array} */ ([])).push(new DeleteItem(clock, length))
}
删除的Item最终会转变成DeleteItem加入到transaction的deleteSet中,然后会跟着序列化传输到其他用户上。
同样当接收到反序列化后的deleteSet,发现如果有其他操作还没接收到就会放到store的pendingDs等待后面接收到新的操作再进行处理。
gc方法
刚刚也提到所有delete的节点只会标记一下,并不会真实的处理,但是Yjs也提供了一个GC的方法来回收内存。
 gc (store, parentGCd) {
    if (!this.deleted) {
      throw error.unexpectedCase()
    }
    this.content.gc(store)
    if (parentGCd) {
      replaceStruct(store, this, new GC(this.id, this.length))
    } else {
      this.content = new ContentDeleted(this.length)
    }
  }
gc的方法就会把内容替换成ContentDelete,Yjs在每次transaction结束时都会触发一次tryGcDeleteSet(ds, store, doc.gcFilter)
const tryGcDeleteSet = (ds, store, gcFilter) => {
  for (const [client, deleteItems] of ds.clients.entries()) {
    const structs = /** @type {Array} */ (store.clients.get(client))
    for (let di = deleteItems.length - 1; di >= 0; di--) {
      const deleteItem = deleteItems[di]
      const endDeleteItemClock = deleteItem.clock + deleteItem.len
      for (
        let si = findIndexSS(structs, deleteItem.clock), struct = structs[si];
        si < structs.length && struct.id.clock < endDeleteItemClock;
        struct = structs[++si]
      ) {
        const struct = structs[si]
        if (deleteItem.clock + deleteItem.len <= struct.id.clock) {
          break
        }
        if (struct instanceof Item && struct.deleted && !struct.keep && gcFilter(struct)) {
          struct.gc(store, false)
        }
      }
    }
  }
}
默认的gcFilter都是返回true,所以默认情况下删除的Item都会被gc掉。
YText
YText是需要重点探索的一个数据结构,Yjs对于文本操作只提供插入,删除和格式化三个操作。
插入文本
从insert方法开始:
 insert (index, text, attributes) {
    if (text.length <= 0) {
      return
    }
    const y = this.doc
    if (y !== null) {
      transact(y, transaction => {
        const pos = findPosition(transaction, this, index)
        if (!attributes) {
          attributes = {}
          // @ts-ignore
          pos.currentAttributes.forEach((v, k) => { attributes[k] = v })
        }
        insertText(transaction, this, pos, text, attributes)
      })
    } else {
      /** @type {Array} */ (this._pending).push(() => this.insert(index, text, attributes))
    }
  }
首先Yjs的所有操作都是在一个transaction里面进行的,在transaction里面先通过findPosition找到文本开始插入的Item位置,如果插入的位置在Item的中间就需要splitItem分裂成两个Item。这个遍历是从Item列表一开始查找遍历的所以是一个O(n)的操作,但是Yjs会通过保存最近操作的位置来加快搜索速度,而且在搜索的过程中也要计算文本的格式属性,文本的每一个属性也会生成一个Item,它的content会是ContentFormat(主要是一个key value的键值对)。
如同上图所示,"BBB"的颜色是红色,但是后续的会被后面的格式覆盖,"aaa"的颜色就会变成红色。
你很快会发现这种方式对操作格式化其实挺复杂的;现在要插入"BBB"和"aaa"插入带有斜体的"EEE"的字符串,就得在插入"EEE"后面得加上斜体清除的格式。
其实可以想象无论增加还是删除文本的时候要清除它的格式都会异常麻烦。
const insertText = (transaction, parent, currPos, text, attributes) => {
  currPos.currentAttributes.forEach((_val, key) => {
    if (attributes[key] === undefined) {
      attributes[key] = null
    }
  })
  const doc = transaction.doc
  const ownClientId = doc.clientID
  minimizeAttributeChanges(currPos, attributes)
  // 1
  const negatedAttributes = insertAttributes(transaction, parent, currPos, attributes)
  // insert content
  const content = text.constructor === String ? new ContentString(/** @type {string} */ (text)) : (text instanceof AbstractType ? new ContentType(text) : new ContentEmbed(text))
  let { left, right, index } = currPos
  if (parent._searchMarker) {
    updateMarkerChanges(parent._searchMarker, currPos.index, content.getLength())
  }
  // 2
  right = new Item(createID(ownClientId, getState(doc.store, ownClientId)), left, left && left.lastId, right, right && right.id, parent, null, content)
  // 3
  right.integrate(transaction, 0)
  currPos.right = right
  currPos.index = index
  currPos.forward()
  // 4
  insertNegatedAttributes(transaction, parent, currPos, negatedAttributes)
}
代码上的1和4两个地方就是代表插入属性和插入消除属性两个操作。然后2,3步就是插入新的节点;
最后进入transaction清理阶段:
export const transact = (doc, f, origin = null, local = true) => {
  const transactionCleanups = doc._transactionCleanups
  let initialCall = false
  /**
   * @type {any}
   */
  let result = null
  if (doc._transaction === null) {
    initialCall = true
    doc._transaction = new Transaction(doc, origin, local)
    transactionCleanups.push(doc._transaction)
    if (transactionCleanups.length === 1) {
      doc.emit('beforeAllTransactions', [doc])
    }
    doc.emit('beforeTransaction', [doc._transaction, doc])
  }
  try {
    result = f(doc._transaction)
  } finally {
    if (initialCall) {
      const finishCleanup = doc._transaction === transactionCleanups[0]
      doc._transaction = null
      if (finishCleanup) {
        cleanupTransactions(transactionCleanups, 0)
      }
    }
  }
  return result
}
简略说明一下整个transaction过程:
- transaction初始化时先计算beforeState (StateVector)
- 业务操作
- 清理阶段
1)计算afterState(StateVector)用于跟beforeState对比,找出前后的差异
2)尝试合并deleteSet(让传输信息体积更小)
3)触发YText,YArray等结构上的事件监听器;类似在YText上会遍历整个Item链表找出有哪些节点是改动或者增加的,聚合到事件上
4)尝试回收被标记删除的Item节点
5)尝试合并已经标记删除的Item节点(让Item链表节点更少,占用内存更少)
6)尝试合并新添加的Item节点
7) 把新增加的Item节点和deleteSet写入UpdateMessage,然后触发文档上的update事件
然后就可以把UpdateMessage发送给其他用户节点了
删除文本
删除文本本身处理是很简单的,只需要找到对应文本的Item节点然后调用它的delete方法即可,但是还要清理文本的格式就很麻烦了,需要小心处理不能清除会影响后续文本格式的属性。
const deleteText = (transaction, currPos, length) => {
  const startLength = length
  const startAttrs = map.copy(currPos.currentAttributes)
  const start = currPos.right
  while (length > 0 && currPos.right !== null) {
    if (currPos.right.deleted === false) {
      switch (currPos.right.content.constructor) {
        case ContentType:
        case ContentEmbed:
        case ContentString:
          if (length < currPos.right.length) {
            getItemCleanStart(transaction, createID(currPos.right.id.client, currPos.right.id.clock + length))
          }
          length -= currPos.right.length
          // 只需要调用delete方法
          currPos.right.delete(transaction)
          break
      }
    }
    currPos.forward()
  }
  if (start) {
    // 清理文本格式
    cleanupFormattingGap(transaction, start, currPos.right, startAttrs, currPos.currentAttributes)
  }
  const parent = /** @type {AbstractType} */ (/** @type {Item} */ (currPos.left || currPos.right).parent)
  if (parent._searchMarker) {
    updateMarkerChanges(parent._searchMarker, currPos.index, -startLength + length)
  }
  return currPos
}
cleanupFormattingGap方法就是清理被删除文本的格式,需要步骤:
- 先计算被删除文本后面的第一段文本的所继承的格式集合
- 再回头遍历一次,找出不在前面计算的集合里面的ContentFormat节点进行删除
格式化文本
正如之前所提到的操作文本格式是异常麻烦的,如果要格式化一段文本,同样需要以下步骤:
- 找出需要格式化的文本的开始节点位置
- 计算前面继承来的格式集合与即将插入的格式集合的差集合,根据计算的集合分别插入对应的ContentFormat节点
- 然后遍历要格式化文本里面的所有节点,把不一样的ContentFormat节点删除,同时收集会影响后面文本的格式集合
- 把收集的受影响格式重新插入到被删文本的节点后面

YArray
YArray属于简化版本的YText,略过。
YMap
set
YMap每个Key都指向一个Item双向链表,跟YText不一样的是,Key永远指向这个链表的最后一个节点,而其他节点都会标记为删除。
export const typeMapSet = (transaction, parent, key, value) => {
  // 获取最后的节点
  const left = parent._map.get(key) || null
  const doc = transaction.doc
  const ownClientId = doc.clientID
  let content
  if (value == null) {
    content = new ContentAny([value])
  } else {
    switch (value.constructor) {
      case Number:
      case Object:
      case Boolean:
      case Array:
      case String:
        content = new ContentAny([value])
        break
      case Uint8Array:
        content = new ContentBinary(/** @type {Uint8Array} */ (value))
        break
      case Doc:
        content = new ContentDoc(/** @type {Doc} */ (value))
        break
      default:
        if (value instanceof AbstractType) {
          content = new ContentType(value)
        } else {
          throw new Error('Unexpected content type')
        }
    }
  }
  // 每次都会新建一个节点,而这个节点也会插入到链表的最后面
  new Item(createID(ownClientId, getState(doc.store, ownClientId)), left, left && left.lastId, null, null, parent, key, content).integrate(transaction, 0)
}
get/delete
get/delete都直接读取/删除最后一个节点即可
同步交互过程
AwarenessProtocol
用于节点发现,更新和离线事件感知。
AwarenessProtocol通过解包所有来往AwarenessMessage并记录每个Client的状态,如果发现没有记录的Client就加入到Client Add List里面,其他情况也如此类推。
对于用户离线的判断,AwarenessProtol主要靠两种方式:- 接收到节点发送state为null的信息
- 超过30s没有接收到用户的信息
- SyncProtocol
用于节点与节点间状态同步,文档描述整个过程实际只有两步,但是还是根据y-websocket把整个过程呈现出来比较直观:
对于图中提到的LocalState 和 AwarenessState区分:
LocalState本质上是各个节点对文档的操作序列,AwarenessState则是自定义一些状态。
undo/redo
Yjs的undo/redo有两种可选方案:
- 基于编辑器的undo/redo
这种方案主要针对富文本编辑器这里自带操作历史记录管理,只要undo/redo时候Yjs跟着应用对应操作即可,Yjs本身无需做额外处理。 - 基于Yjs自身的UndoManager
UndoManager可以针对更加复杂的应用场景,本身Yjs提供的数据可以自由组合完全可以脱离富文本这种场景使用,而且UndoManager可以只针对组合结构里面任一子结构进行管理,灵活性大很多。
但是总结两种方案对于undo/redo都会影响全局的其他用户,也就是意味不能单独只undo/redo自身操作(一般这种更符合使用体验),如果需要这种效果需要做更进一步的处理。
总结
基于Yjs的代码分析到此为止了,期待有一天能够应用到实际项目中。
参考
CRDT 简介
An introduction to Conflict-Free Replicated Data Types
Collaborative Editing in CodeMirror
How Figma’s multiplayer technology works
Realtime Editing of Ordered Sequences
Are CRDTs suitable for shared editing?
Lamport timestamp
Vector clock
On Consistency of Operational Transformation Approach
I was wrong. CRDTs are the future
