本文内容基于
webpack 5.74.0版本进行分析由于
webpack5整体代码过于复杂,为了减少复杂度,本文所有分析将只基于js文件类型进行分析,不会对其它类型(css、image)进行分析,所举的例子也都是基于js类型
为了增加可读性,会对源码进行删减、调整顺序、改变的操作,文中所有源码均可视作为伪代码
本文是webpack5核心流程解析的最后一篇文章,共有5篇,使用流程图的形式分析了webpack5的构建原理:
- 「Webpack5源码」make阶段(流程图)分析
- 「Webpack5源码」enhanced-resolve路径解析库源码分析
- 「Webpack5源码」seal阶段(流程图)分析(一)
- 「Webpack5源码」seal阶段分析(二)-SplitChunksPlugin源码
- 「Webpack5源码」seal阶段分析(三)-生成代码&runtime
前言
在上一篇文章「Webpack5源码」seal阶段分析(二)-SplitChunksPlugin源码中,我们进行了hooks.optimizeChunks()的相关逻辑分析,选取了SplitChunksPlugin进行详细的分析
在上篇文章结束分析SplitChunksPlugin之后,我们将开始codeGeneration()的相关逻辑分析
源码整体概述
在上一篇文章中,我们已经分析了buildChunkGraph()和hooks.optimizeChunks相关逻辑,现在我们要开始分析代码生成和文件打包输出相关的内容
如下面代码所示,我们会执行:
codeGeneration():遍历modules数组,完成所有module代码转化,并将结果存储到compilation.codeGenerationResults中createChunkAssets():合并runtime代码(包括立即执行函数,多种工具函数)、modules代码、其它chunk相关的桥接代码 ,并调用emitAsset()输出产物
seal() {
    //...根据entry初始化chunk和chunkGroup,关联chunk和chunkGroup
    // ...遍历entry所有的dependencies,关联chunk、dependencies、chunkGroup
    // 为module设置深度标记
    this.assignDepths(entryModules);
    buildChunkGraph(this, chunkGraphInit);

    this.createModuleHashes();
    this.codeGeneration(err => {
        this.createChunkAssets(err => { });
    });
}
function codeGeneration() {
    // ......处理runtime代码
    const jobs = [];
    for (const module of this.modules) {
        const runtimes = chunkGraph.getModuleRuntimes(module);
        for (const runtime of runtimes) {
            //...省略runtimes.size>0的逻辑
            //如果有多个runtime,则取第一个runtime的hash
            const hash = chunkGraph.getModuleHash(module, runtime);
            jobs.push({ module, hash, runtime, runtimes: [runtime] });
        }
    }
    this._runCodeGenerationJobs(jobs, callback);
}
function _runCodeGenerationJobs(jobs, callback) {
    //...省略非常多的细节代码
    const { dependencyTemplates, ... } = this;
    //...省略遍历jobs的代码,伪代码为:for(const job of jobs)
    const { module } = job;
    const { hash, runtime, runtimes } = job;
    this._codeGenerationModule({ module, runtime, runtimes, ... , dependencyTemplates });
}
function createChunkAssets(callback) {
    asyncLib.forEachLimit(
        this.chunks,
        (chunk, callback) => {
            let manifest = this.getRenderManifest({
                chunk,
                ...
            });
            // manifest=this.hooks.renderManifest.call([], options);

            //...遍历manifest,调用(manifest[i]=fileManifest)fileManifest.render()
            asyncLib.forEach(
                manifest,
                (fileManifest, callback) => {
                    //....
                    source = fileManifest.render();
                    this.emitAsset(file, source, assetInfo);
                }
            );
        }
    )
}
codeGeneration():module生成代码
1.1 整体流程图
结合1.3.3 具体例子的流程图一起看效果更佳
1.2 codeGeneration()
遍历this.modules,然后获取对应的运行时runtimes,生成hash,将这三个值都放入到job数组中,调用this._runCodeGenerationJobs()
在_runCodeGenerationJobs()中,遍历jobs数组,不断拿出对应的job(包含module、hash、runtime)调用_codeGenerationModule()进行模块代码的生成
seal() {
    //...根据entry初始化chunk和chunkGroup,关联chunk和chunkGroup
    // ...遍历entry所有的dependencies,关联chunk、dependencies、chunkGroup
    // 为module设置深度标记
    this.assignDepths(entryModules);
    buildChunkGraph(this, chunkGraphInit);

    this.createModuleHashes();
    this.codeGeneration(err => {
        this.createChunkAssets(err => { });
    });
}
function codeGeneration() {
    // ......处理runtime代码
    const jobs = [];
    for (const module of this.modules) {
        const runtimes = chunkGraph.getModuleRuntimes(module);
        for (const runtime of runtimes) {
            //...省略runtimes.size>0的逻辑
            //如果有多个runtime,则取第一个runtime的hash
            const hash = chunkGraph.getModuleHash(module, runtime);
            jobs.push({ module, hash, runtime, runtimes: [runtime] });
        }
    }
    this._runCodeGenerationJobs(jobs, callback);
}
function _runCodeGenerationJobs(jobs, callback) {
    //...省略非常多的细节代码
    const { dependencyTemplates, ... } = this;
    //...省略遍历jobs的代码,伪代码为:for(const job of jobs)
    const { module } = job;
    const { hash, runtime, runtimes } = job;
    this._codeGenerationModule({ module, runtime, runtimes, ... , dependencyTemplates });
}
1.3 _codeGenerationModule
从下面代码块可以知道
- 调用
module.codeGeneration()进行代码的生成,将生成结果放入到result - 还会遍历
runtimes,生成运行时代码,放入到results中
function _codeGenerationModule({ module, runtime, runtimes, ... , dependencyTemplates }) {
    //...省略非常多的细节代码
    this.codeGeneratedModules.add(module);
    result = module.codeGeneration({
        chunkGraph,
        moduleGraph,
        dependencyTemplates,
        runtimeTemplate,
        runtime,
        codeGenerationResults: results,
        compilation: this
    });
    for (const runtime of runtimes) {
        results.add(module, runtime, result);
    }
    callback(null, codeGenerated);
}
1.3.1 NormalModule.codeGeneration
// NormalModule.js
// 下面的方法对应上面的module.codeGeneration方法
function codeGeneration(..., dependencyTemplates, codeGenerationResults) {
    //...省略非常多的细节代码
    const sources = new Map();
    for (const type of sourceTypes || chunkGraph.getModuleSourceTypes(this)) {
        const source = this.generator.generate(this, { ..., dependencyTemplates, codeGenerationResults });
        if (source) {
            sources.set(type, new CachedSource(source));
        }
    }
    const resultEntry = {
        sources,
        runtimeRequirements,
        data
    };
    return resultEntry;
}由上面的代码可以知道,最终触发的是this.generator.generate,而这个generator到底是什么呢?
由make阶段的NormalModuleFactory.constructor-this.hooks.resolve的代码可以知道,之前就已经生成对应的parser处理类以及generator处理类
会根据不同的type,比如javascript/auto、css等不同类型的NormalModule进行不同parser和generator的初始化
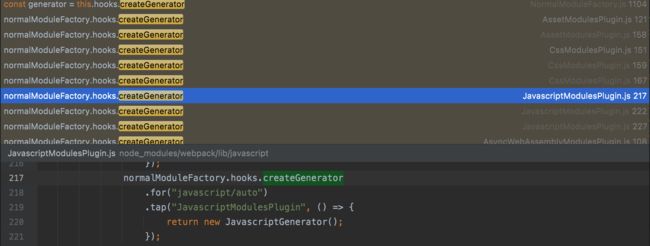
getGenerator本质是触发this.hooks.createGenerator,实际上是由各个Plugin注册该hooks进行各种generator返回,也就是说对于不同的文件内容,会有不同的genrator处理类来进行代码的生成
// lib/NormalModuleFactory.js
const continueCallback = () => {
    // normalLoaders = this.resolveRequestArray进行resolve.resolve的结果
    const allLoaders = postLoaders;
    if (matchResourceData === undefined) {
        for (const loader of loaders) allLoaders.push(loader);
        for (const loader of normalLoaders) allLoaders.push(loader);
    } else {
        for (const loader of normalLoaders) allLoaders.push(loader);
        for (const loader of loaders) allLoaders.push(loader);
    }
    for (const loader of preLoaders) allLoaders.push(loader);

    Object.assign(data.createData, {
        ...
        loaders: allLoaders,
        ...
        type,
        parser: this.getParser(type, settings.parser),
        parserOptions: settings.parser,
        generator: this.getGenerator(type, settings.generator),
        generatorOptions: settings.generator,
        resolveOptions
    });

    // 为了增加可读性,将内部函数提取到外部,下面的callback实际上是this.hooks.resolve.tapAsync注册的callback()
    callback();
}
getGenerator(type, generatorOptions = EMPTY_GENERATOR_OPTIONS) {
  if (generator === undefined) {
    generator = this.createGenerator(type, generatorOptions);
    cache.set(generatorOptions, generator);
  }

  return generator;
}
createGenerator(type, generatorOptions = {}) {
  const generator = this.hooks.createGenerator
    .for(type)
    .call(generatorOptions);
}如下面截图所示,hooks.createGenerator会触发多个Plugin执行,返回不同的return new xxxxxGenerator()类
其中最常见的是javascript类型对应的genrator处理类:JavascriptGenerator
1.3.2 示例:JavascriptGenerator.generate
整体流程图
概述
从以下精简代码中可以发现,JavascriptGenerator.generate()执行的顺序是:
new ReplaceSource(originalSource)初始化源码this.sourceModule()进行依赖的遍历,不断执行对应的template.apply(),将结果放入到initFragments.push(fragment)中- 最后调用
InitFragment.addToSource(source, initFragments, generateContext)合并source和initFragments
generate(module, generateContext) {
    const originalSource = module.originalSource();
    const source = new ReplaceSource(originalSource);
    const initFragments = [];
    this.sourceModule(module, initFragments, source, generateContext);
    return InitFragment.addToSource(source, initFragments, generateContext);
}
this.sourceModule
遍历module.dependencies和module.presentationalDependencies,然后调用sourceDependency()处理依赖文件的代码生成
如果存在异步依赖的模块,则使用sourceBlock()处理,本质就是递归不断调用sourceDependency()处理依赖文件的代码生成
sourceModule(module, initFragments, source, generateContext) {
    for (const dependency of module.dependencies) {
        this.sourceDependency();
    }
    for (const dependency of module.presentationalDependencies) {
        this.sourceDependency();
    }
    for (const childBlock of module.blocks) {
        this.sourceBlock()
    }
}
sourceBlock(module, block, initFragments, source, generateContext) {
    for (const dependency of block.dependencies) {
        this.sourceDependency();
    }
    for (const childBlock of block.blocks) {
        this.sourceBlock();
    }
}
sourceDependency(module, dependency, initFragments, source, generateContext) {
    const constructor = dependency.constructor;
    const template = generateContext.dependencyTemplates.get(constructor);
    template.apply(dependency, source, templateContext);
    const fragments = deprecatedGetInitFragments(
        template,
        dependency,
        templateContext
    );
    if (fragments) {
        for (const fragment of fragments) {
            initFragments.push(fragment);
        }
    }
}在上面sourceDependency()的代码中,又出现了根据不同类型实例化的对象template,接下来我们将分析template、dependencyTemplates到底是什么?
dependencyTemplates跟dependency的提前绑定
通过提前绑定不同类型对应的template,为template.apply()做准备
在初始化webpack时,webpack.js中进行new WebpackOptionsApply().process(options, compiler)
在WebpackOptionsApply.js中,进行了HarmonyModulesPlugin的初始化
new HarmonyModulesPlugin({
  topLevelAwait: options.experiments.topLevelAwait
}).apply(compiler);在HarmonyModulesPlugin.js的apply方法中,提前注册了多个xxxxDependency对应的xxxx.Template()的映射关系,比如下面代码中的
HarmonyCompatibilityDependency对应HarmonyCompatibilityDependency.Template()
// HarmonyModulesPlugin.js
apply(compiler) {
    compiler.hooks.compilation.tap(
        "HarmonyModulesPlugin",
        (compilation, { normalModuleFactory }) => {
            // 绑定Dependency跟Dependency.Template的关系
            compilation.dependencyTemplates.set(
                HarmonyCompatibilityDependency,
                new HarmonyCompatibilityDependency.Template()
            );
            // 绑定Dependency跟NormalModuleFactory的关系
            compilation.dependencyFactories.set(
                HarmonyImportSideEffectDependency,
                normalModuleFactory
            );
            ...
        }
    );
}为什么我们要通过xxxxDenependency绑定对应的xxxx.Template()映射关系呢?
从上一篇文章「Webpack5源码」make整体流程浅析,我们可以知道,我们在make阶段会进行AST的解析,比如上一篇文章中出现的具体例子,我们会将出现的import {getC1}解析为HarmonyImportSideEffectDependency依赖
后面我们就可以根据这个依赖进行对应Template代码的生成
template.apply()
template.apply()的实现也是根据实际类型进行区分的,比如template.apply可能是ConstDependency.Template.apply,也可能是HarmonyImportDependency.Template.apply
主要有两种形式:
- 直接更改
source源码 - 使用
initFragments.push()增加一些代码片段
下面取一些xxxxxDependency进行分析,它会先拿到对应的Template,然后执行apply()
ConstDependency.Template.apply()
直接操作source,直接改变源码
if (typeof dep.range === "number") {
    source.insert(dep.range, dep.expression);
    return;
}
source.replace(dep.range[0], dep.range[1] - 1, dep.expression);
HarmonyImportDependency.Template.apply()
将代码添加到templateContext.initFragments
最终收集的initFragments数组会执行InitFragment.addToSource,在下一个阶段执行
HarmonyImportDependency.Template = class HarmonyImportDependencyTemplate extends (
    ModuleDependency.Template
) {
    apply(dependency, source, templateContext) {
        const importStatement = dep.getImportStatement(false, templateContext);
        templateContext.initFragments.push(
            new ConditionalInitFragment(
                importStatement[0], // 同步
                InitFragment.STAGE_HARMONY_IMPORTS,
                dep.sourceOrder,
                key,
                runtimeCondition
            )
        );
        templateContext.initFragments.push(
            // await
            new AwaitDependenciesInitFragment(
                new Set([dep.getImportVar(templateContext.moduleGraph)])
            )
        );
        templateContext.initFragments.push(
            new ConditionalInitFragment(
                importStatement[1], // 异步
                InitFragment.STAGE_ASYNC_HARMONY_IMPORTS,
                dep.sourceOrder,
                key + " compat",
                runtimeCondition
            )
        );
    }
}
InitFragment.addToSource
经过非常繁杂的数据收集后,this.sourceModule()执行完毕
回到JavascriptGenerator.generate()代码,在this.sourceModule()执行完毕,会执行InitFragment.addToSource()逻辑,而这个InitFragment就是上面template.apply()所收集的数据
generate(module, generateContext) {
    const originalSource = module.originalSource();
    const source = new ReplaceSource(originalSource);
    const initFragments = [];
    this.sourceModule(module, initFragments, source, generateContext);
    return InitFragment.addToSource(source, initFragments, generateContext);
}按照下面顺序拼接最终生成代码concatSource:
header部分代码:fragment.getContent()middle部分代码:module文件实际的内容(可能经过一些改造)bottom部分代码:fragment.getEndContent()
最终返回ConcatSource
static addToSource(source, initFragments, context) {
    // 排序
    const sortedFragments = initFragments
        .map(extractFragmentIndex)
        .sort(sortFragmentWithIndex);

    const keyedFragments = new Map();
    //...省略根据initFragments拼接keyedFragments数据的逻辑
    const endContents = [];
    for (let fragment of keyedFragments.values()) {
        // add fragment Content
        concatSource.add(fragment.getContent(context));
        const endContent = fragment.getEndContent(context);
        if (endContent) {
            endContents.push(endContent);
        }
    }
    // add source
    concatSource.add(source);
    for (const content of endContents.reverse()) {
        // add fragment endContent
        concatSource.add(content);
    }
    return concatSource;

}
1.3.3 具体例子
_codeGenerationModule()流程涉及的文件较为复杂,下面使用一个具体例子进行整个流程再度讲解,可能跟上面的内容会有所重复,但是为了能够真正明白整个流程,笔者认为一定的重复是有必要的
我们使用一个入口文件entry4.js,如下面代码块所示,有两个同步依赖,以及对应的调用语句,还有一个异步依赖chunkB
import {getG} from "./item/common_____g.js";
import voca from 'voca';
voca.kebabCase('goodbye blue sky'); // => 'goodbye-blue-sky'
import (/*webpackChunkName: "B"*/"./async/async_B.js").then(bModule=> {
    bModule.default();
});

console.info("getA2E", getG());
1.3.3.1 整体流程图
1.3.3.2 codeGeneration()
codeGeneration()会遍历所有this.modules,然后经过一系列流程调用module.codeGeneration(),也就是NormalModule.codeGeneration()生成代码放入result中
function codeGeneration() {
    // ......处理runtime代码
    const jobs = [];
    for (const module of this.modules) {
        const runtimes = chunkGraph.getModuleRuntimes(module);
        for (const runtime of runtimes) {
            //...省略runtimes.size>0的逻辑
            //如果有多个runtime,则取第一个runtime的hash
            const hash = chunkGraph.getModuleHash(module, runtime);
            jobs.push({ module, hash, runtime, runtimes: [runtime] });
        }
    }
    this._runCodeGenerationJobs(jobs, callback);
}
function _runCodeGenerationJobs(jobs, callback) {
    //...省略非常多的细节代码
    const { dependencyTemplates, ... } = this;
    //...省略遍历jobs的代码,伪代码为:for(const job of jobs)
    const { module } = job;
    const { hash, runtime, runtimes } = job;
    this._codeGenerationModule({ module, runtime, runtimes, ... , dependencyTemplates });
}
function _codeGenerationModule({ module, runtime, runtimes, ... , dependencyTemplates }) {
    //...省略非常多的细节代码
    this.codeGeneratedModules.add(module);
    result = module.codeGeneration({
        chunkGraph,
        moduleGraph,
        dependencyTemplates,
        runtimeTemplate,
        runtime,
        codeGenerationResults: results,
        compilation: this
    });
    for (const runtime of runtimes) {
        results.add(module, runtime, result);
    }
    callback(null, codeGenerated);
}
1.3.3.3 NormalModule.codeGeneration()
核心代码也就是调用generator.generate(),我们的示例都是JS类型,因此等同于调用JavascriptGenerator.generate()
function codeGeneration(..., dependencyTemplates, codeGenerationResults) {
    //...省略非常多的细节代码
    const sources = new Map();
    for (const type of sourceTypes || chunkGraph.getModuleSourceTypes(this)) {
        const source = this.generator.generate(this, { ..., dependencyTemplates, codeGenerationResults });
        if (source) {
            sources.set(type, new CachedSource(source));
        }
    }
    const resultEntry = {
        sources,
        runtimeRequirements,
        data
    };
    return resultEntry;
}
1.3.3.4 JavascriptGenerator.generate()
generate(module, generateContext) {
    const originalSource = module.originalSource();
    const source = new ReplaceSource(originalSource);
    const initFragments = [];
    this.sourceModule(module, initFragments, source, generateContext);
    return InitFragment.addToSource(source, initFragments, generateContext);
}originalSource本质就是entry4.js的原始内容
sourceModule()
在上面的分析中,我们知道使用sourceModule()就是
- 遍历所有
module.dependency,调用sourceDependency()处理 - 遍历所有
module.presentationalDependencies,调用sourceDependency()处理
而sourceDependency()就是触发对应dependency的template.apply()进行:
- 文件内容
source的改造 initFragments.push(fragment)收集,initFragments数组在InitFragment.addToSource()流程为source插入header代码和bottom代码
在entry4.js这个module中
module.dependencies=[
    HarmonyImportSideEffectDependency("./item/common_____g.js"),
    HarmonyImportSideEffectDependency("voca"),
    HarmonyImportSpecifierDependency("./item/common_____g.js"),
    HarmonyImportSpecifierDependency("voca")
]
module.presentationalDependencies=[HarmonyCompatibilityDependency, ConstDependency, ConstDependency]
InitFragment.addToSource()
经过sourceModule()的处理,我们现在就能拿到originalSource,以及initFragments数组
generate(module, generateContext) {
    const originalSource = module.originalSource();
    const source = new ReplaceSource(originalSource);
    const initFragments = [];
    this.sourceModule(module, initFragments, source, generateContext);
    return InitFragment.addToSource(source, initFragments, generateContext);
}在上面的分析中,我们知道InitFragment.addToSource()就是按照下面顺序拼接最终生成代码concatSource:
header部分代码:fragment.getContent()middle部分代码:module文件代码(可能经过一些改造)bottom部分代码:fragment.getEndContent()
最终返回ConcatSource
而对于entry4.js来说,sourceModule()会触发什么类型的template.apply()进行代码的收集呢?
import {getG} from "./item/common_____g.js";
import voca from 'voca';
voca.kebabCase('goodbye blue sky'); // => 'goodbye-blue-sky'
import (/*webpackChunkName: "B"*/"./async/async_B.js").then(bModule=> {
    bModule.default();
});

console.info("getA2E", getG());最终entry4.js生成的代码如下所示
__webpack_require__.r(__webpack_exports__);
/* harmony import */ var _item_common_g_js__WEBPACK_IMPORTED_MODULE_1__ =
  __webpack_require__(/*! ./item/common_____g.js */ \"./src/item/common_____g.js\");
/* harmony import */ var voca__WEBPACK_IMPORTED_MODULE_0__ =
  __webpack_require__(/*! voca */ \"./node_modules/voca/index.js\");
/* harmony import */ var voca__WEBPACK_IMPORTED_MODULE_0___default =
  /*#__PURE__*/__webpack_require__.n(voca__WEBPACK_IMPORTED_MODULE_0__);


voca__WEBPACK_IMPORTED_MODULE_0___default().kebabCase('goodbye blue sky'); // => 'goodbye-blue-sky'
__webpack_require__.e(/*! import() | B */ \"B\").then(__webpack_require__.bind(__webpack_require__, /*! ./async/async_B.js */ \"./src/async/async_B.js\")).then(bModule=> {
    bModule.default();
});

console.info(\"getA2E\", (0,_item_common_g_js__WEBPACK_IMPORTED_MODULE_1__.getG)());

//# sourceURL=webpack://webpack-5-image/./src/entry4.js?我们接下来就要分析entry4.js的每一句代码会形成什么dependency,从而触发的template的类型是什么,template.apply()又做了什么?
import voca from 'voca';形成HarmonyImportSideEffectDependency,触发HarmonyImportSideEffectDependencyTemplate.apply()
在HarmonyImportSideEffectDependencyTemplate.apply()中,如代码所示,触发initFragments.push(),其中content=importStatement[0] + importStatement[1]
const importStatement = dep.getImportStatement(false, templateContext);
templateContext.initFragments.push(
    new ConditionalInitFragment(
        importStatement[0] + importStatement[1],
        InitFragment.STAGE_HARMONY_IMPORTS,
        dep.sourceOrder,
        key,
        runtimeCondition
    )
);最终在拼接最终生成代码时,ConditionalInitFragment.content也就是importStatement[0] + importStatement[1]的内容如下所示
/* harmony import */ var voca__WEBPACK_IMPORTED_MODULE_0__ =
  __webpack_require__(/*! voca */ "./node_modules/voca/index.js");
/* harmony import */ var voca__WEBPACK_IMPORTED_MODULE_0___default =
/*#__PURE__*/__webpack_require__.n(voca__WEBPACK_IMPORTED_MODULE_0__);问题:我们知道,initFragments.push()做的事情是收集插入的代码,不是替换,那么原来的import voca from 'voca';是如何删除的呢?
涉及到HarmonyImportSideEffectDependency的添加相关逻辑,当AST解析得到HarmonyImportSideEffectDependency时,如下面代码所示,也会触发对应的ConstDependency的添加,即
module.addPresentationalDependency(clearDep)module.addDependency(sideEffectDep)
// CompatibilityPlugin.js
parser.hooks.import.tap(
    "HarmonyImportDependencyParserPlugin",
    (statement, source) => {
        parser.state.lastHarmonyImportOrder =
            (parser.state.lastHarmonyImportOrder || 0) + 1;
        const clearDep = new ConstDependency(
            parser.isAsiPosition(statement.range[0]) ? ";" : "",
            statement.range
        );
        clearDep.loc = statement.loc;
        parser.state.module.addPresentationalDependency(clearDep);
        parser.unsetAsiPosition(statement.range[1]);
        const assertions = getAssertions(statement);
        const sideEffectDep = new HarmonyImportSideEffectDependency(
            source,
            parser.state.lastHarmonyImportOrder,
            assertions
        );
        sideEffectDep.loc = statement.loc;
        parser.state.module.addDependency(sideEffectDep);
        return true;
    }
);因此在entry4.js这个module中,生成对应的HarmonyImportSideEffectDependency,也会生成对应的ConstDependency
module.dependencies=[
    HarmonyImportSideEffectDependency("./item/common_____g.js"),
    HarmonyImportSideEffectDependency("voca"),
    HarmonyImportSpecifierDependency("./item/common_____g.js"),
    HarmonyImportSpecifierDependency("voca")
]
module.presentationalDependencies=[HarmonyCompatibilityDependency, ConstDependency, ConstDependency]ConstDependency的作用就是记录对应的import语句的位置,然后使用source.replace()进行替换
source.replace(dep.range[0], dep.range[1] - 1, dep.expression)在这个示例中,dep.expression="",因此替换后为:
import {getG} from "./item/common_____g.js"; ===> ""voca.kebabCase('goodbye blue sky'); // => 'goodbye-blue-sky'形成HarmonyImportSpecifierDependency,触发HarmonyImportSpecifierDependencyTemplate.apply()
在HarmonyImportSpecifierDependencyTemplate.apply()中,如代码所示,触发initFragments.push(),其中content=importStatement[0] + importStatement[1]
class HarmonyImportSpecifierDependencyTemplate extends (
    HarmonyImportDependency.Template
) {
    apply(dependency, source, templateContext, module) {
        const dep = /** @type {HarmonyImportSpecifierDependency} */ (dependency);
        const { moduleGraph, runtime } = templateContext;
        const ids = dep.getIds(moduleGraph);
        const exportExpr = this._getCodeForIds(dep, source, templateContext, ids);
        const range = dep.range;
        if (dep.shorthand) {
            source.insert(range[1], `: ${exportExpr}`);
        } else {
            source.replace(range[0], range[1] - 1, exportExpr);
        }
    }
}source本质就是ReplaceSource,insert()是将要替换的代码的范围以及内容都放在_replacements属性中
insert(pos, newValue, name) {
    this._replacements.push(new Replacement(pos, pos - 1, newValue, name));
    this._isSorted = false;
}
最终在拼接最终生成代码时,替换的数据为:
voca.kebabCase('goodbye blue sky') ===> "voca__WEBPACK_IMPORTED_MODULE_0___default().kebabCase"同理,import {getG} from "./item/common_____g.js";和对应的调用方法的生成代码流程如上面voca的分析一样
import {getG} from "./item/common_____g.js";
                              ↓
                              ↓
                              ↓
/* harmony import */ var _item_common_g_js__WEBPACK_IMPORTED_MODULE_1__ =
  __webpack_require__(/*! ./item/common_____g.js */ \"./src/item/common_____g.js\");
getG() ===> "(0,_item_common_g_js__WEBPACK_IMPORTED_MODULE_1__.getG)"现在我们已经处理完毕module.dependencies的所有依赖,接下里我们要处理module.presentationalDependencies
module.dependencies=[
    HarmonyImportSideEffectDependency("./item/common_____g.js"),
    HarmonyImportSideEffectDependency("voca"),
    HarmonyImportSpecifierDependency("./item/common_____g.js"),
    HarmonyImportSpecifierDependency("voca")
]
module.presentationalDependencies=[HarmonyCompatibilityDependency, ConstDependency, ConstDependency]HarmonyCompatibilityDependency是一个特殊的依赖,在AST解析的过程中,我们就会判断ast.body是否包含
ImportDeclarationExportDefaultDeclarationExportNamedDeclarationExportAllDeclaration
如果包含,则module.addPresentationalDependency(HarmonyCompatibilityDependency)
// JavascriptParser.js
parse(source, state) {
    if (this.hooks.program.call(ast, comments) === undefined) {
        this.detectMode(ast.body);
        this.preWalkStatements(ast.body);
        this.prevStatement = undefined;
        this.blockPreWalkStatements(ast.body);
        this.prevStatement = undefined;
        this.walkStatements(ast.body);
    }
    return state;
}
// HarmonyDetectionParserPlugin.js
parser.hooks.program.tap("HarmonyDetectionParserPlugin", ast => {
    const isStrictHarmony = parser.state.module.type === "javascript/esm";
    const isHarmony =
        isStrictHarmony ||
        ast.body.some(
            statement =>
                statement.type === "ImportDeclaration" ||
                statement.type === "ExportDefaultDeclaration" ||
                statement.type === "ExportNamedDeclaration" ||
                statement.type === "ExportAllDeclaration"
        );
    if (isHarmony) {
        const module = parser.state.module;
        const compatDep = new HarmonyCompatibilityDependency();

        module.addPresentationalDependency(compatDep);
    }
});而在HarmonyExportDependencyTemplate.apply()的处理也很简单,就是增加一个new InitFragment()数据到initFragments
const exportsInfo = moduleGraph.getExportsInfo(module);
if (
    exportsInfo.getReadOnlyExportInfo("__esModule").getUsed(runtime) !==
    UsageState.Unused
) {
    const content = runtimeTemplate.defineEsModuleFlagStatement({
        exportsArgument: module.exportsArgument,
        runtimeRequirements
    });
    initFragments.push(
        new InitFragment(
            content,
            InitFragment.STAGE_HARMONY_EXPORTS,
            0,
            "harmony compatibility"
        )
    );
}最终这个InitFragment形成的代码为:
__webpack_require__.r(__webpack_exports__);sourceModule()处理完成所有module.dependency和module.presentationalDependencies之后,开始处理module.blocks异步依赖
sourceModule(module, initFragments, source, generateContext) {
    for (const dependency of module.dependencies) {
        this.sourceDependency();
    }
    for (const dependency of module.presentationalDependencies) {
        this.sourceDependency();
    }
    for (const childBlock of module.blocks) {
        this.sourceBlock()
    }
}
sourceBlock(module, block, initFragments, source, generateContext) {
    for (const dependency of block.dependencies) {
        this.sourceDependency();
    }
    for (const childBlock of block.blocks) {
        this.sourceBlock();
    }
}从entry4.js的源码中可以知道,存在着唯一一个异步依赖async_B.js
import {getG} from "./item/common_____g.js";
import voca from 'voca';
voca.kebabCase('goodbye blue sky'); // => 'goodbye-blue-sky'
import (/*webpackChunkName: "B"*/"./async/async_B.js").then(bModule=> {
    bModule.default();
});

console.info("getA2E", getG());异步依赖async_B.js形成ImportDependency,触发ImportDependencyTemplate.apply()
在ImportDependencyTemplate.apply()中,如代码所示,触发source.replace,source本质就是ReplaceSource,replace()是将要替换的代码的范围以及内容都放在_replacements属性中
const dep = /** @type {ImportDependency} */ (dependency);
const block = /** @type {AsyncDependenciesBlock} */ (
  moduleGraph.getParentBlock(dep)
);
const content = runtimeTemplate.moduleNamespacePromise({
  chunkGraph,
  block: block,
  module: moduleGraph.getModule(dep),
  request: dep.request,
  strict: module.buildMeta.strictHarmonyModule,
  message: "import()",
  runtimeRequirements
});

source.replace(dep.range[0], dep.range[1] - 1, content);

// ReplaceSource.js
replace(start, end, newValue, name) {
  this._replacements.push(new Replacement(start, end, newValue, name));
  this._isSorted = false;
}
最终在拼接最终生成代码时,替换的数据为:
import (/*webpackChunkName: "B"*/"./async/async_B.js")
                              ↓
                              ↓
                              ↓

__webpack_require__.e(/*! import() | B */ "B").then(
  __webpack_require__.bind(__webpack_require__, /*! ./async/async_B.js */ "./src/async/async_B.js"))
createChunkAssets: module代码合并打包成chunk
2.1 概述
主要执行逻辑顺序为:
this.hooks.renderManifest.call([], options)触发,获取render()对象,此时还没生成代码source = fileManifest.render(),触发render()进行代码渲染拼凑this.emitAsset(file, source, assetInfo)将代码写入到文件中
seal() {
    //...根据entry初始化chunk和chunkGroup,关联chunk和chunkGroup
    // ...遍历entry所有的dependencies,关联chunk、dependencies、chunkGroup
    // 为module设置深度标记
    this.assignDepths(entryModules);
    buildChunkGraph(this, chunkGraphInit);

    this.createModuleHashes();
    this.codeGeneration(err => {
        this.createChunkAssets(err => { });
    });
}
function createChunkAssets(callback) {
    asyncLib.forEachLimit(
        this.chunks,
        (chunk, callback) => {
            // this.getRenderManifest=this.hooks.renderManifest.call([], options);
            let manifest = this.getRenderManifest({
                chunk,
                ...
            });

            //...遍历manifest,调用(manifest[i]=fileManifest)fileManifest.render()
            asyncLib.forEach(
                manifest,
                (fileManifest, callback) => {
                    //....
                    source = fileManifest.render();
                    this.emitAsset(file, source, assetInfo);
                }
            );
        }
    )
}
2.2 manifest=this.getRenderManifest
manifest=this.hooks.renderManifest.call([], options)
跟parser、generator、dependencyTemplates类似,这里也采用hooks.renderManifest.tap注册监听,根据传入的chunk中不同类型的部分,比如
- 触发
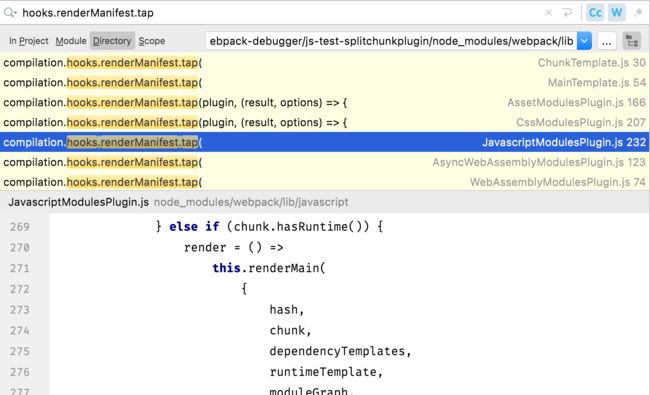
JavascriptModulesPlugin.js处理chunk中的js部分 - 触发
CssModulePlugins.js处理chunk中的css部分
2.3 source = manifest[i].render()
由上面的分析可以知道,会根据chunk中有多少类型数据而采用不同的Plugin进行处理,其中最常见的就是JavascriptModulesPlugin的处理,下面我们使用JavascriptModulesPlugin看下整体的render()流程
2.3.1 source = JavascriptModulesPlugin.render()
根据不同的状态,进行render()方法内容的调用
chunk.hasRuntime()->renderMain()方法chunk.renderChunk()->renderChunk()方法
// JavascriptModulesPlugin
compilation.hooks.renderManifest.tap(
    "JavascriptModulesPlugin",
    (result, options) => {
        if (hotUpdateChunk) {
            render = () => this.renderChunk(...);
        } else if (chunk.hasRuntime()) {
            render = () => this.renderMain(...);
        } else {
            if (!chunkHasJs(chunk, chunkGraph)) {
                return result;
            }
            render = () => this.renderChunk();
        }
        result.push({
            render,
            filenameTemplate,
            pathOptions: {
                hash,
                runtime: chunk.runtime,
                chunk,
                contentHashType: "javascript"
            },
            ...
        });
        return result;
    }
)
2.3.2 renderMain(): 入口entry类型chunk触发代码生成
问题
mode: "development"和mode: "production"两种模式有什么区别?- 为什么
renderMain()的内容是对应mode: "development"的?mode:production是有另外的分支处理还是在renderMain()基础上进行改造呢?
整体流程图
下面会针对该流程图进行具体的文字描述分析
打包产物详细分析
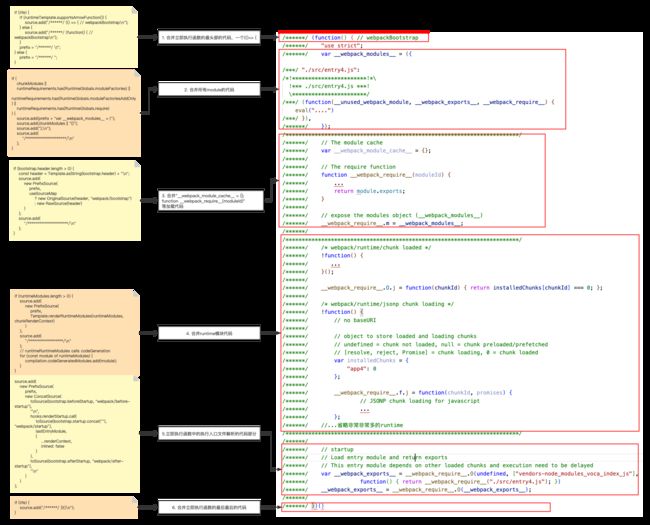
从上面所打包生成的代码,我们可以总结出来打包产物为
整体流程图文字描述
按照指定顺序合并代码
- 合并立即执行函数的最头部的代码,一个
(()=> { - 合并所有
module的代码 - 合并
__webpack_module_cache__ = {};function __webpack_require__(moduleId)等加载代码 - 合并
runtime模块代码 - 合并
"Load entry module and return exports"等代码,即立即执行函数中的执行入口文件解析的代码部分,主动触发入口文件的加载 - 合并立即执行函数的最后最后的代码,即
})()
由于计算代码和合并代码逻辑揉杂在一起,因此调整了下面代码顺序,增强可读性
renderMain(renderContext, hooks, compilation) {
    let source = new ConcatSource();
    const iife = runtimeTemplate.isIIFE();
    // 1. 计算出"function __webpack_require__(moduleId)"等代码
    const bootstrap = this.renderBootstrap(renderContext, hooks);
    // 2. 计算出所有module的代码
    const chunkModules = Template.renderChunkModules(
        chunkRenderContext,
        inlinedModules
            ? allModules.filter(m => !inlinedModules.has(m))
            : allModules,
        module => this.renderModule(module, chunkRenderContext, hooks, true),
        prefix
    );
    // 3. 计算出运行时的代码
    const runtimeModules =
        renderContext.chunkGraph.getChunkRuntimeModulesInOrder(chunk);

    // 1. 合并立即执行函数的最头部的代码,一个(()=> {
    if (iife) {
        if (runtimeTemplate.supportsArrowFunction()) {
            source.add("/******/ (() => { // webpackBootstrap\n");
        } else {
            source.add("/******/ (function() { // webpackBootstrap\n");
        }
        prefix = "/******/ \t";
    } else {
        prefix = "/******/ ";
    }
    // 2. 合并所有module的代码
    if (
        chunkModules ||
        runtimeRequirements.has(RuntimeGlobals.moduleFactories) ||
        runtimeRequirements.has(RuntimeGlobals.moduleFactoriesAddOnly) ||
        runtimeRequirements.has(RuntimeGlobals.require)
    ) {
        source.add(prefix + "var __webpack_modules__ = (");
        source.add(chunkModules || "{}");
        source.add(");\n");
        source.add(
            "/************************************************************************/\n"
        );
    }
    // 3. 合并"__webpack_module_cache__ = {};function __webpack_require__(moduleId)"等加载代码
    if (bootstrap.header.length > 0) {
        const header = Template.asString(bootstrap.header) + "\n";
        source.add(
            new PrefixSource(
                prefix,
                useSourceMap
                    ? new OriginalSource(header, "webpack/bootstrap")
                    : new RawSource(header)
            )
        );
        source.add(
            "/************************************************************************/\n"
        );
    }
    // 4. 合并runtime模块代码
    if (runtimeModules.length > 0) {
        source.add(
            new PrefixSource(
                prefix,
                Template.renderRuntimeModules(runtimeModules, chunkRenderContext)
            )
        );
        source.add(
            "/************************************************************************/\n"
        );
        // runtimeRuntimeModules calls codeGeneration
        for (const module of runtimeModules) {
            compilation.codeGeneratedModules.add(module);
        }
    }
    // 5. 合并"Load entry module and return exports"等代码,即立即执行函数中的执行入口文件解析的代码部分
    // 主动触发入口文件的加载
    source.add(
        new PrefixSource(
            prefix,
            new ConcatSource(
                toSource(bootstrap.beforeStartup, "webpack/before-startup"),
                "\n",
                hooks.renderStartup.call(
                    toSource(bootstrap.startup.concat(""), "webpack/startup"),
                    lastEntryModule,
                    {
                        ...renderContext,
                        inlined: false
                    }
                ),
                toSource(bootstrap.afterStartup, "webpack/after-startup"),
                "\n"
            )
        )
    );
    // 6. 合并立即执行函数的最后最后的代码
    if (iife) {
        source.add("/******/ })()\n");
    }
}
Template.renderChunkModules
在renderMain()的流程中,主要还是调用了Template.renderChunkModules()进行该chunk涉及到module的渲染,下面我们将简单分析下该方法
传入该chunk包含的所有modules以及对应的renderModule()函数,返回所有module渲染的source
在不同的Plugin中书写renderModule()函数,使用Template.renderChunkModules()静态方法调用renderModule()函数生成所有modules的source,本质还是利用codeGeneration()中生成的codeGenerationResults获取对应module的source
注意!要渲染的modules会按照identifier进行排序渲染
2.3.3 renderChunk(): 非入口entry类型chunk触发代码生成
异步chunk、符合splitChunkPlugin的cacheGroup规则的chunk
本质renderChunk()主要也是调用Template.renderChunkModules()进行所有module相关代码的生成
Template.renderChunkModules()方法已经在上面renderMain()中分析,这里不再赘述
然后拼接一些字符串形成最终的bundle
renderChunk(renderContext, hooks) {
    const { chunk, chunkGraph } = renderContext;
    const modules = chunkGraph.getOrderedChunkModulesIterableBySourceType(
        chunk,
        "javascript",
        compareModulesByIdentifier
    );
    const allModules = modules ? Array.from(modules) : [];
    const chunkRenderContext = {
        ...renderContext,
        chunkInitFragments: [],
        strictMode: allStrict
    };
    const moduleSources =
        Template.renderChunkModules(chunkRenderContext, allModules, module =>
            this.renderModule(module, chunkRenderContext, hooks, true)
        ) || new RawSource("{}");
    let source = tryRunOrWebpackError(
        () => hooks.renderChunk.call(moduleSources, chunkRenderContext),
        "JavascriptModulesPlugin.getCompilationHooks().renderChunk"
    );
    //...省略对source的优化处理
    chunk.rendered = true;
    return strictHeader
        ? new ConcatSource(strictHeader, source, ";")
        : renderContext.runtimeTemplate.isModule()
            ? source
            : new ConcatSource(source, ";");
}
Compilation.emitAsset(file, source, assetInfo)
// node_modules/webpack/lib/Compilation.js
seal() {
    //...根据entry初始化chunk和chunkGroup,关联chunk和chunkGroup
    // ...遍历entry所有的dependencies,关联chunk、dependencies、chunkGroup
    // 为module设置深度标记
    this.assignDepths(entryModules);
    buildChunkGraph(this, chunkGraphInit);

    this.createModuleHashes();
    this.codeGeneration(err => {
        this.createChunkAssets(err => { });
    });
}
function createChunkAssets(callback) {
    asyncLib.forEachLimit(
        this.chunks,
        (chunk, callback) => {
            let manifest = this.getRenderManifest({
                chunk,
                ...
            });
            // manifest=this.hooks.renderManifest.call([], options);

            asyncLib.forEach(
                manifest,
                (fileManifest, callback) => {
                    //....
                    source = fileManifest.render();
                    this.emitAsset(file, source, assetInfo);
                }
            );
        }
    )
}将生成代码赋值到assets对象上,准备写入文件,然后调用callback,结束compliation.seal()流程
// node_modules/webpack/lib/Compilation.js
createChunkAssets(callback) {
  this.assets[file] = source;
}
Compiler.emitAsset
从下面代码可以知道,compilation.seal结束时会调用onCompiled()方法,从而触发this.emitAssets()方法
// node_modules/webpack/lib/Compiler.js
run(callback) {
    //....
    const onCompiled = (err, compilation) => {
        this.emitAssets(compilation, err => {
            logger.time("emitRecords");
            this.emitRecords(err => {
                logger.time("done hook");
                const stats = new Stats(compilation);
                this.hooks.done.callAsync(stats, err => {
                    logger.timeEnd("done hook");
                });
            });
        });
    };
    this.compile(onCompiled);
}

compile(callback) {
    compilation.seal(err => {
        this.hooks.afterCompile.callAsync(compilation, err => {
            return callback(null, compilation);
        });
    });
}mkdirp()是webpack封装的一个方法,本质还是调用fs.mkdir(p, err => {})异步地创建目录,然后调用emitFiles()方法
function emitAssets() {
    outputPath = compilation.getPath(this.outputPath, {});
    mkdirp(this.outputFileSystem, outputPath, emitFiles);
}而emitFiles()本质也是遍历Compliation.emitAsset()生成的资源文件this.assets[file],然后从source得到binary (Buffer)内容输出生成文件
const emitFiles = err => {
    const assets = compilation.getAssets();
    asyncLib.forEachLimit(
        assets,
        15,
        ({ name: file, source, info }, callback) => {
            let targetFile = file;
            if (targetFile.match(/\/|\\/)) {
                const fs = this.outputFileSystem;
                const dir = dirname(fs, join(fs, outputPath, targetFile));
                mkdirp(fs, dir, writeOut);
            } else {
                writeOut();
            }
        }
    )
}
const writeOut = err => {
    const targetPath = join(
        this.outputFileSystem,
        outputPath,
        targetFile
    );
    // 从source得到binary (Buffer)内容
    const getContent = () => {
        if (typeof source.buffer === "function") {
            return source.buffer();
        } else {
            const bufferOrString = source.source();
            if (Buffer.isBuffer(bufferOrString)) {
                return bufferOrString;
            } else {
                return Buffer.from(bufferOrString, "utf8");
            }
        }
    };
    const doWrite = content => {
        this.outputFileSystem.writeFile(targetPath, content, err => {
        });
    };
    const processMissingFile = () => {
        const content = getContent();
        //...
        return doWrite(content);
    };
    processMissingFile();
};
其它知识点
6.1 runtime代码的种类和作用
摘录自https://webpack.docschina.org/concepts/manifest#runtime
runtime,以及伴随的 manifest 数据,主要是指:在浏览器运行过程中,webpack 用来连接模块化应用程序所需的所有代码。它包含:在模块交互时,连接模块所需的加载和解析逻辑。包括:已经加载到浏览器中的连接模块逻辑,以及尚未加载模块的延迟加载逻辑。
| runtime包含的函数 | 作用 |
|---|---|
| __webpack_require__.o | 工具函数,判断是否有某属性 |
| __webpack_require__.d | 对应exports,用来定义导出变量对象:Object.defineProperty(exports, key, { enumerable: true, get: definition[key] }) |
| __webpack_require__.r | 区分是否是es模块,给导出导出变量对象添加__esModule:true属性 |
| __webpack_require__.l | 工具函数,动态创建script标签去加载js,比如在热更新HRM中用来加载main.xxx.hot-update.js |
| __webpack_require__.O | chunk loaded |
| __webpack_require__.m | 包含所有module的对象的别名,__webpack_require__.m = __webpack_modules__ |
如果entry Module包含了异步加载的import逻辑,那么合并的runtime代码还会生成一些异步的方法
| runtime包含的函数 | 作用 |
|---|---|
| __webpack_require__.e | 加载异步chunk的入口方法,内部使用__webpack_require__.f进行chunk的加载 |
| __webpack_require__.f | 异步加载的对象,上面可以挂载一些异步加载的具体方法 |
| __webpack_require__.f.j | 具体的chunk的加载方法,封装promise,检测是否有缓存installedChunkData,然后使用多种方法返回结果,最终使用__webpack_require__.l加载对应的js |
| __webpack_require__.g | 获取全局this |
| __webpack_require__.p | 获取publicPath,首先尝试从document中获取publicPath,如果获取不到,我们需要在output.publicPath/__webpack_public_path__主动声明publicPath |
| __webpack_require__.u | 传入chunkId,返回[chunkId].js,拼接后缀 |
| __webpack_require__.l | 工具函数,动态创建script标签去加载js |
runtime包含的方法具体的联动逻辑请看下面的分析
6.2 webpack如何解决循环依赖
同步import、异步import、require、export {xxx}、export default等5种情况分析
6.2.1 ES6和CommonJS的区别
参考自阮一峰-Node.js 如何处理 ES6 模块和ES6模块和CommonJS模块有哪些差异?
| CommonJS | ES6 | |
|---|---|---|
| 语法 | 使用require导入和module.exports(exports)导出 |
使用import导入和export导出 |
| 用法 | 运行时加载:只有代码遇到require指令时,才会去执行模块中的代码,如果已经require一个模块,就要等待它执行完毕后才能执行后面的代码 |
编译时输出接口:编译时就可以确定模块的依赖关系,编译时遇到import不会去执行模块,只会生成一个引用,等到真正需要时,才会到模块中进行取值 |
| 输出值 | CommonJS模块输出的是一个值的复制CommonJS输出的是module.exports={xx}对象,如果这个对象包含基本类型,module内部改变了这个基本类型,输出的值不会受到影响,因此一个Object的基本类型是拷贝的,而不是引用,如果Object包含引用类型,如Array,则会影响外部引用的值 |
ES6模块输出的是值的引用,输出的是一个只读引用,等到脚本真正执行时,再根据这个只读引用,到被加载的那个模块里面去取值,因此ES6模块内部的任何变化,包括基本类型和引用类型的变化,都会导致外部引用的值发生变化。如果是export default {xxx},由于导出的是一个对象,变化规则跟CommonJS一样,基本类型是值的拷贝,引用类型是内存地址的拷贝 |
6.2.2 具体例子分析
加深对打包产物整体运行流程的理解
ES6模式下import的循环引用
如下面代码所示,我们在入口文件中import ./es_a.js,然后在es_a.js中import ./es_b.js,在es_.js中又import ./es_a.js
import {a_Value} from "./es_a";

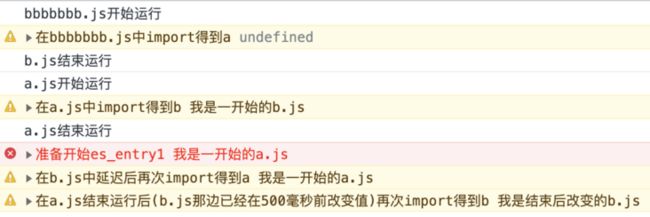
console.error("准备开始es_entry1", a_Value);我们在上面比较中说了ES6模块输出的是值的引用,输出的是一个只读引用,等到脚本真正执行时,再根据这个只读引用,到被加载的那个模块里面去取值
因此在看webpack打包文件时,我们就可以直接判断出应该打印出的顺序为:
- 一开始
import会提升到顶部,进行静态分析 - 在
es_a.js中,我们最开始调用b_Value,因此这个时候我们会去找es_b模块是否已经加载,如果没有加载则创建对应的模块,然后进入es_b模块,试图去寻找export语句 - 在
es_b.js中,我们最开始调用a_Value,我们会寻找es_a模块是否已经加载,目前已经加载了,但是由于还没执行完毕es_a.js的全部内容就进入es_b模块,因此此时a_Value=undefined,然后export var b_Value,继续执行完毕es_b模块剩下的内容 - 此时从
es_b.js->es_a.js,我们拿到了b_Value,将b_Value打印出来,然后再export var a_Value - 500毫秒后,
es_b.js定时器触发,去es_a模块寻找对应的a_Value,此时a_Value="我是一开始的a.js",并且改变了b_Value的值 - 1000毫秒后,
es_a.js定时器触发,去es_b模块寻找对应的b_Value,此时a_Value="我是结束后改变的b.js"
我们再根据webpack打包的结果查看打印的信息(下面的截图),跟我们的推断一样
那webpack是如何产生这种效果的呢?
我们直接查看webpack打包的产物,我们可以发现
__webpack_require__.r:标记为ESModule__webpack_require__.d:将export提升到最顶部,然后声明对应的key以及对应的function__webpack_require__(xxxx):这个时候才进行import的处理- 剩余代码:文件内容的代码逻辑
从下面两个代码块,我们就可以很好解释上面打印信息的前后顺序了,一开始
"./src/es_a.js":声明了对应的harmony export的key,然后__webpack_require__("./src/es_b.js")调用es_b模块,进入"./src/es_b.js""./src/es_b.js":声明了对应的harmony export的key,然后__webpack_require__("./src/es_a.js"),此时_es_a_js__WEBPACK_IMPORTED_MODULE_0__存在!但是a_Value还没赋值,由于var a_Value会进行变量提升,因此拿到的a_Value=undefined,执行完毕es_b.js剩下的代码,此时b_Value已经赋值es_b.js->es_a.js,打印出对应的_es_b_js__WEBPACK_IMPORTED_MODULE_0__.b_Value,然后赋值a_Value- 在接下来的两个
setTimeout()中,由于都是去__webpack_require__.d获取对应key的function(),因此可以实时拿到变化的值
"./src/es_a.js":
(function (__unused_webpack_module, __webpack_exports__, __webpack_require__) {

    __webpack_require__.r(__webpack_exports__);
    /* harmony export */
    __webpack_require__.d(__webpack_exports__, {
        /* harmony export */   "a_Value": function () {
            return /* binding */ a_Value;
        }
        /* harmony export */
    });
    /* harmony import */
    var _es_b_js__WEBPACK_IMPORTED_MODULE_0__ = __webpack_require__(/*! ./es_b.js */ "./src/es_b.js");

    console.info("a.js开始运行");
    console.warn("在a.js中import得到b", _es_b_js__WEBPACK_IMPORTED_MODULE_0__.b_Value);

    var a_Value = "我是一开始的a.js";
    console.info("a.js结束运行");

    setTimeout(() => {
        console.warn("在a.js结束运行后(b.js那边已经在500毫秒前改变值)再次import得到b",
            _es_b_js__WEBPACK_IMPORTED_MODULE_0__.b_Value);
    }, 1000);
})
"./src/es_b.js":
(function (__unused_webpack_module, __webpack_exports__, __webpack_require__) {
__webpack_require__.r(__webpack_exports__);
/* harmony export */
__webpack_require__.d(__webpack_exports__, {
/* harmony export */ "b_Value": function () {
return /* binding */ b_Value;
}
/* harmony export */
});
/* harmony import */
var _es_a_js__WEBPACK_IMPORTED_MODULE_0__ = __webpack_require__(/*! ./es_a.js */ "./src/es_a.js");
console.info("bbbbbbb.js开始运行");
console.warn("在bbbbbbb.js中import得到a", _es_a_js__WEBPACK_IMPORTED_MODULE_0__.a_Value);
var b_Value = "我是一开始的b.js";
console.info("b.js结束运行");
setTimeout(() => {
b_Value = "我是结束后改变的b.js";
console.warn("在b.js中延迟后再次import得到a", _es_a_js__WEBPACK_IMPORTED_MODULE_0__.a_Value);
}, 500);
})CommonJS模式下require的循环引用
console.error("准备开始entry");
const moduleA = require("./a.js");
const moduleB = require("./b.js");

console.error("entry最后拿到的值是", moduleA.a_Value);
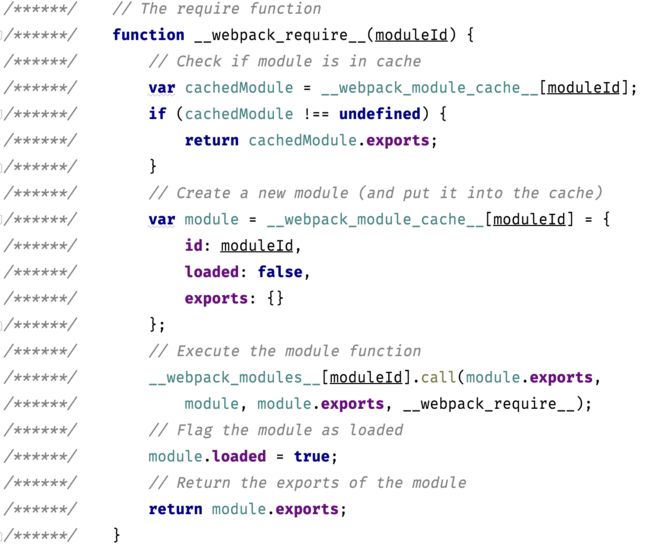
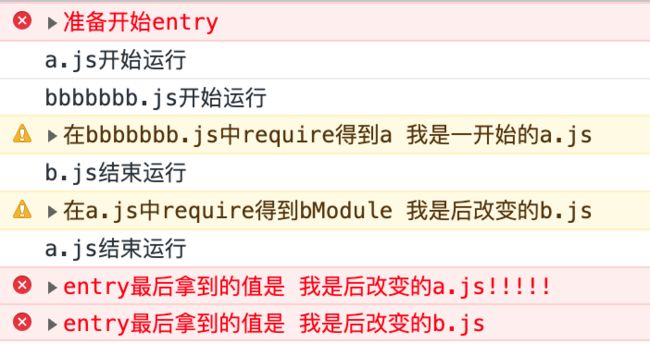
console.error("entry最后拿到的值是", moduleB.b_Value);具体的示例代码如上所示,它所生成的webpack代码如下所示,整体流程是比较简单的,会使用module.exports存储要暴露出去的数据,如果加载过一次,则会存入缓存中,因此上面示例代码整体步骤为
entry2.js:触发require("./a.js"),这个时候由于a模块还没创建,因此会进入到a模块中a.js:先暴露了一个exports.a_Value数据,然后触发require("./b.js"),这个时候由于b模块还没创建,因此会进入到b模块中b.js:进入b.js后,会遇到require("./a.js"),这个时候a模块已经创建,存入到__webpack_module_cache__["a"]中,因此会直接从缓存中读取数据,此时读到了它的module.exports.a_Value,显示出来后,又改变了b模块的module.exports.b_Value数据a.js:回到a.js后,将得到的b模块的module.exports.b_Value打印出来,然后改变自身的一个变量module.exports.a_Value数据entry2.js:a.js->b.js->a.js后回到entry2.js,将a模块的一个变量module.exports.a_Value和b模块的一个变量module.exports.b_Value打印出来
var __webpack_module_cache__ = {};
function __webpack_require__(moduleId) {
    var cachedModule = __webpack_module_cache__[moduleId];
    if (cachedModule !== undefined) {
        return cachedModule.exports;
    }
    var module = __webpack_module_cache__[moduleId] = {
        exports: {}
    };
    __webpack_modules__[moduleId](module, module.exports, __webpack_require__);
    return module.exports;
}
var __webpack_modules__ = ({
    /***/ "./src/CommonJS/a.js":
    /***/ (function (__unused_webpack_module, exports, __webpack_require__) {
            console.info("a.js开始运行");
            var a_Value = "我是一开始的a.js";
            exports.a_Value = a_Value;
            const bModule = __webpack_require__(/*! ./b.js */ "./src/CommonJS/b.js");
            console.warn("在a.js中require得到bModule",
                bModule.b_Value);
            a_Value = "我是后改变的a.js!!!!!";
            exports.a_Value = a_Value;
            console.info("a.js结束运行");
            /***/
        }),
    /***/ "./src/CommonJS/b.js":
    /***/ (function (__unused_webpack_module, exports, __webpack_require__) {
            console.info("bbbbbbb.js开始运行");
            var b_Value = "我是一开始的b.js";
            exports.b_Value = b_Value;
            const aModule = __webpack_require__(/*! ./a.js */ "./src/CommonJS/a.js");
            console.warn("在bbbbbbb.js中require得到a",
                aModule.a_Value);
            b_Value = "我是后改变的b.js";
            exports.b_Value = b_Value;
            console.info("b.js结束运行");
            /***/
        })
    /******/
});上面流程运行结果如下所示,由于整体流程都围绕模块的module.exports.xxx变量展开,比较简单,这里不再着重分析
6.3 chunk是如何实现与其它chunk的联动
6.3.1 入口文件有其它chunk的同步依赖
需要先加载其它chunk再进行入口文件其它代码的执行,常见于使用node_modules的第三方库,触发splitChunks的默认cacheGroups打包形成一个chunk
在上面renderMain()的示例代码中,我们的示例代码如下所示
import getE from "./item/entry1_a.js";
import {getG} from "./item/common_____g.js";
import _ from "loadsh";
console.info(_.add(13, 24));

var testvalue = getE() + getG();

import (/*webpackChunkName: "B"*/"./async/async_B.js").then(bModule => {
    bModule.default();
});


setTimeout(() => {
    const requireA = require("./require/require_A.js");
    console.info("testvalue", testvalue + requireA.getRequireA());
}, 4000);最终生成的chunk有
app4.js:入口形成的Chunk
B.js:异步import形成的Chunk
C.js:异步import形成的Chunk
vendors-node_modules_loadsh_lodash_js.js:命中node_modules而形成的Chunk
从上图我们可以知道,我们在加载入口文件时,我们应该需要先加载完毕vendors-node_modules_loadsh_lodash_js.js,因为在源码中,我们是同步的,得先有loadsh,然后执行入口文件的其它内容
而从生成的代码中(如下所示),我们也可以发现确实如此,从生成的注释可以知道,如果我们的entry module依赖其它chunk,那么我就得使用__webpack_require__.O延迟加载入口文件./src/entry4.js
// This entry module depends on other loaded chunks and execution need to be delayed
var __webpack_exports__ = __webpack_require__.O(undefined,
    ["vendors-node_modules_loadsh_lodash_js"],
    function () { return __webpack_require__("./src/entry4.js"); })
__webpack_exports__ = __webpack_require__.O(__webpack_exports__);那__webpack_require__.O是如何判断的呢?
在调用第一次__webpack_require__.O时,会传入chunkIds,然后会将前置加载的chunk数组存储到deferred中
!function () {
    var deferred = [];
    __webpack_require__.O = function (result, chunkIds, fn, priority) {
        if (chunkIds) {
            priority = priority || 0;
            for (var i = deferred.length; i > 0 && deferred[i - 1][2] > priority; i--) deferred[i] = deferred[i - 1];
            deferred[i] = [chunkIds, fn, priority];
            return;
        }
        //...
        return result;
    };
}();等到第二次调用__webpack_exports__ = __webpack_require__.O(__webpack_exports__),会触发一个遍历逻辑,也就是下面代码块所注释的那一行代码:
return __webpack_require__.O[key](chunkIds[j])- ==>
return __webpack_require__.O.j(chunkIds[j])- ==>
ƒ (chunkId) { return installedChunks[chunkId] === 0; }
实际就是检测是否已经加载deferred存储的chunks,如果加载了,才能触发fn(),也就是"./src/entry4.js"入口文件的加载
!function () {
    var deferred = [];
    __webpack_require__.O = function (result, chunkIds, fn, priority) {
        if (chunkIds) {
           //...
            return;
        }
        //...
        for (var i = 0; i < deferred.length; i++) {
            var chunkIds = deferred[i][0];
            var fn = deferred[i][1];
            //...
            var fulfilled = true;
            for (var j = 0; j < chunkIds.length; j++) {
                //Object.keys(__webpack_require__.O).every(function (key) { return __webpack_require__.O[key](chunkIds[j]); })
                if ((priority & 1 === 0 || notFulfilled >= priority) && Object.keys(__webpack_require__.O).every(function (key) { return __webpack_require__.O[key](chunkIds[j]); })) {
                    chunkIds.splice(j--, 1);
                } else {
                    fulfilled = false;
                    if (priority < notFulfilled) notFulfilled = priority;
                }
            }
            if (fulfilled) {
                deferred.splice(i--, 1)
                var r = fn();
                if (r !== undefined) result = r;
            }
        }
        return result;
    };
}();因此,如果有声明index.html,webpack会帮我们形成下面的html文件,先加载同步依赖的js,再加载对应的入口文件js
Document
6.3.2 入口文件有其它chunk的异步依赖
异步chunk会触发__webpack_require__.e进行处理,内部也是调用__webpack_require__.f.j->__webpack_require__.l加载对应的[chunk].js
__webpack_require__.e = function (chunkId) {
    return Promise.all(Object.keys(__webpack_require__.f).reduce(function (promises, key) {
        __webpack_require__.f[key](chunkId, promises);
        return promises;
    }, []));
};
__webpack_require__.e(/*! import() | B */ "B").then(
    __webpack_require__.bind(__webpack_require__, /*! ./async/async_B.js */ "./src/async/async_B.js")
).then(bModule => {
    bModule.default();
});从下面代码可以知道,异步ChunkB返回的是一个立即执行函数,会执行self["webpackChunkwebpack_5_image"].push,其实就是chunkLoadingGlobal.push,会触发对应的__webpack_require__.m[moduleId]实例化对应的数据
// B.js
(self["webpackChunkwebpack_5_image"] = self["webpackChunkwebpack_5_image"] || []).push([["B"], {
    "./src/async/async_B.js":
        (function (__unused_webpack_module, __webpack_exports__, __webpack_require__) {
            eval("...")
        })
}]);

// app4.js
var chunkLoadingGlobal = self["webpackChunkwebpack_5_image"] = self["webpackChunkwebpack_5_image"] || [];
chunkLoadingGlobal.forEach(webpackJsonpCallback.bind(null, 0));//在异步chunk在chunkLoadingGlobal初始化之前已经塞入数据
chunkLoadingGlobal.push = webpackJsonpCallback.bind(null, chunkLoadingGlobal.push.bind(chunkLoadingGlobal));

var webpackJsonpCallback = function (parentChunkLoadingFunction, data) {
    //...
    var moreModules = data[1];
    //...
    if (chunkIds.some(function (id) { return installedChunks[id] !== 0; })) {
        for (moduleId in moreModules) {
            if (__webpack_require__.o(moreModules, moduleId)) {
                __webpack_require__.m[moduleId] = moreModules[moduleId];
            }
        }
    }
    for (; i < chunkIds.length; i++) {
        chunkId = chunkIds[i];
        if (__webpack_require__.o(installedChunks, chunkId) && installedChunks[chunkId]) {
            installedChunks[chunkId][0]();
        }
        installedChunks[chunkId] = 0;
    }
    //...
}
chunkLoadingGlobal.push = webpackJsonpCallback.bind(null, chunkLoadingGlobal.push.bind(chunkLoadingGlobal))传入的第二个参数会作为初始参数跟后来调用的参数进行合并,因此parentChunkLoadingFunction=chunkLoadingGlobal.push.bind(chunkLoadingGlobal),而data就是B.js中push的数据
webpackJsonpCallback()加载完成对应的chunk.js后,会将chunk.js的内容存储到对应的__webpack_require__.m[moduleId]中,然后调用installedChunks[chunkId][0]()
installedChunks[chunkId][0]()是什么呢?在之前的__webpack_require__.f.j()中,我们注册了对应的installedChunks[chunkId] = [resolve, reject];
__webpack_require__.f.j = function (chunkId, promises) {
    // ....
    var promise = new Promise(function (resolve, reject) {
      installedChunkData = installedChunks[chunkId] = [resolve, reject];
    });
    promises.push(installedChunkData[2] = promise);
    __webpack_require__.l(url, loadingEnded, "chunk-" + chunkId, chunkId);
};这个时候我们又可以回到一开始的__webpack_require__.e,__webpack_require__.f加载对应的chunk.js后,会改变promises的状态,从而触发__webpack_require__.bind(__webpack_require__, "./src/async/async_B.js")的执行,而此时的"./src/async/async_B.js"已经在之前的jsonp请求中存入到__webpack_require__.m[moduleId],因此这里就可以直接获取对应的内容实现异步chunk的调用
__webpack_require__.e = function (chunkId) {
    return Promise.all(Object.keys(__webpack_require__.f).reduce(function (promises, key) {
        __webpack_require__.f[key](chunkId, promises);
        return promises;
    }, []));
};
__webpack_require__.e(/*! import() | B */ "B").then(
    __webpack_require__.bind(__webpack_require__, /*! ./async/async_B.js */ "./src/async/async_B.js")
).then(bModule => {
    bModule.default();
});
6.3.3 其它细小知识点
而在webpack官网中,我们从https://webpack.docschina.org/concepts/manifest/可以知道
一旦你的应用在浏览器中以 index.html 文件的形式被打开,一些 bundle 和应用需要的各种资源都需要用某种方式被加载与链接起来。在经过打包、压缩、为延迟加载而拆分为细小的 chunk 这些 webpack 优化 之后,你精心安排的 /src 目录的文件结构都已经不再存在。所以 webpack 如何管理所有所需模块之间的交互呢?
当 compiler 开始执行、解析和映射应用程序时,它会保留所有模块的详细要点。这个数据集合称为 "manifest"
当完成打包并发送到浏览器时,runtime 会通过 manifest 来解析和加载模块,也就是说在浏览器运行时,runtime是webpack用来连接模块化的应用程序的所有代码
runtime包含:在模块交互时,连接模块所需的加载和解析逻辑
runtime包括:浏览器中的已加载模块的连接,以及懒加载模块的执行逻辑
6.4 runtime代码与module、chunk的关联
6.4.1 计算:runtimeRequirements的初始化
runtime包含很多工具方法,一个Chunk怎么知道它需要什么工具方法?比如一个Chunk只有同步,没有异步,自然不会生成异步runtime的代码
在上面HarmonyImportDependency.Template的分析我们可以知道,生成代码时,会触发dep.getImportStatement(),实际就是RuntimeTemplate.importStatement()
//node_modules/webpack/lib/dependencies/HarmonyImportDependency.js
HarmonyImportDependency.Template = class HarmonyImportDependencyTemplate extends (
    ModuleDependency.Template
) {
    apply(dependency, source, templateContext) {
        const importStatement = dep.getImportStatement(false, templateContext);
        //...
    }
}
getImportStatement() {
    return runtimeTemplate.importStatement({
        update,
        module: moduleGraph.getModule(this),
        chunkGraph,
        importVar: this.getImportVar(moduleGraph),
        request: this.request,
        originModule: module,
        runtimeRequirements
    });
}在RuntimeTemplate.importStatement()中,会生成实际的代码,比如/* harmony import */、__webpack_require__(xxxx)等等
// node_modules/webpack/lib/RuntimeTemplate.js
importStatement() {
    const optDeclaration = update ? "" : "var ";

    const exportsType = module.getExportsType(
        chunkGraph.moduleGraph,
        originModule.buildMeta.strictHarmonyModule
    );
    runtimeRequirements.add(RuntimeGlobals.require);
    const importContent = `/* harmony import */ ${optDeclaration}${importVar} = __webpack_require__(${moduleId});\n`;

    if (exportsType === "dynamic") {
        runtimeRequirements.add(RuntimeGlobals.compatGetDefaultExport);
        return [
            importContent,
            `/* harmony import */ ${optDeclaration}${importVar}_default = /*#__PURE__*/${RuntimeGlobals.compatGetDefaultExport}(${importVar});\n`
        ];
    }
    return [importContent, ""];
}上面代码对应的本质就是webpack生成具体module代码时,entry4.js中内部import的替换语句
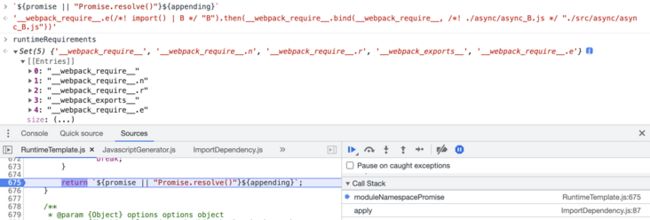
在上面转化语句的流程中,我们也将对应的runtime模块需要的代码放入到runtimeRequirements中,比如
runtimeRequirements=["__webpack_require__", "__webpack_require__.n"]上面的分析是同步的/* harmony import */流程分析,那如果是异步的import呢?
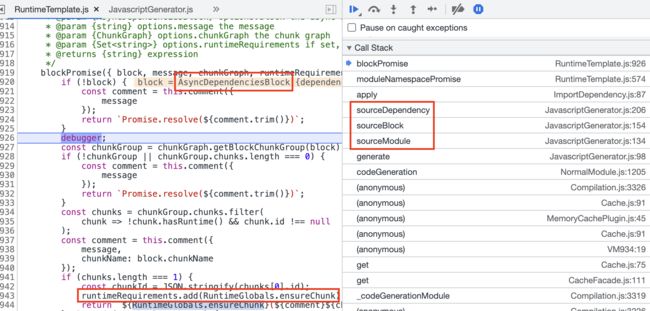
这里我们可以使用倒推法,我们可以发现,本质runtimeRequirements.push()都是RuntimeGlobals这个变量的值,所以我们可以从上面的打包产物中,找到异步所需要的runtime方法:__webpack_require__.e,就可以轻易找到对应的变量为RuntimeGlobals.ensureChunk,然后就可以轻易找到对应的代码所在位置,进行分析
因此我们可以很轻松明白整个异步import计算runtime依赖的流程,通过sourceBlock()->sourceDependency()->触发对应的ImportDependency对应的ImportDependency.Template
从而触发runtimeTemplate.moduleNamespacePromise()完成代码的转化以及runtimeRequirements的计算
6.4.2 依赖收集:runtimeRequirements和module
在经历module.codeGeneration生成模块代码,并且顺便创建runtimeRequirements的流程后,会调用processRuntimeRequirements()进行runtimeRequirements的处理,将数据放入到chunkGraph中
this.codeGeneration(err => {
    //...module.codeGeneration
    this.processRuntimeRequirements();
}
processRuntimeRequirements() {
    for(const module of modules) {
        for (const runtime of chunkGraph.getModuleRuntimes(module)) {
            const runtimeRequirements =
                codeGenerationResults.getRuntimeRequirements(module, runtime);
            if (runtimeRequirements && runtimeRequirements.size > 0) {
                set = new Set(runtimeRequirements);
            }
            chunkGraph.addModuleRuntimeRequirements(module, runtime, set);
        }
    }
    //...
}
6.4.3 依赖收集:runtimeRequirements和chunk
以chunk为单位,遍历所有该chunk中包含的module所依赖的runtimeRequirements,然后使用const set=new Set()进行去重,最终将chunk和runtimeRequirements的关系放入到chunkGraph中
this.hooks.additionalChunkRuntimeRequirements.call(chunk, set, context)触发的逻辑:判断是否需要为set集合数据添加对应的item
processRuntimeRequirements() {
    //...处理module和runtimeRequirements

    for (const chunk of chunks) {
        const set = new Set();
        for (const module of chunkGraph.getChunkModulesIterable(chunk)) {
            const runtimeRequirements = chunkGraph.getModuleRuntimeRequirements(
                module,
                chunk.runtime
            );
            for (const r of runtimeRequirements) set.add(r);
        }
        this.hooks.additionalChunkRuntimeRequirements.call(chunk, set, context);

        for (const r of set) {
            this.hooks.runtimeRequirementInChunk.for(r).call(chunk, set, context);
        }

        chunkGraph.addChunkRuntimeRequirements(chunk, set);
    }
}
6.4.4 依赖收集:runtimeRequirements和chunkGraphEntries
processRuntimeRequirements() {
    //...处理module和runtimeRequirements
    //...处理chunk和runtimeRequirements

    for (const treeEntry of chunkGraphEntries) {
        const set = new Set();
        for (const chunk of treeEntry.getAllReferencedChunks()) {
            const runtimeRequirements =
                chunkGraph.getChunkRuntimeRequirements(chunk);
            for (const r of runtimeRequirements) set.add(r);
        }
        this.hooks.additionalTreeRuntimeRequirements.call(
            treeEntry,
            set,
            context
        );
        for (const r of set) {
            this.hooks.runtimeRequirementInTree
                .for(r)
                .call(treeEntry, set, context);
        }
        chunkGraph.addTreeRuntimeRequirements(treeEntry, set);
    }
} chunkGraphEntries是什么?
chunkGraphEntries = this._getChunkGraphEntries()
获取所有同步entry和异步entry所具有的runtimeChunk,然后都放入到treeEntries这个集合中去
webpack5允许将runtime代码剥离出来形成runtimeChunk,然后提供给多个chunk一起使用
_getChunkGraphEntries() {
    /** @type {Set} */
    const treeEntries = new Set();
    for (const ep of this.entrypoints.values()) {
        const chunk = ep.getRuntimeChunk();
        if (chunk) treeEntries.add(chunk);
    }
    for (const ep of this.asyncEntrypoints) {
        const chunk = ep.getRuntimeChunk();
        if (chunk) treeEntries.add(chunk);
    }
    return treeEntries;
}
hooks.additionalTreeRuntimeRequirements.call
触发多个Plugin的监听,为set集合增加item
hooks.runtimeRequirementInTree.call
for (const r of set) {
    this.hooks.runtimeRequirementInTree
        .for(r)
        .call(treeEntry, set, context);
}根据目前的runtimeRequirements,即RuntimeGlobals.ensureChunk = "__webpack_require__.e"触发对应的逻辑处理
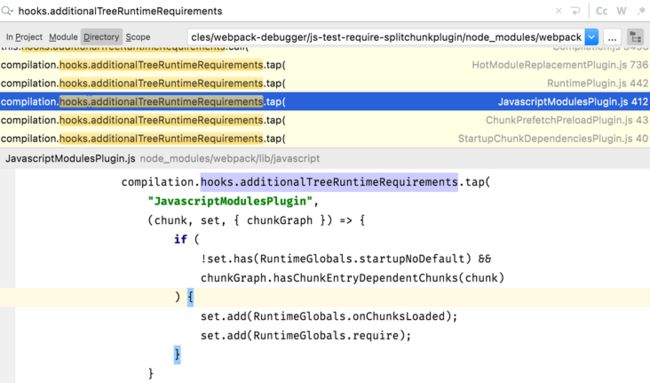
比如上图所示,我们在module.codeGeneration()可以替换对应的代码为"__webpack_require__.e",在上面的runtime代码的种类和作用中,我们知道这是代表异步请求的方法,但是我们只替换了源码,如下代码块所示
__webpack_require__.e(/*! import() | B */ "B").then(
    __webpack_require__.bind(__webpack_require__, /*! ./async/async_B.js */ "./src/async/async_B.js")
).then(bModule => {
    bModule.default();
});我们还需要生成_webpack_require__.e方法的具体内容,即对应的runtime工具方法需要生成,如下所示
__webpack_require__.e = function (chunkId) {
    return Promise.all(Object.keys(__webpack_require__.f).reduce(function (promises, key) {
        __webpack_require__.f[key](chunkId, promises);
        return promises;
    }, []));
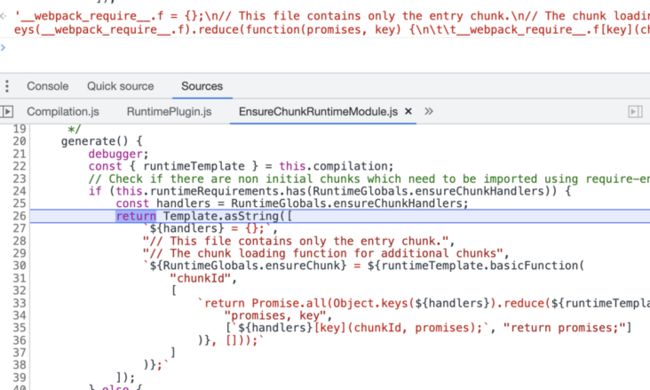
};因此我们通过this.hooks.runtimeRequirementInTree处理这种情况,如上面例子所示,我们最终使用compilation.addRuntimeModule()增加了一个代码模块,在后面的代码生成中,我们就可以触发EnsureChunkRuntimeModule.js的generate()进行对应代码的生成,如下图所示
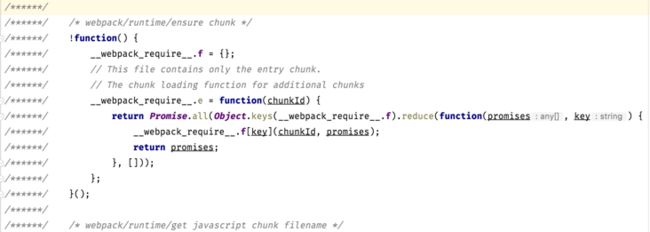
它所对应的就是我们打包后webpack/runtime/ensure chunk的内容
chunkGraph.addTreeRuntimeRequirements
addTreeRuntimeRequirements(chunk, items) {
    const cgc = this._getChunkGraphChunk(chunk);
    const runtimeRequirements = cgc.runtimeRequirementsInTree;
    for (const item of items) runtimeRequirements.add(item);
}
6.4.5 代码生成:合并到其它chunk
在上面的this.hooks.runtimeRequirementInTree.call的分析中,我们可以知道,会触发compilation.addRuntimeModule
//node_modules/webpack/lib/RuntimePlugin.js
compilation.hooks.runtimeRequirementInTree
    //__webpack_require__.e
    .for(RuntimeGlobals.ensureChunk)
    .tap("RuntimePlugin", (chunk, set) => {
        const hasAsyncChunks = chunk.hasAsyncChunks();
        if (hasAsyncChunks) {
            //__webpack_require__.f
            set.add(RuntimeGlobals.ensureChunkHandlers);
        }
        compilation.addRuntimeModule(
            chunk,
            new EnsureChunkRuntimeModule(set)
        );
        return true;
});本质上就是把某一个runtime的方法当作Module与Chunk进行关联,然后在chunk生成代码时,会将chunk包含的modules,包括这些runtime的modules进行代码的生成
// node_modules/webpack/lib/Compilation.js
addRuntimeModule(chunk, module, chunkGraph = this.chunkGraph) {
    // Deprecated ModuleGraph association
    if (this._backCompat)
        ModuleGraph.setModuleGraphForModule(module, this.moduleGraph);

    // add it to the list
    this.modules.add(module);
    this._modules.set(module.identifier(), module);

    // connect to the chunk graph
    chunkGraph.connectChunkAndModule(chunk, module);
    chunkGraph.connectChunkAndRuntimeModule(chunk, module);
    if (module.fullHash) {
        chunkGraph.addFullHashModuleToChunk(chunk, module);
    } else if (module.dependentHash) {
        chunkGraph.addDependentHashModuleToChunk(chunk, module);
    }
    //.......
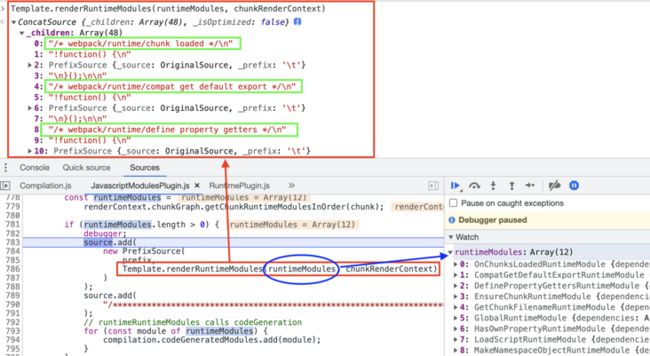
}而真正生成runtime的地方是在生成代码时获取对应chunk的runtimeModule进行代码生成,比如下图的renderMain()中,我们可以拿到一个runtimeModules,仔细观察其实每一个Module就是一个工具方法,每一个Module生成的PrefixSource就是实际工具方法的内容
chunk对应的modules代码生成如下所示
chunk对应的runtime Modules生成的代码就是上面分析的各种工具方法的代码
如果配置了runtime形成独立的chunk,本质也是使用chunk对应的runtime Modules生成代码
6.4.6 代码生成:runtime形成独立的chunk
webpack.config.js配置和entry打包内容展示
webpack5允许在optimization配置对应的参数,比如下面代码块配置name: 'runtime',可以生成一个runtimeChunk,多个Chunk就可以共用生成的runtime.js
webpack5也允许根据不同的Chunk抽离出对应的runtimeChunk
module.exports = {
  optimization: {
    runtimeChunk: {
      name: 'runtime',
    },
    chunkIds: "named",
    splitChunks: {
      chunks: 'all',
      maxInitialRequests: 10,
      maxAsyncRequests: 10,
      cacheGroups: {
        test3: {
          chunks: 'all',
          minChunks: 3,
          name: "test3",
          priority: 3
        },
        test2: {
          chunks: 'all',
          minChunks: 2,
          name: "test2",
          priority: 2,
          maxSize: 50
        }
      }
    }
  }
}
当配置生成runtimeChunk时,入口类型Chunk的代码渲染方法会从renderMain()变为renderChunk(),如下面截图所示,renderChunk()最明显的特点是整个文件会使用全局的变量进行push操作
renderChunk()可以参考上面的分析,逻辑也比较简单,这里不再赘述
形成新的Chunk
简单分析是如何形成新的runtimeChunk
初始化时会判断是否有配置options.optimization.runtimeChunk,然后确定runtime的名称
//node_modules/webpack/lib/WebpackOptionsApply.js
if (options.optimization.runtimeChunk) {
    const RuntimeChunkPlugin = require("./optimize/RuntimeChunkPlugin");
    new RuntimeChunkPlugin(options.optimization.runtimeChunk).apply(compiler);
}

//node_modules/webpack/lib/optimize/RuntimeChunkPlugin.js
apply(compiler) {
    compiler.hooks.thisCompilation.tap("RuntimeChunkPlugin", compilation => {
        compilation.hooks.addEntry.tap(
            "RuntimeChunkPlugin",
            (_, { name: entryName }) => {
                if (entryName === undefined) return;
                const data = compilation.entries.get(entryName);
                if (data.options.runtime === undefined && !data.options.dependOn) {
                    // Determine runtime chunk name
                    let name = this.options.name;
                    if (typeof name === "function") {
                        name = name({ name: entryName });
                    }
                    data.options.runtime = name;
                }
            }
        );
    });
}在seal阶段的初始化阶段,只有配置options.optimization.runtimeChunk才会触发下面添加this.addChunk(runtime)的逻辑
同步入口和异步依赖都会调用this.addChunk()方法
seal(callback) {
    for (const [name, { dependencies, includeDependencies, options }] of this
        .entries) {
        const chunk = this.addChunk(name);
        //...处理正常入口文件为chunk
    }

    outer: for (const [
        name,
        {
            options: { dependOn, runtime }
        }
    ] of this.entries) {

        if (dependOn) {
            //....
        } else if (runtime) {
            const entry = this.entrypoints.get(name);
            let chunk = this.namedChunks.get(runtime);
            if (chunk) {
                //...
            } else {
                chunk = this.addChunk(runtime);
                chunk.preventIntegration = true;
                runtimeChunks.add(chunk);
            }
            entry.unshiftChunk(chunk);
            chunk.addGroup(entry);
            entry.setRuntimeChunk(chunk);
        }
    }
    buildChunkGraph(this, chunkGraphInit);
}
runtimeChunk生成代码流程
正如上面依赖收集:runtimeRequirements和chunkGraphEntries的分析一样,如果有配置options.optimization.runtimeChunk,则chunkGraphEntries为配置的runtimeChunk
如果没有配置,那么chunkGraphEntries就是入口文件本身,比如entry4.js形成app4这个Chunk,那么此时chunkGraphEntries就是app4这个Chunk
最终都会触发hooks.runtimeRequirementInTree进行compilation.addRuntimeModule(chunk, module)增加了一个代码模块,如果有配置runtimeChunk,那么此时chunk就是runtimeChunk,否则就是app4 Chunk
processRuntimeRequirements() {
    //...处理module和runtimeRequirements
    //...处理chunk和runtimeRequirements

    for (const treeEntry of chunkGraphEntries) {
        const set = new Set();
        for (const chunk of treeEntry.getAllReferencedChunks()) {
            const runtimeRequirements =
                chunkGraph.getChunkRuntimeRequirements(chunk);
            for (const r of runtimeRequirements) set.add(r);
        }
        this.hooks.additionalTreeRuntimeRequirements.call(
            treeEntry,
            set,
            context
        );
        for (const r of set) {
            this.hooks.runtimeRequirementInTree
                .for(r)
                .call(treeEntry, set, context);
        }
        chunkGraph.addTreeRuntimeRequirements(treeEntry, set);
    }
}因此无论有无配置options.optimization.runtimeChunk,最终代码runtime代码始终都是下面的代码块,即runtimeChunk本质触发的是renderMain()方法生成代码
renderMain() {
    //...
    const runtimeModules =
        renderContext.chunkGraph.getChunkRuntimeModulesInOrder(chunk);

    if (runtimeModules.length > 0) {
        source.add(
            new PrefixSource(
                prefix,
                Template.renderRuntimeModules(runtimeModules, chunkRenderContext)
            )
        );
    }
    //...
}
参考
- 「万字进阶」深入浅出 Commonjs 和 Es Module
- ES6模块和CommonJS模块有哪些差异?
- 阮一峰-Node.js 如何处理 ES6 模块
- webpack打包后运行时文件分析
- 精通 Webpack 核心原理专栏
- [email protected] 源码分析 专栏
