安装Linux-SUSE操作系统
文章目录
-
-
- 一、安装Linux-SUSE系统
-
- 1、环境准备
- 2、SUSE 镜像的下载
-
- 2.1、下载企业服务器
- 2.2、ARM和桌面的ISO
- 3、安装SUSE
- 4、配置本地 yum 源
- 5、SUSE常用安装命令
- 6、在 SUSE系统上安装mysql数据库步骤:
- 7、破解SUSE系统root密码
-
一、安装Linux-SUSE系统
1、环境准备
| 操作系统 | IP | 应用软件 |
|---|---|---|
| SUSE | 192.168.192.150 | mysql |
2、SUSE 镜像的下载
SUSE官网
点击免费下载
2.1、下载企业服务器
点击Download后出现的页面
选择 SLE-12-SP5-Server-DVD-x86_64-Boothole-Respin-DVD1.iso 下载
2.2、ARM和桌面的ISO
3、安装SUSE
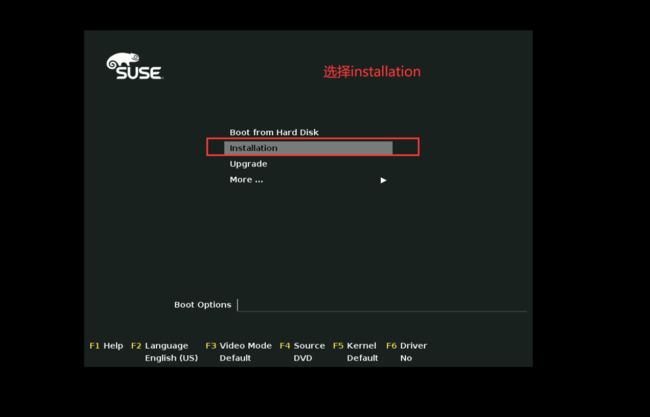
选择installation安装
语言选择英文
跳过注册
选择默认
**根据虚拟化类型选择 **
手动分区规划
选中第一块硬盘sda,添加分区
第一块主分区
自定义2G boot分区
文件系统类型 Ext4
添加swap分区
添加根分区
选择地区
装好系统后新建用户,此处先跳过
自定义root密码
关闭防火墙 enable ssh
核实无误,install安装
登录
设置ssh远程连接
查看是否开启了防火墙:
SUSE12:~ # service SuSEfirewall2 status
● SuSEfirewall2.service - SuSEfirewall2 phase 2
   Loaded: loaded (/usr/lib/systemd/system/SuSEfirewall2.service; disabled; vendor preset: disabled)
   Active: inactive (dead)
SUSE12:~ #
如果开启了则编辑SuSEfirewall2文件,没有则无需往下做:
vim /etc/sysconfig/SuSEfirewall2
FW_SERVICES_EXT_UDP="22"
FW_SERVICES_EXT_TCP="22"
4、配置本地 yum 源
SUSE12:~ # cat /etc/os-release  # 查看版本
NAME="SLES"
VERSION="12-SP5"
VERSION_ID="12.5"
PRETTY_NAME="SUSE Linux Enterprise Server 12 SP5"
ID="sles"
ANSI_COLOR="0;32"
CPE_NAME="cpe:/o:suse:sles:12:sp5"
SUSE12:~ #


# 配置 yum 源
SUSE12:~ # mkdir -p /mnt/suse_local_source  # 创建本地存储目录
SUSE12:~ #
# 执行完后,会自动生成本地源,路径:/etc/zypp/repos.d/local-source.repo
SUSE12:~ # zypper ar file:///mnt/suse_local_source local-source #
Adding repository 'local-source' ..............................................................................................................[done]
Repository 'local-source' successfully added

URI         : file:/mnt/suse_local_source
Enabled     : Yes
GPG Check   : Yes
Autorefresh : No
Priority    : 99 (default priority)

Repository priorities are without effect. All enabled repositories share the same priority.
SUSE12:~ # mount /dev/cdrom /mnt/suse_local_source  # 挂载ISO
mount: /mnt/suse_local_source: WARNING: device write-protected, mounted read-only.
SUSE12:~ # df -h | grep  /mnt/suse_local_source # 查看是否已挂载上了
/dev/sr0        3.9G  3.9G     0 100% /mnt/suse_local_source
SUSE12:~ # ll /etc/zypp/repos.d/
total 8
-rw-r--r-- 1 root root 195 Jun  3 12:35 SLES12-SP5-12.5-0.repo
-rw-r--r-- 1 root root  85 Jun  3 13:02 local-source.repo # 自动创建出来的
SUSE12:~ # cat /etc/zypp/repos.d/local-source.repo
[local-source]
enabled=1
autorefresh=0
baseurl=file:/mnt/suse_local_source
type=NONE
SUSE12:~ # zypper lr  # 列出本地源
Repository priorities are without effect. All enabled repositories share the same priority.

# | Alias             | Name              | Enabled | GPG Check | Refresh
--+-------------------+-------------------+---------+-----------+--------
1 | SLES12-SP5-12.5-0 | SLES12-SP5-12.5-0 | Yes     | (r ) Yes  | No
2 | local-source      | local-source      | Yes     | ( p) Yes  | No
SUSE12:~ #
SUSE12:~ # which wget  # 查看是否有 wget 命令
which: no wget in (/sbin:/usr/sbin:/usr/local/sbin:/root/bin:/usr/local/bin:/usr/bin:/bin:/usr/bin/X11:/usr/games)
SUSE12:~ # zypper in -y wget  # 安装 wget 命令
Warning: The gpg key signing file 'content' has expired.
  Repository:       local-source
  Key Name:         SuSE Package Signing Key
  Key Fingerprint:  FEAB5025 39D846DB 2C0961CA 70AF9E81 39DB7C82
  Key Created:      Wed Dec  7 18:57:35 2016
  Key Expires:      Sun Dec  6 18:57:35 2020 (EXPIRED)
  Rpm Name:         gpg-pubkey-39db7c82-5847eb1f
Building repository 'local-source' cache
···省略N

SUSE12:~ # which wget   # 显示已有 wget 命令
/usr/bin/wget
SUSE12:~ #
5、SUSE常用安装命令
# 搜索软件包
zypper se example

#安装软件包
zypper in example

#卸载软件包
zypper rm example

#升级更新软件包
zypper up example

# 防火墙查看命令
chkconfig --list|grep -i fire


# 启动防火墙
SuSEfirewall2 start


# 关闭防火墙
SuSEfirewall2 stop
6、在 SUSE系统上安装mysql数据库步骤:
SUSE12:/opt # rpm -ivh mysql-community-common-8.0.25-1.el7.x86_64.rpm
warning: mysql-community-common-8.0.25-1.el7.x86_64.rpm: Header V3 DSA/SHA1 Signature, key ID 5072e1f5: NOKEY
Preparing...                          ################################# [100%]
Updating / installing...
   1:mysql-community-common-8.0.25-1.e################################# [100%]
SUSE12:/opt #

SUSE12:/opt # rpm -ivh mysql-community-client-plugins-8.0.25-1.el7.x86_64.rpm
warning: mysql-community-client-plugins-8.0.25-1.el7.x86_64.rpm: Header V3 DSA/SHA1 Signature, key ID 5072e1f5: NOKEY
Preparing...                          ################################# [100%]
Updating / installing...
   1:mysql-community-client-plugins-8.################################# [100%]
SUSE12:/opt # rpm -ivh mysql-community-libs-8.0.25-1.el7.x86_64.rpm
warning: mysql-community-libs-8.0.25-1.el7.x86_64.rpm: Header V3 DSA/SHA1 Signature, key ID 5072e1f5: NOKEY
Preparing...                          ################################# [100%]
Updating / installing...
   1:mysql-community-libs-8.0.25-1.el7################################# [100%]
SUSE12:/opt # rpm -ivh mysql-community-client-8.0.25-1.el7.x86_64.rpm
warning: mysql-community-client-8.0.25-1.el7.x86_64.rpm: Header V3 DSA/SHA1 Signature, key ID 5072e1f5: NOKEY
Preparing...                          ################################# [100%]
Updating / installing...
   1:mysql-community-client-8.0.25-1.e################################# [100%]

SUSE12:/opt # rpm -ivh mysql-community-devel-8.0.25-1.el7.x86_64.rpm
warning: mysql-community-devel-8.0.25-1.el7.x86_64.rpm: Header V3 DSA/SHA1 Signature, key ID 5072e1f5: NOKEY
Preparing...                          ################################# [100%]
Updating / installing...
   1:mysql-community-devel-8.0.25-1.el################################# [100%]

SUSE12:/opt # rpm -ivh mysql-community-server-8.0.25-1.el7.x86_64.rpm
warning: mysql-community-server-8.0.25-1.el7.x86_64.rpm: Header V3 DSA/SHA1 Signature, key ID 5072e1f5: NOKEY
Preparing...                          ################################# [100%]
Updating / installing...
   1:mysql-community-server-8.0.25-1.e################################# [100%]
SUSE12:/opt #

SUSE12:/opt # systemctl status mysqld  // 查看状态
● mysqld.service - MySQL Server
   Loaded: loaded (/usr/lib/systemd/system/mysqld.service; enabled; vendor preset: disabled)
   Active: inactive (dead)
     Docs: man:mysqld(8)
           http://dev.mysql.com/doc/refman/en/using-systemd.html
SUSE12:/opt #

SUSE12:/opt # systemctl start mysqld   // 启动MySQL
SUSE12:/opt # systemctl status mysqld  // 查看状态
● mysqld.service - MySQL Server
   Loaded: loaded (/usr/lib/systemd/system/mysqld.service; enabled; vendor preset: disabled)
   Active: active (running) since Fri 2023-02-24 13:26:46 CST; 12s ago
     Docs: man:mysqld(8)
           http://dev.mysql.com/doc/refman/en/using-systemd.html
  Process: 2949 ExecStartPre=/usr/bin/mysqld_pre_systemd (code=exited, status=0/SUCCESS)
 Main PID: 3019 (mysqld)
   Status: "Server is operational"
    Tasks: 38 (limit: 512)
   CGroup: /system.slice/mysqld.service
           └─3019 /usr/sbin/mysqld

Feb 24 13:26:38 SUSE12 systemd[1]: Starting MySQL Server...
Feb 24 13:26:46 SUSE12 systemd[1]: Started MySQL Server.
SUSE12:/opt #
7、破解SUSE系统root密码
第一步:
第二步:
写完之后按 Ctrl + x
第三步:
1、直接进入/bin/bash界面,然后就可以准备开始修改密码了
2、输入 mount -n / -o remount,rw   #(注意是逗号,不是点号)
3、输入 /usr/bin/passwd重置root密码
4、修改完成后输入 mount -n / -o remount,ro,将根文件系统设为原来的状态
5、输入exit退出系统,重新启动系统,用新密码登陆。


