linkindList源码分析
前言
LinkedList ,基于节点实现的双向链表的 List ,每个节点都指向前一个和后一个节点从而形成链表。
LinkedList集合同时具有List集合和Queue集合的基本特征
类图

如下 1 个接口是少于 ArrayList 的:
java.util.RandomAccess 接口,LinkedList 不同于 ArrayList 的很大一点,不支持随机访问。
如下 1 个接口是多于 ArrayList 的:
java.util.Deque 接口,提供双端队列的功能,LinkedList 支持快速的在头尾添加元素和读取元素,所以很容易实现该特性。
因为实现 Deque 即可以作为队列使用,也可以作为栈使用。当然,作为双端队列,也是可以的
继承了 java.util.AbstractSequentialList 抽象类,它是 AbstractList 的子类,实现了只能连续访问“数据存储”(例如说链表)的 #get(int index)、#add(int index, E element) 等等随机操作的方法
所以
对于支持随机访问数据的继承 AbstractList 抽象类,不支持的继承 AbstractSequentialList 抽象类。
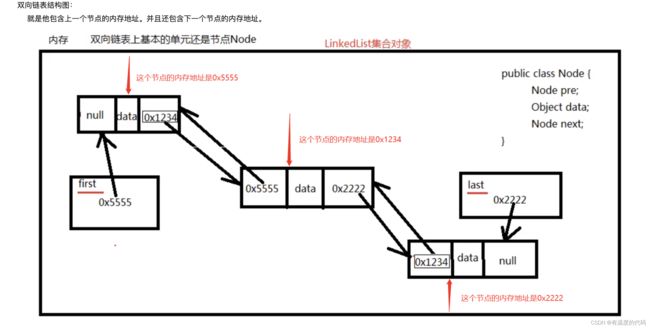
通过 Node 节点指向前后节点,从而形成双向链表。
first 和 last 属性:链表的头尾指针。
在初始时候,first 和 last 指向 null ,因为此时暂时没有 Node 节点。
在添加完首个节点后,创建对应的 Node 节点 node1 ,前后指向 null 。此时,first 和 last 指向该 Node 节点。
继续添加一个节点后,创建对应的 Node 节点 node2 ,其 prev = node1 和 next = null ,而 node1 的 prev = null 和 next = node2 。此时,first 保持不变,指向 node1 ,last 发生改变,指向 node2 。
size 属性:链表的节点数量。通过它进行计数,避免每次需要 List 大小时,需要从头到尾的遍历。
对应代码如下:
// LinkedList.java

/**
 * 链表大小
 */
transient int size = 0;

/**
 * 头节点
 *
 * Pointer to first node.
 */
transient Node<E> first;

/**
 * 尾节点
 *
 * Pointer to last node.
 */
transient Node<E> last;

/**
 * 节点
 *
 * @param  元素泛型
 */
private static class Node<E> {

    /**
     * 元素
     */
    E item;
    /**
     * 前一个节点
     */
    Node<E> next;
    /**
     * 后一个节点
     */
    Node<E> prev;

    Node(Node<E> prev, E element, Node<E> next) {
        this.item = element;
        this.next = next;
        this.prev = prev;
    }

}
构造方法
LinkedList 一共有两个构造方法,我们分别来看看。代码如下:
public LinkedList() {
}

public LinkedList(Collection<? extends E> c) {
    this();
    // 添加 c 到链表中
    addAll(c);
}
相比 ArrayList 来说,因为没有容量一说,所以不需要提供 #ArrayList(int initialCapacity) 这样的构造方法。
为什么ArrayList需要制定容量而LinkedList不需要?
因为ArrayList需要连续的内存空间碎片而LinkedList不需奥
添加单个元素
public boolean add(E e) {
    //  添加末尾
    linkLast(e);
    return true;
}

void linkLast(E e) {
    // <1> 记录原 last 节点
    final Node<E> l = last;
    // <2> 创建新节点
    // 第一个参数表示,newNode 的前一个节点为 l 。
    // 第二个参数表示,e 为元素。
    // 第三个参数表示,newNode 的后一个节点为 null 。
    final Node<E> newNode = new Node<>(l, e, null);
    // <3> last 指向新节点
    last = newNode;
    // <4.1> 如果原 last 为 null ,说明 first 也为空,则 first 也指向新节点
    if (l == null)
        first = newNode;
    // <4.2> 如果原 last 非 null ,说明 first 也非空,则原 last 的 next 指向新节点。
    else
        l.next = newNode;
    // <5> 增加链表大小
    size++;
    // <6> 增加数组修改次数
    modCount++;
}
处,调用 #linkLast(E e) 方法,将新元素添加到链表的尾巴。所以,#add(E e) 方法,实际就是 #linkLast(E e) 方法。
总体来说,代码实现比较简单。重点就是对 last 的处理。
相比 ArrayList 来说,无需考虑容量不够时的扩容。
add(int index, E element)
public void add(int index, E element) {
    // 校验不要超过范围
    checkPositionIndex(index);

    // <1> 如果刚好等于链表大小,直接添加到尾部即可
    if (index == size)
        linkLast(element);
    // <2> 添加到第 index 的节点的前面
    else
        linkBefore(element, node(index));
}
<1> 处,如果刚好等于链表大小,直接调用 #linkLast(E element) 方法,添加到尾部即可。
<2> 处,先调用 #node(int index) 方法,获得第 index 位置的 Node 节点 node 。然后,调用 #linkBefore(E element, Node node) 方法,将新节点添加到 node 的前面。相当于说,node 的前一个节点的 next 指向新节点,node 的 prev 指向新节点。
#node(int index) 方法,获得第 index 个 Node 节点。代码如下:
Node<E> node(int index) {
    // assert isElementIndex(index);

    // 如果 index 小于 size 的一半,就正序遍历,获得第 index 个节点
    if (index < (size >> 1)) {
        Node<E> x = first;
        for (int i = 0; i < index; i++)
            x = x.next;
        return x;
    // 如果 index 大于 size 的一半,就倒序遍历,获得第 index 个节点
    } else {
        Node<E> x = last;
        for (int i = size - 1; i > index; i--)
            x = x.prev;
        return x;
    }
}
这里 LinkedList 做的一个小骚操作,根据 index 是否超过链表的一半大小,选择是否使用倒序遍历替代正序遍历,从而减少遍历次数
linkBefore(E e, Node succ) 方法,添加元素 e 到 succ 节点的前面。代码如下:
void linkBefore(E e, Node<E> succ) {
    // assert succ != null;
    // 获得 succ 的前一个节点
    final Node<E> pred = succ.prev;
    // 创建新的节点 newNode
    final Node<E> newNode = new Node<>(pred, e, succ);
    //  设置 succ 的前一个节点为新节点
    succ.prev = newNode;
    // 如果 pred 为 null ,说明 first 也为空,则 first 也指向新节点
    if (pred == null)
        first = newNode;
    // 如果 pred 非 null ,说明 first 也为空,则 pred 也指向新节点
    else
        pred.next = newNode;
    // 增加链表大小
    size++;
    // 增加数组修改次数
    modCount++;
}
因为 LinkedList 实现了 Deque 接口,所以它实现了 #addFirst(E e) 和 #addLast(E e) 方法,分别添加元素到链表的头尾。代码如下
// LinkedList.java 实现 Deque 接口

public void addFirst(E e) {
    linkFirst(e);
}
public boolean offerFirst(E e) {
    addFirst(e); // 调用上面的方法
    return true;
}

public void addLast(E e) {
    linkLast(e);
}
public boolean offerLast(E e) {
    addLast(e); // 调用上面的方法
    return true;
}
addFirst(E e) 方法,调用 #linkFirst(E e) 方法,添加元素到队头。代码如下:
private void linkFirst(E e) {
    // 记录原 first 节点
    final Node<E> f = first;
    // 创建新节点
    final Node<E> newNode = new Node<>(null, e, f);
    // first 指向新节点
    first = newNode;
    // 如果原 first 为空,说明 last 也为空,则 last 也指向新节点
    if (f == null)
        last = newNode;
    // 如果原 first 非空,说明 last 也非空,则原 first 的 next 指向新节点。
    else
        f.prev = newNode;
    // 增加链表大小
    size++;
    // 增加数组修改次数
    modCount++;
}
因为 LinkedList 实现了 Queue 接口,所以它实现了 #push(E e) 和 #offer(E e) 方法,添加元素到链表的头尾。代码如下
// LinkedList.java 实现 Queue 接口

public void push(E e) {
    addFirst(e);
}

public boolean offer(E e) {
    return add(e);
}
链表扩容
LinkedList 不存在扩容的需求,因为通过 Node 的前后指向即可。
移除单个元素
// LinkedList.java

public E remove(int index) {
    checkElementIndex(index);
    // 获得第 index 的 Node 节点,然后进行移除。
    return unlink(node(index));
}
首先,调用 #node(int index) 方法,获得第 index 的 Node 节点。然后偶,调用 #unlink(Node x) 方法,移除该节点。
#unlink(Node x) 方法,代码如下:
E unlink(Node<E> x) {
    // assert x != null;
    // <1> 获得 x 的前后节点 prev、next
    final E element = x.item;
    final Node<E> next = x.next;
    final Node<E> prev = x.prev;

    // <2> 将 prev 的 next 指向下一个节点
    if (prev == null) { // <2.1> 如果 prev 为空,说明 first 被移除,则直接将 first 指向 next
        first = next;
    } else { // <2.2> 如果 prev 非空
        prev.next = next; // prev 的 next 指向 next
        x.prev = null; // x 的 pre 指向 null
    }

    // <3> 将 next 的 prev 指向上一个节点
    if (next == null) { // <3.1> 如果 next 为空,说明 last 被移除,则直接将 last 指向 prev
        last = prev;
    } else { // <3.2> 如果 next 非空
        next.prev = prev; // next 的 prev 指向 prev
        x.next = null; // x 的 next 指向 null
    }

    // <4> 将 x 的 item 设置为 null ,帮助 GC
    x.item = null;
    // <5> 减少链表大小
    size--;
    // <6> 增加数组的修改次数
    modCount++;
    return element;
}

**#remove(Object o) 方法,移除首个为 o 的元素,并返回是否移除到。代码如下:**
// LinkedList.java

public boolean remove(Object o) {
    if (o == null) { // o 为 null 的情况
        // 顺序遍历,找到 null 的元素后,进行移除
        for (Node<E> x = first; x != null; x = x.next) {
            if (x.item == null) {
                unlink(x);
                return true;
            }
        }
    } else {
        // 顺序遍历,找到等于 o 的元素后,进行移除
        for (Node<E> x = first; x != null; x = x.next) {
            if (o.equals(x.item)) {
                unlink(x);
                return true;
            }
        }
    }
    return false;
}
#removeFirstOccurrence(Object o) 和 #removeLastOccurrence(Object o) 方法,分别实现移除链表首个节点和最后节点。代码如下:
 **// LinkedList.java 实现 Deque 接口

public boolean removeFirstOccurrence(Object o) { // 移除首个
    return remove(o);
}

public boolean removeLastOccurrence(Object o) {
    if (o == null) { // o 为 null 的情况
        // 倒序遍历,找到 null 的元素后,进行移除
        for (Node<E> x = last; x != null; x = x.prev) {
            if (x.item == null) {
                unlink(x);
                return true;
            }
        }
    } else {
        // 倒序遍历,找到等于 o 的元素后,进行移除
        for (Node<E> x = last; x != null; x = x.prev) {
            if (o.equals(x.item)) {
                unlink(x);
                return true;
            }
        }
    }
    return false;
}**
#remove() 方法,移除链表首个节点。代码如下:
public E remove() {
    return removeFirst();
}

public E removeFirst() {
    final Node<E> f = first;
    // <1> 如果链表为空,抛出 NoSuchElementException 异常
    if (f == null)
        throw new NoSuchElementException();
    // <2> 移除链表时首个元素
    return unlinkFirst(f);
}

private E unlinkFirst(Node<E> f) {
    // assert f == first && f != null;
    final E element = f.item;
    // 获得 f 的下一个节点
    final Node<E> next = f.next;
    // 设置 f 的 item 为 null ,帮助 GC
    f.item = null;
    // 设置 f 的 next 为 null ,帮助 GC
    f.next = null; // help GC
    // 修改 fisrt 指向 next
    first = next;
    // 修改 next 节点的 prev 指向 null
    if (next == null) // 如果链表只有一个元素,说明被移除后,队列就是空的,则 last 设置为 null
        last = null;
    else
        next.prev = null;
    // 链表大小减一
    size--;
    // 增加数组修改次数
    modCount++;
    return element;
}
#removeLast() 方法,移除链表最后一个节点。代码如下:
// LinkedList.java 实现 Deque 接口

public E removeLast() {
    final Node<E> l = last;
    // 如果链表为空,则抛出 NoSuchElementException 移除
    if (l == null)
        throw new NoSuchElementException();
    // 移除链表的最后一个元素
    return unlinkLast(l);
}

private E unlinkLast(Node<E> l) {
    // assert l == last && l != null;
    final E element = l.item;
    // 获得 f 的上一个节点
    final Node<E> prev = l.prev;
    // 设置 l 的 item 为 null ,帮助 GC
    l.item = null;
    // 设置 l 的 prev 为 null ,帮助 GC
    l.prev = null; // help GC
    // 修改 last 指向 prev
    last = prev;
    // 修改 prev 节点的 next 指向 null
    if (prev == null) // 如果链表只有一个元素,说明被移除后,队列就是空的,则 first 设置为 null
        first = null;
    else
        prev.next = null;
    // 链表大小减一
    size--;
    // 增加数组修改次数
    modCount++;
    return element;
}


 **查找单个元素**

```java
public int indexOf(Object o) {
    int index = 0;
    if (o == null) { // 如果 o 为 null 的情况
        // 顺序遍历,如果 item 为 null 的节点,进行返回
        for (Node<E> x = first; x != null; x = x.next) {
            if (x.item == null)
                return index; // 找到
            index++;
        }
    } else { // 如果 o 非 null 的情况
        // 顺序遍历,如果 item 为 o 的节点,进行返回
        for (Node<E> x = first; x != null; x = x.next) {
            if (o.equals(x.item))
                return index; // 找到
            index++;
        }
    }
    // 未找到
    return -1;
}
#contains(Object o) 方法就是基于该方法实现。代码如下:
public boolean contains(Object o) {
    return indexOf(o) >= 0;
}
有时我们需要查找最后一个为指定元素的位置,所以会使用到 #lastIndexOf(Object o) 方法。代码如下:
public int lastIndexOf(Object o) {
    int index = size;
    if (o == null) { // 如果 o 为 null 的情况
        // 倒序遍历,如果 item 为 null 的节点,进行返回
        for (Node<E> x = last; x != null; x = x.prev) {
            index--;
            if (x.item == null)
                return index; // 找到
        }
    } else { // 如果 o 非 null 的情况
        // 倒序遍历,如果 item 为 o 的节点,进行返回
        for (Node<E> x = last; x != null; x = x.prev) {
            index--;
            if (o.equals(x.item))
                return index; // 找到
        }
    }
    // 未找到
    return -1;
}
获得指定位置的元素
get(int index) 方法,获得指定位置的元素。代码如下
JDK
精尽 JDK 源码解析 —— 集合(二)链表 LinkedList
考虑到 LinkedList 和 ArrayList 是 List 绝代双骄,所以本文在编写的时候,尽量保持标题一致,方便胖友对比。
相比来说,LinkedList 会简单蛮多。看完本文后,胖友可以试着做下 设计链表 题目。
- 概述
LinkedList ,基于节点实现的双向链表的 List ,每个节点都指向前一个和后一个节点从而形成链表。
相比 ArrayList 来说,我们日常开发使用 LinkedList 相对比较少。如果胖友打开 IDEA ,搜下项目中 LinkedList 后,会发现使用的少之又少。
- 类图
LinkedList 实现的接口、继承的抽象类,如下图所示:类图
类图
如下 3 个接口是 ArrayList 一致的:
java.util.List 接口
java.io.Serializable 接口
java.lang.Cloneable 接口
如下 1 个接口是少于 ArrayList 的:
java.util.RandomAccess 接口,LinkedList 不同于 ArrayList 的很大一点,不支持随机访问。
如下 1 个接口是多于 ArrayList 的:
java.util.Deque 接口,提供双端队列的功能,LinkedList 支持快速的在头尾添加元素和读取元素,所以很容易实现该特性。
注意,以为 LinkedList 实现了 Deque 接口,所以我们在 「5. 添加单个元素」 和 「7. 移除单个元素」 中,会看到多种方法,胖友可以快速看过去即可。 因为确实蛮多的。
也因为实现 Deque 即可以作为队列使用,也可以作为栈使用。当然,作为双端队列,也是可以的。
继承了 java.util.AbstractSequentialList 抽象类,它是 AbstractList 的子类,实现了只能连续访问“数据存储”(例如说链表)的 #get(int index)、#add(int index, E element) 等等随机操作的方法。可能这样表述有点抽象,胖友点到 java.util.AbstractSequentialList 抽象类中看看这几个方法,基于迭代器顺序遍历后,从而实现后续的操作。
但是呢,LinkedList 和 ArrayList 多是一个有点“脾气”的小伙子,都为了结合自身的特性,更加高效的实现,多选择了重写了 AbstractSequentialList 的方法,嘿嘿。
不过一般情况下,对于支持随机访问数据的继承 AbstractList 抽象类,不支持的继承 AbstractSequentialList 抽象类。
3. 属性
LinkedList 一共有 3 个属性。如下图所示:
LinkedList
LinkedList
通过 Node 节点指向前后节点,从而形成双向链表。
first 和 last 属性:链表的头尾指针。
在初始时候,first 和 last 指向 null ,因为此时暂时没有 Node 节点。
在添加完首个节点后,创建对应的 Node 节点 node1 ,前后指向 null 。此时,first 和 last 指向该 Node 节点。
继续添加一个节点后,创建对应的 Node 节点 node2 ,其 prev = node1 和 next = null ,而 node1 的 prev = null 和 next = node2 。此时,first 保持不变,指向 node1 ,last 发生改变,指向 node2 。
size 属性:链表的节点数量。通过它进行计数,避免每次需要 List 大小时,需要从头到尾的遍历。
对应代码如下:
// LinkedList.java
/**
- 链表大小
*/
transient int size = 0;
/**
- 头节点
- Pointer to first node.
*/
transient Node first;
/**
- 尾节点
- Pointer to last node.
*/
transient Node last;
/**
-
节点
-
@param 元素泛型
*/
private static class Node {/**
- 元素
/
E item;
/* - 前一个节点
/
Node next;
/* - 后一个节点
*/
Node prev;
Node(Node prev, E element, Node next) {
this.item = element;
this.next = next;
this.prev = prev;
} - 元素
}
4. 构造方法
ArrayList 一共有两个构造方法,我们分别来看看。代码如下:
public LinkedList() {
}
public LinkedList(Collection c) {
this();
// 添加 c 到链表中
addAll©;
}
相比 ArrayList 来说,因为没有容量一说,所以不需要提供 #ArrayList(int initialCapacity) 这样的构造方法。
- 添加单个元素
#add(E e) 方法,顺序添加单个元素到链表。代码如下:
// LinkedList.java
public boolean add(E e) {
// 添加末尾
linkLast(e);
return true;
}
void linkLast(E e) {
// <1> 记录原 last 节点
final Node l = last;
// <2> 创建新节点
// 第一个参数表示,newNode 的前一个节点为 l 。
// 第二个参数表示,e 为元素。
// 第三个参数表示,newNode 的后一个节点为 null 。
final Node newNode = new Node<>(l, e, null);
// <3> last 指向新节点
last = newNode;
// <4.1> 如果原 last 为 null ,说明 first 也为空,则 first 也指向新节点
if (l == null)
first = newNode;
// <4.2> 如果原 last 非 null ,说明 first 也非空,则原 last 的 next 指向新节点。
else
l.next = newNode;
// <5> 增加链表大小
size++;
// <6> 增加数组修改次数
modCount++;
}
处,调用 #linkLast(E e) 方法,将新元素添加到链表的尾巴。所以,#add(E e) 方法,实际就是 #linkLast(E e) 方法。
总体来说,代码实现比较简单。重点就是对 last 的处理。
相比 ArrayList 来说,无需考虑容量不够时的扩容。
看懂这个方法后,我们来看看 #add(int index, E element) 方法,插入单个元素到指定位置。代码如下:
// LinkedList.java
public void add(int index, E element) {
// 校验不要超过范围
checkPositionIndex(index);
// <1> 如果刚好等于链表大小,直接添加到尾部即可
if (index == size)
    linkLast(element);
// <2> 添加到第 index 的节点的前面
else
    linkBefore(element, node(index));
}
<1> 处,如果刚好等于链表大小,直接调用 #linkLast(E element) 方法,添加到尾部即可。
<2> 处,先调用 #node(int index) 方法,获得第 index 位置的 Node 节点 node 。然后,调用 #linkBefore(E element, Node node) 方法,将新节点添加到 node 的前面。相当于说,node 的前一个节点的 next 指向新节点,node 的 prev 指向新节点。
#node(int index) 方法,获得第 index 个 Node 节点。代码如下:
// LinkedList.java
Node node(int index) {
// assert isElementIndex(index);
// 如果 index 小于 size 的一半,就正序遍历,获得第 index 个节点
if (index < (size >> 1)) {
    Node x = first;
    for (int i = 0; i < index; i++)
        x = x.next;
    return x;
// 如果 index 大于 size 的一半,就倒序遍历,获得第 index 个节点
} else {
    Node x = last;
    for (int i = size - 1; i > index; i--)
        x = x.prev;
    return x;
}
}
这里 LinkedList 做的一个小骚操作,根据 index 是否超过链表的一半大小,选择是否使用倒序遍历替代正序遍历,从而减少遍历次数。
#linkBefore(E e, Node succ) 方法,添加元素 e 到 succ 节点的前面。代码如下:
// LinkedList.java
void linkBefore(E e, Node succ) {
// assert succ != null;
// 获得 succ 的前一个节点
final Node pred = succ.prev;
// 创建新的节点 newNode
final Node newNode = new Node<>(pred, e, succ);
// 设置 succ 的前一个节点为新节点
succ.prev = newNode;
// 如果 pred 为 null ,说明 first 也为空,则 first 也指向新节点
if (pred == null)
first = newNode;
// 如果 pred 非 null ,说明 first 也为空,则 pred 也指向新节点
else
pred.next = newNode;
// 增加链表大小
size++;
// 增加数组修改次数
modCount++;
}
逻辑上,和 #linkLast(E e) 方法差不多。差别在于 处,设置 succ 的前一个节点为新节点。
因为 LinkedList 实现了 Deque 接口,所以它实现了 #addFirst(E e) 和 #addLast(E e) 方法,分别添加元素到链表的头尾。代码如下:
// LinkedList.java 实现 Deque 接口
public void addFirst(E e) {
linkFirst(e);
}
public boolean offerFirst(E e) {
addFirst(e); // 调用上面的方法
return true;
}
public void addLast(E e) {
linkLast(e);
}
public boolean offerLast(E e) {
addLast(e); // 调用上面的方法
return true;
}
#linkLast(E e) 方法,和 #add(E e) 方法是一致的,就不哔哔了。
#addFirst(E e) 方法,调用 #linkFirst(E e) 方法,添加元素到队头。代码如下:
// LinkedList.java
private void linkFirst(E e) {
// 记录原 first 节点
final Node f = first;
// 创建新节点
final Node newNode = new Node<>(null, e, f);
// first 指向新节点
first = newNode;
// 如果原 first 为空,说明 last 也为空,则 last 也指向新节点
if (f == null)
last = newNode;
// 如果原 first 非空,说明 last 也非空,则原 first 的 next 指向新节点。
else
f.prev = newNode;
// 增加链表大小
size++;
// 增加数组修改次数
modCount++;
}
逻辑上,和 #linkLast(E e) 方法差不多。就不重复哔哔了。
因为 LinkedList 实现了 Queue 接口,所以它实现了 #push(E e) 和 #offer(E e) 方法,添加元素到链表的头尾。代码如下:
// LinkedList.java 实现 Queue 接口
public void push(E e) {
addFirst(e);
}
public boolean offer(E e) {
return add(e);
}
总的来说,添加单个元素,分成三个情况:
添加元素到队头
添加元素到队尾
添加元素到中间
对于链表的操作,代码会比较简洁,胖友如果不太理解,可以在草稿纸上手绘下整个过程。
-
链表扩容
LinkedList 不存在扩容的需求,因为通过 Node 的前后指向即可。 -
添加多个元素
#addAll(Collection c) 方法,批量添加多个元素。代码如下:
// LinkedList.java
public boolean addAll(Collection c) {
return addAll(size, c);
}
public boolean addAll(int index, Collection c) {
checkPositionIndex(index);
// <1> 将 c 转成 a 数组
Object[] a = c.toArray();
int numNew = a.length;
if (numNew == 0) // 如果无添加元素,直接返回 false 数组未变更
    return false;

// <2> 获得第 index 位置的节点 succ ,和其前一个节点 pred
Node pred, succ;
if (index == size) { // 如果 index 就是链表大小,那说明插入队尾,所以 succ 为 null ,pred 为 last 。
    succ = null;
    pred = last;
} else { // 如果 index 小于链表大小,则 succ 是第 index 个节点,prev 是 succ 的前一个二节点。
    succ = node(index);
    pred = succ.prev;
}

// <3> 遍历 a 数组,添加到 pred 的后面
for (Object o : a) {
    // 创建新节点
    @SuppressWarnings("unchecked") E e = (E) o;
    Node newNode = new Node<>(pred, e, null);
    // 如果 pred 为 null ,说明 first 也为 null ,则直接将 first 指向新节点
    if (pred == null)
        first = newNode;
    // pred 下一个指向新节点
    else
        pred.next = newNode;
    // 修改 pred 指向新节点
    pred = newNode;
}

// <4> 修改 succ 和 pred 的指向
if (succ == null) { // 如果 succ 为 null ,说明插入队尾,则直接修改 last 指向最后一个 pred
    last = pred;
} else { // 如果 succ 非 null ,说明插入到 succ 的前面
    pred.next = succ; // prev 下一个指向 succ
    succ.prev = pred; // succes 前一个指向 pred
}

// <5> 增加链表大小
size += numNew;
// <6> 增加数组修改次数
modCount++;
// 返回 true 数组有变更
return true;
}
#addAll(Collection c) 方法,其内部调用的是 #addAll(int index, Collection c) 方法,表示在队列之后,继续添加 c 集合。
<2> 处,获得第 index 位置的节点 succ ,和其前一个节点 pred 。分成两种情况,胖友自己看注释。实际上,ArrayList 在添加 c 集合的时候,也是分成跟 LinkedList 一样的两种情况,只是说 LinkedList 在一个方法统一实现了。
<3> 处,遍历 a 数组,添加到 pred 的后面。其实,我们可以把 pred 理解成“尾巴”,然后不断的指向新节点,而新节点又称为新的 pred 尾巴。如此反复插入~
<4> 处,修改 succ 和 pred 的指向。根据 <2> 处分的两种情况,进行处理。
虽然很长,但是还是很简单的。
8. 移除单个元素
#remove(int index) 方法,移除指定位置的元素,并返回该位置的原元素。代码如下:
// LinkedList.java
public E remove(int index) {
checkElementIndex(index);
// 获得第 index 的 Node 节点,然后进行移除。
return unlink(node(index));
}
首先,调用 #node(int index) 方法,获得第 index 的 Node 节点。然后偶,调用 #unlink(Node x) 方法,移除该节点。
#unlink(Node x) 方法,代码如下:
// LinkedList.java
E unlink(Node x) {
// assert x != null;
// <1> 获得 x 的前后节点 prev、next
final E element = x.item;
final Node next = x.next;
final Node prev = x.prev;
// <2> 将 prev 的 next 指向下一个节点
if (prev == null) { // <2.1> 如果 prev 为空,说明 first 被移除,则直接将 first 指向 next
    first = next;
} else { // <2.2> 如果 prev 非空
    prev.next = next; // prev 的 next 指向 next
    x.prev = null; // x 的 pre 指向 null
}

// <3> 将 next 的 prev 指向上一个节点
if (next == null) { // <3.1> 如果 next 为空,说明 last 被移除,则直接将 last 指向 prev
    last = prev;
} else { // <3.2> 如果 next 非空
    next.prev = prev; // next 的 prev 指向 prev
    x.next = null; // x 的 next 指向 null
}

// <4> 将 x 的 item 设置为 null ,帮助 GC
x.item = null;
// <5> 减少链表大小
size--;
// <6> 增加数组的修改次数
modCount++;
return element;
}
<2> 处,将 prev 的 next 指向下一个节点。其中,<2.1> 处,是移除队头 first 的情况。
<3> 处,将 next 的 prev 指向上一个节点。其中,❤️.1> 处,如果 next 为空,说明队尾 last 被移除的情况。
其它步骤,胖友自己看看代码注释。
#remove(Object o) 方法,移除首个为 o 的元素,并返回是否移除到。代码如下:
// LinkedList.java
public boolean remove(Object o) {
if (o == null) { // o 为 null 的情况
// 顺序遍历,找到 null 的元素后,进行移除
for (Node x = first; x != null; x = x.next) {
if (x.item == null) {
unlink(x);
return true;
}
}
} else {
// 顺序遍历,找到等于 o 的元素后,进行移除
for (Node x = first; x != null; x = x.next) {
if (o.equals(x.item)) {
unlink(x);
return true;
}
}
}
return false;
}
相比 #remove(int index) 方法来说,需要去寻找首个等于 o 的节点进行移除。当然,最终还是调用 #unlink(Node x) 方法,移除该节点。
#removeFirstOccurrence(Object o) 和 #removeLastOccurrence(Object o) 方法,分别实现移除链表首个节点和最后节点。代码如下:
// LinkedList.java 实现 Deque 接口
public boolean removeFirstOccurrence(Object o) { // 移除首个
return remove(o);
}
public boolean removeLastOccurrence(Object o) {
if (o == null) { // o 为 null 的情况
// 倒序遍历,找到 null 的元素后,进行移除
for (Node x = last; x != null; x = x.prev) {
if (x.item == null) {
unlink(x);
return true;
}
}
} else {
// 倒序遍历,找到等于 o 的元素后,进行移除
for (Node x = last; x != null; x = x.prev) {
if (o.equals(x.item)) {
unlink(x);
return true;
}
}
}
return false;
}
#remove() 方法,移除链表首个节点。代码如下:
// LinkedList.java 实现 Queue 接口
public E remove() {
return removeFirst();
}
public E removeFirst() {
final Node f = first;
// <1> 如果链表为空,抛出 NoSuchElementException 异常
if (f == null)
throw new NoSuchElementException();
// <2> 移除链表时首个元素
return unlinkFirst(f);
}
private E unlinkFirst(Node f) {
// assert f == first && f != null;
final E element = f.item;
// 获得 f 的下一个节点
final Node next = f.next;
// 设置 f 的 item 为 null ,帮助 GC
f.item = null;
// 设置 f 的 next 为 null ,帮助 GC
f.next = null; // help GC
// 修改 fisrt 指向 next
first = next;
// 修改 next 节点的 prev 指向 null
if (next == null) // 如果链表只有一个元素,说明被移除后,队列就是空的,则 last 设置为 null
last = null;
else
next.prev = null;
// 链表大小减一
size–;
// 增加数组修改次数
modCount++;
return element;
}
<1> 处,如果链表为空,抛出 NoSuchElementException 异常。
<2> 处,移除链表时首个元素。比较简单,胖友自己看看。 因为 LinkedList 有 first 和 last 头尾节点,所以添加和删除操作,都可能需要小心处理。
#removeLast() 方法,移除链表最后一个节点。代码如下:
// LinkedList.java 实现 Deque 接口
public E removeLast() {
final Node l = last;
// 如果链表为空,则抛出 NoSuchElementException 移除
if (l == null)
throw new NoSuchElementException();
// 移除链表的最后一个元素
return unlinkLast(l);
}
private E unlinkLast(Node l) {
// assert l == last && l != null;
final E element = l.item;
// 获得 f 的上一个节点
final Node prev = l.prev;
// 设置 l 的 item 为 null ,帮助 GC
l.item = null;
// 设置 l 的 prev 为 null ,帮助 GC
l.prev = null; // help GC
// 修改 last 指向 prev
last = prev;
// 修改 prev 节点的 next 指向 null
if (prev == null) // 如果链表只有一个元素,说明被移除后,队列就是空的,则 first 设置为 null
first = null;
else
prev.next = null;
// 链表大小减一
size–;
// 增加数组修改次数
modCount++;
return element;
}
和 #removeFirst() 方法相反,当然实现上是差不多。
#poll() 和 # 方法,移除链表的头或尾,差异点在于链表为空时候,不会抛出 NoSuchElementException 异常。代码如下:
// LinkedList.java 实现 Queue 接口
public E poll() { // 移除头
final Node f = first;
return (f == null) ? null : unlinkFirst(f);
}
public E pop() {
return removeFirst(); // 这个方法,如果队列为空,还是会抛出 NoSuchElementException 异常。 不知道放在哪里哈。这里来凑凑~
}
// LinkedList.java 实现 Deque 接口
public E pollFirst() { // 移除头
final Node f = first;
return (f == null) ? null : unlinkFirst(f);
}
public E pollLast() { // 移除尾
final Node l = last;
return (l == null) ? null : unlinkLast(l);
}
9. 移除多个元素
#removeAll(Collection c) 方法,批量移除指定的多个元素。代码如下:
// AbstractCollection.java
public boolean removeAll(Collection c) { Objects.requireNonNull(c); boolean modified = false; // 获得迭代器 Iterator it = iterator();
// 通过迭代器遍历
while (it.hasNext()) {
// 如果 c 中存在该元素,则进行移除
if (c.contains(it.next())) {
it.remove();
modified = true; // 标记修改
}
}
return modified;
}
该方法,是通过父类 AbstractCollection 来实现的,通过迭代器来遍历 LinkedList ,然后判断 c 中如果包含,则进行移除。
#retainAll(Collection c) 方法,求 LinkedList 和指定多个元素的交集。简单来说,恰好和 #removeAll(Collection c) 相反,移除不在 c 中的元素。代码如下:
// AbstractCollection.java
public boolean retainAll(Collection c) {
Objects.requireNonNull©;
boolean modified = false;
// 获得迭代器
Iterator it = iterator();
// 通过迭代器遍历
while (it.hasNext()) {
// 如果 c 中不存在该元素,则进行移除
if (!c.contains(it.next())) {
it.remove();
modified = true;
}
}
return modified;
}
逻辑比较简单, 处的判断条件进行了调整。
10. 查找单个元素
#indexOf(Object o) 方法,查找首个为指定元素的位置。代码如下:
// LinkedList.java
public int indexOf(Object o) {
int index = 0;
if (o == null) { // 如果 o 为 null 的情况
// 顺序遍历,如果 item 为 null 的节点,进行返回
for (Node x = first; x != null; x = x.next) {
if (x.item == null)
return index; // 找到
index++;
}
} else { // 如果 o 非 null 的情况
// 顺序遍历,如果 item 为 o 的节点,进行返回
for (Node x = first; x != null; x = x.next) {
if (o.equals(x.item))
return index; // 找到
index++;
}
}
// 未找到
return -1;
}
而 #contains(Object o) 方法,就是基于该方法实现。代码如下:
// LinkedList.java
public boolean contains(Object o) {
return indexOf(o) >= 0;
}
有时我们需要查找最后一个为指定元素的位置,所以会使用到 #lastIndexOf(Object o) 方法。代码如下:
// LinkedList.java
public int lastIndexOf(Object o) {
int index = size;
if (o == null) { // 如果 o 为 null 的情况
// 倒序遍历,如果 item 为 null 的节点,进行返回
for (Node x = last; x != null; x = x.prev) {
index–;
if (x.item == null)
return index; // 找到
}
} else { // 如果 o 非 null 的情况
// 倒序遍历,如果 item 为 o 的节点,进行返回
for (Node x = last; x != null; x = x.prev) {
index–;
if (o.equals(x.item))
return index; // 找到
}
}
// 未找到
return -1;
}
11. 获得指定位置的元素
#get(int index) 方法,获得指定位置的元素。代码如下:
public E get(int index) {
    checkElementIndex(index);
    // 基于 node(int index) 方法实现
    return node(index).item;
}
随机访问 index 位置的元素,时间复杂度为 O(n) 。
因为 LinkedList 实现了 Deque 接口,所以它实现了 #peekFirst() 和 #peekLast() 方法,分别获得元素到链表的头尾。代码如下:
public E peekFirst() {
    final Node<E> f = first;
    return (f == null) ? null : f.item;
}

public E peekLast() {
    final Node<E> l = last;
    return (l == null) ? null : l.item;
}
总结
LinkedList 基于节点实现的双向链表的 List ,每个节点都指向前一个和后一个节点从而形成链表。
LinkedList 提供队列、双端队列、栈的功能。
因为 first 节点,所以提供了队列的功能的实现的功能。
因为 last 节点,所以提供了栈的功能的实现的功能。
因为同时具有 first + last 节点,所以提供了双端队列的功能。
LinkedList 随机访问平均时间复杂度是 O(n) ,查找指定元素的平均时间复杂度是 O(n) 。
LinkedList 移除指定位置的元素的最好时间复杂度是 O(1) ,最坏时间复杂度是 O(n) ,平均时间复杂度是 O(n) 。
最好时间复杂度发生在头部、或尾部移除的情况。
LinkedList 添加元素的最好时间复杂度是 O(1) ,最坏时间复杂度是 O(n) ,平均时间复杂度是 O(n) 。
最好时间复杂度发生在头部、或尾部添加的情况。
因为 LinkedList 提供了多种添加、删除、查找的方法,会根据是否能够找到对应的元素进行操作,抛出 NoSuchElementException 异常