Python进阶知识(2)—— 什么是GUI编程?一起来学习用Python,Tkinter“做画”吧
文章目录
- 01 | 什么是 G U I ? \color{red}{什么是GUI?} 什么是GUI?
- 02 | 什么是 T k i n t e r ?为什么是 T k i n t e r ? \color{orange}{什么是Tkinter?为什么是Tkinter?} 什么是Tkinter?为什么是Tkinter?
- 03 | 了解 T k i n t e r 基础知识 \color{yellow}{了解Tkinter基础知识} 了解Tkinter基础知识
- 04 | T k i n t e r 示例学习 \color{green}{Tkinter示例学习} Tkinter示例学习
- 05 | 经典练习:实现一个简单的计算器 \color{blue}{经典练习:实现一个简单的计算器} 经典练习:实现一个简单的计算器
- 06 | 归纳总结:代码重构 \color{cyan}{归纳总结:代码重构} 归纳总结:代码重构
- 07 | 写在最后 \color{purple}{写在最后} 写在最后
All things are difficult before they are easy.
凡事必先难后易。
01 | 什么是 G U I ? \color{red}{什么是GUI?} 什么是GUI?
GUI是Graphical User Interface(图形用户界面)的缩写。它是指通过图形化的方式,为人们提供更加友好、直观的用户界面,使得用户可以通过鼠标和键盘等外设更加轻松、快捷地操作计算机。在GUI界面中,计算机会呈现出各种窗口、按钮、菜单、对话框等控件,用户可以通过这些控件与计算机进行交互。常见的GUI框架有Tkinter、Qt、wxPython等。
Python提供了多种库和框架来创建图形用户界面(GUI)。其中,最常用的是Python自带的Tkinter库、PyQt和wxPython等第三方库。先从最简单的Tkinter库开始学习
02 | 什么是 T k i n t e r ?为什么是 T k i n t e r ? \color{orange}{什么是Tkinter?为什么是Tkinter?} 什么是Tkinter?为什么是Tkinter?
-
什么是Tkinter?
Tkinter是Python中的一个标准图形用户界面(GUI)库,它是Python的内置库,可以方便地创建窗口应用程序并为其添加用户界面。
Tkinter提供了各种控件(如按钮、文本框、标签等)和布局选项,可以轻松地创建各种复杂的GUI界面。同时,Tkinter库还提供了绘图功能、文件对话框等实用工具,使得可以在应用中添加更多的功能和交互性,让应用更加出色。
使用Tkinter库,可以创建漂亮而功能强大的桌面应用程序,包括游戏、工具、图像编辑器等。它是Python开发中非常重要的一部分,应用广泛。
-
为什么学习Tkinter?
由于 Tkinter 是内置到 python 的安装包中、只要安装好 Python 之后就能 import Tkinter 库进行使用,不用多余的环境配置步骤,讲究的就是一个便捷 -
怎么安装Tkinter?
pip install tkinter
03 | 了解 T k i n t e r 基础知识 \color{yellow}{了解Tkinter基础知识} 了解Tkinter基础知识
想要学习tkinter,我们首先需要了解它的基础知识,包括如何创建窗口、如何添加组件、如何设置布局等,常用的基本步骤如下
-
导入模块:要使用tkinter库,需要先导入它,
import tkinter表示导入tkinter库。import tkinter as tk -
创建主窗口:在tkinter中,所有图形用户界面组件都必须是某个容器的子组件。通常,最顶层的容器是主窗口,可以用如下代码创建:
root = tkinter.Tk()这条语句创建了一个名为
root的窗口。 -
设置窗口标题:通过调用
title()方法,可以设置主窗口的标题,例如:root.title("窗口标题")这将显示一个标题为“窗口标题”的窗口。
-
设置窗口尺寸:可以调用
geometry()方法来设置主窗口的大小,例如:root.geometry("400x300")这将创建一个宽度为400像素,高度为300像素的窗口。
-
添加组件:在tkinter中,可以通过创建各种组件来构建GUI界面。例如按钮、标签、文本框等。可以使用如下代码创建一个按钮:
btn = tkinter.Button(root, text="按钮文本")这将创建一个名为
btn的按钮,并将其作为主窗口的子组件展示出来。 -
组件布局:要将组件放置在GUI窗口中,可以使用
pack()、place()或grid()等方法。例如:btn.pack()这将使按钮出现在主窗口的默认位置。
-
显示窗口:要显示GUI窗口,需要调用
mainloop()方法,例如:root.mainloop()这将在屏幕上显示主窗口并监听事件,直到主窗口被关闭。
-
处理事件:在tkinter中,事件是用户输入或系统触发的动作,例如键盘输入或鼠标点击。可以使用
bind()方法将事件函数绑定到指定组件的特定事件上,例如:btn.bind('' , handle_btn_click)这表示将
handle_btn_click()函数与按钮的左键单击事件绑定起来。
除此之外,tkinter还提供了很多常用组件,例如菜单、对话框、画布等,之后再进一步学习。
04 | T k i n t e r 示例学习 \color{green}{Tkinter示例学习} Tkinter示例学习
-
以下是一个简单的示例,演示了如何使用tkinter创建一个基本的窗口:
import tkinter as tk
# 创建窗口
window = tk.Tk()
window.title("My Window")
window.geometry("300x200")

# 添加标签
label = tk.Label(window, text="Hello World!")
label.pack()

# 进入消息循环
window.mainloop()
通过上述代码,我们可以创建一个300x200的窗口,添加一个标签,并在窗口中显示出来。接下来,我们需要深入学习tkinter的各种组件和布局。
-
掌握常用组件和布局方式
tkinter提供了各种GUI组件,例如按钮、文本框、选择框、滚动条等。在实际开发中,我们需要灵活运用这些组件,以满足不同的需求。以下是一个示例代码,展示了如何使用Frame和Button组件:import tkinter as tk window = tk.Tk() window.title("My Window") window.geometry("300x200") # 创建Frame frame = tk.Frame(window) frame.pack() # 添加按钮 btn1 = tk.Button(frame, text="Button 1") btn1.pack(side=tk.LEFT) btn2 = tk.Button(frame, text="Button 2") btn2.pack(side=tk.LEFT) btn3 = tk.Button(frame, text="Button 3") btn3.pack(side=tk.LEFT) window.mainloop()上述代码创建了一个300x200的窗口,包含一个Frame和三个按钮。按钮被添加到Frame中,并通过设置side参数来实现水平排列。掌握常用组件和布局方式是学习tkinter的关键所在。
-
学习事件处理机制
在GUI程序中,常常需要响应用户的交互操作。例如点击按钮、输入文本等都会触发相应的事件。我们需要了解tkinter的事件处理机制,并学会如何编写事件处理函数。以下是一个示例代码,演示了如何响应按钮的点击事件:import tkinter as tk window = tk.Tk() window.title("My Window") window.geometry("300x200") def on_btn_click(): label.config(text="Button Clicked!") # 添加标签 label = tk.Label(window, text="Hello World!") label.pack() # 添加按钮 btn = tk.Button(window, text="Click Me", command=on_btn_click) btn.pack() window.mainloop()在上述代码中,我们定义了一个名为on_btn_click的函数,该函数会在按钮被点击时触发。通过设置按钮的command参数,我们将按钮和该函数关联。当按钮被点击时,就会调用该函数,并在标签中显示相应的文本。
通过示例,学习了如何使用tkinter创建窗口、添加组件、设置布局,以及如何编写事件处理函数,下面来简单的练习一下吧
05 | 经典练习:实现一个简单的计算器 \color{blue}{经典练习:实现一个简单的计算器} 经典练习:实现一个简单的计算器
下面是实现计算器的详细步骤:
-
导入Tkinter库
from tkinter import * -
创建主窗口对象
window = Tk() window.title("计算器") -
定义布局
result = Entry(window, width=33, borderwidth=5) result.grid(row=0, column=0, columnspan=4, padx=10, pady=10) button_1 = Button(window, text="1", padx=40, pady=20, command=lambda: button_click(1)) button_2 = Button(window, text="2", padx=40, pady=20, command=lambda: button_click(2)) button_3 = Button(window, text="3", padx=40, pady=20, command=lambda: button_click(3)) button_4 = Button(window, text="4", padx=40, pady=20, command=lambda: button_click(4)) button_5 = Button(window, text="5", padx=40, pady=20, command=lambda: button_click(5)) button_6 = Button(window, text="6", padx=40, pady=20, command=lambda: button_click(6)) button_7 = Button(window, text="7", padx=40, pady=20, command=lambda: button_click(7)) button_8 = Button(window, text="8", padx=40, pady=20, command=lambda: button_click(8)) button_9 = Button(window, text="9", padx=40, pady=20, command=lambda: button_click(9)) button_0 = Button(window, text="0", padx=40, pady=20, command=lambda: button_click(0)) button_add = Button(window, text="+", padx=39, pady=20, command=button_add) button_subtract = Button(window, text="-", padx=41, pady=20, command=button_subtract) button_multiply = Button(window, text="*", padx=40, pady=20, command=button_multiply) button_divide = Button(window, text="/", padx=41, pady=20, command=button_divide) button_clear = Button(window, text="清空", padx=79, pady=20, command=button_clear) button_equals = Button(window, text="=", padx=91, pady=20, command=button_equals) -
创建按钮操作函数
def button_click(number): current = result.get() result.delete(0, END) result.insert(0, str(current) + str(number)) def button_clear(): result.delete(0, END) def button_add(): first_number = result.get() global f_num global math math = "addition" f_num = int(first_number) result.delete(0, END) def button_subtract(): first_number = result.get() global f_num global math math = "subtraction" f_num = int(first_number) result.delete(0, END) def button_multiply(): first_number = result.get() global f_num global math math = "multiplication" f_num = int(first_number) result.delete(0, END) def button_divide(): first_number = result.get() global f_num global math math = "division" f_num = int(first_number) result.delete(0, END) def button_equals(): second_number = result.get() result.delete(0, END) if math == "addition": result.insert(0, f_num + int(second_number)) if math == "subtraction": result.insert(0, f_num - int(second_number)) if math == "multiplication": result.insert(0, f_num * int(second_number)) if math == "division": result.insert(0, f_num / int(second_number)) -
定义按钮位置和样式
button_1.grid(row=3, column=0) button_2.grid(row=3, column=1) button_3.grid(row=3, column=2) button_4.grid(row=2, column=0) button_5.grid(row=2, column=1) button_6.grid(row=2, column=2) button_7.grid(row=1, column=0) button_8.grid(row=1, column=1) button_9.grid(row=1, column=2) button_0.grid(row=4, column=0) button_clear.grid(row=4, column=1, columnspan=2) button_add.grid(row=5, column=0) button_subtract.grid(row=6, column=0) button_multiply.grid(row=6, column=1) button_divide.grid(row=6, column=2) button_equals.grid(row=5, column=1, columnspan=2) -
运行主循环
window.mainloop()
下面是完整代码:
from tkinter import *

window = Tk()
window.title("计算器")

result = Entry(window, width=33, borderwidth=5)
result.grid(row=0, column=0, columnspan=4, padx=10, pady=10)

def button_click(number):
    current = result.get()
    result.delete(0, END)
    result.insert(0, str(current) + str(number))

def button_clear():
    result.delete(0, END)

def button_add():
    first_number = result.get()
    global f_num
    global math
    math = "addition"
    f_num = int(first_number)
    result.delete(0, END)

def button_subtract():
    first_number = result.get()
    global f_num
    global math
    math = "subtraction"
    f_num = int(first_number)
    result.delete(0, END)

def button_multiply():
    first_number = result.get()
    global f_num
    global math
    math = "multiplication"
    f_num = int(first_number)
    result.delete(0, END)

def button_divide():
    first_number = result.get()
    global f_num
    global math
    math = "division"
    f_num = int(first_number)
    result.delete(0, END)

def button_equals():
    second_number = result.get()
    result.delete(0, END)

    if math == "addition":
        result.insert(0, f_num + int(second_number))

    if math == "subtraction":
        result.insert(0, f_num - int(second_number))

    if math == "multiplication":
        result.insert(0, f_num * int(second_number))

    if math == "division":
        result.insert(0, f_num / int(second_number))

button_1 = Button(window, text="1", padx=40, pady=20, command=lambda: button_click(1))
button_2 = Button(window, text="2", padx=40, pady=20, command=lambda: button_click(2))
button_3 = Button(window, text="3", padx=40, pady=20, command=lambda: button_click(3))
button_4 = Button(window, text="4", padx=40, pady=20, command=lambda: button_click(4))
button_5 = Button(window, text="5", padx=40, pady=20, command=lambda: button_click(5))
button_6 = Button(window, text="6", padx=40, pady=20, command=lambda: button_click(6))
button_7 = Button(window, text="7", padx=40, pady=20, command=lambda: button_click(7))
button_8 = Button(window, text="8", padx=40, pady=20, command=lambda: button_click(8))
button_9 = Button(window, text="9", padx=40, pady=20, command=lambda: button_click(9))
button_0 = Button(window, text="0", padx=40, pady=20, command=lambda: button_click(0))

button_add = Button(window, text="+", padx=39, pady=20, command=button_add)
button_subtract = Button(window, text="-", padx=41, pady=20, command=button_subtract)
button_multiply = Button(window, text="*", padx=40, pady=20, command=button_multiply)
button_divide = Button(window, text="/", padx=41, pady=20, command=button_divide)

button_clear = Button(window, text="清空", padx=79, pady=20, command=button_clear)
button_equals = Button(window, text="=", padx=91, pady=20, command=button_equals)

button_1.grid(row=3, column=0)
button_2.grid(row=3, column=1)
button_3.grid(row=3, column=2)

button_4.grid(row=2, column=0)
button_5.grid(row=2, column=1)
button_6.grid(row=2, column=2)

button_7.grid(row=1, column=0)
button_8.grid(row=1, column=1)
button_9.grid(row=1, column=2)

button_0.grid(row=4, column=0)

button_clear.grid(row=4, column=1, columnspan=2)
button_add.grid(row=5, column=0)
button_subtract.grid(row=6, column=0)
button_multiply.grid(row=6, column=1)
button_divide.grid(row=6, column=2)

button_equals.grid(row=5, column=1, columnspan=2)

window.mainloop()
06 | 归纳总结:代码重构 \color{cyan}{归纳总结:代码重构} 归纳总结:代码重构
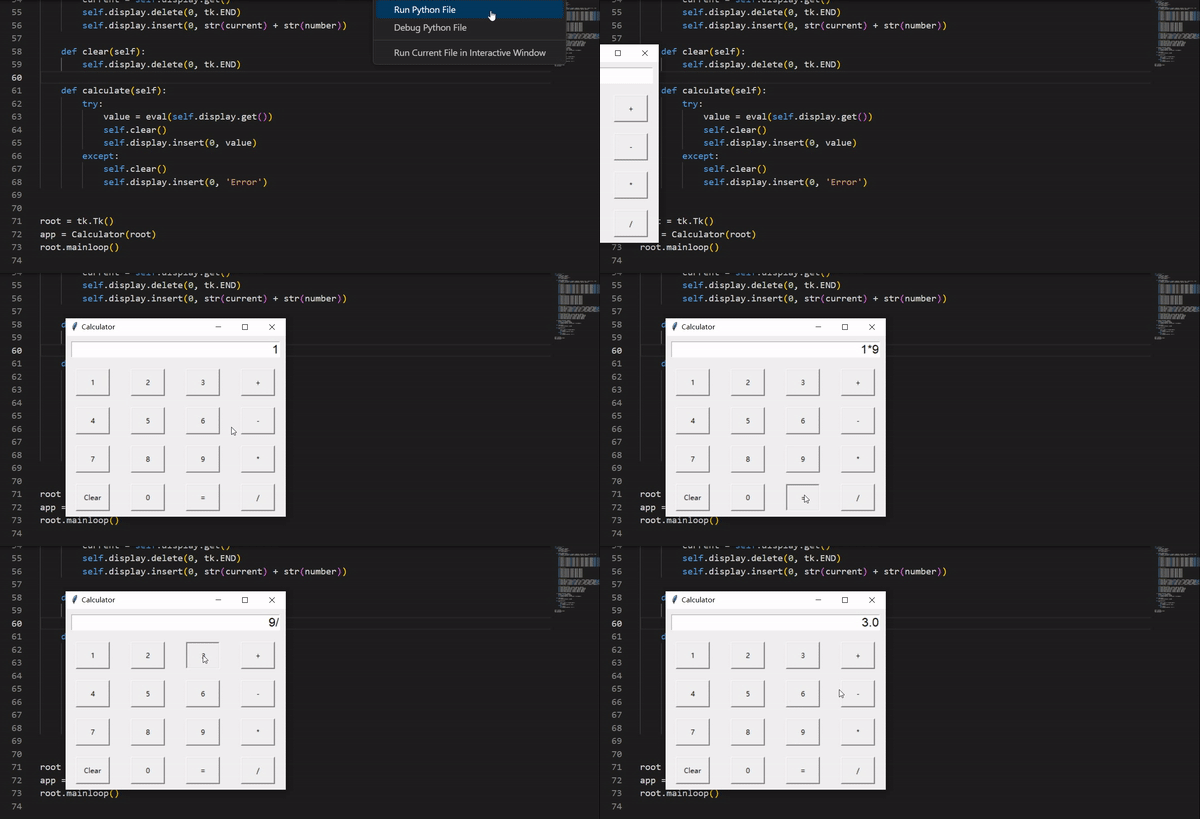
通过前面所学的函数、类和对象的知识,把上面的草稿版计算器重构一下,顺便换一下这个丑陋的界面了
import tkinter as tk

class Calculator:
    def __init__(self, master):
        self.master = master
        master.title('Calculator')
        self.create_widgets()

    def create_widgets(self):
        self.display = tk.Entry(self.master, width=30, justify='right', font=('Arial', 16))
        self.display.grid(row=0, column=0, columnspan=4, padx=10, pady=10)

        # Add Buttons
        self.button_1 = tk.Button(self.master, text='1', width=7, height=2, command=lambda: self.button_click('1'))
        self.button_2 = tk.Button(self.master, text='2', width=7, height=2, command=lambda: self.button_click('2'))
        self.button_3 = tk.Button(self.master, text='3', width=7, height=2, command=lambda: self.button_click('3'))
        self.button_4 = tk.Button(self.master, text='4', width=7, height=2, command=lambda: self.button_click('4'))
        self.button_5 = tk.Button(self.master, text='5', width=7, height=2, command=lambda: self.button_click('5'))
        self.button_6 = tk.Button(self.master, text='6', width=7, height=2, command=lambda: self.button_click('6'))
        self.button_7 = tk.Button(self.master, text='7', width=7, height=2, command=lambda: self.button_click('7'))
        self.button_8 = tk.Button(self.master, text='8', width=7, height=2, command=lambda: self.button_click('8'))
        self.button_9 = tk.Button(self.master, text='9', width=7, height=2, command=lambda: self.button_click('9'))
        self.button_0 = tk.Button(self.master, text='0', width=7, height=2, command=lambda: self.button_click('0'))

        # Layout Buttons
        self.button_1.grid(row=1, column=0, padx=10, pady=10)
        self.button_2.grid(row=1, column=1, padx=10, pady=10)
        self.button_3.grid(row=1, column=2, padx=10, pady=10)
        self.button_4.grid(row=2, column=0, padx=10, pady=10)
        self.button_5.grid(row=2, column=1, padx=10, pady=10)
        self.button_6.grid(row=2, column=2, padx=10, pady=10)
        self.button_7.grid(row=3, column=0, padx=10, pady=10)
        self.button_8.grid(row=3, column=1, padx=10, pady=10)
        self.button_9.grid(row=3, column=2, padx=10, pady=10)
        self.button_0.grid(row=4, column=1, padx=10, pady=10)

        # Operator Buttons
        self.button_add = tk.Button(self.master, text='+', width=7, height=2, command=lambda: self.button_click('+'))
        self.button_subtract = tk.Button(self.master, text='-', width=7, height=2, command=lambda: self.button_click('-'))
        self.button_multiply = tk.Button(self.master, text='*', width=7, height=2, command=lambda: self.button_click('*'))
        self.button_divide = tk.Button(self.master, text='/', width=7, height=2, command=lambda: self.button_click('/'))
        self.button_equal = tk.Button(self.master, text='=', width=7, height=2, command=self.calculate)
        self.button_clear = tk.Button(self.master, text='Clear', width=7, height=2, command=self.clear)

        # Layout Operator Buttons
        self.button_add.grid(row=1, column=3, padx=10, pady=10)
        self.button_subtract.grid(row=2, column=3, padx=10, pady=10)
        self.button_multiply.grid(row=3, column=3, padx=10, pady=10)
        self.button_divide.grid(row=4, column=3, padx=10, pady=10)
        self.button_equal.grid(row=4, column=2, padx=10, pady=10)
        self.button_clear.grid(row=4, column=0, padx=10, pady=10)

    def button_click(self, number):
        current = self.display.get()
        self.display.delete(0, tk.END)
        self.display.insert(0, str(current) + str(number))

    def clear(self):
        self.display.delete(0, tk.END)

    def calculate(self):
        try:
            value = eval(self.display.get())
            self.clear()
            self.display.insert(0, value)
        except:
            self.clear()
            self.display.insert(0, 'Error')


root = tk.Tk()
app = Calculator(root)
root.mainloop()
07 | 写在最后 \color{purple}{写在最后} 写在最后
学习Python GUI编程可以掌握基本的图形界面设计技能,能够开发出各种有趣的应用程序,比如桌面应用程序、游戏、工具等等,以下是今天学习GUI编程的一些总结:
-
学习Python的GUI编程,需要先掌握Python的基础语法和函数库的使用。
-
Tkinter是Python的标准GUI库,有很多教程和文档可以学习。如果希望做一些复杂的交互,可以使用第三方库PyQt或wxPython。
-
学习GUI编程的核心技能在于掌握各种组件的使用和布局方式的选择。常见的组件包括按钮、标签、文本框、列表框、下拉框等等。
-
学习GUI编程需要多写代码多实践,可以参考各种开源项目,也可以自己动手实现一些小型应用。
-
GUI编程中需要非常注重用户体验和界面设计,需要考虑不同分辨率、不同操作系统、不同用户的使用习惯等等因素。
总之,学习Python的GUI编程可以帮助我们掌握很多有用的开发技能,也可以让应用程序拥有更好的界面和交互体验。
最后希望大家能一起学习,加油进步,也希望大佬们能看下我的代码还有哪里可以继续改进的地方。
如果本篇文章对你有所帮助的话,请给我一个三连支持哦,谢谢各位大佬的观看,下期再见啦了ヾ(≧▽≦*)o


